


The output monitor will be connected to your recording VCR (3), or you can use any arrangement that
allows you to view tapes played on the VCR. Required connections for any monitor hookup depend on
the VCR.
If you are not using a mixer, this may be the only monitor you need. If you have a preference for viewing
the source material on its own, you can connect another monitor to the Play VCRs.
If you are using an MX-1, you will need another video monitor connected to the MX-1’s Preview output.
The MX-1 allows any connected video source (up to a total of four) to be viewed using this PREVIEW
monitor.
If you are using a third-party mixer or switcher, you may want to add monitors to each of your Play
VCRs in order to view their material separately.
3 A Record VCR. This VCR will ideally have an edit control port and flying erase heads for smooth edit
breaks. Infrared support is also available for those Record VCRs without wired control capability.
• Cables. You will need one edit control cable for each VCR with an edit control jack, one IR wand if
your record VCR uses IR control, one GPI cable for a mixer (if you have a mixer) and one GPI cable for
a titler (if you have a titler or character generator). Make sure the GPI cable you use with the MX-1 is a
stereo cable.
You will also need audio and video cables to connect the play sources to the mixer, titler, and record
VCR plus cables to attach the outputs to your monitor(s).
Optional Cables
• Additional audio and video cables for routing time code to Edit Suite.
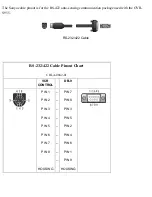
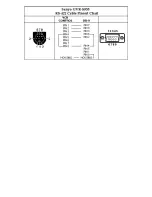
• Serial RS-232C computer cable for importing and exporting EDLs.
Appendix B provides figures and part numbers for each cable you may need.
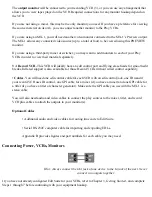
Connecting Power, VCRs, Monitors
Hint: Always connect the Out jack of one device to the In jack of the next. Never
connect two outputs together.
If you have not already configured Edit Suite for your VCRs, refer to Chapter 3, Getting Started, and complete
Steps 1 through 7 before continuing with your equipment hookup.


