G10 Installation Guide 7.13.2
30
2
Install Hardware and Power Cabling
Rev. 005-140228
5.
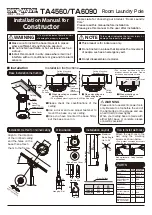
Attach the rear brackets to the rear rack posts using two rackmount screws
(
). Enclosures installed in 30-inch racks attach directly to the rear
bracket.
Figure 2.13 - Rear Bracket on Rack (Left)
for the following steps for 36-inch, 1000 MM, and 42-inch racks:
6.
Two People: Position the enclosure in the rack and carefully slide the side
brackets into the rear brackets. Slide the enclosure until the front brackets are
flush with the front rack posts.
7.
Secure the front of the enclosure to the front rack posts using four rackmount
screws (not shown).
8.
Secure the side brackets to the rear brackets with Phillips pan-head screws and
washers at holes appropriate for your rack depth. Two or four screws are used
depending on the rack depth.
9.
For DC configurations, continue with
For AC configurations, continue with
30-inch Rack Installation
Enclosure attaches directly
to rear brackets with two
Phillips flat-head screws
Two Rackmount
Screws
Rear Bracket
Installation
Tektronix Communications | For Licensed Users | Unauthorized Duplication and Distribution Prohibited