background image

9 – 19

Field installation

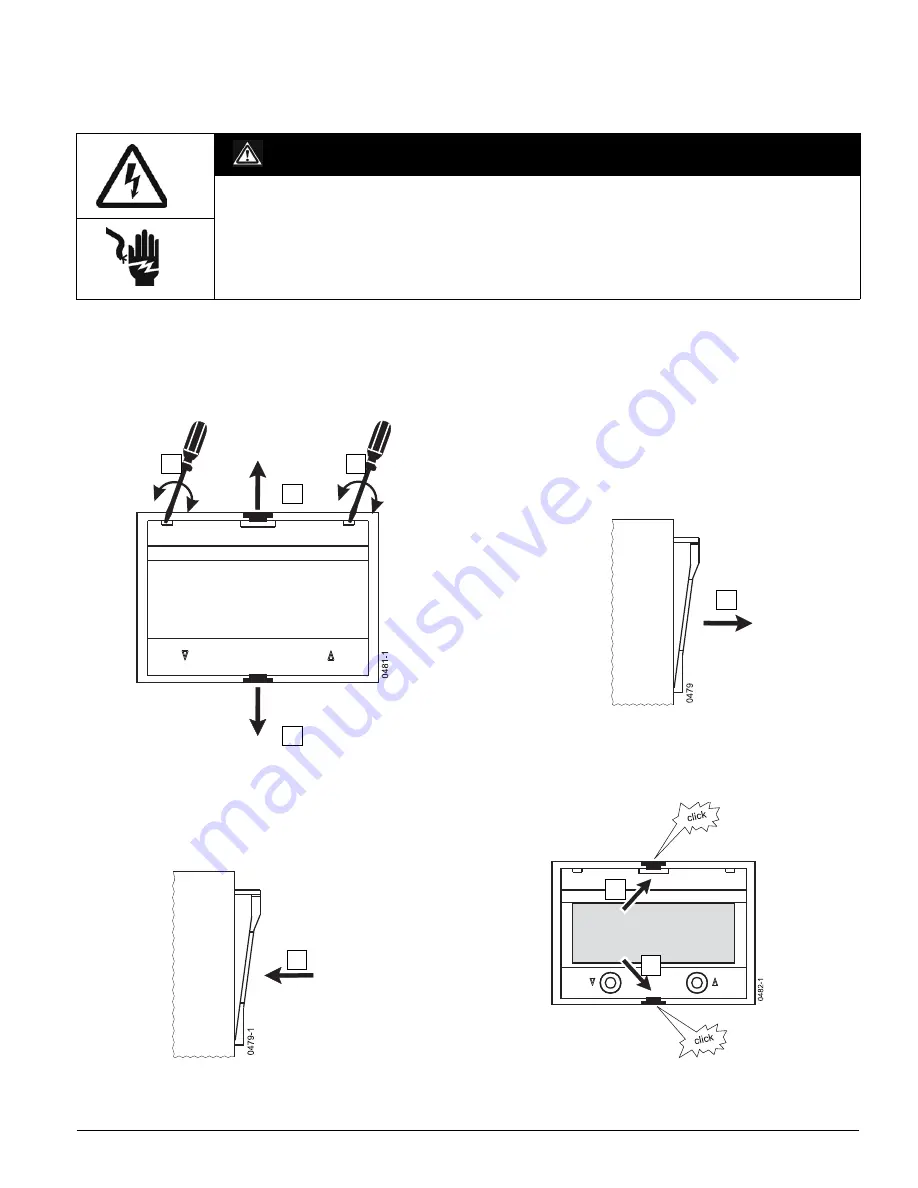
The trip units ETU745 and ETU748 can be field installed with an alphanumeric display.

- OPEN circuit breaker and discharge the closing spring 

 (page 23-2)

- Disconnect external 24 V DC voltage supply, if applicable
- Remove sealing cap of trip unit, if applicable 

 (page 9-53)

Removing dummy flange

Installing display and latching it tight

- Fit and seal trip unit sealing cap, if applicable 

 (page 9-53)

- Reconnect external 24 V DC voltage supply, if applicable


DANGER

Hazardous voltage.

Will cause death, serious personal injury, or equipment damage.

Turn off and lock out all power supplying this device before working on this device.

1

2

3

4

5

1

2

3

Summary of Contents for UL 1066

Page 1: ...REAKER DANGER Hazardous voltage Will cause death serious personal injury or equipment damage Turn off and lock out all power supplying this device before working on this device 3ZX1812 0WL00 1AN2 923 99984 174 Operating Instructions Catalog No WLOPMAN1 ...

Page 2: ...act contains the entire obligation of Siemens The warranty contained in the contract between the parties is the sole warranty of Siemens Any statements contained herein do not create new warranties or modify the existing warranty TRADEMARKS Unless otherwise noted all names identified by are registered trademarks of Siemens AG or Siemens Industry Inc The remaining trademarks in this publication may...

Page 3: ...t applicable for 4 pole 6 11 Measures 6 11 Replacing the fuses 6 13 Removing from service 6 18 Troubleshooting 6 19 7 Frame sizes dimension drawings 7 1 Frame size II Drawout 7 1 Frame size II fused 7 5 Frame size II fixed mounted version 7 8 Frame size II door cut outs 7 9 Frame size III fixed mounted version 7 10 Frame size III Drawout 7 11 Frame size III fuse carriage 7 14 Frame size III door c...

Page 4: ...perating elements 14 1 Limiting Access to OPEN CLOSE Buttons 14 1 EMERGENCY OPEN button 14 3 Operations counter 14 4 15 Locking devices 15 1 Key Locks 15 1 Breaker mounted key lock 15 2 Cradle mounted key lock 15 4 Installing racking handle key lock 15 11 Installing a Bell Alarm cover key lock 15 15 Padlocking provisions 15 16 Padlock locking the breaker OPEN 15 17 Padlock Locking device for shutt...

Page 5: ...erosion 23 10 Replacing the circuit breaker internal contact assemblies 23 11 Removing front panel 23 12 Removing arc chutes 23 12 Removing vertical adapter 23 12 Removing pole assemblies 23 12 Installing pole assemblies 23 17 Adjusting the contact wear indicator 23 22 Attaching the vertical adapter 23 23 Order numbers 23 26 Attaching the front panel 23 27 Installing the arc chutes 23 27 Mechanica...

Page 6: ...er page 6 4 12 Racking handle 13 Racking shaft 14 Options label page 2 1 15 Grounding terminal 16 Position indicator page 6 2 17 Table for ground fault protection page 9 13 18 Key lock for racking handle 19 Mechanical release of racking handle 20 Trip unit page 9 1 21 Rating plug 22 OPEN button or EMERGENCY OPEN mushroom pushbutton option 23 Ready to close indicator page 6 7 24 Circuit breaker OPE...

Page 7: ...utual mechanical circuit breaker interlocking option 7 Locking provision for guide rail 8 Door interlock option 9 Locking device in OPEN position option 10 Cradle mounted locking device against closing the circuit breaker in disconnect position option 11 Shutter operating device 12 Rejection feature 13 Option related coding 14 Secondary disconnects 0618 2 9 10 11 12 13 8 14 ...

Page 8: ... Trip UVR 2nd Shunt Trip Remote Reset X6 13 X6 14 X5 11 X5 12 X9 1 X9 2 X8 13 X8 14 Ready to Close Switch X6 5 X6 6 240 VAC 4 A 240 VAC 1st Shunt Trip Switch X9 7 X9 8 240 VAC 240 VAC UVR Switch Open Fuse Switch X9 10 X9 11 X9 5 X9 6 52a 1st Aux SW 52b X6 3 X6 4 X6 11 X6 12 X6 1 X6 2 X6 9 X6 10 X5 5 X5 6 X5 9 X5 10 X5 3 X5 4 X5 7 X5 8 52a 2nd Aux SW 52b 240 VAC Bell Alarm 240 VAC 5 A 5 A X9 13 X9 ...

Page 9: ...3 Frame size 4 No of poles 5 Maximum rated continuous current 2 4 Trip unit designation 1 Type 2 Catalog number 3 Can be used in the following types of circuit breakers 4 Regulatory approvals on a separate label WLL2332 1 2 3 4 5 N450101000001 WLN WLS WLH WLL WLF WLM 0132 01 1 2 3 4 ...

Page 10: ...radle 3 Seals of approval 4 Circuit breakers that can be used with this cradle 5 Siemens internal data A second type label is attached to the baseplate inside the cradle or on one of its side walls 1 2 3 0130 0130 Continous Rating Bz Pos ass order Q C For use with C B frames type R LV AC Power Circuit Breaker Adapter 635 VAC WLGL2320 9344183 20 250000445789 1 of 5 WLL2A320 WLL2S320 WLL2D320 2000 A...

Page 11: ...by dust corrosive vapors or gases Circuit breakers to be installed in dusty or damp locations must be appropriately enclosed The circuit breakers are in conformity with the following standards ANSI C37 13 ANSI C37 16 ANSI C37 50 UL 1066 The electronic trip units are in conformity with the following standards ANSI C37 17 UL 1066 The cradles are in conformity with the following standards ANSI C37 20...

Page 12: ...ole 4 pole 4 pole 3 pole 4 pole 3 pole 4 pole II 800 A 159 lb 72 kg 210 lb 95 kg 185 lb 84 kg 112 lb 51 kg 161 lb 73 kg Only lift separately II 1600 A 159 lb 72 kg 210 lb 95 kg 185 lb 84 kg 112 lb 51 kg 161 lb 73 kg Only lift separately II 2000 A 177 lb 80 kg 227 lb 103 kg 203 lb 92 kg 128 lb 58kg 181 lb 82 kg Only lift separately II 3200 A 209 lb 95 kg 258 lb 117 kg 229 lb 104 kg 152 lb 69 kg 212...

Page 13: ...ow instructions for use of lifting bar assembly Use OSHA NIOSH approved crane equipment and personal protection equipment for lifting moving the circuit breakers and cradles Circuit Breaker Cradle max rope NOTICE Lifting a frame size III or frame size II 4 pole cradle with a breaker inside may result in distortion of the cradle Remove the frame size III breaker from the cradle before lifting 3 f t...

Page 14: ...ircuit breaker in frame size II 2 Locking position for circuit breaker in frame size III 3 Receptacle for circuit breaker carrying handle FS II III DANGER Heavy Equipment Improper lifting will cause death serious personal injury or equipment property damage Never lift a circuit breaker or cradle above personnel Follow instructions for use of lifting bar assembly Use OSHA NIOSH approved crane equip...

Page 15: ...4 4 4 4 3 Lifting the circuit breaker 4 4 4 Lifting the fuse carriage frame size III 0610 1_nu 1 2 2 0614_1 3 3 4 Lifting eye 0610 1_nu 1 2 2 ...

Page 16: ...5 Catalog No Lifting beam for circuit breaker and cradle 3 pole WLLFT Lifting beam for circuit breaker and cradle 4 pole WLLFT4 Portable hoist for use with the lifting beam WLHOIST 0613_1 5 3 3 4 4 0613_2 ...

Page 17: ...rsonal injury or equipment property damage Never lift a circuit breaker fuse carriage or cradle above personnel Follow instructions for use of lifting bar assembly Use OSHA NIOSH approved crane equipment and personal protection equipment for lifting moving the circuit breakers and cradles WARNING High speed moving parts Can cause serious personal injury Discharge the closing spring before inspecti...

Page 18: ...quipment Can cause serious personal injury Use care when racking the breaker into the disconnect position When a draw out circuit breaker is mounted tilting toward the front side it is possible that the circuit breaker may slide out on the rails 30 30 30 30 ...

Page 19: ...m amount of offset in the mounting plane is 3 64 1mm 1 4 bolts 5 16 diameter belleville washers nuts NOTICE Damage to finger clusters Improperly aligned bussing at the terminal connections may affect the position of the bus stabs Misaligned bus stabs may result in damage to the finger clusters during circuit breaker rack in Do not distort the cradle terminal connections when connecting to the main...

Page 20: ...ions Cubicle ventilation Width W1 inch Height H inch Depth D1 inch Width W2 inch Depth D2 inch Top square inch Bottom square inch II 800 N S H L 22 22 51 19 5 18 5 10 5 not required 1600 2000 3200 N S H L 22 22 51 19 5 18 5 10 5 55 552 II Fused 800 F 22 22 51 25 18 5 10 5 143 1372 1600 2000 III 4000 H L 32 22 51 19 5 28 5 10 5 48 2 x 24 882 5000 3200 M 32 30 19 5 28 5 10 5 48 2 x 24 882 4000 5000 ...

Page 21: ...ertical connections for 4 pole fixed mount breakers 1 The terminal permits the use of 2 x busbars is possible 2 The terminal permits the use of 4 x busbars is possible 3 The FSII 3200 A and FSIII 4000 A 5000A require vertical connectors Drawout Circuit breaker Connections to Line Load side cradle connectors Frame Size In max Number of Available Busbar Mounting Positions Busbar cross section Number...

Page 22: ...sonal injury or equipment damage Turn off and lock out all power supplying this device before working on this device Clean the main conductor connection plated busbars Securing line and load side busbars 0058_u Use grade 5 bolts 1 2 and Belleville washers Tighten to a torque of 70 Nm 50 lb ft ...

Page 23: ...tely Frame size Rated breaking current kA Dimension x mm inch II 50 65 250 10 85 200 8 100 200 8 II fused 200 200 8 III 85 100 200 8 130 150 100 4 III fused 200 200 8 These distances are recommendations and are not construction specifications All designs should be type tested according to ANSI C37 20 1 and ANSI C37 51 for design validation ...

Page 24: ...sign must be verified by type testing Siemens fused circuit breakers are not sensitive to the infeed direction The circuit breakers or the combination of circuit breaker and fuse carriage can be fed from either the upper or the lower terminals 5 3 1 2 Open fuse lockout Every Siemens fused circuit breakers or fused switch is equipped with an open fuse lockout OFLO The purpose of the OFLO device is ...

Page 25: ...reaker In order to rack the fuse carriage the associated fused circuit breaker must be open and the KIRK key must be removed from the circuit breaker which unlocks the racking mechanism of the fuse carriage 1 Fuse carriage FS III 2 Circuit breaker FS III 3 Interconnenction between cradles according to the rated current of the circuit breaker 1 line or load line or load 3 2 ...

Page 26: ...win wire end ferrule 2 2 x up to 14 AWG tube type without insulating sleeve 2 x up to 16 AWG tube type with insulating sleeve Connection type Strip conductors 1 x 2 x Screw clamp terminal SIGUT system 20 14 AWG1 0 5 2 5 mm2 1 20 14 AWG 1 0 5 1 5 mm2 1 Spring clamp terminal 20 14 AWG 1 0 5 2 5 mm2 1 20 14 AWG 2 0 5 2 5 mm2 2 Ring terminal system 14 16 AWG 7 mm 1 4 7 mm 1 4 Recommendation AMP PIDG s...

Page 27: ...t 1 Arc chute 2 Secondary disconnect block Field installation 1 Dummy block 2 Secondary disconnect block 3 Secondary disconnect adapter block for high arc chutes X5 X6 X8 X9 1 2 COM15 COM16 0173 06 1 2 1 2 3 4 0173 09 3 5 6 0 7 Nm PH 1 6 lb in TX 8 or ...

Page 28: ...y wiring Spring clamp terminal 5 4 2 Cradle Secondary Disconnect Block Field installation 1 Cradle with sliding contact modules 2 Secondary disconnect blocks Disassembly 1 Secondary disconnect block 3 0 x 0 6 1 8 1 2 1 2 1 2 1 ...

Page 29: ... Secondary disconnect terminal blocks Versions 1 Screw clamp terminal system 2 Ring terminal system 3 Insulated ring terminal 4 Screws ANSI B 18 6 3 4 5 Spring clamp terminal system 2 terminals per contact 0769 3 0 x 0 6 0 5 Nm 4 lb in 3 0 x 0 6 1 PH 1 2 3 4 1 8 0 5 Nm 4 lb in 0 5 Nm 4 lb in 3 0 x 0 6 1 8 5 ...

Page 30: ...radle secondary disconnect block 5 4 4 Wiring in cradle 1 Arcing space 2 Arcing openings 3 Interlockings If arc chute covers are available the wires of the secondary disconnect blocks must not be laid on these covers NOTICE Impermissable area for wires Damage to wires in this area 1 1 2 2 1 2 3 0106 01_nu ...

Page 31: ...Screw clamp terminal SIGUT system WLGAUXPLUGP Spring clamp terminal WLGAUXPLUGT Ring terminal system WLGAUXPLUGR Cradle secondary disconnect block WLGDSCN Blanking cover WLGDAUXPLUG Ring terminal crimp lug for AWG 10 wire WL10RL Cradle secondary disconnect block with integrated low profile screw clamp terminal block WLGAUXPLUGL ...

Page 32: ...e rails 1 The circuit breaker can only be pushed in when the indicator displays DISCON 2 Pull out guide rails to the end stop Place the circuit breaker into the guide rails and push it into the cradle up to the disconnected position Close cubicle door NOTE Remove padlocks from the shutter and place the locking device in the stowed position page 15 19 2 green 1 5 4 3 4 4 ...

Page 33: ...ram Positon indicator Primary Circuit Secondary Circuit Cubicle Door Shutter Withdrawn position disconnected disconnected open closed Disconnected position disconnected disconnected closed closed Test position disconnected connected closed closed Connected position connected connected closed open 1 2 4 green 3 green blue red ...

Page 34: ...ull out the crank 6 1 4 Racking circuit breaker into connected position 6 1 5 Inserting racking handle NOTICE Racking Handle Damage Turning the racking handle beyond the stop will cause damage to the racking mechanism When the stop is reached rotate the racking handle counter clockwise until it can be pushed inwards 5 4 Hold 3 2 1 Position indicator blue green red Stop 1 2 3 4 ...

Page 35: ...ally e g during service on the work bench NOTE To charge the spring mechanism grip the handle firmly and carry out each stroke evenly moving the lever down as far as it will go Despite a significant increase in the required actuating force the lever must be moved as far in the ninth stroke as in the first eight When the closing spring is fully charged the lever can be moved without resistance 9 x ...

Page 36: ...operated mechanism The motor operated mechanism starts automatically when the control voltage is applied The motor switches off automatically when the charging process is completed The motor will re engage immediately following spring discharge closing operation Installing the motor operator page 13 1 0063 1 1 0063 2 2 ...

Page 37: ...ircuit breaker is OPEN Verify the rating plug is installed Rating plug page 9 44 Verify the TRIP indicator is reset Set the trip unit to appropriate values Trip units page 9 1 Apply secondary and control voltages Close the cubicle door Rack circuit breaker into connected position Push in the racking handle Charge closing spring Ensure the following conditions exist Undervoltage release energized L...

Page 38: ...fter the circuit breaker has closed OPEN button Remote activation NOTE The minimum time interval between ON and OFF signal of the Low Voltage Power Circuit Breakers 3WL shall not be shorter than 100 ms Indicators or Indicators Without motor operated mechanism With motor operated mechanism after 10 seconds or Indicators Without motor operated mechanism With motor operated mechanism ...

Page 39: ...ker is untripped and the Bell Alarm is shown reset Tripped by Trip unit Bell Alarm tripped indicator Bell Alarm Breaker indicators X9 12 X9 14 X9 13 S24 Indicators Without motor operated mechanism With motor operated mechanism ...

Page 40: ...ast 10 minutes before tripping 1 Find reason for tripping 2 Indicator Overload in main conductor Overload in neutral conductor Short circuit short time delay trip Short circuit instantaneous trip Ground fault trip 3 Find and rem edy cause Check downstream load Check trip unit settings Inspect switchgear Check downstream load 4 Inspect circuit breaker Inspect contact system for possible damage Main...

Page 41: ...tional With mechanical reclosing lockout optional Manual reset of reclosing lockout Bell Alarm and tripped indicator page 10 2 7 Indicators Without motor operated mechanism With motor operated mechanism Charge the closing spring page 6 4 Closing the circuit breaker page 6 7 ...

Page 42: ... size II Frame size III 1 Remove fused circuit breaker fuse carriage 2 Identify and remedy cause of tripping Check downstream loads Check switchgear 3 Inspect main contacts of fused circuit breaker Checking contact erosion page 23 10 4 Replace fuses 5 Insert fused circuit breaker fuse carriage ...

Page 43: ...6 12 7 Reset reclosing lockout 8 Charge closing spring 9 Switch ON Frame size II Frame size III 9X ...

Page 44: ...6 13 6 8 2 Replacing the fuses Frame size II Remove draw out circuit breaker from cradle Replace all fuses Remove all fuses 3 2 1 PH 1 4 5 Size 5 ...

Page 45: ... cap screw 2 Belleville washer 3 Ring terminal 4 Threaded plate 5 2 x self tapping collar screws M4 6 7 8 9 10 11 12 13 PH 1 Size 10 4 1 2 3 4 5 6 PH 1 3 2 Nm 9 5 28 lb in 7 8 1 2 3 4 Size 10 70 Nm 50 ft lb 11 10 11 Size 5 8 Nm 71 lb in ...

Page 46: ...6 15 Frame size III 1 Circuit breaker in cubicle 2 Fuse carriage in cubicle Rack out and remove the fuse carriage 13 14 PH 1 12 1 2 1 2 3 4 ...

Page 47: ...2 Remove crank with retaining ring from racking shaft 3 Pull out racking shaft on the other side 4 Remove 6 screws securing the racking assembly 5 Take out the complete racking assembly 6 Replace the fuses Re assembly is carried out in the opposite order Insert the fuse carriage and rack it into the connected position 0635 1 Size 10 60 Nm 45 ft lb 1 2 3 1 6 2 3 4 4 5 5 4 3 1 2 ...

Page 48: ...e Rating Fuse Kit 3 fuses FS II 400 A WLCLF0400 600 A WLCLF0600 800 A WLCLF0800 900 A WLCLF0900 1000 A WLCLF1000 1200 A WLCLF1200 1600 A WLCLF1600 2000 A WLCLF2000 2500 A WLCLF2500 3000 A WLCLF3000 FS III 6000 A WLCLF6000 ...

Page 49: ...moving from service Draw out circuit breaker 1 OPEN the circuit breaker 2 Disconnect secondary circuits 3 Depress the CLOSE button 4 Depress the OPEN button 5 Indicators Position Indicator green Secondary Circuit ...

Page 50: ...nal accessory Unlock X 5 Padlocks installed Remove padlocks X 6 EMERGENCY OPEN button engaged in operating position accessories Release EMERGENCY OPEN button by rotating it X 7 Lockout effective against closing when cubicle door is open accessories Close cubicle door X 8 Electronic trip unit missing or incorrectly installed Install electronic trip unit properly X 9 Racking handle withdrawn Rack ci...

Page 51: ...cuit breaker is not rated for use in this cradle Replace with the proper circuit breaker permissible circuit breakers are listed on the cradle type label X When racking from the discon nected into the test position the circuit breaker does not move during the first 6 rotations approximately 2 Not a fault functional property Continue racking X Racking handle cannot be drawn out 1 Circuit breaker is...

Page 52: ...optional factory provided accessory Bottom ventilation area to remain unobstructed 12 83 326 0 5 59 142 0 22 13 562 Ø0 35 Ø9 0 5 2461 133 3 8 35 212 0 7 89 200 5 Top ventilation area must remain unobstructed 4 86 123 5 12 89 327 5 10 83 275 0 2 99 76 0 3 27 83 0 8 46 215 0 18 62 473 0 19 41 493 0 19 53 496 0 Middle escutcheon 19 65 499 0 Center escutcheon 2 31 58 7 3 pole cradle 2 24 57 0 4 pole c...

Page 53: ...6 5 18 131 6 7 37 187 3 1 75 44 5 1 75 44 5 2 31 58 7 3 74 95 0 1 75 44 5 0 53 13 5 3200 A 2000 A 800 1600 A 5 25 133 3 5 25 133 3 0 25 6 4 0 25 6 4 0 25 6 4 5 25 133 3 5 25 133 3 5 25 133 3 5 75 146 1 0 25 6 3 0 25 6 3 5 25 133 3 5 25 133 3 0 25 6 3 0 25 6 3 5 25 133 3 5 25 133 3 5 25 133 3 5 75 146 0 ...

Page 54: ... 19 0 1 75 44 5 1 75 44 5 1 75 44 5 HORIZONTAL MAIN BUS CONNECTORS NOTE ROTATABLE MAIN BUS CONNECTORS ARE ONLY AVAILABLE UNDER THE FOLLOWING CONDITIONS 3 ONLY ACCEPTABLE FOR SHORT CIRCUIT RATINGS OF 85kAIC OR LESS 2 ONLY ACCEPTABLE FOR FS2 800A 2000A 1 ONLY ACCEPTABLE FOR 3 POLE VERSIONS 5 25 133 3 5 25 133 3 HORIZONTAL MAIN BUS CONNECTORS 0 50 12 7 0 50 12 7 3 75 95 3 6 97 177 1 3 75 95 2 7 5 190...

Page 55: ...d Breaker Do not lift by other points Closed door racking Lifting Point Cradle only Do not lift by other points 34 80 884 Withdrawn position 15 7 398 19 13 486 0 Minimum free space for circuit breaker racking 6 43 163 4 0 75 19 0 ...

Page 56: ...7 5 7 2 Frame size II fused ...

Page 57: ...33 4 7 89 200 5 13 35 339 2 5 25 133 4 5 25 133 4 0 25 6 3 0 25 6 4 Top ventilation area must remain unobstructed 23 63 600 1 2 31 58 7 1 75 44 5 6 97 177 1 1 75 44 5 0 75 19 1 1 75 44 5 4 00 101 6 Ø0 53 Ø 13 5 1 75 44 5 10 38 263 6 9 25 235 0 2 88 73 2 ...

Page 58: ...7 7 ...

Page 59: ... 5 12 130 0 5 12 130 0 5 91 150 0 M8 required space for aux connectors including wire channel press in nut M8 metric thread 0 53 13 5 3 75 95 3 7 50 190 5 0 67 17 0 0 75 19 0 10 17 258 4 5 91 150 0 1 77 45 0 4 25 108 0 large door cut out with edge protector 4 45 113 0 door cut out middle escutcheon visible 4 61 117 0 minimal door cut out only center escutcheon visible 5 00 127 0 0 79 20 0 1 75 44 ...

Page 60: ...t out with edge protector 11 41 289 9 5 71 144 9 Ø1 42 Ø36 0 4 45 113 0 1 40 35 5 Max radii 4 plc s R0 39 R10 0 13 38 339 9 0 83 21 1 2 74 69 5 5 19 131 9 Max radii 4 plcs R0 08 R2 0 only center escutcheon visible Minimal door cut out 5 63 142 9 1 93 49 0 10 98 278 9 4 78 121 5 R0 08 R2 0 Max radii 4 plcs 10 98 278 9 4 78 121 5 door sealing frame Door cut out and mounting holes for edge protector ...

Page 61: ...d space for aux connectors including wire channel 4 25 108 0 large door cut out with edge protector 4 45 113 0 door cut out middle escutcheon visible 4 61 117 0 minimal door cut out only center escutcheon visible Fixed mounted versions are only available as 4 pole with vertical connections 8 27 210 0 8 27 210 0 8 27 210 0 0 25 6 4 0 26 6 7 gap copperbar breaker front cover 9 04 229 5 5 91 150 0 4 ...

Page 62: ... 0 31 50 800 0 8 35 212 0 7 89 200 5 Arcchutecover optionalaccessory Sideventilationarea bothsides mustremain unobstructed 6 75 171 5 3 39 86 0 8 46 215 0 18 62 473 0 19 41 493 0 19 53 496 0 Middleescutcheon 19 65 499 0 Centerescutcheon 2 31 58 7 3 polecradle 2 24 57 0 4 polecradle Bottomventilationarea toremainunobstructed for5000Acircuitbreaker Ø 0 55 14 0 Holeprovidedas standradgroundingprovisi...

Page 63: ...7 12 8 27 210 0 8 27 210 0 8 27 210 0 3 75 95 2 ...

Page 64: ...7 13 ...

Page 65: ...7 14 7 7 Frame size III fuse carriage ...

Page 66: ...7 15 ...

Page 67: ...eon visible Minimal door cut out only center escutecheon visible RO 39 RIO O Max radii 4 plc s ø36 0 ø1 42 145 1 5 71 35 5 1 40 113 1 4 45 290 1 11 42 21 1 0 83 69 5 2 74 340 2 13 39 R2 0 R0 08 Max radii 4 plc s 279 1 10 99 121 6 4 79 49 0 1 93 264 1 10 40 132 1 5 20 121 6 4 79 279 1 10 99 143 1 5 63 ...

Page 68: ...7 17 Additional information on Cut outs for through door racking with Door sealing frame page 21 1 are shown in Chapter 21 Cut outs for attaching the plexiglass cover are shown in Chapter 22 ...

Page 69: ...7 18 7 9 External sensor for neutral conductor WLNCT2 ...

Page 70: ...7 19 WLNCT3 ...

Page 71: ...0NMCT23 WLG5000NMCT23 WLG6000NMCT23 WLGNMDGCT23 7 10 Further dimension drawings Door sealing frame page 21 1 Shrouding cover page 22 2 Additional information on Cut outs for through door racking with Door sealing frame page 21 1 are shown in Chapter 21 Cut outs for attaching the plexiglass cover are shown in Chapter 22 ...

Page 72: ...only quick OPEN 0053 07_nu Internal External Terminals ANSI C37 2 device LT Control power N EMERGENCY OPEN or short terminals Phase A Phase B Phase C 24 V DC Input Terminating resistor if no external CubicleBUS module is connected 120 0 5 W Ω Short terminals if no Neutral sensor 1 2 3 4 5 6 7 8 9 10 11 12 13 14 30 52CS 52CC 52CS 52TC 79 52TC 86 52a 52b 52b 52b 52a 52a 52LC 52CC 52a 52b 52M 62 27 S...

Page 73: ...4 X6 4 X6 2 X6 2 X6 3 X6 3 X6 1 X6 1 X5 10 X5 10 X5 8 X5 8 X5 9 X5 9 X5 7 X5 7 X5 6 X5 6 X5 4 X5 4 X5 5 X5 5 X5 3 X5 3 S1 S2 Optional auxiliary switches Internal S3 S4 Optional additional auxiliary switches 0136 01_u Wire no Terminals Terminals b a 1 3 2 4 S3 b a 1 3 2 4 S4 b a 2 4 S2 b a S1 S2 S3 S4 ...

Page 74: ...ge release is not energized or shunt trip is energized circuit breaker is not ready to close Reset S20 S26 X6 6 X9 6 X6 6 X9 6 X6 5 X9 5 X6 5 X9 5 color color sw blk bl blue bl blue bl blue Trip Reset bn or gr sw blk sw blk 1 4 COM NO NO NO NC COM COM S23 X9 10 X9 11 1 4 S24 X9 14 X9 12 X9 13 F1 S22 X9 8 X9 7 1 4 0136 02_u Wire no Internal Wire no er T minals Terminals TC TC UVR Open Fuse Indicati...

Page 75: ...lockout L EMERGENCY OPEN or short terminals Same installation location 1 For circuit breaker equipped with shunt trip and closing coil the combined cutoff switch S14 S15 will be used One switch NO NC is serving both solenoids TC TC UVR UVRD a a F1 F2 F3 F4 1 ...

Page 76: ...as S12 1 For circuit breaker equipped with shunt trip and closing coil the combined cutoff switch S14 S15 will be used One switch NO NC is serving both solenoids 2 Use twin wire end ferrule Crimping tool e g Weidmüller PZ3 to PZ6 WAGO Variocrimp 4 CC S10 CC CC b 1 2 ...

Page 77: ...8 6 8 6 Motor operated mechanism Same installation location as S10 8 7 Remote Bell Alarm Reset _u S12 M 24 30 V DC 48 60 V DC L L X5 1 X5 2 BA _u F7 S13 ...

Page 78: ... system for interconnection of circuit breaker components and connection to the fieldbus PROFIBUS DP with COM15 MODBUS with COM16 ETU Trip Unit S40 signaling switch ready to close S41 signaling switch for spring charge level S43 signaling switch 2nd shunt trip F3 or F4 S44 signaling switch for main contacts OPEN CLOSE position S45 Bell Alarm signaling switch _u External Air Core Sensor Input Exter...

Page 79: ...8 8 8 8 2 Metering module only 1 Terminating resistor 120 0 5 W on X8 1 X8 2 if no external c module _u External Air Core Sensor Input External Iron Core Sensor Input ...

Page 80: ...8 9 8 8 3 Breaker Status Sensor BSS only L 1 Terminating resistor 120 0 5 W on X8 1 X8 2 if no external c module _u External Air Core Sensor Input External Iron Core Sensor Input ...

Page 81: ... switched on off q q q Instantaneous short circuit protection can be switched on off q q Short time delayed short circuit protection switchable to I2 t q q q Overload protection switchable to I4 t q q q Changeable parameter sets q Ground fault protection to I2 t o o o Ground fault alarm o o o Display page 9 18 Alphanumeric display o o Graphical display fixed mounted q Communication Communication v...

Page 82: ...round fault pickup setting Rotary coding switch ground fault alarm setting Query button Test button Option Reset Lockout prevents accidental resetting of the lock out mechanism after a trip Option Alphanumeric display Thermal memory On Off Neutral conductor protection On Off Neutral conductor overload setting Overload trip curve mode I2t I4t Rotary coding switch long time delay setting Rotary codi...

Page 83: ...d protection L tripping page 9 12 Short time delayed short circuit tripping S tripping page 9 12 Instantaneous short circuit tripping I tripping page 9 13 Ground fault tripping G tripping page 9 13 Neutral conductor protection N tripping page 9 14 Load monitoring load restore load shedding page 9 14 Leading signal for L tripping page 9 14 Thermal memory can be switched On Off page 9 15 Ground faul...

Page 84: ...e respective parameters Possible tolerance ranges are not included here Tolerance ranges are shown in the Easy TCC Time Current Curve Software The characteristics apply to the circuit breaker version H class 480 V frame size II with ground fault protection module L tripping S tripping ...

Page 85: ...9 5 I tripping Ground fault tripping ...

Page 86: ... setting Rotary coding switch ground fault alarm setting Query button Test button Rotary coding switch long time delay setting Option Reset Lockout Option Alphanumeric display Scroll down Thermal memory On Off Neutral conductor protection On Off Neutral conductor overload setting Overload trip curve mode I2 t I4 t Rotary coding switch short time delay setting Trip cause indicator 1 Indications Gro...

Page 87: ...onductor protection N tripping page 9 14 Load monitoring load restore load shedding page 9 14 Leading signal for L tripping page 9 14 Thermal memory can be switched On Off page 9 15 Ground fault protection modules page 9 45 Characteristics The ranges shown in the following are only setting ranges of the respective parameters Possible tolerance ranges are not included here Tolerance ranges are show...

Page 88: ...ersonnel are at the same potential Mechanical RESET for Bell Alarm and Rating plug Indicators Trip cause indicator 1 Query button Test button Areas to record protective settings Option Ground fault module COMMUNICATIONS Trip unit activated Overcurrent alarm Areas to record protective settings Option Reset Lockout Graphical display Trip unit error indicator Indicators Ground fault alarm Ground faul...

Page 89: ...ad monitoring load restore load shedding page 9 14 Leading signal for L tripping page 9 14 Thermal memory can be switched On Off page 9 15 Ground fault protection modules page 9 45 Characteristics The ranges shown in the following are only setting ranges of the respective parameters Possible tolerance ranges are not included here Tolerance ranges are shown in the Easy TCC Time Current Curve Softwa...

Page 90: ...I 150 A for frame size III Flashing LED Overcurrent alarm Steady LED if I IR Communication active Another CublicleBUS module has been recognized and communication started Extended protective function has tripped due to metering function trip cause saved in event memory trip cause readable via BDA PROFIBUS DP MODBUS graphical display ETU776 external digital output modules ...

Page 91: ...or flashes Limited protective function the protective parameters are reset to minimum values Causes Rated current of the rating plug is higher than that of the circuit breaker Rotary coding switch in undefined intermediate position Trip unit defective 2 T U Error lights up continuously Protective function not available Causes Rating plug not compatible with circuit breaker type Trip unit defective...

Page 92: ...or protection function is activated in this position 2 For settings tsd 0 4 sec the maximum possible setting Isd is reduced automatically according to the frame size Frame size II 20 kA Frame size III 30 kA The setting OFF for trip units ETU745 and ETU776 is provided to deactivate the short time delayed short circuit protection If the zone selective interlocking ZSI page 9 15 is used and the ZSI m...

Page 93: ...ptionally Ground fault protection modules page 9 45 The response value Ig together with the setting for the delay time tg determines the shutdown of ground fault currents If the zone selective interlocking ZSI page 9 15 is used and the ZSI module is set to S or S G the adjusted delay time tg is auto matically set to 100 ms provided that in the event of ground fault the circuit breaker does not rec...

Page 94: ...ing circuit breakers Load monitoring can be adjusted via the alphanumeric display ETU745 748 the graphical display ETU776 the BDA the PROFIBUS DP the MODBUS Leading signal for L tripping Trip units ETU745 776 provide a leading signal for L tripping which is transmitted via the CublicleBUS 100 milliseconds before overload tripping In this way it is possible e g to disconnect thyristor controllers P...

Page 95: ...rcuit breakers are interconnected through their ZSI modules When a short circuit occurs each circuit breaker affected by the short circuit current queries its downstream circuit breaker to determine whether the short circuit is also present in the next downstream grading level In the direction of the energy flow only the circuit breaker nearest to the short circuit is tripped A delay time which ma...

Page 96: ...tch ETU745 748 this must be set to a value in the white area the graphical display ETU776 the BDA ETU776 the PROFIBUS DP ETU776 the MODBUS ETU776 Changeable parameter sets Trip units ETU745 776 make it possible to store two different parameter sets for protective functions This enables new protection settings to be adopted when a transfer to another supply source takes place Switchover can be made...

Page 97: ...ith a constant I2 tg value providing better selectivity of the ground fault protection in systems with several grading levels The setting options for the delay time remain unchanged Switchover to the I2 tg characteristic can be made via the tg rotary coding switch ETU745 748 this must be set to a value in the white area the graphical display ETU776 the BDA ETU776 the PROFIBUS DP ETU776 the MODBUS ...

Page 98: ...9 18 9 1 7 ETU displays 9 1 7 1 Alphanumeric display Trip units ETU745 and ETU748 can be retrofitted with an alphanumeric display Overview 1 Screen 4 lines with 20 characters each 2 Up key 3 Down key ...

Page 99: ...cable Remove sealing cap of trip unit if applicable page 9 53 Removing dummy flange Installing display and latching it tight Fit and seal trip unit sealing cap if applicable page 9 53 Reconnect external 24 V DC voltage supply if applicable DANGER Hazardous voltage Will cause death serious personal injury or equipment damage Turn off and lock out all power supplying this device before working on th...

Page 100: ...n inclined upwards OPEN the circuit breaker and discharge the closing spring page 23 2 Disconnect external 24 V DC voltage supply if applicable Remove trip unit sealing cap if applicable page 9 53 Removing the display DANGER Hazardous voltage Will cause death serious personal injury or equipment damage Turn off and lock out all power supplying this device before working on this device 5 1 2 3 4 ...

Page 101: ...h 180 insert and lock it into place Fit and seal the trip unit sealing cap if applicable page 9 53 Reconnect external 24 V DC voltage supply if applicable Catalog number Catalog No Alphanumeric display for ETU745 748 WLLCD48 2 3 1 ...

Page 102: ...seconds If there is no measurement module available the display changes continuously back and forth between screens 1 and 2 If there is a measurement module available a total of five screens are displayed in Autoscroll mode To access Autoscroll mode press the following button s In Fixed screen display mode In Tripping counter reset mode In Contrast setting mode In Parameter setting mode Do not pre...

Page 103: ... V31 Screen 5 Energy positive direction Energy negative direction Present direction of energy flow Frequency NOTE The data to be displayed are updated every time the screen page is set up again No updates take place when a screen page is being displayed Button functions in Autoscroll mode Display is frozen Switchover to Fixed screen display mode Change to Parameter setting mode Change to Contrast ...

Page 104: ...ions Button functions in Fixed screen display mode Change to next higher screen level Change to Autoscroll mode Change to Tripping counter reset mode NOTE The counter should only be reset after contact maintenance If the counter is reset without contact maintenance having been performed the maintenance information displayed will not correspond to the actual condition of the contacts To access Trip...

Page 105: ...ipping counter reset mode If screen 1 is displayed Canceling no counter reset to zero Change to Autoscroll mode Counter reset to zero Change to screen 2 If screen 2 is displayed Change to Autoscroll mode Screens displayed in Tripping counter reset mode Trips and Ops Counter reset continue or or or ...

Page 106: ...g mode Screen 1 Setting Load shedding Screen 2 Setting Load restore Screen 3 Setting Delay time Load shedding load restore Screen 4 Setting Display language XXXX may be ENGL or GERM Screen 5 Parameter settings are being changed switches to Auto scroll mode after 10 seconds NOTE When screen 1 2 3 or 4 is displayed and no key is pressed within 10 seconds Parameter setting mode is canceled Any parame...

Page 107: ...yed in Contrast setting mode Screen 1 Contrast setting The longer the bar the higher the contrast Button functions in Contrast setting mode Increases the contrast Reduces the contrast Accept the contrast switch to the Autoscroll mode Screens displayed in Tripping info mode Tripping type Phase affected XX may be L S I G N M1 YY may be L1 L2 L3 Button functions in Tripping info mode Display of maint...

Page 108: ...his is only displayed if a ground fault protection module is installed Delay time for ground fault protection this is only displayed if a ground fault protection module is installed Inverse time delay I2 t dependent of ground fault protection this is only displayed if a ground fault protection module is installed Inverse time delay I2 t dependent for overload tripping Inverse time delay I4 t depen...

Page 109: ... the operating keys provided on the trip unit 1 Graphical display 2 Operating keys Display overview 1 Menu title 2 8 line alphanumeric display or graphical representation of characteristics 3 Status line Status line The status line shows by means of bold symbols which actions the operator can carry out and which settings are currently active at this moment 1 Access with password only 2 Maintenance...

Page 110: ...pdated during the measurement Display during operation After the supply voltage is applied the display switches from the power up screen to the operational screen after approximately 5 seconds It shows the currents in the three phases and in the neutral conductor as numerical values and in the form of a bar diagram The background illumination of the display is automatically switched off after appr...

Page 111: ...vigating in the menu structure Use the operating keys to navigate in the menu structure Selection of a menu item Button functions Shift the marking Select the marked menu item Switch back to the previous menu ...

Page 112: ... 5 0 F enter esc kW down 8x up 8x down 7x up 7x kW enter esc enter esc PAR A TRIG AB PAR A TRIG AB PAR A TRIG AB PAR A TRIG AB PAR A TRIG AB PAR A TRIG AB M A I N M E N U M E T E R I N G F R E Q U E N C Y F R E Q M e t e r i n g I a v g 7 5 2 A F r e q 5 0 0 2 H z f m i n 5 0 0 2 H z D i a g n o s t i c U a v g 4 0 1 V 2 8 J A N 0 3 V i e w P a r a m e t e r P 2 7 7 I T H D 1 0 1 6 2 9 3 2 0 1 C h...

Page 113: ...H z 6 0 0 0 0 T e m p 2 2 5 0 F 7 3 0 3 0 H A R M O N I C S 2 2 0 0 0 0 2 3 0 0 0 0 2 4 0 0 0 0 2 5 0 0 0 0 2 6 0 0 0 0 2 7 0 0 0 0 2 8 0 0 0 0 2 9 0 0 0 0 esc enter enter esc kW down 8x up 8x down5x up 5x k W down 28x up 28x PAR A TRIG AB PAR A TRIG AB PAR A TRIG AB PAR A TRIG AB PAR A TRIG AB PAR A TRIG AB PAR A TRIG AB M A I N M E N U V I E W P A R A M E T E R P R O T P A R S E T B L T r i p M ...

Page 114: ... 8x up 8x enter esc enter enter esc k W k W k W k W k W k W PAR A TRIG AB PAR A TRIG AB PAR A TRIG AB PAR A TRIG AB PAR A TRIG AB M A I N M E N U D I A G N O S T I C M A I N T E N A N C E M e t e r i n g Wa r n i n g s T o t a l O p s 2 2 7 D i a g n o s t i c T r i p L o g O p s w l o a d 1 2 5 V i e w P a r a m e t e r S e t p o i n t s S I T r i p s 2 C h a n g e P a r a m e t e r M a i n t e n...

Page 115: ... G G E R T R I P E V E N T P R O T P A R A M E T E R S T r i p E v e n t P r o t P a r a m e t e r s L T r i p S e t p o i n t E v e n t C u r r e n t S T r i p O v e r l o a d V o l t a g e I T r i p N o T r i g g e r R e a l P o w e r G T r i p F r e q u e n c y N T r i p P O S I T I O N P O S I T I O N P O S I T I O N 0 s 1 s 0 s 1 s 0 s 1 s P r e T r i g P r e T r i g P r e T r i g 0 8 0 s 0 3...

Page 116: ...G G E R A T r i g g e r L T r i p P o s i t i o n 0 s 1 s R e s e t S t a r t S E T T R I G G E R A R E S E T S T A R T T r i g g e r L T r i p T r i g g e r A N o w M o n i t o r i n g P o s i t i o n 0 s 1 s R e s e t S t a r t esc enter esc enter esc enter esc esc enter esc enter enter enter 3 sec T T T PAR A TRIG AB PAR A TRIG AB PAR A TRIG AB PAR A TRIG AB PAR A TRIG AB ...

Page 117: ...e r S e t p o i n t s C h a n g e P a r a m e t e r M a i n t e n a n c e I d e n t i f i c a t i o n C u b i c a l B U S C l e a r Wa v e f o r m D i s p l a y S e t u p C U R R E N T S U P L O A D A E V E N T S U p l o a d A E v e n t s U p l o a d B E v e n t s P l e a s e Wa i t U p l o a d I n P r o c e s s enter esc enter esc goto DISPLAY GRAPH in example 9 enter enter esc esc PAR A TRIG AB ...

Page 118: ...A D E v e n t U p l o a d C u r r e n t s D i s p l a y G r a p h C u r r e n t s G N V o l t a g e s U P L O A D A E V E N T S T r i g g e r H a s N o t O c c u r r e d enter esc enter esc enter 5 sec enter esc PAR A TRIG AB PAR A TRIG AB PAR A TRIG AB ...

Page 119: ...d e n t i f i c a t i o n C u b i c l e B U S C l e a r Wa v e f o r m D i s p l a y S e t u p D I S P L A Y WA V E F O R M D I S P L A Y G R A P H E v e n t U p l o a d D i s p l a y G r a p h T r i g g e r A C u r r e n t s R e c o r d e d D I S P L A Y G R A P H N o D a t a A v a i l a b l e P l e a s e U p l o a d E v e n t enter 5 sec enter esc enter esc 5 sec enter PAR A TRIG AB PAR A TRIG A...

Page 120: ...L 3 L 3 L 3 L g L g L g L N L N L N I L 1 0 A I L 1 1 0 0 0 0 0 A I L 1 1 0 0 0 0 0 A t 0 0 0 0 s t 0 0 0 8 s t 0 0 0 8 s I L 2 WA V E F O R M L 1 L 3 L g L N I L 2 8 0 0 0 0 A t 0 0 0 8 s esc goes to DISPLAY WAVEFORM menu enter esc enter 8X down 2X enter X X T X X T T T T T PAR A TRIG AB PAR A TRIG AB PAR A TRIG AB PAR A TRIG AB X T T PAR A TRIG AB ...

Page 121: ... n T a u 1 0 0 P R O T P A R S E T B P R O T P A R S E T B P a r a m e t e r C h a n g e P a r a m e t e r C h a n g e N o t S a v e d S a v e d enter enter enter esc esc esc PAR A TRIG AB PAR A TRIG AB PAR A TRIG AB PAR A TRIG AB PAR A TRIG AB M A I N M E N U D I S P L A Y S E T U P P A S S WO R D M e t e r i n g S y s t e m T i m e E n t e r N e w P s w r d D i a g n o s t i c L a n g u a g e V ...

Page 122: ...nter S a v e P a r a m e t e r C h a n g e s Y E S E S C N o all greyed except key pencil esc enter down enter esc esc enter esc PAR A TRIG AB PAR A TRIG AB PAR A TRIG AB PAR A TRIG AB P A S S WO R D P A S S WO R D E n t e r N e w P s w r d E n t e r N e w P s w r d 7 7 2 6 5 1 2 3 4 5 6 7 8 9 10 11 12 13 14 15 16 P A S S WO R D enter S a v e C h a n g e s Y E S E S C N o esc enter esc esc enter e...

Page 123: ...p enter esc enter esc PAR A TRIG AB PAR A TRIG AB PAR A TRIG AB ESC M A I N M E N U C L E A R M e t e r i n g C u r r e n t F a u l t D i a g n o s t i c M i n M a x B u f f e r V i e w P a r a m e t e r T e m p M i n M a x C h a n g e P a r a m e t e r T r i p L o g I d e n t i f i c a t i o n M a i n t e n a n c e I n f o C l e a r D i s p l a y S e t u p M I N M A X B U F F E R M I N M A X B U ...

Page 124: ...equipped with a rating plug smaller than 800 A All set protection parameters are adjusted accordingly It is not permitted to operate the trip unit without a rating plug If a circuit breaker is nevertheless started up without a rating plug the T U ERROR indicator will light up and the trip unit settings will default to the lowest possible settings for that frame rating Frame size Rating plug Catalo...

Page 125: ...rate 1200 A 1 A ground fault sensor Input current carrying capacity of the ground fault protection module max 1 A continuous max 5 A for 0 5 sec Alarm and tripped signals can be transmitted via the c PROFIBUS DP and MODBUS Module GFM A 745 Alarm only circuit breaker does not trip The changeover switch for ground fault detection is only accessible when the control panel or the trip unit itself is r...

Page 126: ... the PROFIBUS DP ETU776 the MODBUS ETU776 Ground fault detection selectable vectorial summation I L1 L2 L3 N external iron core ground fault current sensor 1200 A 1 A Rotary coding switch for ground fault protection setting value Rotary coding switch for ground fault alarm setting value Indicators ground fault alarm ground fault tripped Rotary coding switch for ground fault delay setting tg I2 tg ...

Page 127: ...e handheld test device page 9 97 Install and seal sealing cap of trip unit if applicable page 9 53 DANGER Hazardous voltage Will cause death serious personal injury or equipment damage Turn off and lock out all power supplying this device before working on this device WARNING High speed moving parts Can cause serious personal injury Discharge the closing spring before inspection and before carryin...

Page 128: ...og numbers NOTE Once the ground fault module is snapped into place it cannot be removed Ground fault protection module Catalog No GFM A 745 748 WLGFA48 GFM AT 745 748 WLGFM48 GFM A 776 WLGFA76 GFM AT 776 WLGFM76 ...

Page 129: ...Will cause death serious personal injury or equipment damage Turn off and lock out all power supplying this device before working on this device WARNING High speed moving parts Can cause serious personal injury Discharge the closing spring before inspection and before carrying out any work on the circuit breaker 2 3 During installation 1 5 Nm 44 lb in PH 2 5 4 ...

Page 130: ... Voltage Power Circuit Breaker catalog If a trip unit with another configuration than the existing one is installed the Catalog No on the options label of the circuit breaker must be changed according to the catalog data Please contact the technical assistance hotline if you have any queries Remove connectors N sensor 1 1 Equipment dependent on type Current sensors Energy transducer BSS module 1 6...

Page 131: ...will light up one after other from left to right or from top to bottom 3 The flashing time corresponds to the long time delay tR The flashing time deviates more than 10 from the set long time delay tR 4 The L tripping indicator lights up Test OK T U ERROR indicator lights up Test not OK Test not OK Trip unit is defective even if the L tripping indicator lights up 5 LED goes out after 30 sec End of...

Page 132: ...e corresponds to the long time delay tR The flashing time deviates more than 10 from the set long time delay tR 4 Circuit breaker trips Test OK Circuit breaker does not trip Test not OK Test not OK Trip unit is defective even if the circuit breaker trips 5 q Reclosing a circuit breaker trip ped by the trip unit page 6 9 Test with handheld test device Check wiring between trip unit and tripping sol...

Page 133: ...9 53 9 1 12 Sealing and locking device NOTE Keep sealing wire as short as possible Catalog No ETU745 ETU748 WLTUSC55 ETU776 WLTUSC76 2 1 lock seal 1 2 remove ...

Page 134: ...aker Status Sensor BSS DI Digital input modules for potential free input signals 0 1 signals a maximum of two modules with different configurations can be connected DO Digital output modules with 6 outputs each a maximum of three modules with different configurations or versions can be connected ETU Electronic trip unit Metering Measurement function or measurement function PLUS PROFIBUS DP MODBUS ...

Page 135: ...r BSS 1 Spring charge signaling switch 2 Signaling switch OPEN CLOSE position S44 3 Ready to close signaling switch 4 S45 Bell Alarm signaling switch 5 Signaling switch for connected position S46 6 Signaling switch for test position S47 7 Signaling switch for disconnected position S48 8 Signaling switch S43 UVR or 2nd shunt trip 0206 3 Trip Unit UVR or 2nd shunt trip Springs c 1 2 3 4 5 6 7 8 ...

Page 136: ...Replace the trip unit page 9 49 1 BSS 2 Actuating shaft 3 BSS 4 Ready to close indicator 5 Drive shaft 6 Carrier DANGER Hazardous voltage Will cause death serious personal injury or equipment damage Turn off and lock out all power supplying this device before working on this device WARNING High speed moving parts Can cause serious personal injury Discharge the closing spring before inspection and ...

Page 137: ...g signaling switch S43 to the 2nd shunt trip UVR 1 See saw 2 Signaling switch 3 Guide 4 Groove Attaching signaling switch S45 to the ETU carriage 1 black wiring 1 2 3 4 UVR 2nd shunt trip signaling switch S 43 1 S45 ...

Page 138: ...bicle bus link does only exist in release 1 release 2 uses an internal link 9 2 2 2 COM15 module Interface adapter for converting csignals to PROFIBUS DP signals and vice versa for draw out circuit breakers detecting the circuit breaker position in the cradle with auxiliary signaling switches S46 S47 and S48 and emitting the corre sponding signals to the cand the PROFIBUS DP providing special func...

Page 139: ...and plug X8 6 c connection for connecting external cmodules or for the terminating resistor Indications LED Indication Significance PROFIBUS DP off No voltage at COM15 green PROFIBUS DP communication red no PROFIBUS DP communication with master class 1 activ c off No cmodules found green ccommunication with master class 1 activ green flashing no connection to ETU or metering function red cfault ...

Page 140: ...cting the circuit breaker position in the cradle and transfer to PROFIBUS DP and c page 8 1 Attaching the position indicating module to the withdrawable circuit breaker DANGER Hazardous voltage Will cause death serious personal injury or equipment damage Turn off and lock out all power supplying this device before working on this device COM15 module S46 S47 S48 1 2 X7 v2 2 x M4x8 1 2 3 4 PZ 3 ...

Page 141: ...ections for additional inputs and outputs Designation Assignment Terminal X8 1 c X8 1 X8 2 c X8 2 X8 3 24 V DC X8 3 X8 4 24 V DC GND X8 4 NOTE If no external cmodules are connected to the COM15 module the terminating resistor has to be plugged into the cterminal Absence of the terminating resistor can cause errors and potentially loss of communications 3 0 x 0 6 1 8 0 5 Nm 4 lb in ...

Page 142: ...ditional inputs and outputs to provide special functions 2 SUB D plug 9 pole for MODBUS connection 3 cLED 4 MODBUS LED 5 Connecting cables to hand plug X8 6 cconnection for connecting external cmodules or for the terminating resistor Indicators For installation and connection of the COM15 module please refer to installation and connection of the COM15 module page 9 58 LED Indication Significance M...

Page 143: ...blocked if the Write Enable input is inactive opening closing circuit breaker resetting after a trip Changing any protective function parameters and extended protective function parameters changing any communications parameter e g address changing any parameter of the metering function e g demand period length resetting any diagnostic or service related counter or indicator setting resetting outpu...

Page 144: ...of a single Control Bit or Extra Flag 15 Write Multiple Coils Sets the state of multiple Control Bits and Extra Flags 04 Read Input Registers Reads the Basic Data Registers Three Basic Types 1 2 and 3 are supported 03 Read Holding Registers Reads a complete data set 16 Write Multiple Registers Writes a complete data set 07 Read Exception Status Reads the state of eight Exception Status bits 08 Dia...

Page 145: ...bers are used to identify the selected parity If the COM16 module receives an invalid parity the invalid parity will be ignored Auto configuration of baud rate and parity The factory settings for baud rate and parity are 19200 baud and Even Parity These settings may be changed either by writing from the master to data points 427 and 428 in register 40994 0xA022 or via the auto configuration proces...

Page 146: ... in the cyclic profile of MODBUS 7 COM16 COM11 COM21 Format 7 224 40979 0xA013 Reserved 48 40982 0xA016 IP address of the BDA BDA PLUS 10 BDA Format 10 40 40985 0xA019 LOW MODBUS transmission rate baud rate 427 COM16 COM11 COM21 Format 427 8 40985 0xA019 HIGH Parity 428 COM16 COM11 COM21 Format 428 8 40986 0xA01A Reserved 144 40995 0xA023 LOW Property byte parity 428 COM16 COM11 COM21 PB 8 40995 0...

Page 147: ... WL 0 1 Circuit breaker position 00 disconnected position 01 connected position 10 test position 11 circuit breaker not present 2 3 Circuit breaker status 00 not ready 01 circuit breaker open 10 circuit breaker closed 11 circuit breaker tripped 4 Circuit Breaker is ready to close 5 Undervoltage release 6 Closing spring charged 7 Overload warning 8 Setpoints active 9 Warning s active 10 MODBUS Writ...

Page 148: ...ls Bit number WL Control Bits 0 1 Breaker open close 00 no action 01 open circuit breaker 10 close circuit breaker 11 no action 2 clear reason for trip 3 Not used 4 User output 0 User output Off 1 User output On 5 Not used 6 Not used 7 Not used Extra Flags 8 9 not used 10 Clear log book 11 Clear all min max values 12 Clear temperature min max values 13 Not used 14 Clear maintainance counters 15 Sy...

Page 149: ...Type 1 Registers and Default Data Points Register Byte Name Default Data Point WL 1 0 1 Status Register WL status bits 2 2 3 Data Block 1 Phase L1 current 3 4 5 Data Block 2 Phase L2 current 4 6 7 Data Block 3 Phase L3 current 5 8 9 Data Block 4 Current in phase under highest load 6 LOW 10 Block 1 property byte Property byte of phase L1 current 6 HIGH 11 Block 2 property byte Property byte of phas...

Page 150: ...f 3 phasesa a Only 2 bytes of the 4 byte data point will be communicated range 0 65535 MWh 10 LOW 18 Block 1 property byte Property byte of phase L1 current 10 HIGH 19 Block 2 property byte Property byte of phase L2 current 11 LOW 20 Block 3 property byte Property byte of phase L3 current 11 HIGH 21 Block 4 property byte Property byte of current in phase under highest load 12 LOW 22 Block 5 proper...

Page 151: ...29 Data Block 14 Total apparent power of 3 phases 16 30 Block 1 property byte Property byte of phase L1 current 31 Block 2 property byte Property byte of phase L2 current 17 32 Block 3 property byte Property byte of phase L3 current 33 Block 4 property byte Property byte of current in phase under highest load 18 34 Block 5 property byte Property byte of current in neutral conductor 35 Block 6 prop...

Page 152: ...etering function PLUS This however requires external voltage transformers providing a three phase metering voltage In addition to the values for the currents the metering function PLUS provides data on voltages powers energy values power factors and frequency via the cfor further processing Bit Description 0 Excessive breaker contact wear 1 Communication with trip unit OK 2 COM16 is OK 3 7 Reserve...

Page 153: ...arent power Power factors cos L1 cos L2 cos L3 0 6 1 0 6 0 6 1 0 6 0 04 0 04 Power factor total 0 6 1 0 6 0 6 1 0 6 0 04 0 04 Long term average of currents IL1 IL2 IL3 30 8000 A 1 of measurement range Long term average of 3 phase current 30 8000 A 1 of measurement range Long term average of active power in L1 L2 L3 13 8000 kW 2 of apparent power P F 0 6 Long term average of active power 3 phase 13...

Page 154: ...djusted delay via the c The parameters can be adjusted via the test socket with the BDA the PROFIBUS DP the MODBUS the graphical display ETU776 Parameter Range Delay Undervoltage 100 1100 V 0 15 sec Overvoltage 200 1200 V 0 15 sec Active power in normal direction 1 12000 kW 0 15 sec Active power in reverse direction 1 12000 kW 0 15 sec Overfrequency 40 70 Hz 0 15 sec Underfrequency 40 70 Hz 0 15 s...

Page 155: ...al overcurrent 30 10000 A 0 255 sec phase current unbalance 5 50 0 255 sec current demand 30 10000 A 0 255 sec undervoltage 100 1100 V 0 255 sec phase voltage unbalance 5 50 0 255 sec overvoltage 100 1100 V 0 255 sec overpower in normal direction 1 12000 kW 0 255 sec KW reverse 1 12000 kW 0 255 sec KW demand 1 12000 kW 0 255 sec KVA demand 1 12000 kVA 0 255 sec KVAR demand 1 12000 kVar 0 255 sec K...

Page 156: ...ly defined event occurs Then the recording is stopped and the current or voltage waveforms at the time of the event can be observed on a visual display graphical LCD laptop or PC The time window is one second the resolution is 1649 values second The waveform buffers can also be started or stopped individually via the communication channels PROFIBUS DP MODBUS c The waveform buffers can be parameter...

Page 157: ...injury or equipment damage Turn off and lock out all power supplying this device before working on this device Note Required primary and secondary overcurrent protection fusing not shown for clarity to X8 8 to X8 7 to X8 6 to X8 5 L1 L2 L3 LN 120V 3 primary bus configuration VT primary connection VT primary connection 3 4W System Wye L N L G Connection Secondary to X8 8 to X8 7 to X8 6 to X8 5 L1 ...

Page 158: ...itchgear panel It must be ensured that the length of the connecting cable of the first module to the circuit breaker does not exceed 6 5 ft Connection setup The cmodules must only be connected to each other and to the circuit breaker using the pre assembled cables supplied These cables are also used for the 24 V DC voltage supply of the cmodules If more than two cmodules are connected the 24 V DC ...

Page 159: ...le 1 Connecting cable to 1st module 4 core cores X8 4 X3 1 twisted with X8 3 X3 4 and X8 1 X3 2 twisted with X8 2 X3 3 2 Connecting cables between modules 3 cmodules 4 Terminating resistor 120 0 5 W 5 Cable connection for 24 V DC voltage supply ...

Page 160: ...between the X8 and the first cmodule for 24 V DC voltage supply 2 Connecting cables between cmodules 3 cmodules 4 Terminating resistor 120 0 5 W 5 Connecting cables between the modules for 24 V DC voltage supply 6 Connecting cable between COM15 16 and the first cmodule with two RJ45 plugs 7 COM15 COM16 ...

Page 161: ...e NOTICE Unintended operation of the circuit breaker and other devices The test circuits of this unit emit real output signals that may cause operation of the circuit breaker and other devices that may be connected to the associated cmodule During the test the circuit breaker and downstream devices shoud be isolated to prevent unintended device operations Pressing the TEST Button Reaction Twice qu...

Page 162: ...s tripped If S or S G is selected on the ZSI module and the circuit breaker does not receive a blocking signal ZSI IN from its downstream circuit breaker in the event of short circuit the delay time setting for the short circuit trip is set to 50 ms If a short circuit is detected a blocking signal ZSI OUT will be sent to the upstream circuit breakers The trip takes place after 50 ms It typically d...

Page 163: ...ed to AWG 13 The ZSI connections must consist of twisted pair cables or shielded cables The ZSI module allows connection of up to 8 circuit breakers at the ZSI IN input and 20 circuit breakers at the ZSI OUT output Terminal Connection TIE BRKR Only for bus couplers Allows complete ZSI functionality in systems with buscouplers so that various energy flow directions can be taken into account ZSI IN ...

Page 164: ... trip units ETU776 it is possible as an alternative to use an input signal of this type at input 1 to switch between two different sets of pro tection parameters if provided Installation page 9 78 Connection Connection setup page 9 78 A maximum of two digital input modules can be operated on the c at the same time 1 module with the BUS INPUT setting 1 module with the PARAMETER SWITCH setting Setti...

Page 165: ... an input signal present a corresponding message is transmitted to the BUS via the COM15 16 module PARAMETER SWITCH Input 1 is used for parameter switchover All other inputs have no function No input signal LED 1 not lights up Parameter set A activated Input signal available LED 1 lights up Parameter set B activated NOTE The parameter switchover query can be overruled by a query via the BUS commun...

Page 166: ...ing versions with rotary coding switch and relay outputs configurable and with relay outputs Installation page 9 78 Connection Connection setup page 9 78 If a combination of digital output modules with rotary switch and configurable digital outputs is to be connected to a circuit breaker the following can be connected per circuit breaker 1 digital output module with rotary coding switch and output...

Page 167: ...gital output modules with rotary coding switch 1 Output assignment 1 2 Delay time setting 3 Output assignment 2 Configurable digital output modules Terminal assignment of digital output module X4 Outputs 4 6 X5 Outputs 1 3 1 2 3 ...

Page 168: ...capacity of the outputs Relay output 250 V AC 12 A 25 V DC 12 A Terminal assignment 1 TRIP L Signaling contact overload tripping S Signaling contact short time delayed short circuit tripping I Signaling contact instantaneous short circuit tripping G Signaling contact ground fault tripping G ALARM Signaling contact ground fault alarm N Signaling contact neutral conductor tripping Delay time setting...

Page 169: ...tion setup page 9 78 A maximum of 2 analog output modules can be connected the rotary coding switches of these modules must however have different settings Terminal assignment Settings Setting principle page 9 81 The measured values to be signaled are adjusted using the rotary switch They are always present on the two terminal strips in the corresponding format The following values are available a...

Page 170: ...ction c module Catalog No ZSI module WLZSIMD Analog output module WLANLGCUB Digital output module with relay output WLRLYCUB Digital output module with relay output parameterizable WLRLYCCUB Digital input module WLDGNCUB ccable 1 m WLCBUSCABLE1 ccable 2 m WLCBUSCABLE2 ccable 0 2 m WLCBUSCABLE02 ccable 4 m WLCBUSCABLE4 ccable 9 m WLCBUSCABLE9 ...

Page 171: ...Version with copper connectors 5 Connector P2 6 Connector P1 Dimension drawings page 7 18 Terminal assignment Remove bridge X8 9 X8 10 This arrangement ensures the same direction of the current flow for the circuit breaker and the external neutral sensor 1 2 3 4 5 6 Main conducting path 0377_nu S1 P1 P2 S2 X8 10 X8 9 1 2 3 4 5 6 External N sensor ...

Page 172: ...h the maximum possible number of external cmodules one of the Siemens power supply units listed below can be used If a second circuit breaker is to be supplied a second power supply unit is also required The external power supply used for electronic components must not be used to supply the motor operated mechanism When using voltage supply units from other manufacturers the following conditions m...

Page 173: ... with the electronic system of the circuit breaker takes place via the c For this purpose the BDA can be option ally connected to the test socket of the trip unit or in case of longer stationary operation to the last cmodule and snapped onto a 35 mm DIN rail The required connection cables are supplied with the unit 9 4 2 View 9 4 3 Indicators 9 4 4 Connection versions The BDA can depending on the ...

Page 174: ... to communicate with the circuit breaker When the connection to the circuit breaker is established these data can be transmitted and the circuit breaker can be parameterized auto matically 1 Browser capable input output device e g laptop computer 2 BDA or BDA PLUS 3 24 V DC voltage supply class 2 4 RS232 interface ...

Page 175: ...ly is provided via the c 3 BDA or BDA PLUS 4 Test socket of the trip unit 40 pole 5 Connection cable SUB D 15 pole BDA to SUB D 40 pole test socket of trip unit 6 RS232 interface SUB D 9 pole Remote access via modem The circuit breaker data including parameterization can be accessed from any remote location 1 Browser capable input output device e g laptop computer 2 Modem 3 BDA PLUS 4 External c m...

Page 176: ...e g laptop computer 2 Ethernet cable 3 BDA PLUS 4 External cmodule 5 Connection cable SUB D 15 pole BDA to RJ45 plug c connection 6 Ethernet connection 9 4 5 Voltage supply The BDA requires a voltage supply of 24 V DC This can be applied via a separate standard plug type power supply unit or the CublicleBUS with the external voltage supply of the circuit breaker electronics 9 4 6 Catalog numbers C...

Page 177: ...ting values of the overload release Setting value IR 1 0 In Interrupt external voltage supply for the electronic system if present Remove the cap from test socket X25 of the trip unit NOTICE Circuit breaker may trip If the trip settings are changed while the breaker is closed and under load the breaker may trip Adjust parameters only when the circuit breaker is in the open position Cat No WLTS Rev...

Page 178: ...START button for at least three seconds It is also possible to test a trip unit that is already activated i e one that is supplied by an external voltage source However it must be taken into account that the ETU STATUS LED may briefly flash twice when the status test result is displayed even if there have not been any faults As a precaution the status test should be repeated without external volta...

Page 179: ...es are listed on page 9 104 Short time delayed tripping Test The short time delayed short circuit tripping function and the trip unit circuitry can be tested using the test device 1 Charge the circuit breaker 2 Close the circuit breaker 3 Press the S button The circuit breaker will trip after the set short time delay time plus approx 2 seconds processing time has elapsed If the test device has com...

Page 180: ... continuously green If a fault is detected the LED will flash The type of flashing indicates what type of fault is present fault codes are listed on page 9 104 Testing the measured value display This function works by inputting a signal into the trip unit The signal is displayed as a single phase current on the trip unit s display and the current s measured value is also transmitted via the commun...

Page 181: ...9 101 9 5 6 Finishing Restore the documented settings Mount the cover on X25 9 5 7 Catalog numbers Catalog No Handheld test device WLTS Replacement cables WLTSC ...

Page 182: ...nals 3 Reset Bell Alarm Electrical remote reset Option Electrical remote reset of reclosing lockout and the Bell Alarm via a remote reset solenoid page 10 5 Manual reset Press Bell Alarm red pin until it latches 4 Bell Alarm Reset Tripped signal reset Automatic reset of the maglatch Tripping solenoid 0077 01_u F5 Bell Alarm Trip X9 12 X9 14 X9 13 S24 0053 06_u F7 S13 X8 13 X8 14 S24 X9 13 X9 14 X9...

Page 183: ...t solenoid When the WL breaker is configured with option WLNOAUTRSET the tripping coil must be manually reset before the circuit breaker is capable of closing The following instruction details the resetting of the Bell Alarm and the tripping coil 1 Circuit breaker is tripped by the trip unit 2 Indicators Signals 3 Manual reset Press Bell Alarm red pin until it latches 4 Bell Alarm reset Tripping s...

Page 184: ...t breaker and discharge the closing spring page 23 2 Move the circuit breaker into the withdrawn position in the cradle page 23 3 Remove front panel page 23 4 Remove the trip unit page 9 49 DANGER Hazardous voltage Will cause death serious personal injury or equipment damage Turn off and lock out all power supplying this device before working on this device WARNING High speed moving parts Can caus...

Page 185: ...10 4 10 3 1 Removing the automatic reset mechanism 1 Remove lock washer 2 Remove bolt 3 Remove reset spring Then Install trip unit page 9 49 Install front panel page 23 4 2 3 0565 3 1 ...

Page 186: ...e trip unit page 9 49 NOTICE Can only be used with automatic reclosing lockout reset The remote reset solenoid will otherwise be overloaded and damaged DANGER Hazardous voltage Will cause death serious personal injury or equipment damage Turn off and lock out all power supplying this device before working on this device WARNING High speed moving parts Can cause serious personal injury Discharge th...

Page 187: ...et solenoid F7 10 4 2 Connecting wires page 8 1 NOTICE When routing the wires care must be taken to ensure that wires are not damaged when reinstalling the ETU carriage 0191 2 0191 1 1 2 0191 3 3 PZ 1 3 0 x 0 6 1 8 Terminals X8 13 X8 14 ...

Page 188: ... 14 X9 13 S24 Siemens Industry Inc Fort Worth TX 76155 USA Charging Motor Remote Close Coil X5 2 X5 1 X6 7 X6 8 240 250 VAC VDC 120 125 VAC VDC 240 250 VAC VDC 120 125 VAC VDC VAC VDC 120 125 VAC VDC 1st Shunt Trip UVR 2nd Shunt Trip Remote Reset X6 13 X6 14 X5 11 X5 12 X9 1 X9 2 X8 13 X8 14 Ready to Close Switch X6 5 X6 6 240 VAC 4 A 240 VAC 1st Shunt Trip Switch X9 7 X9 8 240 VAC 240 VAC UVR Swi...

Page 189: ...t trip F1 2 Signaling switch S22 3 Closing coil CC 4 2nd shunt trip F2 or undervoltage release instantaneous F3 or undervoltage release time delayed F4 5 Signaling switch S23 or S43 6 Cut off switch S14 for shunt trip 5 duty cycle 7 Cut off switch S15 for closing coil CC 5 duty cycle 1 2 3 4 5 6 7 ...

Page 190: ...ront panel page 23 4 DANGER Hazardous voltage Will cause death serious personal injury or equipment damage Turn off and lock out all power supplying this device before working on this device WARNING High speed moving parts Can cause serious personal injury Discharge the closing spring before inspection and before carrying out any work on the circuit breaker 2 1 Retaining bracket 3 4 Replace retain...

Page 191: ...losing coil or undervoltage device to the BSS A Snap in place B Disassembly 1 See saw 2 Signaling switch 3 Guide 4 Groove 5 Snap fit 1 Disengage the snap fit 2 Pull out the signaling switch 11 4 Setting delay times on undervoltage release Instantaneous release 5 B 1 2 1 2 3 4 A short time delayed instantaneous J1 td q 80 milliseconds td q 200 milliseconds ...

Page 192: ...delayed release 11 5 Field Installation of a cut off switch for shunt trips and closing coils td 0 2 1 6 sec 1 6 sec td 0 2 1 6 sec 3 x 0 5 S1 Delay time td 1 8 S14 S15 pre wired 0136 07_nu F1 CC F2 S15 S14 b a a ...

Page 193: ...11 5 A Shunt trip with cut off switch S14 B Closing coil with cut off switch S15 C Combination of shunt trip and closing coil with combined cut off switch S14 S15 B A C ...

Page 194: ...ion and before carrying out any work on the circuit breaker Shunt trip Closing coil 1 Charge the closing spring manually page 6 4 2 Close circuit breaker page 6 7 3 4 Circuit breaker opens Circuit breaker closes 5 Opening the circuit breaker page 6 7 Armature 0169 02_u CC Armature 0083_u 0083_u 3 0 x 0 6 1 8 Terminals CC F1 F2 F3 F4 X6 7 X6 8 X6 13 X6 14 X5 11 X5 12 X5 11 X5 14 X9 9 X6 7 S10 ...

Page 195: ... is connected 11 9 Electrical function test NOTE Make sure that the closing coil with 5 operating time is only activated when the circuit breaker is ready for closing Otherwise the closing coil will be damaged Closing coil Undervoltage release 1 Charge the closing spring page 6 4 2 3 Actuate the closing coil Electrical Closed Remote activation Remove control power to test undervoltage release 4 Ci...

Page 196: ... Undervoltage release 1 Charge the closing spring page 6 4 Closing the circuit breaker page 6 7 2 3 Actuate shunt trip Remote activation Remove control power to test undervoltage release 4 Circuit breaker opens 0083_u ...

Page 197: ...20 250 WLST240 Undervoltage release F3 instantaneous 24 WLUV24 48 WLUV48 110 127 110 125 WLUV120 208 240 220 250 WLUV240 Undervoltage release F4 time delayed 48 WLUVD48 110 127 110 125 WLUVD120 208 240 220 250 WLUVD240 Siemens Industry Inc Fort Worth TX 76155 USA Charging Motor Remote Close Coil X5 2 X5 1 X6 7 X6 8 240 250 VAC VDC 120 125 VAC VDC 240 250 VAC VDC 120 125 VAC VDC VAC VDC 120 125 VAC...

Page 198: ...itch S22 for 1st shunt trip page 11 3 5 Signaling switch for ready to close S20 6 Signaling switch S23 for 2nd shunt trip or under voltage release page 11 3 7 Contact position driven auxiliary switch S1 8 Contact position driven auxiliary switch S2 9 Contact position driven auxiliary switch S4 10 Contact position driven auxiliary switch S3 1 3 5 6 7 8 9 10 4 2 ...

Page 199: ...and X6 according to the wiring plan page 8 2 DANGER Hazardous voltage Will cause death serious personal injury or equipment damage Turn off and lock out all power supplying this device before working on this device WARNING High speed moving parts Can cause serious personal injury Discharge the closing spring before inspection and before carrying out any work on the circuit breaker Contact position...

Page 200: ... Hazardous voltage Will cause death serious personal injury or equipment damage Turn off and lock out all power supplying this device before working on this device WARNING High speed moving parts Can cause serious personal injury Discharge the closing spring before inspection and before carrying out any work on the circuit breaker Signaling switches Catalog No Ready to close signaling switch S20 W...

Page 201: ...ath serious personal injury or equipment damage Turn off and lock out all power supplying this device before working on this device WARNING High speed moving parts Can cause serious personal injury Discharge the closing spring before inspection and before carrying out any work on the circuit breaker ...

Page 202: ...be connected to secondary disconnects X8 and X9 according to the wiring plan page 8 3 and page 8 6 NOTICE Over tightening the mounting screws may deform the signaling switch and could lead to an incorrect indication of breaker status Hardware shall be tightened carefully until the underside of the screw head is flush with the mounting surface Signaling switches Catalog No Bell Alarm S24 1 form C c...

Page 203: ...n 1 2 3 4 3 0 x 0 6 Siemens Industry Inc Fort Worth TX 76155 USA Charging Motor Remote Close Coil X5 2 X5 1 X6 7 X6 8 240 250 VAC VDC 120 125 VAC VDC 240 250 VAC VDC 120 125 VAC VDC VAC VDC 120 125 VAC VDC 1st Shunt Trip UVR 2nd Shunt Trip Remote Reset X6 13 X6 14 X5 11 X5 12 X9 1 X9 2 X8 13 X8 14 Ready to Close Switch X6 5 X6 6 240 VAC 4 A 240 VAC 1st Shunt Trip Switch X9 7 X9 8 240 VAC 240 VAC U...

Page 204: ... a 2 b contacts or eight internal auxiliary switches 4 a 4 b contacts With the addition of a MOC device an additional eight auxiliary switches 4 a 4 b contacts may be added to a circuit breaker Note referencing ANSI C37 100 a contact A secondary contact that is open when the circuit breaker is open and closed when the circuit breaker is closed b contact A secondary contact that is closed when the ...

Page 205: ...reaker frame size 2 WLMOC and a second for circuit breaker frame size 3 WLMOC3 12 8 2 MOC Installation Instructions There are two MOC versions available with and without a driver for the test position The version with only one drive is generally used for fixed mounted circuit breakers OPEN the circuit breaker and discharge the closing spring page 23 2 Remove circuit breaker from cradle page 23 3 1...

Page 206: ...the coupler is oriented properly when installed Figure 3 illustrates the proper installed orientation of a shaft extension circuit breaker shown in the OPEN position with the tampered flange facing the rear of the circuit breaker NOTE The tapered flange of the coupler must point towards the rear side of the circuit breaker Figure 3 0421 1_nu ...

Page 207: ...late assembly is secured to the circuit breaker compartment cradle by two tabs in the rear and two screws in the front With the screws inserted from the inside of the cubicle and the nuts and lockwashers on the outside the nuts must be torqued to 71 lbin 8 Nm 1 2 3 4 ...

Page 208: ...rd pressure with a thin blade screwdriver in the area shown in Figure 6 NOTICE MOC Reliability May cause intermittent signaling All four contact blocks whether wired or not must be installed into the MOC assembly to ensure reliable operation NOTICE Contact block damage May cause loss of signaling Do not over extend the feet of the contact block when reinstalling into the MOC assembly Figure 6 ...

Page 209: ...sembly a replacement contact block must be used Replacement contact blocks may be purchased per catalog number WLMOCSWK includes four replacement contact block assemblies NOTICE MOC Reliability May cause intermittent signaling All four contact blocks whether wired or not must be installed into the MOC assembly to ensure reliable operation NOTICE Contact block damage May cause loss of signaling Do ...

Page 210: ...e mounted 4 NO 4 NC Test and connected position for draw out circuit breaker only FS II WLMOC Mechanism Operated Auxiliary Contacts cradle mounted 4 NO 4 NC Connected position only for draw out circuit breaker only FS II WLMOCC Mechanism Operated Auxiliary Contacts cradle mounted 4 NO 4 NC Test and connected position for draw out circuit breaker only FS III WLMOC3 Mechanism Operated Auxiliary Cont...

Page 211: ...l mechanical interlocking module a special clutch shaft must be used in place of the normal one 1 Clutch shaft 2 Lock nut 12 8 5 Mounting of MOC and mechanical interlocking module on the cradle Longer side turned upwards 12 Nm 105 lb in wrench size 13mm 1 2 MOC Side wall Mechanical interlocking module 8 Nm 71 lb in 5 Size ...

Page 212: ...EN the circuit breaker and discharge the closing spring page 23 2 Move the circuit breaker into the withdrawn position in the cradle page 23 3 Remove front panel page 23 4 DANGER Hazardous voltage Will cause death serious personal injury or equipment damage Turn off and lock out all power supplying this device before working on this device WARNING High speed moving parts Can cause serious personal...

Page 213: ...unting the motor on the operating shaft Fixing the motor operated mechanism connecting wires Operating shaft of the manual operating mechanism 1 3 2 3 0 x 0 6 X5 Terminals X5 1 X5 2 1 2 6 Nm Size 5 53 lb in 3 ...

Page 214: ...e wire to be soldered Installing motor disconnect switch Connecting motor disconnect switch Disconnect the brown wire from the motor operated mechanism from terminal X5 2 Connect wire X5 2 of the disconnect switch S12 to terminal X5 2 Solder the brown wire from the motor operated mechanism to terminal 4 of the disconnect switch S12 See saw S 12 1 2 Solder point ...

Page 215: ...110 127 V AC 110 125 V DC 150 W WLELCMTR120S 208 240 V AC 220 250 V DC 130 W WLELCMTR240S 4 3 2 1 Front Panel 3 0 x 0 6 hand tighten Siemens Industry Inc Fort Worth TX 76155 USA Charging Motor Remote Close Coil X5 2 X5 1 X6 7 X6 8 240 250 VAC VDC 120 125 VAC VDC 240 250 VAC VDC 120 125 VAC VDC VAC VDC 120 125 VAC VDC 1st Shunt Trip UVR 2nd Shunt Trip Remote Reset X6 13 X6 14 X5 11 X5 12 X9 1 X9 2 ...

Page 216: ...nents OPEN the circuit breaker and discharge the closing spring page 23 2 Move the circuit breaker into the withdrawn position in the cradle page 23 3 Remove front panel page 23 4 DANGER Hazardous voltage Will cause death serious personal injury or equipment damage Turn off and lock out all power supplying this device before working on this device WARNING High speed moving parts Can cause serious ...

Page 217: ... 3 Shield to prevent inadvertent operation 4 Mounting plate Catalog No NOTICE Damage to accessory Over tightening the mounting screws may strip the plastic frame or damage components rendering the accessory unusable Hardware shall be tightened carefully until the underside of the screw head is flush with the mounting surface Catalog No Locking set WLLKKT OPEN CLOSE 3 2 1 PZ 1 hand tighten ...

Page 218: ...om pushbutton is released Catalog No NOTICE Damage to accessory Over tightening the mounting screws may strip the plastic frame or damage components rendering the accessory unusable Hardware shall be tightened carefully until the underside of the screw head is flush with the mounting surface NOTE Install the EMERGENCY OFF mushroom pushbutton as shown arrow on the right side Catalog No EMERGENCY OF...

Page 219: ...le manual or electrically operated The mechanical operations counter can be installed only if the circuit breaker is equipped with a motor operated mechanism Knocking out the fields on the front panel Catalog No Catalog No Mechanical operations counter WLNUMCNT 1 2 PZ 1 Front panel knock out Use a suitable base deburr ...

Page 220: ...nstalled in the cell which this lock is installed Up to two independent Kirk or Superior key locks may be installed To activate the lock the circuit breaker must be open If the circuit breaker is closed the locking device is blocked The block is only effective if the key is withdrawn The key can only be removed in the OPEN position page 15 4 3 Racking handle key lock KIRK SUPERIOR Prevents drawing...

Page 221: ...locking mechanism For key lock types KIRK Superior DANGER Hazardous voltage Will cause death serious personal injury or equipment damage Turn off and lock out all power supplying this device before working on this device WARNING High speed moving parts Can cause serious personal injury Discharge the closing spring before inspection and before carrying out any work on the circuit breaker NOTE When ...

Page 222: ...panel Then Install trip unit page 9 49 Install front panel page 23 4 Key lock Manufacturer Catalog No Breaker mounted key lock KIRK WLLKOFFKRK SUPERIOR WLLKOFFSUP deburr Front panel knock out Use a suitable base 3 4 5 6 3 0 x 0 6 2 Nm 18 lb in ...

Page 223: ...the circuit breaker and discharge the closing spring page 23 2 Move the circuit breaker into the withdrawn position in the cradle page 23 3 Remove front panel page 23 4 DANGER Hazardous voltage Will cause death serious personal injury or equipment damage Turn off and lock out all power supplying this device before working on this device 0636_nu ...

Page 224: ...th lock waschers and nuts for FS III only 9 Extension for FS III only 10 Bolt with washer size 5 mm and clip for 4 mm inner diameter groove for 4 mm groove for FS II only 11 Ramp extension for FS III only 12 2x M4 flat head screw for FS III only 13 Small attachment angle 14 2x M4 socket head cap screws 15 Spacer for FS II only 16 Plastic slider slotted FS II III short slot FS II fused long slot 17...

Page 225: ...ck The spacer 5 supplied with the mounting must be used in place of the spacers supplied with the lock For FS II 4 pole and FS III 3 pole only NOTE Attach the lever 4 to the KIRK Superior locks 6 with the screws supplied with the lock Attach the KIRK Superior locks 6 together with the spacer 5 to the lock mechanism using the supplied screws NOTE Omit Step 2 for FS II fused circuit breakers 0709 1 ...

Page 226: ...nd Frame size II 4 pole 1 Guide rail on left side 2 Spacer for FS II must be mounted between angle and guide rail 3 Attachment angle 4 Guide for FS II 5 Guide for ANSI FS II fused Step 3 For FS II fused insert the bolt in to the hole for the long slot 1 2 3 1 3 2 Nm 28 lb in PZ 2 0711_nu 0713_nu A B 1 2 1 1 2 3 1 2 3 3 4 5 3 2 Nm 12 Nm PZ 2 28 lb in PZ 2 106 lb in ...

Page 227: ...adle Step 2 Mounting the guide to the attachment angle Step 3 Mounting the attachment angle to the guide rail Step 4 To connect the lever with the short slot of guide use the long bolt Step 5 To connect the lever with the skid use the short bolt 1 3 2 Nm 28 lb in 3 2 Nm 28 lb in 12 Nm 106 lb in 5 2 4 3 ...

Page 228: ...k out the fields on the front panel using a suitable base 2 Deburr the edges Then Install front panel page 23 4 Function test Check that the locking mechanism on the locks can rotate freely when the keys are turned Check that the spring turns the locking mechanism back to the starting position when it is unlocked By repeatedly drawing out and re inserting the left guide rail check that the carriag...

Page 229: ...ey for Cradle Mounting FSII 4 pole Manufacturer Catalog No Single lock Kirk WL4DLKRK2 Superior WL4DLSUP2 Double lock Kirk WL4DLDKRK2 Superior WL4DLDSUP2 Provision only for Cradle Lock FSII 4 pole Catalog No Lock Provision WL4DLPR2 Lock Key for Cradle Mounting FSIII 4 pole Manufacturer Catalog No Single lock Kirk WL4DLKRK3 Superior WL4DLSUP3 Double lock Kirk WL4DLDKRK3 Superior WL4DLDSUP3 Provision...

Page 230: ...rt OPEN the circuit breaker and discharge the closing spring page 23 2 Move the circuit breaker into the withdrawn position in the cradle page 23 3 Remove front panel page 23 4 DANGER Hazardous voltage Will cause death serious personal injury or equipment damage Turn off and lock out all power supplying this device before working on this device WARNING High speed moving parts Can cause serious per...

Page 231: ...15 12 Pre assembling the locking module Installing 0767 1 2 3 4 6 5 ...

Page 232: ...15 13 1 Socket head cap screw M5 with washer and nut 7 8 Size 4 5 Nm 45 lb in ...

Page 233: ... panel 1 Knock out the fields on the front panel using a suitable base 2 Deburr the edges Then Install front panel page 23 4 Key lock Manufacturer Catalog No Circuit breaker racking handle key lock KIRK WLLKCLKRK SUPERIOR WLLKCLSUP 0044 08 1 2 ...

Page 234: ...is removed the cover cannot be removed and the Bell Alarm cannot be reset 1 Cover with safety lock 2 Trip unit Locking Key lock Manufacturer Catalog No Bell Alarm and open fuse lockout key lock WLTUSC55 Knock out 1 Push outwards not inward 3 2 1 2 1 1 2 Withdraw key ...

Page 235: ...s not possible to insert a circuit breaker into the cradle page 15 20 4 Racking handle Up to 3 padlocks can be used to prevent the racking handle being drawn out The circuit breaker is then locked against being moved page 15 20 5 Spring charging lever The spring charging lever can be locked with a padlock This prevents manual charging of the closing spring page 15 20 6 CLOSE Actuation of the CLOSE...

Page 236: ...n OPEN the circuit breaker and discharge the closing spring page 23 2 Move the circuit breaker into the withdrawn position in the cradle page 23 3 Remove front panel page 23 4 Install the control gate if not already present DANGER Hazardous voltage Will cause death serious personal injury or equipment damage Turn off and lock out all power supplying this device before working on this device WARNIN...

Page 237: ...15 18 Mounting padlock locking bracket Latching plate in control gate Then Install front panel page 23 4 Padlock locking device Catalog No Padlock locking breaker OPEN WLLKNP 1 2 1 2 3 ...

Page 238: ...ng the shutter Field installation of shutter page 18 2 Opening the padlock locking device To unlatch the padlock locking device press the latching pins left and right NOTICE Damage to shutter Applying too many padlocks may damage the shutter mechanism The maximum total weight of the padlocks must not exceed 2 2 lbs 1 kg 0620_nu 1 click click 0621_nu 2 2 2 3 2 0621 2_nu 1 1 0620 2_nu 2 ...

Page 239: ...ndle Draw out circuit breakers are equipped with this locking device as standard Up to three padlocks can be applied to prevent the circuit breaker from being racked into another position 15 2 5 Padlock Locking device for spring charging lever This locking device is an optional accessory for preventing manual charging of the circuit breaker closing spring mechanism It does not pre vent charging vi...

Page 240: ...th serious personal injury or equipment damage Turn off and lock out all power supplying this device before working on this device WARNING High speed moving parts Can cause serious personal injury Discharge the closing spring before inspection and before carrying out any work on the circuit breaker Padlock Locking device Catalog No Locking device for spring charging lever WLHANDLC 2 Knock out 1 ...

Page 241: ... of this circuit breaker can be prevented when this optional accessory is installed The covers for the CLOSE button and the OPEN button can be fitted with up to three padlocks With padlocks applied it is still possible to electrically open and close this circuit breaker ...

Page 242: ...ff and lock out all power supplying this device before working on this device WARNING High speed moving parts Can cause serious personal injury Discharge the closing spring before inspection and before carrying out any work on the circuit breaker NOTICE Damage to accessory Over tightening the mounting screws may strip the plastic frame or damage components rendering the accessory unusable Hardware...

Page 243: ...E button 2 Sealing cover for ETU electronic trip unit 3 Sealing cover for OPEN button Sealing cover for CLOSE OPEN buttons Field installation of sealing cover page 15 23 Sealing cover for ETU electronic trip unit Sealing and locking device page 9 53 ...

Page 244: ...covered in such a way that operation is only possible with a tool page 17 2 2 Cubicle door locking mechanism The cubicle door cannot be opened if the circuit breaker is in the CONNECTED position page 17 3 3 Interlock against racking when cubicle door is open The racking handle cannot be withdrawn if the cubicle door is open 0064 06 04_nu 3 1 2 ...

Page 245: ... Will cause death serious personal injury or equipment damage Turn off and lock out all power supplying this device before working on this device WARNING High speed moving parts Can cause serious personal injury Discharge the closing spring before inspection and before carrying out any work on the circuit breaker NOTICE Damage to accessory Over tightening the mounting screws may strip the plastic ...

Page 246: ...DANGER Hazardous voltage Will cause death serious personal injury or equipment damage Turn off and lock out all power supplying this device before working on this device WARNING High speed moving parts Can cause serious personal injury Discharge the closing spring before inspection and before carrying out any work on the circuit breaker ...

Page 247: ...e 6 1 17 2 2 Cubicle door interlock drill pattern 1 Centerline of breaker front panel 2 Door cutout for breaker front panel 3 Inner side of cubicle door 4 Hole for manual defeat Ø 7 32 inches 5 Hole for manual defeat Ø 7 32 inches Drill this hole only if a manual defeat is required 6 Mounting surface 4 Engage tension spring 5 1 Engage tension spring 2 press hold 3 ...

Page 248: ...ers ISO7089 5 5 2 hex nuts M5 17 2 4 Function check Rack the circuit breaker into the connected position Close the cubicle door Checking the manual defeat function 1 Lock position with circuit breaker closed 2 Device in normal position 3 Device in bypassed position Interlock Order No Door locking mechanism for cradle WLDRLC 1 2 3 ...

Page 249: ... the circuit breaker from the cradle page 23 3 Installing the mechanical interlock DANGER Hazardous voltage Will cause death serious personal injury or equipment damage Turn off and lock out all power supplying this device before working on this device 1 Engage spring 3 2 Engage spring 4 check 5 Base plate of cradle ...

Page 250: ...cradle Draw out circuit breakers and cradles are equiped with a factory coding This coding ensures that only circuit breakers can be inserted whose blade contacts match the contacts of the cradle and whose instanta neous interrupting capacity and rated current correspond to those of the cradle Mechanical interlock Order No Locking device against moving the circuit breaker if the cubicle door is op...

Page 251: ...n be fixed in a closed position and protected against unauthorized opening by means of padlocks page 15 19 1 Shutter 2 Locking strap 3 Locking device 4 Actuator 1 Actuator mounting holes for FS III M class FS III fuse carriage 2 Actuator mounting holes for FS II FS III except M class and fuse carriage 3 Four supports only for the version listed under 2 1 2 3 4 1 2 1 2 3 3 ...

Page 252: ...rn off and lock out all power supplying this device before working on this device NOTICE Damage to accessory Over tightening the mounting screws may strip the plastic frame or damage components rendering the accessory unusable Hardware shall be tightened carefully until the underside of the screw head is flush with the mounting surface 0730_nu 6x 2 1 1 2 3 Nm T 30 28 lb in ...

Page 253: ...shutter Bill of material 1 Shutter subassembly 1 unit 2 Socket head cap screws M6x10 with locking coating 8 units 3 Shutter spring assemblies 4 units Tools required 4 inch slotted type screwdriver 5 5 mm hex socket screwdriver 6 Torque wrench with 5 mm hex socket bit 1 2 3 6 5 4 ...

Page 254: ...at screws are tight and that the shutter mechanism moves freely when opening 1 Danger label 1 Position the shutter subassembly as shown 2 Notice that the danger label was placed on top 3 Carefully position shutter subassembly into cradle Do not apply excessive force to the sliding mechanism 1 1 ...

Page 255: ...ad 5 Locating dowel pins 6 Font tines 7 Front spring bearing 8 Center guide pin tail 1 Inspect the shutter spring assemblies to make sure that the two locating dowel pins 5 are present that the front 7 and rear 3 tabs are at a 90 angle that the front tines 6 are straight and parallel and that the center guide pin is firmly in place at the front and rear as shown If deficiencies are found please co...

Page 256: ...excessive force to the white trumpets when inserting the tines through the side walls if necessary adjust tines using pliers 1 Spread the tines with a turning motion using the slotted type screwdriver clockwise and counterclockwise Check that the shutter spring assembly is firmly in place Attach all four shutter assemblies as described Ensure that the tines are spread 2 After installing and affixi...

Page 257: ...h for tightening torque 31 lb in 10 1 Use a torque wrench to ensure that the eight screws are tightened to a torque of 31 lb in 10 2 Carry out a visual check that the shutter assembly installation looks sqare and 4 trumpets are parallel to side walls Inspect for any crack or bending signs on the four corner of the shutter guides or shutter sliding windows Inspect for and remove any loose parts e g...

Page 258: ...anism 2 To avoid damage to Locking mechanism feature Fold back and latch the wings of the locking device to avoid damage of the shutter while inserting and in racking of the circuit breaker 18 1 2 Catalog numbers Interrupting class Frame size Catalog No Shutter N S H L F II WLGSHUT2 H L F III WLGSHUT3 M fuse carriage III WLGSHUTM3 B A ...

Page 259: ...for CONNECT position S34 WLGSGSW321 Version 2 One form C contact for DISCONNECT position S30 Two form C contacts for TEST position S31 and S32 Three form C contacts for CONNECT position S33 S34 and S35 WLGSGSW6 Version 3 Six form C contacts for CONNECT position S30 S31 S32 S33 S34 and S35 Terminals The TOC accessory is equipped with an integrated terminal block The integrated terminal block is of ...

Page 260: ...contact state Contact open Contact closed Switch Designation Terminal Points Test position Connected position Disconnect position Circuit breaker position S30 S31 S32 S33 S34 S35 TOC Config 3 S30 S31 S32 S33 S34 S35 1 2 4 2 4 2 4 2 4 1 1 1 ...

Page 261: ...essary to wire the TOC prior to installation Then Insert the circuit breaker into the cradle and rack it into the connected position page 6 1 Catalog numbers TOC Version Catalog No 1 CONNECT 1 TEST 1 DISCONNECT WLGSGSW111 3 CONNECT 2 TEST 1 DISCONNECT WLGSGSW321 6 CONNECT WLGSGSW6 2 4 3 1 8 7 ...

Page 262: ...n cables must exceed 20 500 mm 3 The total curvature of the Bowden cable must not exceed 540 degrees 4 When stacking interlocked circuit breakers vertically the interlocking devices shall be vertically aligned with each other 5 Circuit breakers intended to be interlocked must be positioned so that Bowden cables of 6 ft or 15 ft 2 m or 4 5 m length can be laid out per the above requirements 1 4 6 B...

Page 263: ...tions the following designations apply A 1 Output signal 1 E 1 Input signal 1 S 1 Circuit breaker 1 For example in order to couple the output signal 1 of circuit breaker 1 with the input signal 2 of circuit breaker 2 the abbreviation S1 A1 S2 E2 is used The states of the circuit breaker are shown at the front panel Circuit breaker closed Circuit breaker open and not ready to close interlocked Circ...

Page 264: ...transition Description A circuit breaker can be closed only if the other is open Materials required Each circuit breaker has an interlocking module and a Bowden cable Order no page 19 3 Connections of Bowden cables Example Possible circuit breaker states S 1 S 2 1st Bowden cable S1 A1 S2 E1 2nd Bowden cable S2 A1 S1 E1 S1 S2 ...

Page 265: ...terlocked Materials required Each circuit breaker has an interlocking module and a Bowden cables Three additional Bowden cables must be ordered separately Order no page 19 4 Connections of Bowden cables Example Possible circuit breaker states S 1 S 2 S 3 1st Bowden cable S1 A1 S2 E1 2nd Bowden cable S1 A2 S3 E1 3rd Bowden cable S2 A1 S1 E1 4th Bowden cable S2 A2 S3 E2 5th Bowden cable S3 A1 S1 E2 ...

Page 266: ...ot be closed Materials required Each circuit breaker has an interlocking module and a Bowden cable Three additional Bowden cables must be ordered separately Order no page 19 5 Connections of Bowden cables Example Possible circuit breaker states S 1 S 2 S 3 1st Bowden cable S1 A1 S2 E1 2nd Bowden cable S1 A2 S3 E1 3rd Bowden cable S2 A1 S1 E1 4th Bowden cable S2 A2 S3 E2 5th Bowden cable S3 A1 S1 E...

Page 267: ...pendently opened and closed the third S2 being ready to close only if the other two are open If the third is closed the other two cannot be closed Materials required Each circuit breaker has an interlocking module and a Bowden cable A Bowden cable must be ordered separately Order no page 19 6 Connections of Bowden cables Example Possible circuit breaker states S 1 S 2 S 3 1st Bowden cable S1 A1 S2...

Page 268: ...circuit breaker S1 can be opened and closed independently of the two others The two others cancel each other out i e one can only be closed if the other is open Materials required Two of the three circuit breakers S2 S3 each have an interlocking module and a Bowden cable Order no page 19 7 Connections of Bowden cables Example Possible circuit breaker states S 1 S 2 S 3 1st Bowden cable S2 A1 S3 E1...

Page 269: ...page 5 2 Remove front panel and side cover on the right if required page 23 4 19 2 1 Installing intermediate shaft and coupling Fitting WARNING High speed moving parts Can cause serious personal injury Discharge the closing spring before inspection and before carrying out any work on the circuit breaker Frame size Length L mm I 48 II 118 III 232 Mechanical interlooking module with ring 1 ...

Page 270: ... 9 the intermediate shaft must engage in a hole inside the circuit breaker Only then it will be possible working through step 10 to fit the support for the intermediate shaft in the guide of the side wall mechanical interlocking module with ringg 2 3 4 5 Hold 6 7 8 9 ...

Page 271: ...19 10 Function check Then Fit back front panel and side cover on the right if it was removed page 23 4 10 ...

Page 272: ...ain washer 6 2x jam nut penetrates into mounting foot by tightening if necessary prevent jam nut from rotating 7 1x washer with large outside diameter Then Install back the breaker page 5 2 Note If there isn t enough free space for installation on the right side of the circuit breaker inside the cubicle it may be advantageous to pre assemble the Bowden cables on the output side before fitting the ...

Page 273: ...unting the Bowden cables Fitting Bowden cable on output site Securing the Bowden cable Installing the Bowden cable at the input of the circuit breaker to be interlocked 4 1 3 2 5 6 7 0256 2_u R 20 500 mm 1 2 3 4 6 5 7 ...

Page 274: ...ocket head cap screws with toothed lock washers respectively plastite screws with lock washers into the associated index clips if applicable Configurations page 19 1 Insert the draw out circuit breaker into the cradle push into disconnected position close the cubicle door if required and rack it into connected position page 6 1 1 1 1 4 2 3 ...

Page 275: ...ery 1000 operations or at least once every year 3 During the inspection the Bowden cables have to be checked against kinks and abrasions split wires of the exposed steel cable damage to the cable housing and the adjustment unit tube setting with thread and nut and have to be readjusted if necessary In addition the movability of movable parts of the interlocking device in their bearings needs to be...

Page 276: ...larger foreign objects e g tools 20 1 Field installation OPEN the circuit breaker and discharge the closing spring page 23 2 Remove the circuit breaker from the cradle page 23 3 DANGER Hazardous voltage Will cause death serious personal injury or equipment damage Turn off and lock out all power supplying this device before working on this device ...

Page 277: ...x10 3 Socket head cap screw M6x20 Frame size III For frame size III installation is essentially the same but the steps 6 to 9 can be omitted since the related part is already installed 1 2 1 2 Size 5 10 5 4 3 4 5 6 7 7 9 8 8 9 1 2 3 Size 5 8 Nm 71 lb in PH 2 3 2 Nm 28 lb in ...

Page 278: ... numbers Not available for FS II fused circuit breakers Not available for FS III M class Frame size Catalog No Arc chute cover for cradle II WLGARC2 III WLGARC3 Arc chute cover for cradle 4 pole II WL4GARC2 III WL4GARC3 ...

Page 279: ... 1 21 Door sealing frame Dimension drawing of door cutout Front view of the cubicle door 1 Mounting surface of the cradle 2 Center of breaker front panel 3 Eight mounting holes for the door sealing frame ...

Page 280: ...21 2 Installing the door sealing frame Not for use with fuse carriages Catalog No Door sealing frame WLDSF 1 2 3 NOTICE ...

Page 281: ...utout and mounting holes 1 Center of breaker front panel 2 4 mounting holes for hinges 3 Mounting surface of circuit breaker or cradle NOTE Following a short circuit interruption check that the Plexiglas breaker cover is firmly in place and the seal is maintained ...

Page 282: ...tion right and left 5 8 x Socket head cap screws M5 with washer and lock nuts Installation of the right side hinge in the same fashion Handling To open the Plexiglas cover push the hinge pins on the left or right hinge together or to remove the Plexiglas cover unlock both hinges Catalog number Catalog No Plexiglas cover WLPGC ...

Page 283: ...e changed depending on their condition but no later than 12 500 operations in FS II up to 1600 A 3 and 4 pole 10 000 operations in FS II 3200 A 3 and 4 pole 10 000 operations in FS III 3 and 4 pole The switchgear operator must determine the inspection intervals depending on the conditions under which the circuit breaker is used minimum 1 time per year after breaking heavy current After 1000 switch...

Page 284: ...Opening the circuit breaker and discharging the closing spring 1 OPEN the circuit breaker 2 Disconnect secondary circuits 3 CLOSE the circuit breaker 4 Depress the OPEN button again 5 Indications Position Indicator red green Secondary Disconnects ...

Page 285: ...g handle page 6 3 Push in the racking handle Pull circuit breaker into withdrawn position and remove NOTICE Racking Handle Damage Turning the racking handle beyond the stop will cause damage to the racking mechanism When the stop is reached rotate the handle counter clockwise until it can be stowed blue Position indicator red green Stop 2 3 4 1 2 3 1 ...

Page 286: ...azardous voltage Will cause death serious personal injury or equipment damage Turn off and lock out all power supplying this device before working on this device WARNING High speed moving parts Can cause serious personal injury Discharge the closing spring before inspection and before carrying out any work on the circuit breaker 1 1 2 3 PH 2 2 1 3 3 PH 2 2 5 Nm 22 lb in ...

Page 287: ...uit breaker s internal contacts are replaced See Checking contact erosion page 23 10 for evaluation of contact wear and Replacing the circuit breaker internal contact assemblies page 23 11 for internal contact replacement OPEN the circuit breaker and discharge the closing spring page 23 2 Move the circuit breaker into the withdrawn position in the cradle page 23 3 DANGER Hazardous voltage Will cau...

Page 288: ... wear burnout on arc splitter plates replace the arc chutes WARNING Damage to arc chute components Mishandling may lead to broken insulation plates of the arc chute housing and compromised insulation capacity Do not stand arc chutes up when placing them on a table or any other surface outside of the circuit breaker The arc chutes should be placed on their side to prevent breakage of the insulation...

Page 289: ...23 7 23 3 3 Installing arc chutes 1 2 6 5 PH 2 0043 02 3 4 5 6 For frame size III 3 PH 2 ...

Page 290: ... 3 Check position of the 2 screens FS III only 4 Hook the cover carefully into place and fold it down FS III only 5 Insert the screw and tighten to the specified torque 23 3 4 Catalog numbers Interrupting class Frame size Catalog No all II WLARC2 H L F III WLARC3 M III WLARCM3 0043 02 1 2 3 4 5 PH 2 10 Nm 89 lb in ...

Page 291: ...rs which face the arc chutes must not be burned A layer of soot or small spots of collections of molten metal are normal If the powder coating on the inner side of the cover has burned through or damaged this must be replaced Arc chute covers page 20 1 in the opposite order DANGER Hazardous voltage Will cause death serious personal injury or equipment damage Turn off and lock out all power supplyi...

Page 292: ...uit breaker closed 1 Indicator pin 2 Indicator pin is visible in the big recess 3 Indicator pin is no longer visible 4 Arcing tip 5 Arc Chamber If the indicator pin is no longer visible the contact system must be replaced The contact system must also be replaced if the end of the circuit breaker s mechanical service life according to its technical data has been reached due to wear on the copper br...

Page 293: ...t the same time See Checking arc chutes page 23 5 for replacement arc chutes OPEN the circuit breaker and discharge the closing spring page 23 2 Remove the circuit breaker from the cradle page 23 3 DANGER Hazardous voltage Will cause death serious personal injury or equipment damage Turn off and lock out all power supplying this device before working on this device WARNING High speed moving parts ...

Page 294: ...mblies Mounting actuating shaft retainer NOTICE Damage to the operator mechanism Failure to install the actuating shaft retainer will cause the closing spring to discharge and will result in the operator mechanism being misaligned and damaged Follow steps 1 through 5 closely to ensure that the actuating shaft retainer is properly installed 1 1 2 3 PH 2 0640 3 1 2 3 1 2 3 Size 5 mm ...

Page 295: ... 5 3 4 5 Mount and fix main shaft retainer Removing racking shaft Strip off the driving collar of the spring dump mechanism when extracting the racking shaft page 23 21 1 Remove retaining ring 2 Remove crank 3 Pull out racking shaft on the other side 2 1 3 4 5 PH 2 Actuating shaft retainer 3 1 2 ...

Page 296: ... duct 2 Detach connectors 3 Remove current sensor covers 4 Remove current sensors Frame size II unhook the circuit breaker feet 1 Place circuit breaker in upright position remove both circuit breaker feet remove screw 2 Only loosen these screws 2 1 4 3 Size 5 mm 1 2 Loosen only Size 4 mm ...

Page 297: ...lly draw off to view the end position retaining springs 7 Note the position of the end position retaining springs 8 Separate and remove rearwall 9 Remove end position retaining springs Removing upper fixed contacts 1 Remove three bolts and associated nuts 2 Remove fixed contact NOTE Before removing the screws support circuit breaker in such a way that the circuit breaker feet are not supporting th...

Page 298: ...23 16 6 7 8 9 5 2 1 Size 5 mm ...

Page 299: ...Re tighten screws of guide horns with 89 lb ft Installing lower moving contacts Clean and grease bearings and coupling bolts before assembly Grease Isoflex Topas NB 52 Fa Klüber Lubrication München KG Installing lower moving contacts 1 Mount supports for connecting bars 2 Mount central pole assembly 3 Insert coupling bolt 4 Mount external pole assemblies 1 2 3 4 1 Support connecting bars 1 Push ou...

Page 300: ... not pinch or crimp the wires WARNING Reduction of current carrying capacity Incorrect assembly may result in a reduction of contact force which may reduce the current carrying capabilities of the cir cuit breaker After re assembling the circuit breaker housing the contacts should be inspected to make sure that they are aligned and mobile This is accomplished by closing the circuit breaker and obs...

Page 301: ...in self tapping screws not in the existing threads will damage the breaker housing and prevent the sensor cover from beeing secured Tighten the screw as follows Insert the screw by hand with slight inward pressure Rotate the screw counter clockwise by hand until the thread fits Tighten Tighten to a torque of 45 lb in 7 8 9 Size 4 mm 10 Nm 89 lb in 3 4 45 lb in 5 mm 5 Nm Size All upper screws 89 lb...

Page 302: ...ections WARNING Loss of overcurrent protection Incomplete connections of the sensor to the sensor wire harness may result in loss of overcurrent protection Make sure that the connectors are fully inserted and latched when connecting the sensor cable harness to the sensor 0524 1 89 lb in 5 mm 10 Nm 1 2 Size All lower screws 45 lb in 5 mm 5 Nm Size All upper screws 6 5 ...

Page 303: ...he main shaft retainer 3 Remove the main shaft retainer 4 Remove the actuator 5 Attach the cover Installing the racking shaft When inserting the racking shaft slide on the driving collar for the spring dump mechanism Position both flanges of the driving collar in the groove of the circuit breaker housing 0520 to ETU current sensor L1 sensor L2 sensor L3 current current 2 3 4 PH 2 1 5 ...

Page 304: ...ng manually page 6 4 Close page 6 7 1 Indicator pin 2 Indicator pin before adjustment 3 Indicator pin adjusted Using a screwdriver cut the plastic indicator pin along the upper edge of the large recess If the indicator pin is no longer visible the contact system must be replaced 3 2 1 0071 2 1 2 3 screwdriver 10 mm 3 8 blade ...

Page 305: ...ncorrect adjustment of the vertical connections on the circuit breaker may cause damage to the finger cluster assemblies when the circuit breaker is racked into the cradle Adjust the vertical connections according to the dimension drawings on the following pages 0640 4 1 3 2 4 70 Nm 50 ft lb B 0643 02 1 2 3 4 Size 10 mm 70 Nm 50 ft lb A ...

Page 306: ...nd bottom M12 x 60 3200 A N pole top M12 x 75 A Construction Style A B Construction Style B NOTE To achieve correct finger cluster position in frame size II center the vertical adapter of the center pole phase B on the copper connector of the frame and tighten it Shift the vertical adapters 7 of the outer poles phase A B outwards until the specified distance of 5 1 4 is reached and tighten them 06...

Page 307: ...er cluster 1 Reinforced bend of the inner finger clusters can be adjusted as desired Reinforced bend of the inner finger clusters can be adjusted as desired NOTE To achieve correct finger cluster position in frame size III center the vertical adapter of all poles on the copper connector of the frame 1 2 3 4 5 6 ...

Page 308: ... In max A Suitable for circuit breaker types Order No II 800 1600 WLN2A308 WLN2A316 RCS2N10 WLS2A308 WLS2A316 RCS2S10 WLH2A308 WLF2A308 WLH2A316 WLF2A316 WLF2S308 WLF2S316 RCS2H10 WLL2A308 WLL2A316 WLL2S308 WLL2S316 RCS2L10 2000 WLS2A320 RCS2S15 WLH2A320 WLF2A320 WLF2S320 RCS2HF15 WLL2A320 WLL2S320 RCS2L15 3200 WLS2A332 RCS2S30 WLH2A332 RCS2H30 WLL2A332 WLL2S332 RCS2L30 III 4000 5000 WLH3A340 WLF3...

Page 309: ... internal contacts are replaced it is also necessary to replace the arc chutes See Installing arc chutes page 23 7 23 6 11 Mechanical function test Charge the closing spring manually page 6 4 Close page 6 7 Open page 6 7 Check again the wear indicator page 23 10 2 1 3 3 PH 2 2 5 Nm 22 lb in ...

Page 310: ...d discharge the closing spring page 23 2 Remove the circuit breaker from the cradle page 23 3 1 Self tapping M4 screw DANGER Hazardous voltage Will cause death serious personal injury or equipment damage Turn off and lock out all power supplying this device before working on this device 2 1 6 7 8 9 10 1 PZ 2 3 2 Nm 28 lb in 1 2 3 5 4 PZ 2 ...

Page 311: ...über Lubrication Attaching vertical adapter with finger cluster page 23 23 23 7 2 Catalog numbers NOTE Ensure that the shoulder bolt has free play in the slotted holes of the brass bracket of the finger cluster Frame size Max circuit breaker rated current In max A Catalog No Replacement Finger Cluster Kit II 800 1600 WLFNGR10 2000 WLFNGR15 3200 WLFNGR30 III 4000 5000 WLFCK3 Grease used for assemlb...

Page 312: ... cap screw M6 3 Hex head screw M12 1 6x Socket head cap screw M10x40 40Nm 28ft lb and belleville washer 2 Stab tip bridge 3 Vertical bus connector 1 2 3 5 7 6 8 9 8 Nm 71 lb in 70 Nm 50 ft lb 4 1 2 3 Size 5 mm Size 10 mm Size 8 mm 0649 4 2 1 3 FS III only 0649 3 ...

Page 313: ...63LL 2000 WLGST15203LL 3200 WLGST30323LL Stab tip load II 800 1600 2 bolt hole pattern WLGST10163LL 800 1600 4 bolt hole pattern WLGST10163LD 2000 2 bolt hole pattern WLGST15203LL 2000 4 bolt hole pattern WLGST15203LD 3200 WLGST30323LL Stab tip load and line III 4000 5000 WLGST30503LL Grease for contact fingers all all WLGREASE ...

Page 314: ...23 32 23 8 Cleaning and greasing the circuit breaker Finger cluster 1 Greasing points 1 Wipe away old grease and 2 apply new grease 0645 01 1 1 1 ...

Page 315: ...sing points 2 opposite side accordingly 1 Clean the track of the rails and 2 relubricate the designated points Grease Catalog No Isoflex Topas NB52 manufactured by Klüber Lubrication München KG WLBGREASE 0645 02 1 1 2 1 1 ...

Page 316: ...ker efficiency Watts loss at rated In 700 1650 Draw out fused breaker efficiency Watts loss at rated In Consult factory Consult factory Ambient operating temperature ºC 25 to 40 25 to 40 Weights Fused Breaker Breaker Cradle lbs 227 209 152 227 209 152 WL frame ratings Frame size 2 800A 1600A Rating Class N S H L F N S H L F Interrupting current frame Ics kAIC RMS 50 60 Hz 254VAC 50 65 85 100 200 5...

Page 317: ...C RMS 50 60 Hz 508VAC 150 200 85 100 150 200 85 100 150 200 600VAC 200 200 200 635VAC 85 85 85 85 85 85 85 Short time current Icw kA RMS 1 sec 100 85 100 100 85 100 100 Close and latch rating kA RMS 100 85 100 100 85 100 100 Applicable rating plug range 800 3200A 800 4000A 800 5000 A Mechanical make time ms 35 35 35 Mechanical break time ms 34 34 24 Electric close make time ms 50 50 50 Electric tr...

Page 318: ...G 16 spring clamp terminal 2 x AWG 14 2 x AWG 14 2 x AWG 14 2 x AWG 14 2 x AWG 14 2 x AWG 14 2 x AWG 14 Ring 2 x AWG 14 2 x AWG 14 2 x AWG 14 2 x AWG 14 2 x AWG 14 2 x AWG 14 2 x AWG 14 terminal 1 x AWG 10 1 x AWG 10 1 x AWG 10 1x AWG 10 1 x AWG 10 1 x AWG 10 1x AWG 10 system 2 x AWG 16 2 x AWG 16 2 x AWG 16 2 x AWG 16 2 x AWG 16 2 x AWG 16 2 x AWG 16 TOC wire connection size spring Cu max of aux ...

Page 319: ...olerance at 120V AC 240V AC 85 110 Extended tolerance for battery operation at 24 V DC 48 V DC 125 V DC 250 V DC 70 126 Power consumption of the motor 110 W Time required for charging the closing spring 10s For motor and switch on solenoid short circuit protection Short circuit protection Standard slow blow cartridge 24 60 V 6A 110 250 V 3A Auxiliary Release Undervoltage release UVR Operating valu...

Page 320: ...Contact Contact rating Alternating current 50 60 Hz Rated operational voltage 240 V Rated operational current continuous 5A Rated operational current making 8A Rated operational current breaking 5A Direct current Rated operational voltage 24 V 48 V 125 V 250 V DC1 Rated operational current continuous 0 4 A 0 2 A Rated operational current making 0 4 A 0 2 A Rated operational current breaking 0 4 A ...

Page 321: ...20 V Rated operational current continuous 10 A Rated operational current making 6 A Rated operational current breaking 6 A Direct current Rated operational voltage 24 V 24 V 48 V 125 V 250 V Rated operational current continuous 6 A 1 A 1 A Rated operational current making 6 A 0 22 A 0 11 A Rated operational current breaking 6 A 0 22 A 0 11 A ...

Page 322: ...protection Function can be switched ON OFF Extended Instantaneous Protection is enabled when OFF via rotary coding switch Setting range Ii In x 1 5 2 2 3 4 6 8 10 12 0 8 x Icw max OFF Icw EIP Ground fault protection O field installable module Trip and alarm function Detection of the ground fault current by residual summing method Detection of the ground fault current by direct summing method Setti...

Page 323: ...ith ground fault module m r a l a G only with ground fault module Tripped by extended protection or n o i t c n u f y a l e r e v i t c e t o r p n o i t a c i n u m m o C Signal contacts with external CubicleBUS modules opto or relay g n i n r a w t n e r r u c r e v O N O F F O g n i d d e h s d a o L s m 0 0 2 p i r t e m i t g n o l f o l a n g i s y l r a E m r a l a e r u t a r e p m e T e c...

Page 324: ... key pad or communications Setting range Ii In x Ii Icw EIP 1 5 xIn 0 8 x Ics max OFF Icw EIP Ground fault protection O field installable module O field installable module Trip and alarm function via key pad or communications Detection of the ground fault current by residual summing method Detection of the ground fault current by direct summing method Setting range of the Ig for trip A B C D E A E...

Page 325: ...Tripped by extended protection or protective relay function Communication Signal contacts with external CubicleBUS modules opto or relay Overcurrent warning Load shedding OFF ON Early signal of long time trip 200ms Temperature alarm Phase unbalance Instantaneous trip Short time trip Long time trip Neutral conductor trip Ground fault protection trip only with ground fault module only with ground fa...

Page 326: ...rent DIN German Engineering Standard DISCON Disconnected position E Set current for ground fault protection E 1 2 Input signal 1 2 mechanical interlocking ED Duty cycle ESD Electrostatic sensitive device EN European Standard ETU Trip unit electronic trip unit EXTEND Extended additional protection function F1 1st shunt trip F2 2nd shunt trip F3 Undervoltage release F4 Undervoltage release with dela...

Page 327: ... L tripping Isd Current setting value for S tripping L1 Phase 1 L2 Phase 2 L3 Phase 3 L tripping Long time delayed tripping overload LED Light emitting diode M Motor MOC Mechanism Operated Auxiliary Conntacts N Neutral pole NC Normally closed contact NO Normally open contact N tripping Neutral overload tripping PIDG Ring lug style Trademark of AMP PZ 3 6 Crimping tool Weidmüller GmbH S 1 2 3 Circu...

Page 328: ...for test position S48 c signaling switch for disconnected position S50 S53 MOC external auxiliary switches S7 Contact position driven auxiliary switch S8 Contact position driven auxiliary switch S tripping Short time delayed tripping SIGUT Siemens trademark for aux termination technique ST Shunt trip T U ERROR Trip unit error TEST Test position tg Delay time for G tripping TOC Truck operated cell ...

Page 329: ...WAGO Kontakttechnik München X Terminal designation according to DIN ZSI Zone Selective Interlocking Iavg Present average of current Iavglt Long term average of current ITHD Distortion factor of current UTHD Distortion factor of voltage ...

Page 330: ...rface adapter for converting c signals to PROFIBUS DP MODBUS signals and vice versa providing three potential free outputs for control functions OPEN CLOSE 1 freely available one input freely usable for control information from the switchgear Additional function for draw out circuit breakers detecting the circuit breaker position in the cradle by means of signaling switches S 46 S 47 and S 48 c Bu...

Page 331: ...ter Shutters are insulation plates for covering live main circuits in the cradle shock protection Signaling switch for circuit breaker position TOC These auxiliary switches operate according to the circuit breaker position in the cradle Truck operated contact Spring charging lever The closing spring is charged by several pumping operations Energy transformer Power supply for the trip unit Tool ope...

Page 332: ... Manual reset 10 2 Mechanism operated contacts 12 7 MOC 12 7 Motor disconnect switch 13 3 Motor operated mechanism 13 1 Mounting position 5 2 Mutual mechanical interlocking 19 1 O Opening the circuit breaker 6 7 Options for guide frame 18 1 P Packing 4 1 Padlocking facilities 15 16 Positions of the circuit breaker in the guide frame 6 2 Q Qualified Personnel 3 1 R Racking circuit breaker into conn...

Page 333: ......

Page 334: ...Siemens Industry Inc Norcross GA 30092 Technical assistance 1 800 241 3138 www usa siemens com powerdistribution Version No CBIM 02000 0814 ...

Reviews: