8-42
TROUBLESHOOTING
Contents
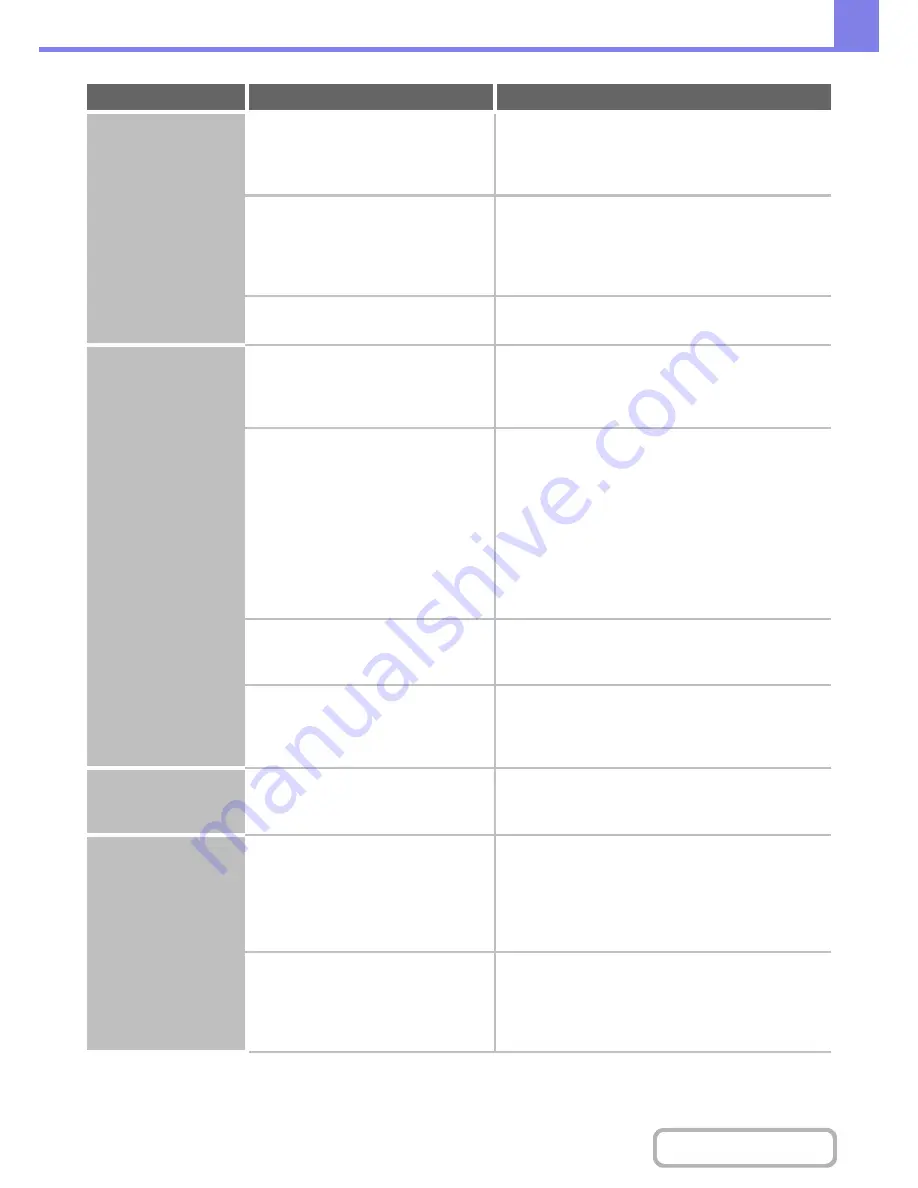
Smudges appear on
printed output.
Are you using paper that is not within
the specifications?
Use SHARP-recommended paper. Using paper that is
for other models or special paper that is not supported
may result in misfeeds, creases, or smudges.
☞
"SUPPLIES" in the Safety Guide
Are you printing on pre-punched paper?
If the printed image overlaps the punch holes, smudges
may appear on the reverse side of the paper following
one-sided printing, or on both sides following two-sided
printing. Take care that the image does not overlap the
punch holes.
Does a message appear indicating the
need for maintenance?
Contact your dealer or nearest SHARP Service
Department as soon as possible.
Toner does not adhere
well or creases appear
in the paper.
Are you using paper that is not within
the specifications?
Use SHARP-recommended paper. Using paper that is
for other models or special paper that is not supported
may result in misfeeds, creases, or smudges.
☞
"SUPPLIES" in the Safety Guide
Did you set the correct paper type?
Set the correct paper type in the tray settings. Make
sure that the following has not occurred:
• Heavy paper is being used, but a paper type other
than heavy paper is selected in the tray settings. (The
image may disappear if rubbed.)
• Paper other than heavy paper is being used, but
heavy paper is selected in the tray settings. (This may
cause creases and misfeeds.)
➞
System Settings > "Paper Tray Settings" > "Tray
Settings"
Is the paper loaded so that printing
takes place on the reverse side?
If printing takes place on the wrong side of label sheets
or transparency film, the toner may not adhere well and
a clear image may not be obtained.
Is a suitable paper weight set?
Setting a suitable paper weight in the system settings
(administrator) may improve toner adherence.
➞
System Settings (administrator) > "Device Control" >
"Fusing Control Settings"
Print quality is poor.
Is "Toner Save Mode" enabled?
When "Toner Save Mode" is enabled, printing takes
place using less toner and thus the print result is lighter.
Check with your administrator.
Part of the image is
cut off.
Has the correct paper size been set?
If you are using a special size, be sure to specify the
paper size.
If the size of paper loaded in a tray was changed, be
sure to check the paper size setting.
➞
System Settings > "Paper Tray Settings" > "Tray
Settings"
Was the original placed in the correct
position?
If you are using the document glass, be sure to place
the original in the far left corner of the document glass.
☞
1. BEFORE USING THE MACHINE "
PLACING
THE ORIGINAL ON THE DOCUMENT GLASS
"
(page 1-40)
Problem
Point to check
Solution
Summary of Contents for MX-M283
Page 11: ...Conserve Print on both sides of the paper Print multiple pages on one side of the paper ...
Page 35: ...Organize my files Delete a file Delete all files Periodically delete files Change the folder ...
Page 277: ...3 18 PRINTER Contents 4 Click the Print button Printing begins ...
Page 850: ......
Page 851: ......
Page 882: ......
Page 883: ......


