


Basic sensor cable installation
Intelli-FLEX II product guide • • • 5 - 7
•
Do NOT subject the sensor cable to more than 4.5 kg (10 lbs) of tension at
any time during the installation.
•
Always apply consistent tension to the cable while it is being attached to the
fence.
•
Use UV resistant nylon cable ties to secure the cable to the fence fabric.
•
Install the cable ties by hand, tightening them enough to hold the cable
securely against the fence.
Do not use mechanical devices to tighten the tie wraps.
•
Attach the sensor cable to the midpoint of the chain link. Do not attach sensor
cable to the intersecting points (where two fence wires intersect).
•
Space the cable ties every 25 to 30 cm (10 to 12 in.) along the sensor cable.
•
Do not attach the sensor cable to tension wires. Insufficient mechanical
contact between these wires and the fence fabric may prevent the sensor
cable from adequately detecting vibrations.
•
Attach the sensor cable at least 30 cm (1 ft.) away from horizontal support
bars and other cables.
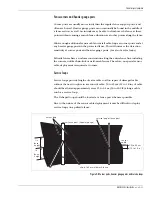
For high security applications, or for additional security
for all applications, Senstar recommends using two
galvanized wire ties on each fence panel, in addition to
the nylon cable ties. Twist the wire ties to hold the
sensor cable snugly against the fence fabric, then
flatten the twisted wire against the fence. Do not over-
tighten the wire ties, or the sensor cable response may
be affected.
Installation instructions
For fences other than chain-link or weld-mesh, refer to
cable installation on different fence types.
The following procedure requires two people.


