


User Manual
Reference number: 4111A-RADAR4600-GBD-R1.1
Date: 27 February 2018
Page 140 of 149
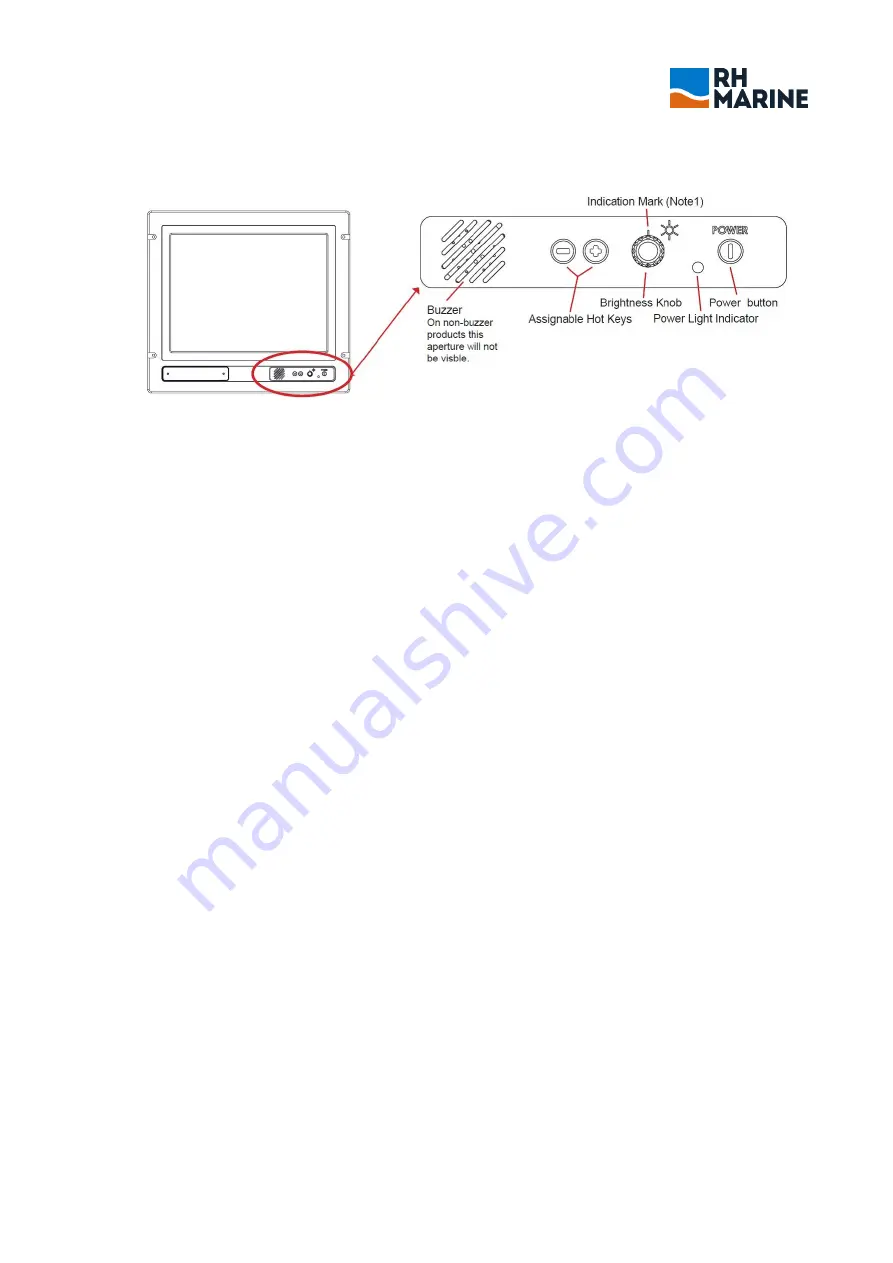
Power ON:
To turn the unit on, press down the power button. The power light indicator (LED) will illuminate
green. (If no signal is detected, the screen will be black and the power light indicator (LED) will illuminate
red).
Power OFF:
To turn the unit off, press and hold the power button down for 3 seconds. The power light
indicator will be off/black.
10.2
Brightness adjustment controls
The unit features a 100% dimmable image, which means it is capable of displaying a completely black image
when the BRIGHTNESS knob is turned fully to the left.
NOTE 1:
For ECDIS systems the brightness knob indication mark should be aligned directly with the
indication mark located on the label. (See illustration FIG1 / FIG2)
NOTE 2:
The design and placement of the user / osd controls may vary slightly from product to
product due to product evolution, however the overall usage is unchanged.
10.2.1
Automatic Power Light Dimming
The unit features a Power LED Dimmer function, which controls the light intensity of the power light
indicator. There are two different solutions for this feature:
Intelligent Auto Power LED Dimmer, which controls the light intensity based on the environment
lightning. This can also be manually adjusted using the LED adjust knob on the rear side of the
display.
The light intensity is regulated according to the backlight, which is according to the set brightness knob.
With the exception that when the backlight brightness is zero, the power LED is just visible in dark
environment. This means that the power LED is not visible in daylight, when the brightness knob is
turned fully to the left.
Note:
If there is a LED adjustment knob at the connection area of the display as described in
“INSTALLATION AND RECOMMENDATIONS”
chapter, the manner of operation
described in paragraph one applies.
For displays produced after the creation date of this manual, paragraph two applies. For
displays produced before year 2002, paragraph one applies.
Basic settings and further information about Hatteland Displays,
- see separate manual !