


Chapter 6 - Maintenance
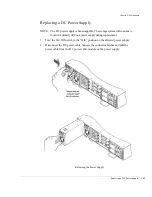
Replacing the Disk I/O Card
154
5
Insert the dust covers on the transceiver when they have been removed. This will
protect the optics.
6
Using a flat-blade screwdriver, loosen the two captive fastener screws that secure
the card.
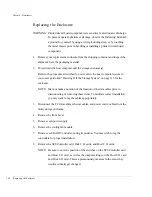
Removing the Disk I/O Card
7
Using the captive fastener screws, gently pull the card from the enclosure.
8
Note the position of the jumpers on the faulty card.
9
Remove the new replacement card from the shipping container and inspect for
obvious damage. Save the packaging materials.
10
Set the jumpers to match those on the faulty card being replaced.
11
Insert the replacement card by aligning it into the rail guides and push the card
until it fully seats.
Tighten the two captive fastener screws. Do not overtighten the screws.
12
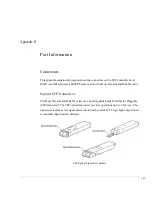
Insert the transceiver(s) into each of the SFP cages located on the Disk I/O card.
Summary of Contents for OmniStor 4900F Series
Page 1: ......
Page 2: ......
Page 4: ......
Page 38: ...Chapter 1 Getting Started Audible Alarm 24...
Page 58: ...Chapter 2 Topologies and Operating Modes Application of Availability 44...
Page 128: ...Chapter 3 Setup and Installation Powering Off the Storage System 114...
Page 156: ...Chapter 5 Troubleshooting Problems During Bootup 142...
Page 178: ...Chapter 6 Maintenance Replacing the Enclosure 164...
Page 182: ...Appendix A Technical Information Specifications 168...
Page 196: ...Index 182...