


Chapter 6 - Maintenance
Replacing a Disk Drive
152
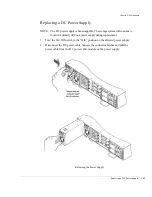
The drive carrier has tension clips which ensures that the drive fits very tight. It
requires some force to remove or install the drive.
4
Remove the replacement disk drive from its shipping container and remove the
anti-static protection packaging.
Inspect the drive for obvious damage. Save the packaging material.
5
Install the replacement disk drive.
a
Align the drive carrier with the rail grooves in the drive bay.
b
Ensure that the drive seats completely. The drive carrier tension clips ensure
that the disk drive fits very tight, so it requires some force to push the drive
into its bay.
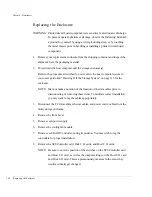
Installing the Disk Drive
6
Re-install and secure the front bezel. Using a Phillips screwdriver, rotate the
fasteners clockwise one-quarter turn to lock.
7
Using the packaging materials from the replacement disk drive, repackage the
failed drive and return it per your RMA instructions.
Summary of Contents for OmniStor 4900F Series
Page 1: ......
Page 2: ......
Page 4: ......
Page 38: ...Chapter 1 Getting Started Audible Alarm 24...
Page 58: ...Chapter 2 Topologies and Operating Modes Application of Availability 44...
Page 128: ...Chapter 3 Setup and Installation Powering Off the Storage System 114...
Page 156: ...Chapter 5 Troubleshooting Problems During Bootup 142...
Page 178: ...Chapter 6 Maintenance Replacing the Enclosure 164...
Page 182: ...Appendix A Technical Information Specifications 168...
Page 196: ...Index 182...