Main Mode: Using the Unit Connected to a Network
81
M
a
in M
o
de
• While the rec during upload function is enabled, the setting
values in the menu “NETWORK” (
➝
page 105) cannot be
changed or initialized.
• The copying between the P2 cards will not operate during
the transmission or waiting to transmit the clips registered in
the upload list.
• The clip delete function will not operate during the transmis-
sion or waiting to transmit the clips registered in the upload
list.
• The format function of the P2 card will not operate during the
transmission or waiting to transmit the clips registered in the
upload list.
• If a file that exceeds 4 GB was recorded with the “FILE
SPLIT” (
➝
page 98) menu item set to “ONE FILE,” that file
cannot be copied.
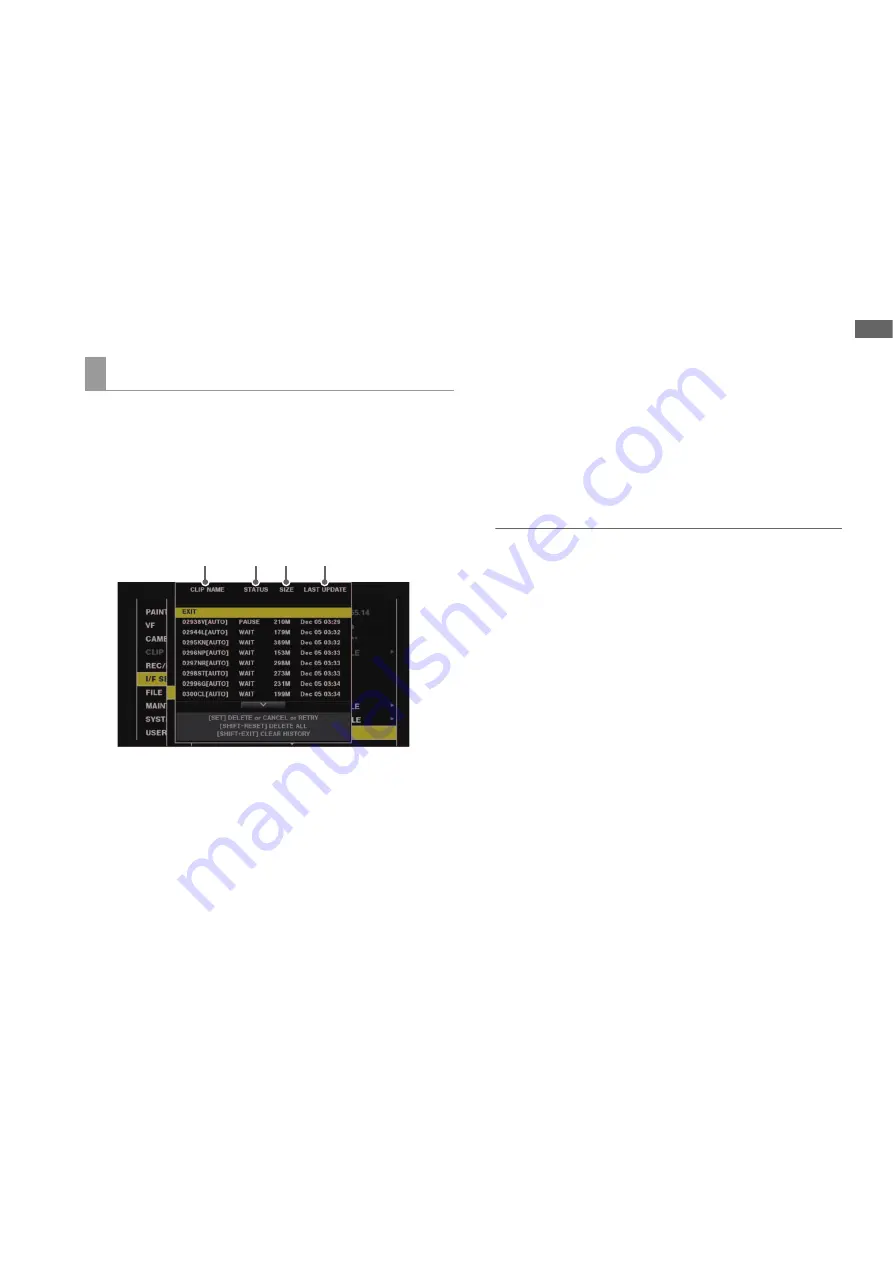
The upload list allows you to check the transfer status of clips
to be uploaded.
1
Select the menu “UPLOAD LIST” (
➝
page 105).
The upload list is displayed.
Upload list screen
1)
CLIP NAME
Displays clip names. For the clip where automatic transfer
is set, “AUTO” is displayed after the clip name.
2)
STATUS
Displays the upload status.
OK:
Uploaded
ERROR:
Upload failed
PAUSE:
Preparing the upload
COPY:
Uploading
WAIT:
Waiting for upload
3)
SIZE
Displays the file size.
4)
LAST UPDATE
Displays the date and time “STATUS” display changed.
Operations on the upload list screen
You can delete, cancel, or re-transfer items from the upload
list.
1
Use the up or down cursor button to select an item in
the upload list and then press the [SET] button.
2
Perform one of the following operations.
• To delete the item, use the up or down cursor button to
select [DELETE].
• To cancel the upload, use the up or down cursor button
to select [CANCEL].
• To re-transfer the item, use the up or down cursor button
to select [RETRY].
• To delete all items, press the [SHIFT] button and the [RE-
SET] button simultaneously. A confirmation screen ap-
pears. Use the up or down cursor button to select [YES].
The current log of the clip information registered to the
upload list will also be deleted at this time.
• To delete the history (items of which [STATUS] is [OK] or
[ERROR]), press the [SHIFT] button and [EXIT] button at
the same time. A confirmation screen appears. Use the
up or down cursor button to select [YES].
Note:
• If the [STATUS] display changes while displaying the upload
list, the screen is not updated.
• Save up to the latest 1000 logs for clip information (month
and date, clip number (global clip ID), status) registered in
the upload list to an SD memory card.
Displaying the upload list
1)
2) 3)
4)


