18
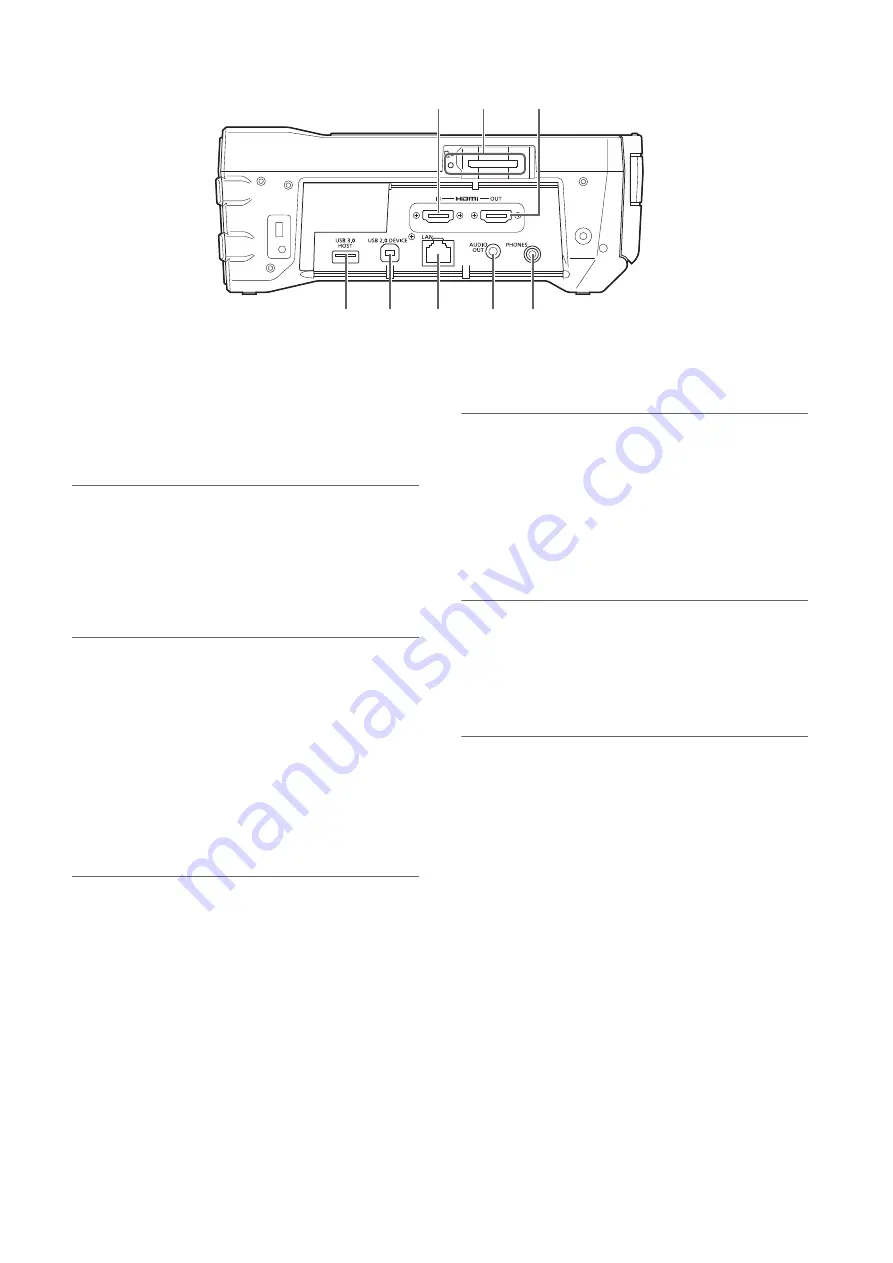
Control Reference Guide: Slots and I/O Controls
1.
SD/SDHC/SDXC memory card slot and access lamp
Insert an SD/SDHC/SDXC memory card.
Insert the cut-corner-edge first with the label-side up, until
the card latches into place.
When removing a card, check that the access lamp is not
lit green, then release the latch by gently pushing the card
in again.
Note:
Use SD/SDHC/SDXC memory cards for reading the CPS pass-
word, reading and writing menu settings, reading and writing
metadata, and proxy recording.
(
➝
“Using SD/SDHC/SDXC Memory Cards” page 29)
2.
HDMI OUT connector
Connect a monitor or TV using an HDMI cable.
Note:
• This unit does not support Viera Link. Be aware that con-
necting a Viera Link compatible device using an HDMI cable
may cause Viera Link to malfunction on the other device.
• Use a double-shielded cable to connect to this port.
• When “VIDEO” - “INPUT SEL” is set to “HDMI”, EE video, au-
dio, and other signals from the HDMI output connector will
not be output. In addition, the thumbnail screen will not be
output.
3.
HDMI IN connector
Use an HDMI cable to connect a camera recorder, etc.
here.
Note:
• This unit does not support Viera Link. Be aware that con-
necting a Viera Link compatible device using an HDMI cable
may cause Viera Link to malfunction on the other device.
• Use a double-shielded cable to connect to this port.
• When HDCP signals are detected, external output is
stopped and recording will not be possible. In addition, the
thumbnail screen will not be output.
• This unit does not support 60 Hz JUST frequency signals.
For the input signals, use 59.94 Hz or 50 Hz signals. Even
when using 59.94 Hz or 50 Hz signals, if there is a discrep-
ancy in the frequency, reception will not be possible (in the
case of some computers, for example).
• When an input signal cannot be received, the “INVALID
INPUT FORMAT
”
warning will be displayed and the video
will be black and muted.
4.
USB 3.0 HOST port (USB 3.0 Type A)
(
➝
“Connecting an External Device via the USB HOST
Port” page 57)
Note:
• Use a double-shielded cable to connect to this port.
• Use a USB 3.0 compliant cable to connect USB 3.0 compat-
ible storage devices.
• When using this unit with the battery, externally supply pow-
er to any storage device connected to the [USB3.0 HOST]
port.
5.
USB 2.0 device port
(
➝
“USB Device Mode” page 82)
Note:
Use a double-shielded cable to connect to this port.
6.
LAN port
This port enables a 100BASE-TX/10BASE-T network con-
nection.
(
➝
“Using the Unit Connected to a Network” page 65)
Note:
• Use a shielded cable to connect to this port.
• The orange lamp lights when a LAN link is established. The
green lamp flashes while data is being transferred.
7.
AUDIO OUT connector
Outputs the audio signals (CH1 to CH4) selected in the
“MONITOR CH” (
➝
page 104) menu item.
8.
PHONES (Headphone) jack
Headphone jack:
This jack is for connecting stereo headphones to listen to
the sound being recorded or played back with the head-
phones.
8
1
3
2
4
5
7
6


