Remove the Fan Assembly Door From the Server
66
Oracle Server X5-2L Service Manual • May 2015
1.
Ensure that the AC power cords are disconnected from the server power
supplies.
2.
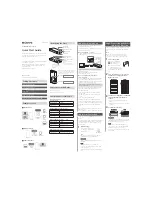
Use a No. 2 Phillips screwdriver to remove the screws that secure the fan
assembly door [1].
■
If your system is configured with twelve 3.5-inch storage drives, remove the
two screws on each side of the chassis and the three screws on top of the
chassis.
■
If your system is configured with twenty-four 2.5-inch storage drives,
remove the two screws on each side of the chassis.
FIGURE 10
Removing the Fan Assembly Door
3.
Slide the fan assembly door toward the rear of the server, and lift and remove the
door from the chassis [2].
Related Information
■
“Take Antistatic Measures” on page 64
■
“Remove the Server Top Cover” on page 64
■
“Install the Server Top Cover” on page 226
■
“Install the Fan Assembly Door” on page 228
Summary of Contents for X5-2L
Page 1: ...Part No E48333 04 May 2015 Oracle Server X5 2L Service Manual ...
Page 2: ......
Page 12: ...12 Oracle Server X5 2L Service Manual May 2015 ...
Page 24: ...24 Oracle Server X5 2L Service Manual May 2015 ...
Page 50: ...50 Oracle Server X5 2L Service Manual May 2015 ...
Page 70: ...70 Oracle Server X5 2L Service Manual May 2015 ...
Page 100: ...100 Oracle Server X5 2L Service Manual May 2015 ...
Page 268: ...268 Oracle Server X5 2L Service Manual May 2015 ...
Page 292: ...292 Oracle Server X5 2L Service Manual May 2015 ...