250
Installing Accessories
Installing Tray 2
Note
Since consumables are installed in the machine, be sure to keep the machine
level when moving it in order to prevent accidental spills.
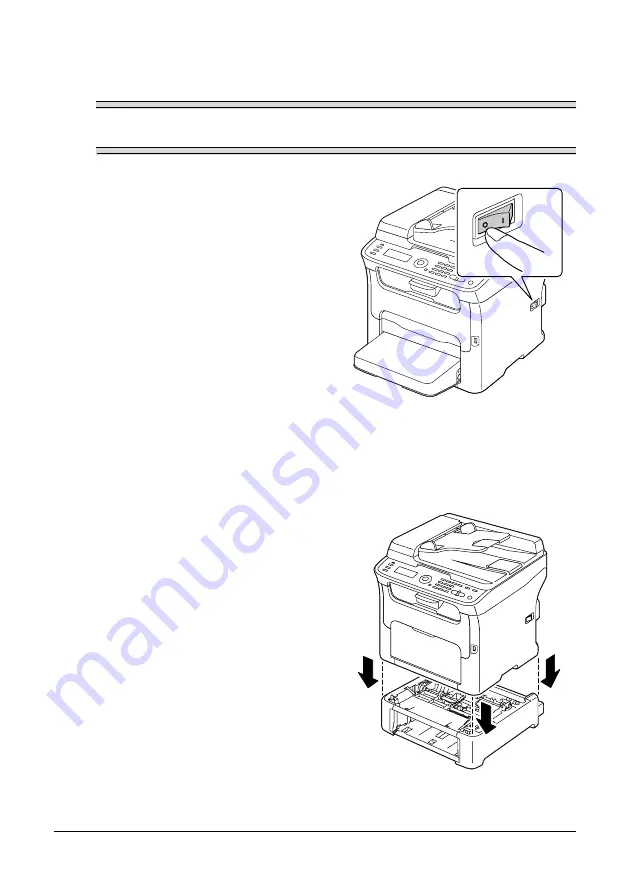
1
Turn off the machine and discon-
nect the power cord and interface
cables.
2
Remove the dust cover from Tray 1.
Close Tray 1 and the output tray.
3
Prepare the lower feeder unit.
"
Be sure to place the lower feeder unit on a level surface.
4
Lift the machine and place it on top
of the lower feeder unit, making
sure that the positioning pins on the
lower feeder unit correctly fit into the
holes on the bottom of the machine.
Summary of Contents for MC160N
Page 1: ...User Guide Print Copy Scan Modes 59320401 my okidata com MC160n MFP...
Page 9: ...1Introduction...
Page 21: ...1Control Panel and Configuration Menu...
Page 40: ...40 Control Panel and Configuration Menu FAX RX OPERATION REPORTING SCAN SETTING...
Page 76: ...2Media Handling...
Page 91: ...91 Media Handling 6 Reattach the lid to Tray 2 7 Reinsert Tray 2 into the machine...
Page 101: ...2Using the Printer Driver...
Page 108: ...3Using the Copier...
Page 121: ...4Using the Scanner...
Page 150: ...150 Using the Scanner...
Page 151: ...5Replacing Consumables...
Page 174: ...174 Replacing Consumables...
Page 175: ...6Maintenance...
Page 199: ...7Troubleshooting...
Page 213: ...213 Troubleshooting Note Do not touch the wires and flat cable shown in the illustration...
Page 217: ...217 Troubleshooting 7 Load the media in Tray 2 and attach the lid 8 Reinsert Tray 2...
Page 218: ...218 Troubleshooting 9 Open and close the scanner unit to clear the missfeed message...
Page 222: ...222 Troubleshooting 3 Close the duplex cover...
Page 247: ...3Installing Accessories...
Page 260: ...Appendix...


