background image

Stapler Sorter-F2

5-43

3

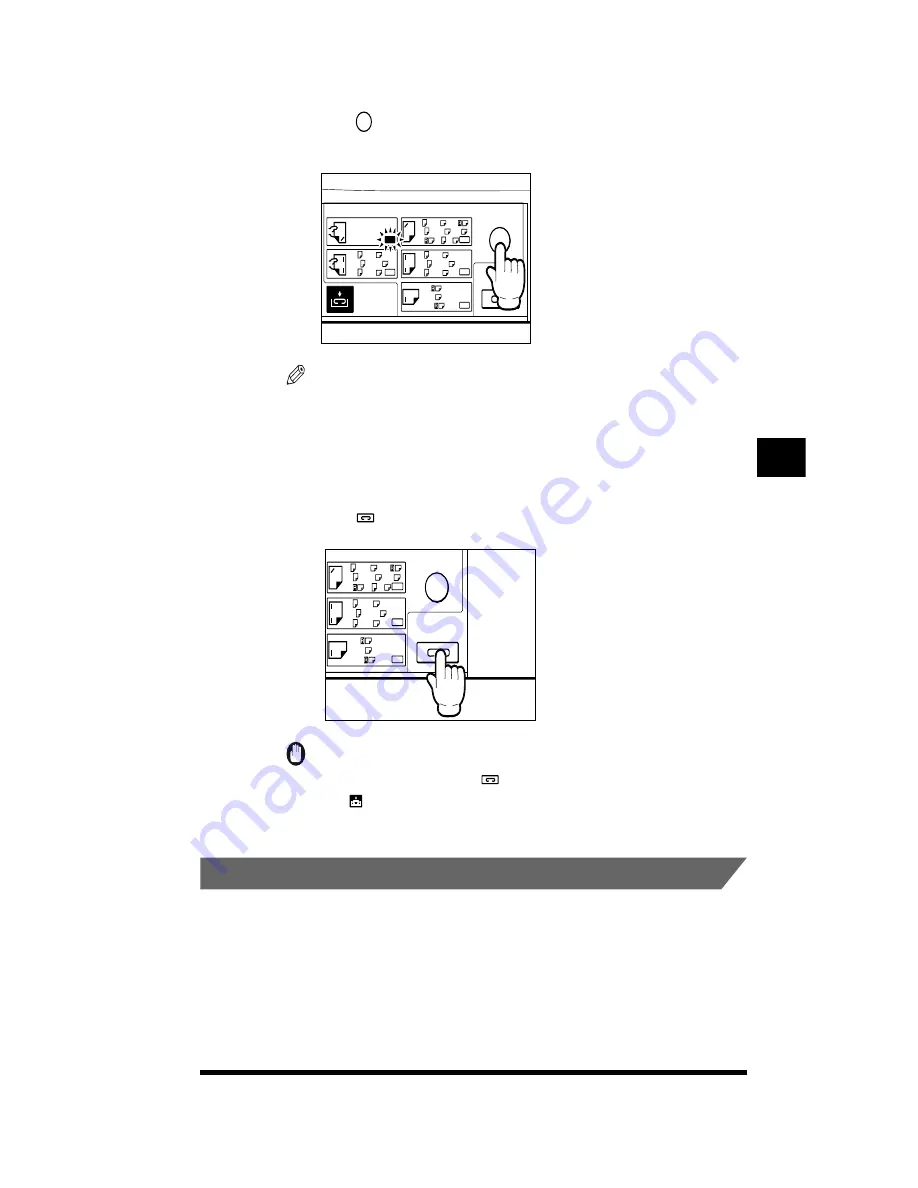
Press 

 (Staple Position) as many times as needed to select 

the desired stapling position.

NOTE

.

The position where insert stapling can be done varies depending on the paper size.
- Corner stapling:  11" x 17", LGL, LTR, LTRR
- Double stapling: 11" x 17", LGL, LTR
- Single stapling:  Cannot be selected.

4

Press 

 (Stapling Start/Stop).

IMPORTANT

.

You cannot staple the copies if 

 (Stapling Start/Stop) is not lit.

If the 

 (Load Staples) indicator is lit, the stapler is out of staples. Replace the 

staple case. (See “Replacing the Staple Case,” on p. 5-59.)

.

Limitations of the Stapler Sorter

By making copies pass through the buffer pass unit, the stapler sorter prevents 
paper curl, which hampers sorting and stapling. However, depending on the copy 
exposure setting, the following situations can occur.

A4

A3

LTR 11x17
B5

B4

A4

A3

LTR 11x17
B5

B4

A4
LTR 11x17

B5

LGL

LGL
LTR

A4

A3

B4

A4

LTR

Staple Position

Manual Staple

Manual Insert Stapling

Stapling

Start/Stop

A4

A3

LTR 11x17
B5

B4

A4
LTR 11x17

B5

LGL

LGL
LTR

A4

A3

B4

A4

LTR

Staple Position

Manual Staple

Stapling

Start/Stop

Handling Options

5

Summary of Contents for CS120

Page 1: ...Oc CS120 125 Oc CS120 125 Reference Guide...

Page 2: ...in modifications in order to provide the very best product available in its class Your Oc CS120 125 is also backed by the same Oc service organization that is world renowned for exceptional service re...

Page 3: ...COLOR LASER COPIER 1180 1140 Reference Guide0 Ot i o j...

Page 4: ...Please refer to them for detailed information About the Manuals for the Machine Basic Operation Troubleshooting Copying Guide Reference Guide This Document Copying Instructions The product illustratio...

Page 5: ...leshooting 4 Chap 5 Handling Options 5 Chap 6 Appendix 6 Includes the Copier Specifications and Index How the Reference Guide Is Organized Considerable effort has been made to make sure that this manu...

Page 6: ...xix Consumables xxi Others xxi Legal Limitation on Usage ofYour Product and the Use of Images xxii Chapter 1 BeforeYou Start UsingThis Copier About the Installation Location and Handling 1 3 Installa...

Page 7: ...s Complete 1 31 Universal Functions 1 33 Auto Power off Function 1 33 Energy Saver Mode 1 33 Auto Drawer Switching Function 1 33 Auto Clear Function 1 34 Paper Supply Indicator 1 34 Guide Function 1 3...

Page 8: ...g the Auto Clear Time 2 32 Changing the Auto Energy Saver Time 2 33 Changing the Auto Power off Time 2 33 Adjusting the Copier Adjustment Cleaning 2 35 Fine adjusting the Zoom When Differences in the...

Page 9: ...e Drawers 4 13 Removing Paper Jams in the Duplexing Unit CLC 1180 only 4 15 Removing Paper Jams in the Stack Bypass 4 18 Removing Paper Jams in the Paper Transport Area 4 20 Removing Paper Jams in the...

Page 10: ...Removing Paper Jams in the Paper Deck 5 31 Specifications 5 34 Stapler Sorter F2 5 35 Parts and Their Functions 5 36 Functions of the Stapler Sorter 5 37 Sort Function 5 37 Group Function 5 38 Staple...

Page 11: ...ix Buffer Pass Unit 5 69 Control Card 5 70 Before Copying 5 70 After Copying 5 71 Dedicated Printer Device 5 71 Chapter 6 Appendix Copier Speci cations 6 2 Index 6 4...

Page 12: ...rmed correctly In order to use the machine safely always pay attention to these warnings CAUTION Indicates a caution concerning operations that may lead to injury to persons or damage to property if n...

Page 13: ...l display The keys which you should press are marked with as shown below When multiple keys can be pressed on the touch panel display all keys are marked Select the keys which suit your needs This mac...

Page 14: ...to correct the interference at his own expense Do not make any changes or modifications to the equipment unless otherwise specified in the manual If such changes or modifications should be made you co...

Page 15: ...in hazardous radiation exposure Canon the Canon logo CLC and the GENUIN logo are trademarks of Canon Inc Other product and company names herein may be the trademarks of their respective owners Copyri...

Page 16: ...owerpots and other containers lled with water or liquids CAUTION Do not install the machine in unstable locations such as on unsteady platforms or on inclined oors or in locations subject to excessiv...

Page 17: ...shock Insert the power cord completely into the outlet as failure to do so may result in a re or electrical shock As a general rule do not use extension cords Using an extension cord may result in a r...

Page 18: ...moving the machine Otherwise the power cord or interface cable may be damaged resulting in re or electrical shock Do not drop paper clips staples or other metal objects inside the machine Also do not...

Page 19: ...s during consecutive holidays Do not place your hand in the part of the bins where stapling is performed when a Stapling Sorter is attached as this may result in personal injury Laser light can be har...

Page 20: ...xviii Do not remove the caution label attached to the cover of the laser scanner unit If the laser beam escapes form the machine exposure may cause serious damage to your eyes...

Page 21: ...use a short circuit and result in a re Clean the machine using a rmly wrung cloth dampened with a mild detergent mixed with water Do not use alcohol benzene paint thinner or other ammable substances I...

Page 22: ...s will dirty your hands or clothing If they become dirty wash them immediately with cold water Washing them with warm water will x the toner and make it impossible to remove the toner stains When remo...

Page 23: ...g inside the bottles to ignite resulting in burns or a re Do not store toner bottles xing oil bottles or copy paper in places exposed to open ames as this may cause the toner oil or paper to ignite re...

Page 24: ...thorized Use of Copier The CLC 1180 1140 is provided with a Security key to ensure that only authorized copies are made The use of this key should be strictly supervised Legal Limitation on Usage of Y...

Page 25: ...and Functions 1 18 Turning On and Off the Copier 1 20 Turning On the Power 1 20 Turning Off the Power 1 23 Using the Touch Panel Display 1 24 Frequently Used Keys on the Touch Panel Display 1 24 Unde...

Page 26: ...1 2 1 Before You Start Using This Copier Auto Clear Function 1 34 Paper Supply Indicator 1 34 Guide Function 1 35 Before You Start Using This Copier 1...

Page 27: ...ions Installation Precautions Avoid Installing the Copier in the Following Locations Avoid locations subject to extremes of temperature and humidity whether low or high For example avoid installing th...

Page 28: ...tended period of time in a poorly ventilated room It is recommended that you ventilate the room to make the working environment as comfortable as possible Avoid locations where a considerable amount o...

Page 29: ...the copier during a Copy job can adversely affect the operation of such equipment Avoid installing the copier near televisions radios or similar electronic equipment The copier might interfere with so...

Page 30: ...Doing so might cause a re The power cord may become damaged if it is often stepped on or if heavy objects are placed on it Continued use of a damaged power cord can lead to an accident Provide Adequat...

Page 31: ...subject to high voltages and temperatures Take adequate precaution when inspecting the inside of the copier Do not carry out any inspections not described in this manual Be careful not to drop any fo...

Page 32: ...e copier in this state may cause a re or an electric shock Also avoid placing objects around the plug so that the copier can be unplugged whenever necessary Do not turn the power switch off or open th...

Page 33: ...extended period of time in a poorly ventilated room It is recommended that you ventilate the room to make the working environment as comfortable as possible For safety reasons turn off the power swit...

Page 34: ...tions that can be attached to the copier NOTE The parts colored in gray are options Some of the options may require the use of an installation kit that comes packaged with the product Options and Thei...

Page 35: ...n be placed on the Document Tray The inside of the tray can also be used for storing originals copy paper manual or other objects d Control Card The Control Card facilitates the management of the numb...

Page 36: ...vides you with the names of all the parts on the outside and inside of the main unit the control panel and the touch panel display as well as describes their individual functions External View Color L...

Page 37: ...the copier and preventing unauthorized copies See In Order to Avoid Unauthorized Use of Copier on p xxii f Power switch Press to the side to turn the power on See Turning On and Off the Copier on p 1...

Page 38: ...eed copying e Security key For managing the use of the copier and preventing unauthorized copies See In Order to Avoid Unauthorized Use of Copier on p xxii f Power switch Press to the side to turn the...

Page 39: ...ough their respective ports g Toner box Pull the toner box out to refill toner h Right front door Open this door when clearing a paper jam i Transfer drum knob Feeds paper around the transfer drum j R...

Page 40: ...nal is in black and white or color e Full Color key Press to make copies in full color f Black key Press to make copies in black and white only g Original Recognition key Press to turn the copier s fu...

Page 41: ...the Department ID Management function q Interrupt key Press to interrupt a Copy job when you need to make priority copies r Additional Functions key Press to specify Additional Functions s Touch panel...

Page 42: ...pecial Features function Mode Memory Press to store and recall copy settings Recall Press to recall previously specified copy settings b Message display Operational instructions and copier status info...

Page 43: ...adjust the copy exposure Press A to copy the original without copying the background color l OriginalType Press to specify the type of the original to be copied m Two sided Mode Press to specify two s...

Page 44: ...ake sure that the power plug is rmly inserted into the power outlet WARNING Never remove or insert the power plug with wet hands This may cause an electrical shock 2 Make sure that the Security key is...

Page 45: ...rature of 68 F IMPORTANT Once you turn off the power texture patterns and scans of text originals made for copying using the Character Composition function are lost Such settings stored in mode memory...

Page 46: ...ay for this screen using Additional Functions See Changing the Display of the Basic Features Screen on p 2 9 4 If a message appears on the touch panel display follow its instructions If the message In...

Page 47: ...Turning On and Off the Copier 1 23 Turning Off the Power 1 Press the power switch to the side to turn the copier off Before You Start Using This Copier 1...

Page 48: ...e When you specify certain functions modes the characters on some other keys may become difficult to see that is they become grayed out Press to close the current setting screen retaining the programm...

Page 49: ...e touch panel display peel off its protective film Adjusting the Contrast of the Touch Panel Display If the touch panel display is difficult to see use the display contrast dial on the control panel t...

Page 50: ...display or Number keys on the control panel as shown below Entering Alphabets Example Enter CANON 1 Press Entry Mode until Uppercase is displayed above it Pressing Entry Mode switches the entry mode...

Page 51: ...phabet You can also delete all alphabets you have entered by pressing Clear You can only enter up to 10 alphabets 3 When you are nished entering the alphabets press OK Entering Symbols Example Enter 1...

Page 52: ...delete the symbol Then reenter the correct symbol You can also delete all symbols you have entered by pressing Clear You can only enter up to 10 symbols 4 When you are nished entering the symbols pre...

Page 53: ...lue You can enter only 2 4 8 or 16 as the denominator The value entered in inches is converted to mm by the copier each time it is entered Thus there may be a slight difference between the value calcu...

Page 54: ...nsert the Control Card into the card slot See Control Card on p 5 70 Operations After Turning the Power On After turning the power on and the copier is ready to make copies the screen for entering the...

Page 55: ...ot been stored Enter the number again appears Repeat the procedure from step 1 Operations After Copying Is Complete 1 When you are nished copying press ID on the control panel The screen for entering...

Page 56: ...you are finished copying any subsequent copy will be added to your department ID s total Even if you forget to press ID after you are finished copying the screen for entering the department ID and pas...

Page 57: ...Saver mode Press Energy Saver again to wake it up for normal operation NOTE You can set the energy saving level to 10 25 or 50 or specify Return to Standard Mode See Changing Settings for the Energy...

Page 58: ...rawer or paper deck option There are four different indicators as shown below This indicator shows the remaining amount of paper in all drawers and the paper deck option during paper selection see Cha...

Page 59: ...uide after selecting a function brings up a screen with an explanation for that function Use this guide function if you do not understand how to use the function you are specifying Example If you pres...

Page 60: ...r Special Features screen is displayed The Guide Menu screen appears on the touch panel display as shown below The Guide Menu screen Example When making copies of photo originals Press Various Origina...

Page 61: ...witching 2 13 Setting Entry Tone Error Tone and Job Done Tone 2 14 Changing the Exposure Level Exposure Level Switch 2 15 Designating the Feeding Location for Transparencies 2 16 Designating the Feedi...

Page 62: ...38 Cleaning the Feeder 2 39 Cleaning the Wire 2 40 Adjusting the Gradation for Print Output Print Gradation Adjustment 2 41 Increasing the Resemblance of Prints to Their Counterparts in Offset Printi...

Page 63: ...en you press Reset Accessing the Additional Functions Screen 1 Press Additional Functions The Additional Functions screen is displayed 2 Select an Additional Functions feature 3 Press the function tha...

Page 64: ...are Additional Functions 2 4 NOTE The Custom Settings and Adjustment Cleaning screens consist of a list of individual settings Use and to scroll to the desired setting Customizing Settings to Your Nee...

Page 65: ...each paper feeding location On Off P 2 13 Audible Tones Entry Tone Error Tone Job Done Tone All On Off P 2 14 Exposure Level Switch 9 Levels 17 Levels P 2 15 Transparency Feed Location All available d...

Page 66: ...Cleaning Zoom Fine Adjustment X Y 0 1 0 to 1 0 in 0 1 increments P 2 35 Exposure Recalibration 2 to 2 0 P 2 36 Gradation Auto Adjustment Perform the adjustment P 2 36 Text Photo Priority Scale adjust...

Page 67: ...ions that can be specified include Copy Ratio Sorter Two sided and Original Type from the Basic Features screen various setting keys from the Special Features screen mode memory keys and Additional Fu...

Page 68: ...ghlighted If you want to cancel the assigned function press No Settings 4 Select the function that you want to assign to the standard key then press OK Only one function can be assigned to each standa...

Page 69: ...the main settings screen for the selected function will be displayed as part of the Basic Features screen NOTE By default the Basic Features screen does not display any function s settings screen 1 Di...

Page 70: ...temperature of the fixing unit is lowered thus economizing on electricity You can set the energy saving level to 10 25 or 50 or specify Return to Standard Mode NOTE Increasing the energy saving level...

Page 71: ...e key for entering values in inches is displayed in the various numeric entry screens NOTE The default setting is On Even if Inch Entry is set to On you can enter in millimeters by pressing mm 1 Displ...

Page 72: ...llows Press Additional Functions Custom Settings or Con rmation Window Auto Display 2 Select On or Off then press OK 3 Press Done Specifying Auto Sort When the feeder option and the stapler sorter opt...

Page 73: ...Drawer Switching ADS If a drawer or the paper deck option runs out of paper during a Copy job the copier automatically selects another paper feeding location with the same paper size and begins feedi...

Page 74: ...er Eligibility for APS ADS 3 Press Done Setting Entry Tone Error Tone and Job Done Tone You can select whether or not to sound the following audible tones Entry Tone When pressing keys on the control...

Page 75: ...adations of copy exposure are available for adjustment with the exposure keys on the touch panel display You can select between 9 levels and 17 levels with 17 levels offering a higher degree of contro...

Page 76: ...on for transparencies then press OK IMPORTANT Loading a drawer designated as the feeding location for transparencies with plain paper will lead to paper jams To use such a drawer with plain paper canc...

Page 77: ...desired paper feeding location to designate as the feeding location for thin paper then press OK NOTE Paper feeding locations that are already designated for use with thin paper are highlighted To ca...

Page 78: ...tte sheets can be output only if the IP ED board option is attached NOTE For information on the types of color palette sheets available with the editor option and instructions on how to change the she...

Page 79: ...Sheet The Change Color Sheet function enables you to register colors onto the custom sheet or make changes to the colors already registered You can copy or duplicate a specific color from another shee...

Page 80: ...duplicated sheet will be specified 4 Select the color palette sheet to duplicate then press OK 5 Select the key of the color to be changed or registered then press Setting Color The small square in th...

Page 81: ...olors of other keys repeat steps 5 and 6 IMPORTANT If a color is selected through the Color Palette Selection method without carrying out a color palette duplication the registered color is colorless...

Page 82: ...tion allows you to specify whether or not an original placed in the feeder s option single sheet document feeder is automatically pulled into the copier and copied IMPORTANT Feeder Auto Start can be s...

Page 83: ...standard copy settings are shown below Storing Standard Copy Settings You can store standard copy settings of your choice NOTE To change the standard copy settings you will have to first specify the s...

Page 84: ...nal Functions Custom Settings or Standard Settings 2 Press Register 3 Press Yes To cancel changing the standard copy settings press No The screen below is displayed for approximately two seconds then...

Page 85: ...Press Additional Functions Custom Settings or Standard Settings 2 Press Initial Settings 3 Press Yes To cancel initializing the standard copy settings press No The screen below is displayed for appro...

Page 86: ...lows Press Additional Functions Custom Settings or Set System Settings Password If a system settings password is set enter the password after pressing Set System Settings Password then press OK 2 To c...

Page 87: ...the copy totals for each department With Department ID Management the following operations can be performed Setting whether or not to use Department ID Management Storing the department ID and the pa...

Page 88: ...ounts by Department on p 2 29 4 Press the column for department ID and enter a 4 digit number using Number keys You cannot store 0000 as a department ID Also you cannot store a number that is already...

Page 89: ...Department ID and Password on p 1 30 7 Press Done Displaying Copy Counts by Department You can display the total paper count by department NOTE If a system settings password is set you will need to fi...

Page 90: ...ro 4 Press Done Initializing the Custom Settings Initializing Custom Settings will restore all the original default settings NOTE Department related settings that are protected by a system settings pa...

Page 91: ...Customizing the Copier s Global Settings 2 31 2 Press Yes To cancel initialization select No The screen shown below is displayed for about two seconds 3 Press Done Customizing Settings to Your Needs 2...

Page 92: ...lay will return to the Basic Features screen This is called the Auto Clear function NOTE The default setting is 2 min 1 Display the required screen as follows Press Additional Functions Timer Settings...

Page 93: ...aver Time can be set to 0 min 1 min 2 min 5 min 10 min 20 min 30 min or 1 to 8 hours 1 hour increments When 0 is selected the Auto Energy Saver function is not speci ed 3 Press Done Changing the Auto...

Page 94: ...d time period using and then press OK The Auto Power off Time settings are from 1 to 4 hours in 1 hour increments Pressing No Settings will turn off the Auto Power off function NOTE If No Settings is...

Page 95: ...at you press and or is indicated in this manual Fine adjusting the Zoom When Differences in the Original Image and the Copy Image Occur When a copy is made a slight difference may occur in size betwee...

Page 96: ...NOTE The default setting is the center value of a scale from 1 to 5 1 Display the required screen as follows Press Additional Functions Adjustment Cleaning Expo Recal 2 Press Light or Dark to adjust...

Page 97: ...into the copier before proceeding Test prints are not counted as copies 1 Display the required screen as follows Press Additional Functions Adjustment Cleaning Grad A Adjst 2 Press Test Print 1 The m...

Page 98: ...djustment is also complete The display returns to the Adjustment Cleaning screen 8 Remove the second test print from the platen glass then press Done Adjusting the Text Photo Priority Text Photo Prior...

Page 99: ...Press Done Cleaning the Feeder You can clean the roller of the feeder option by repeatedly feeding blank paper through it IMPORTANT Feeder Cleaning is a function that can only be performed when the fe...

Page 100: ...eaned the screen below appears NOTE To cancel Feeder Cleaning when it is in progress press Cancel 3 Press Done Cleaning the Wire You can set the copier to clean the primary corona assembly wire NOTE I...

Page 101: ...with the help of your service representative Contact your service representative for more information Print Gradation Adjustment is usually made via the print controller option For details refer to t...

Page 102: ...ia a print controller option IMPORTANT SWOP Emulation is available only when a print controller option is installed NOTE This function cannot be used for copying from the platen glass or feeder option...

Page 103: ...ginal Type Selection for Printer This function enables you to select the image type for prints output using the print controller option NOTE This function cannot be used for copying from the platen gl...

Page 104: ...Adjusting the Copier Adjustment Cleaning 2 44 3 Press Done Customizing Settings to Your Needs 2...

Page 105: ...al number of Copy jobs made by displaying the copy count on the touch panel display 1 Press Counter Check on the control panel The various copy counts are shown on the touch panel display 2 Press Done...

Page 106: ...Checking the Counter 2 46 Customizing Settings to Your Needs 2...

Page 107: ...such as toner and fixing oil Loading Paper 3 2 Loading Paper into the Drawers 3 2 Adjusting a Drawer to Hold a Different Paper Size 3 6 Loading Paper in the Stack Bypass 3 9 Adding Toner 3 13 Refilli...

Page 108: ...Use the stack bypass to load paper that is heavier Do not load 12 x 18 size paper or irregular size paper into the drawers The message also appears if the selected drawer is not fully inserted into t...

Page 109: ...rrect way to load paper into the paper deck option 1 Press and then release the button of the drawer that you want to load paper into Gently press the button all the way to the back If you do not pres...

Page 110: ...by Canon 4 Place the stack of paper in the drawer Even out the edges of the paper stack Load the paper stack against the right edge of the drawer When loading paper into the drawer for the rst time se...

Page 111: ...ng a printer or a copier other than this copier do not copy on the reverse side either Always use the stack bypass to feed paper when you copy onto the rear side of a sheet of paper that already has s...

Page 112: ...you want to load a new paper size into a drawer follow the procedure described below to adjust the drawer guides NOTE Drawer 2 can be adjusted to hold paper of 11 x 17 LGL LTR and LTRR sizes Drawer 1...

Page 113: ...ft guide as shown below Without releasing the lever slide the left guide to align it with the mark for the desired paper size When adjusting the left guide for 11 x 17 size paper slide it all the way...

Page 114: ...gn them with the mark for the desired paper size IMPORTANT Not adjusting the guides correctly may cause paper jams produce copies with dirt marks or make the inside of the copier dirty To prevent thes...

Page 115: ...g LTRR Loading Paper in the Stack Bypass If the stack bypass runs out of paper during a Copy job a screen prompting you to load paper is displayed on the touch panel display Follow the procedure belo...

Page 116: ...r weight 17 lb bond to 110 lb index 64 to 209 g m2 Curl down paper before use There are some types of paper that may meet the above specifications but cannot feed through the stack bypass Do not load...

Page 117: ...misaligned copies When output is continued with the images cut off using the print controller optional it may result in the back of the paper getting dirty 3 Load the paper into the stack bypass Make...

Page 118: ...tructions on the package of paper about which side of the paper to load follow those instructions If problems such as poor copy quality or paper jams occur try turning the paper over and loading it Lo...

Page 119: ...mediately If toner gets onto your hands or clothes wash it off immediately with cold water Do not use warm water as this may x the toner permanently and you may not be able to remove it later IMPORTAN...

Page 120: ...n the right front door of the main unit 2 Push the toner box release lever down 3 Grip the handle on the toner box then pull the toner box out until it stops Toner box release lever Loading Paper and...

Page 121: ...he quality of copies 5 Shake the toner bottle as illustrated below With the opening of the toner bottle facing downward drop the bottle about ve times from a height of approximately 1 1 4 3 cm onto a...

Page 122: ...then turn the bottle in the direction of the arrow IMPORTANT The shape of the toner bottle opening and the toner supply port is different for each color If the toner bottle does not seem to fit the p...

Page 123: ...ly port Toner is emptied into the copier NOTE It takes a while to transfer all the toner into the toner box 8 Gently tap the bottom and sides of the toner bottle two or three times to dislodge toner c...

Page 124: ...ay ignite the toner remaining inside the bottle and result in burns or a re CAUTION When removing the used toner bottle from the toner supply port be careful not to scatter the toner and allow it to e...

Page 125: ...oner box makes a clicking sound when you push it into the copier as this indicates that it is correctly seated 13 Close the right front door of the main unit CAUTION Your service representative will d...

Page 126: ...d on the touch panel display CAUTION Make sure that the room where the copier is located is well ventilated before proceeding with the oil re ll procedure NOTE It is recommended that you prepare fixin...

Page 127: ...TANT Make sure that the nozzle is firmly attached to the bottle 4 Re ll the oil tank with one bottle of xing oil CAUTION Be careful not to spill the xing oil while you are re lling it If oil is spilt...

Page 128: ...te and result in burns or a re CAUTION Attach the cap onto the empty xing oil bottle and dispose of it as noncombustible garbage 6 Close the front doors of the main unit The copier makes internal adju...

Page 129: ...the used waste toner container Use the seal removed from the new waste toner container to cover up the opening of the used waste toner container CAUTION Used toner cannot be reused Do not mix new and...

Page 130: ...4 The duplexing unit is available only with the CLC 1180 2 Open the cover under the lower drawer This step is not necessary with the CLC 1180 3 Open the lower left front door Lower left front door Loa...

Page 131: ...er container 5 Remove the seal that covers the opening of the new waste toner container CAUTION Be careful not to tear the seal as you will need it to cover up the opening of the used waste toner cont...

Page 132: ...store all the drawers and the duplexing unit to their original positions The duplexing unit is available only with the CLC 1180 9 Close the cover under the lower drawer This step is not necessary with...

Page 133: ...Changing the Waste Toner Container 3 27 10 Use the seal removed from the new waste toner container to cover up the opening of the used waste toner container Loading Paper and Refilling Consumables 3...

Page 134: ...es in empty spaces inside the copier such as under the fixing unit or inside drawers Doing so may damage the consumables or affect the copy quality Consumables Paper In addition to plain paper 11 x 17...

Page 135: ...ypes are not suited to this copier Consult with your service representative when you need to purchase paper Toner When the Add xxx toner message appears on the touch panel display add toner that has b...

Page 136: ...G Never dispose of waste xing oil bottles in a re or incinerator Doing so may result in burns or a re Do not store xing oil bottles in places exposed to open ames as this may cause the xing oil to ign...

Page 137: ...mended storage conditions are temperature below 86 F and humidity below 80 Options Universal Drawer A universal drawer can be adjusted to hold paper of various sizes See Adjusting a Drawer to Hold a D...

Page 138: ...Consumables and Options 3 32 Loading Paper and Refilling Consumables 3...

Page 139: ...Side Door CLC 1180 only 4 11 Removing Paper Jams in the Drawers 4 13 Removing Paper Jams in the Duplexing Unit CLC 1180 only 4 15 Removing Paper Jams in the Stack Bypass 4 18 Removing Paper Jams in th...

Page 140: ...e paper jam is completely cleared Example of screen indicating the location of the paper jam Example of screen indicating how to clear the paper jam WARNING There are high voltage areas inside the cop...

Page 141: ...ed in several locations remove jammed paper in the order displayed on the touch panel display 1 Inspect all areas which appear on the touch panel display and remove any jammed paper See the appropriat...

Page 142: ...4 23 Fixing unit area See Removing Paper Jams in the Fixing Unit Area on p 4 26 2 If a paper jam occurs inside the options see the instructions on the following pages Recirculating Document Feeder RD...

Page 143: ...h panel display restore all levers and doors to their original positions Be sure to restore all levers to their original positions Otherwise the right and left front doors will not close 4 Continue wi...

Page 144: ...per Jam Areas The paper path varies depending on the copy mode When a paper jam occurs use the number that is shown on the illustration as a reference for the area of the paper path that needs to be i...

Page 145: ...j Right side door area Removing Paper Jams in the Right Side Door If a paper jam occurs inside the right side door a screen similar to the one shown below appears on the touch panel display Check the...

Page 146: ...way from the main unit See Paper Deck E1 on p 5 26 2 Remove any jammed paper Remove any remaining pieces of paper inside the right side door If there is paper sticking out from the drawer the duplexin...

Page 147: ...l display NOTE For details see About the Paper Jam Troubleshooting Screen on p 4 2 Removing Paper Jams in the Output Area If a paper jam occurs in the output area a screen similar to the one shown bel...

Page 148: ...main unit See Stapler Sorter F2 on p 5 35 2 Turn the green xing unit knob in the direction of the arrow to remove the paper Remove any remaining pieces of paper in the output area 3 Close the front d...

Page 149: ...ving Paper Jams in the Left Side Door CLC 1180 only If a paper jam occurs inside the left side door a screen similar to the one shown below appears on the touch panel display Check the location of the...

Page 150: ...from the buffer pass unit See Removing Paper Jams in the Buffer Pass Unit on p 5 45 2 Remove any jammed paper Remove any remaining pieces of paper inside the left side door If there is paper sticking...

Page 151: ...uch panel display Check the location of the paper jam and using the screen on the touch panel display as a reference follow the procedure described below to remove the jammed paper IMPORTANT Before re...

Page 152: ...ted on the touch panel display Gently press the button all the way to the back If you do not press the button all the way you will not be able to pull the drawer out In this case push the drawer back...

Page 153: ...ouch panel display NOTE For details see About the Paper Jam Troubleshooting Screen on p 4 2 Removing Paper Jams in the Duplexing Unit CLC 1180 only If a paper jam occurs in the duplexing unit a screen...

Page 154: ...re to remove that paper first If you pull the duplexing unit out without removing the jammed paper the paper may tear and leave paper pieces inside the copier NOTE The screen that appears differs depe...

Page 155: ...ly the jammed paper It is not necessary to remove paper that is not jammed 4 Lower the cover then restore the duplexing unit to its original position CAUTION Be careful not to get your ngers caught wh...

Page 156: ...rs in the stack bypass a screen similar to the one shown below appears on the touch panel display Check the location of the paper jam and using the screen on the touch panel display as a reference fol...

Page 157: ...right front door of the main unit If the paper jam is only located at the stack bypass opening and closing the right front door after removing the jammed paper enables the copier to recover from the...

Page 158: ...efore removing jammed paper from the paper transport area always check for paper jams in the right side door left side door and the output area first See Removing Paper Jams in the Right Side Door on...

Page 159: ...ease lever to the left and pull out the main assembly 3 Open the cover of the paper transport area and remove the jammed paper CAUTION Do not touch the transfer drum Lock release lever Cover of the pa...

Page 160: ...ers caught in the gap when pushing the main assembly back into the copier 5 Close the front doors of the main unit If the front doors do not close check to make sure that the green lock release lever...

Page 161: ...heck for paper jams in the right side door left side door and the output area first See Removing Paper Jams in the Right Side Door on p 4 7 Removing Paper Jams in the Output Area on p 4 9 and Removing...

Page 162: ...aper while rotating the green resistance knob below the transfer drum in the direction of the arrow If rotating the resistance knob does not remove the jammed paper or if the jammed paper shows from t...

Page 163: ...t stops CAUTION Be careful not to get your ngers caught in the gap when pushing the main assembly back into the copier 5 Close the front doors of the main unit If the front doors do not close check to...

Page 164: ...t the green xing unit knob Failure to follow this precaution may result in burns IMPORTANT Before removing jammed paper from the fixing unit area always check for paper jams in the right side door lef...

Page 165: ...ed paper Grip the green tab to open the cover of the xing unit s output port then carefully pull out the jammed paper while rotating the green xing unit knob in the direction of the arrow CAUTION Some...

Page 166: ...5 Close the front doors of the main unit If the front doors do not close check to make sure that the green lock release lever is restored to its original position CAUTION When closing the doors be ca...

Page 167: ...e paper jam problem There are torn pieces of paper left inside the copier Pulling jammed paper out from the copier by force may leave parts of the paper torn inside the copier leading to frequent pape...

Page 168: ...other solvents for cleaning Doing so might result in the plastic parts becoming deformed CAUTION Unplug the power cord from the outlet at least once a year and clean the plug s metal pins and the are...

Page 169: ...cover Originals That Have Fed Through the Feeder Are Dirty If originals that have fed through the feeder option are dirty or if marks not on an original appear in the copies the feeder s feeding belt...

Page 170: ...ay Is Dirty The touch panel display needs to be cleaned Wipe the touch panel display with a piece of well wrung cloth dampened with water or a mild cleansing agent then wipe it again with a dry cloth...

Page 171: ...res as indicated by the messages The following describes some of the messages that require further explanation NOTE The messages are listed in alphabetical order Add black toner Cause The copier has r...

Page 172: ...copies specified and reduce the number if it exceeds the maximum stapling capacity For information on the maximum number of sheets that can be stapled together for the different paper sizes and types...

Page 173: ...buffer pass unit s option front cover is left open Remedy Close the buffer pass unit s option front cover Close the front doors Cause The front doors are left open Remedy Close the front doors Close...

Page 174: ...daries of the paper Remedy Change the amount of image shift See Chapter 2 Useful Copy Functions in the Copying Guide Inappropriate original Cause A paper jam occurred because originals unsuitable for...

Page 175: ...be recognized Cause The original cannot be recognized Remedy If you are using an original that cannot be detected such as a transparency turn the Original Recognition function off and manually select...

Page 176: ...Remedy Reduce the number of originals For information on the maximum number of originals that can be set refer to Acceptable Originals see p 5 9 Remove the original from the platen glass Cause The or...

Page 177: ...stack bypass Remedy Adjust the slide guides to match the size of the paper loaded in the stack bypass This number has not been stored Enter the number again Cause The number entered is incorrect Reme...

Page 178: ...en unplugging the power cord Pulling on the power cord may expose or snap the core wire or otherwise damage the power cord If the cord is damaged electricity may leak and result in a re or electrical...

Page 179: ...epresentative after performing the following procedures Turn off the power switch Disconnect the power plug NOTE When you contact your service representative have the following information ready Produ...

Page 180: ...Touch Panel Display Messages 4 42 Troubleshooting 4...

Page 181: ...13 Removing Paper Jams in the Left Feeder Cover 5 14 Removing Paper Jams in the Right Feeder Cover 5 18 Removing Paper Jams in the Single Sheet Document Feeder 5 21 Removing Paper Jams on the Platen...

Page 182: ...5 2 5 Handling Options Replacing the Staple Case 5 59 Removing Jammed Staples 5 64 Consumables 5 67 Speci cations 5 68 Control Card 5 70 Before Copying 5 70 After Copying 5 71 Handling Options 5...

Page 183: ...Use the edit pen for area designation and for specifying colors on the color palette or on originals c Area designation board Place originals here and use the edit pen for area designation d Color pal...

Page 184: ...ition that has been heavily shaded with a pencil accurate area designation may be difficult Consult with your service representative about how to connect the editor to the copier Placing an Original P...

Page 185: ...100 Black Very pale tone Light tone Bright tone Dark tone Very pale Light Primary color Dark Primary Black Very pale tone Light tone Bright tone Dark tone B Bright tone Pale tone Grayish tone Dark ton...

Page 186: ...m Settings For instructions see Specifying Color Palette Sheet Settings Change Color Sheet on p 2 18 Changing the colors on a color palette sheet You can change the colors on a color palette sheet Onc...

Page 187: ...ass for copying The feeder can also be set to automatically flip two sided originals for making two one sided copies IMPORTANT The manual that comes packaged with the feeder is a general manual and it...

Page 188: ...nals one sheet at a time e Right feeder cover Open to remove jammed originals f Slide guides Adjust the slide guides to fit the size of the originals g Original tray Set originals into this tray with...

Page 189: ...is useful for making copies of originals that you want to avoid getting curled or folded NOTE The feeder cannot be used when any one of the following functions is specified Multi page Enlargement Col...

Page 190: ...themselves color copies may not feed properly through the feeder particularly if they are copies that contain a large amount of toner For these types of originals it is highly recommended that you use...

Page 191: ...ing 11 x 17 LGL or LTRR size originals ip open the auxiliary tray for support before placing the originals as shown in the illustration below 2 Neatly place the originals face up in the original tray...

Page 192: ...p open the auxiliary tray when placing 11 x 17 LGL or LTRR size originals into the original tray The number of originals that can be placed into the feeder s original tray at one time is as follows 11...

Page 193: ...et Document Feeder Follow the procedure below when making copies using the feeder s single sheet document feeder 1 Open the single sheet document feeder 2 Adjust the slide guide on the single sheet do...

Page 194: ...Press Start to begin copying The original is delivered back to the single sheet document feeder after it has been copied Be sure to remove the original after you are finished copying If the original i...

Page 195: ...ng on the options attached 1 Remove all originals from the original tray CAUTION When the originals are removed the original tray automatically rises Be careful not to get your ngers caught 2 Open the...

Page 196: ...rculating Document Feeder RDF E3 5 16 4 Open the inner cover 5 Remove any jammed originals 6 Close the inner cover CAUTION When closing the cover be careful not to get your ngers caught Handling Optio...

Page 197: ...left feeder cover CAUTION When closing the cover be careful not to get your ngers caught 8 Lift up the feeder 9 Open the cover along the left side by lifting at the center of the cover then remove the...

Page 198: ...sm of the feeder Removing Paper Jams in the Right Feeder Cover If a paper jam occurs in the right feeder cover a screen similar to the one shown below appears on the touch panel display Check the loca...

Page 199: ...1 Remove all originals from the original tray CAUTION When the originals are removed the original tray automatically rises Be careful not to get your ngers caught 2 Open the right feeder cover 3 Remov...

Page 200: ...he right feeder cover CAUTION When closing the cover be careful not to get your ngers caught 5 Lift up the feeder 6 Open the cover along the right side by lifting it as shown in the illustration below...

Page 201: ...feeder Removing Paper Jams in the Single Sheet Document Feeder If a paper jam occurs in the single sheet document feeder a screen similar to the one shown below appears on the touch panel display Chec...

Page 202: ...tearing it When it is dif cult to pull the original out Lift up the feeder Open the cover along the right side by lifting it as shown in the illustration below then remove the jammed original Lower th...

Page 203: ...the touch panel display as a reference follow the procedure described below to remove the jammed original CAUTION When removing jammed original take care not to cut your hands on the edges of the ori...

Page 204: ...eeder 5 Follow the instructions on the touch panel display NOTE For details see About the Paper Jam Troubleshooting Screen on p 4 2 If the touch panel display continues to show paper jams in the feede...

Page 205: ...ever these situations occur you need to clean the feeder See Cleaning the Feeder on p 2 39 Speci cations These specifications are subject to change without prior notice Name RDF E3 Original size 11 x...

Page 206: ...Up to 2 500 sheets 20 lb bond 80 g m2 of paper can be loaded into the paper deck IMPORTANT You may not be able to open the paper deck when the copier is in the Energy Saver mode In this case press Ene...

Page 207: ...he main unit b Open button Press to load paper or to check for a paper jam c Paper deck A maximum of 2 500 sheets 20 lb bond 80 g m2 can be stacked d Front cover Open this cover to load paper or to cl...

Page 208: ...RTANT The paper deck can only accommodate paper from 17 to 28 lb bond 64 to 105 g m2 in weight Use the stack bypass to load paper that is heavier NOTE If the message is displayed during a Copy job you...

Page 209: ...scends to the paper loading position 2 Open a package of paper and remove a stack of paper to load IMPORTANT Rewrap any remaining paper in its original package and store it in a dry place away from di...

Page 210: ...s been output using a printer or a copier other than this copier do not copy on the reverse side either Always use the stack bypass to feed paper when you copy onto the rear side of a sheet of paper t...

Page 211: ...k for copying CAUTION When closing the paper deck be careful not to get your ngers caught Removing Paper Jams in the Paper Deck If a paper jam occurs in the paper deck a screen similar to the one show...

Page 212: ...to cut your hands on the edges of the paper NOTE The screen that appears differs depending on the options attached 1 Push the paper deck release button then pull the paper deck away from the main uni...

Page 213: ...ll go down automatically 4 Remove any jammed paper Look carefully as jammed paper may be dif cult to see 5 Close the paper deck and reconnect it to the main unit CAUTION When reconnecting the paper de...

Page 214: ...Jam Troubleshooting Screen on p 4 2 Speci cations These specifications are subject to change without prior notice Name Paper Deck E1 Paper size LTR Maximum paper capacity 2 500 sheets 20 lb bond 80 g...

Page 215: ...ler Sorter on p 5 37 The Buffer Pass Unit 1 must be installed to install the stapler sorter IMPORTANT The manual that comes packaged with the stapler sorter is a general manual and its contents are no...

Page 216: ...Buffer pass unit release handle Grip this handle to pull the stapler sorter and the buffer pass unit away from the main unit f Buffer Pass Unit 1 The buffer pass unit functions to straighten curls on...

Page 217: ...aking place and touching them may result in personal injury If the stapler sorter is installed be sure not to place your hand into the location where stapling is performed inside the bins This may lea...

Page 218: ...re removed from the bins Sorting may be interrupted if the copy exposure on the front and rear sides of two sided copies is markedly different If the Stopped due to incorrect loading Remove paper from...

Page 219: ...the output exceeds the capacity of the bins copying will temporarily stop and will only resume after all the output copies are removed from the bins Sorting may be interrupted if the copy exposure on...

Page 220: ...2 15 sheets 60 lb cover or 90 lb index to 110 lb index 157 to 209 g m2 If the number of output sheets exceeds the stapling capacity the copies will be sorted but not stapled In this case manual stapli...

Page 221: ...eets 60 lb cover or 90 lb index to 110 lb index 157 to 209 g m2 Insert Stapling Function This function enables you to staple documents that you insert into the first top sort bin Use it when you want...

Page 222: ...out the edges of the sheets to be stapled together 2 Place the sheets on the rst top sort bin Insert the sheets straight into the bin such that they are aligned in the position indicated by the dotte...

Page 223: ...lit the stapler is out of staples Replace the staple case See Replacing the Staple Case on p 5 59 Limitations of the Stapler Sorter By making copies pass through the buffer pass unit the stapler sort...

Page 224: ...put sheets exceeds the stapling capacity the copies will be sorted but not stapled In this case manual stapling is also disabled The screen that appears differs depending on the options attached Copie...

Page 225: ...ts 60 lb cover or 90 lb index 157 g m2 The screen that appears differs depending on the options attached Removing Paper Jams in the Buffer Pass Unit If a paper jam occurs in the buffer pass unit a scr...

Page 226: ...es become dirty wash them immediately with cold water Washing with warm water will x the toner and make it impossible to remove later When removing jammed paper from inside the copier be sure to remov...

Page 227: ...ing unit knob in the direction of the arrow If the jammed paper is not visible when you lift the cover inside the buffer pass unit pull out the main assembly rst before you rotate the xing unit knob S...

Page 228: ...e front cover of the buffer pass unit is closed properly 6 Close the front doors of the main unit CAUTION When closing the doors be careful not to get your ngers caught 7 Follow the instructions on th...

Page 229: ...r or otherwise inspecting the inside of the copier Failure to follow this precaution may result in burns or electrical shock CAUTION When removing jammed paper take care not to cut your hands on the e...

Page 230: ...ting to the Non sort Bin 1 Open the front cover of the buffer pass unit 2 Open the front cover of the stapler sorter Buffer pass unit front cover Main unit Buffer pass unit Stapler sorter front cover...

Page 231: ...ide the stapler sorter while rotating the knob on the buffer pass unit Rotating the knob with the cover inside the stapler sorter down may cause a malfunction 4 Remove any jammed paper CAUTION There a...

Page 232: ...ea on the non sort bin 6 Close the front cover of the stapler sorter CAUTION When closing the cover be careful not to get your ngers caught IMPORTANT Make sure that the front cover of the stapler sort...

Page 233: ...er of the buffer pass unit is closed properly 8 Follow the instructions on the touch panel display NOTE For details see About the Paper Jam Troubleshooting Screen on p 4 2 When Outputting to a Sort Bi...

Page 234: ...he knob on the buffer pass unit in the direction of the arrow IMPORTANT Always hold up the cover inside the stapler sorter while rotating the knob on the buffer pass unit Rotating the knob with the co...

Page 235: ...that are very hot Be careful not to touch anywhere except for the parts colored in green 5 Turn the knob on the stapler sorter in the direction of the arrow to feed the jammed paper 6 Open the upper...

Page 236: ...The bins on the stapler sorter can be moved to make removing jammed paper easier See Removing Paper Jams in the Sort Bins on p 5 57 9 Close the front cover of the stapler sorter CAUTION When closing...

Page 237: ...the instructions on the touch panel display NOTE For details see About the Paper Jam Troubleshooting Screen on p 4 2 Removing Paper Jams in the Sort Bins Paper that is jammed in the rear of the sort...

Page 238: ...s lowered to the position of the widely spaced bin If paper is jammed in a bin below the widely spaced bin press until the bin with the paper jam is raised to the position of the widely spaced bin IMP...

Page 239: ...ng message is displayed on the touch panel display Follow the procedure below to replace the staple case inside the staple cartridge IMPORTANT Only replace staples when the Load Staples indicator ligh...

Page 240: ...cover of the stapler sorter 2 Grip the stapler unit by the green handle and pull it out of the stapler sorter until it stops 3 Press the green button to unlock the stapler section Stapler sorter fron...

Page 241: ...emove the empty staple case If there are any staples remaining in the staple case the case cannot be removed 6 Place a new staple case into the staple cartridge by aligning the arrows on the case and...

Page 242: ...le case into the staple cartridge 7 Pull the seal holding the staples together straight up to remove it IMPORTANT Make sure you pull the seal straight up because it may tear if you pull it at an angle...

Page 243: ...be careful not to get your ngers caught IMPORTANT Make sure that the front cover of the stapler sorter is closed properly After replacing the staple cartridge no staples may appear for the first eigh...

Page 244: ...ed on the touch panel display Follow the procedure described below to remove the jammed staples NOTE The screen that appears differs depending on the options attached 1 Open the front cover of the sta...

Page 245: ...e stapler section 4 Unlock the stopper then lift up the staple cover Gently lift up the staple cover by its metal tab with your thumb while unlocking the stopper with your index nger 5 Remove all jamm...

Page 246: ...he stopper 7 Restore the stapler unit to its original position Push the staple unit in until it is locked The stapler unit automatically rotates and is stored into position 8 Close the front cover of...

Page 247: ...aining copies stapled However stapling will take place without staples for each staple removed Therefore you will need to manually restaple any copies that are not stapled Consumables Only use staple...

Page 248: ...lb index 157 g m2 Staple sort function 1st to 20th bin LTR LTRR 30 sheets 20 to 28 lb bond 80 to 104 7 g m2 20 sheets 60 lb cover or 90 lb index 157 g m2 11 x 17 LGL 25 sheets 20 to 28 lb bond 80 to...

Page 249: ...specifications are subject to change without prior notice Name Buffer Pass Unit 1 Paper weight 17 lb bond to 110 lb index 64 to 209 g m2 Dimensions H x W x D 37 3 4 x 10 3 8 x 24 958 x 264 x 609 mm W...

Page 250: ...nserted in the correct direction The Control Card is inserted as far as it can go An unusable Control Card is not inserted For example cards which are damaged cards already used to the set limit or ca...

Page 251: ...rol Card The touch panel display returns to the screen for inserting the Control Card IMPORTANT Once you have removed the Control Card you cannot operate the copier until the Control Card is inserted...

Page 252: ...Control Card 5 72 Handling Options 5...

Page 253: ...6 1 CHAPTER 6 Appendix This chapter consists of the specifications and the index Copier Specifications 6 2 Index 6 4...

Page 254: ...lar size 7 3 16 x 7 3 16 to 12 x 18 182 x 182 mm to 305 x 457 mm Non image area Top 5 16 to 3 8 8 0 mm 1 5 mm Bottom 1 16 to 3 16 2 5 mm 1 5 mm Sides 1 16 to 1 8 2 0 mm 1 0 mm Warm up time 8 min 30 se...

Page 255: ...80 g m2 Stack bypass 250 sheets 20 lb bond 80 g m2 Copy exposure 9 17 gradations switchable Auto Two sided copying Automatic CLC 1180 Manual feeding for the second side CLC 1140 Multiple copies 100 s...

Page 256: ...36 Recalibrating the Standard Exposure 2 36 Selecting the Image Type Based on the Type of Image to Print Original Type Selection for Printer 2 43 When Differences in the Original Image and Copy Image...

Page 257: ...ss 4 31 Cleaning the Touch Panel Display 4 32 Cleaning the Wire 2 40 Clear Key 1 17 Clip Tray 1 17 Color Palette Sheets About Color Palette Sheets 5 5 Changing the Color Palette Sheet 5 6 Changing the...

Page 258: ...g Department ID Management 2 27 Copy Quantity Indicator 1 19 Copy Ratio Display 1 18 Copy Ratio Key 1 19 Copy Tray 1 13 Counter Check Key 1 17 Custom Settings Customizing 2 7 Initializing 2 30 D Depar...

Page 259: ...e Energy Saver Mode 1 33 Changing the Energy Saving Level 2 10 Changing the Timer Settings Auto Energy Saver Time 2 33 Energy Saver Key 1 16 Error Messages 4 33 Exposure A Key 1 19 Changing the Number...

Page 260: ...eeder 5 21 Specifications 5 25 Specifying Feeder Auto Start 2 22 Feeder Auto Start Specifying 2 22 Fixing Oil Refilling 3 20 Fixing Unit Fixing Unit Knob 1 15 Removing Paper Jams in the Fixing Unit Ar...

Page 261: ...ms in the Left Side Door 4 11 Legal Issues Limitations on the Use of Images xxii Limitations on the Use of This Copier xxii Loading Paper Loading Paper into the Drawers 3 2 Loading Paper into the Pape...

Page 262: ...rawer 3 31 Original Auxiliary Tray 5 8 Original Recognition Key 1 16 Original Separation Lever 5 8 Original Set Indicator 5 8 Original Tray 5 8 Original Type Key 1 19 Original Type Selection for Print...

Page 263: ...s in the Fixing Unit Area 4 26 Removing Paper Jams in the Left Feeder Cover 5 14 Removing Paper Jams in the Left Side Door 4 11 Removing Paper Jams in the Output Area 4 9 Removing Paper Jams in the Pa...

Page 264: ...r Jams on the Platen Glass 5 23 Platen Glass Cover Cleaning 4 31 Location 1 13 Power Supply Power Switch Location 1 13 Safety Precautions xv 1 6 Turning On and Off 1 20 Precautions Handling 1 7 Instal...

Page 265: ...r Key 1 19 Specifications Buffer Pass Unit 5 69 Copier 6 2 Editor 5 6 Feeder 5 25 Paper Deck 5 34 Stapler Sorter 5 68 Stack Bypass Acceptable Paper Sizes 6 2 Loading Paper in the Stack Bypass 3 9 Loca...

Page 266: ...tions 5 40 Staples Removing Jammed Staples 5 64 Replacing the Staple Case 5 59 Staple sort Function 5 39 Stapling Insert Stapling 5 41 Manual Stapling 5 40 Start Key 1 17 Stop Key 1 16 SWOP Emulation...

Page 267: ...on 1 17 Messages 4 33 Parts 1 18 Understanding How Keys are Displayed 1 24 Trademarks xiii Transfer Drum Knob 1 15 Transparencies Designating the Feeding Location 2 16 Troubleshooting Paper Jam Troubl...

Page 268: ...16 1 16 1 8 3 8 1 4 7 64 9 64 11 64 13 64 15 64 17 64 19 64 21 64 23 64 25 64 27 64 29 64 31 64 3 64 5 64 4ths 8ths 16ths 32nds 64ths To 4 Places To 3 Places Milli meters 5156 516 52 13 097 5312 531 5...

Reviews: