NETAVIS Observer 4.6 User Manual (October 2015)
Page 178 of 204
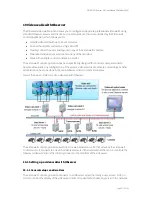
for that purpose. However, all cameras that you want to display on the video wall must be accessible
by this server (i.e. must be configured at this server or must be mounted from other servers).
It is also possible to use more than 1 server for providing the streams for the video wall (this depends
on how you setup your server network topology). In such a case the VWCA and also the video wall
clients (that directly connect to the monitors) must connect to these servers. For simplicity and easier
setup and management of the video wall, we suggest using one Observer server for driving the video
wall.
Each video wall client workstation/PC can drive several monitors of the video wall (how many
depends on your hardware setup, i.e. graphics card). Each such video wall monitor has to map to one
window in the Observer client.
User management for the video wall
You will need a few users to manage video wall functions appropriately. Generally these users must
have access rights to all cameras that are to be displayed on the video wall:
1 video wall management user (with which you login in to the VWCA).
For each video wall client workstation/PC you need 1 user
You can create a user group that has privileges and access rights to all relevant cameras and then
create the above users belonging to this group (automatically inheriting the privileges and rights).
Please note these special issues:
It is impossible to display a camera on a video wall monitor which is not available on the server
where the video wall client connects to. Depending on your setup, it is therefore possible that
you cannot display every camera on any video wall monitor.
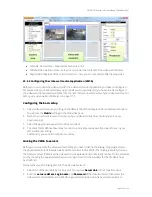
The video wall control application itself does not display live video streams of the cameras but
snapshot images for better orientation instead. The real video streams appear in the video wall
monitors.
19.1.2 Setting up the video wall
Please follow these steps for setting up the video wall:
1.
Configure your Observer server network with all the cameras and other settings.
2.
Setup the video wall monitors and the video wall client PCs (how many monitors you can connect
to 1 client PC depends on your hardware setup). The video wall clients must run the Observer
desktop application.
3.
We suggest using 1 specific user per video wall client PC. As indicated above, you can create a user
group that has privileges and access rights to all relevant cameras and then create 1 user for each
VW client PC. In the example diagram above it would be 2 users with names like VWPC1 and
VWPC2.
4.
Start the Observer application on the first video wall client PC and login with the user of that client
PC (e.g. VWPC1).
5.
For each video wall monitor you have to define a separate window in the Observer application
(there is a 1 to 1 mapping between video wall monitors and Observer application windows). For
each of these windows you can define multiple views with different layouts (you can also add and
modify views later on). These views can later on be controlled by the video wall control
application.


