background image

2AR

1-3-15

Start key

SM

Fwd. rotation

Rev. rotation

SHPSW

FVSYNC signal

A

B

270 P

414 P

9921 P

120 P

C

D

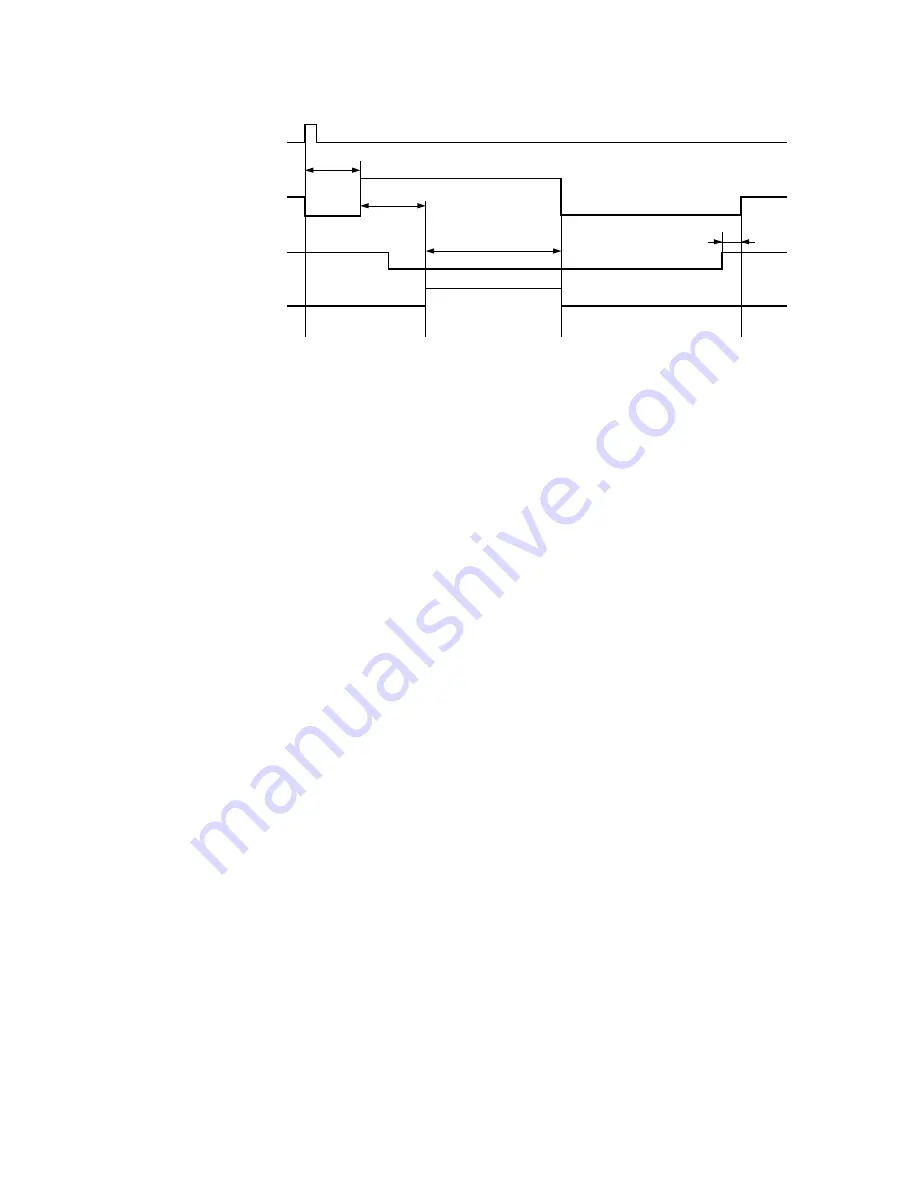
Original: A3/11" ¥ 17", magnification ratio 100%

Timing chart 1-3-3  Scanner operation

A

When the start key is pressed, the scanner motor (SM) reverses for 270 pulses and
then rotates forward.

B

414 pulses after the scanner motor (SM) starts rotating forward, the FVSYNC signal
turns on for 9921 pulses for scanning.

C

The scanner motor (SM) reverses to return the scanner to the home position.

D

120 pulses after the scanner home position switch (SHPSW) turns on, the scanner
motor (SM) turns off, and the scanner stops at its home position.

Summary of Contents for PointSource Ai 3010

Page 1: ...3010 S M MCA SERVICE MANUAL Published in Apr 00 2AR70765 Revision 5 PointSource Ai 3010 R...

Page 2: ...Service Manual PointSource Ai 3010...

Page 3: ...RER DISPOSE OF USED BATTERIES ACCORDING TO THE MANUFAC TURER S INSTRUCTIONS ATTENTION IL Y A DANGER D EXPLOSION S IL Y A REMPLACEMENT IN CORRECT DE LA BATTERIE REMPLACER UNIQUEMENT AVEC UNE BATTERIE D...

Page 4: ...sonnel to ensure the safety of their customers their machines as well as themselves during maintenance activities Service personnel are advised to read this booklet carefully to familiarize themselves...

Page 5: ...m insufficient attention to or incorrect compliance with warning messages using this symbol CAUTION Bodily injury or damage to property may result from insufficient attention to or incorrect complianc...

Page 6: ...the earth wire to an object not approved for the purpose may cause explosion or electric shock Never connect the ground cable to any of the following gas pipes lightning rods ground cables for telepho...

Page 7: ...2 Precautions for Maintenance WARNING Always remove the power plug from the wall outlet before starting machine disassembly Always follow the procedures for maintenance described in the service manual...

Page 8: ...machine Keep away from chains and belts Handle the fixing section with care to avoid burns as it can be extremely hot Check that the fixing unit thermistor heat and press rollers are clean Dirt on the...

Page 9: ...only a small amount of solvent at a time being careful not to spill Wipe spills off completely Ventilate the room well while using grease or solvents Allow applied solvents to evaporate completely bef...

Page 10: ...3 5 Scanner motor PCB 2 3 7 2 3 6 Operation unit main PCB operation unit right PCB and operation unit left PCB 2 3 8 2 3 7 CCD PCB 2 3 10 2 3 8 Laser diode PCB and beam detection PCB 2 3 11 III SET UP...

Page 11: ...does not operate 3 6 49 15 The registration clutch does not operate 3 6 49 16 The cleaning lamp does not turn on 3 6 49 17 The exposure lamp does not turn on 3 6 49 18 The exposure lamp does not turn...

Page 12: ...eed 3 6 55 2 No secondary paper feed 3 6 55 3 Skewed paper feed 3 6 55 4 The scanner does not travel 3 6 56 5 Multiple sheets of paper are fed at one time 3 6 56 6 Paper jams 3 6 56 7 Toner drops on t...

Page 13: ...3010 S M MCA THEORY AND CONSTRUCTION SECTION I I Theory and Construction Section...

Page 14: ...2AR CONTENTS 1 1 Specifications 1 1 1 Specifications 1 1 1...

Page 15: ...Auto copy mode fixed ratios Metric 1 1 1 0 1 4 00 1 2 00 1 1 41 1 1 27 1 1 06 1 0 90 1 0 75 1 0 70 1 0 50 1 0 25 Inch 1 1 1 0 1 4 00 1 2 00 1 1 54 1 1 29 1 1 21 1 0 78 1 0 77 1 0 64 1 0 50 1 0 25 Cop...

Page 16: ...osure by cleaning lamp Cleaning system Cleaning blade Scanning system Flat bed scanning by CCD image sensor Bit map memory 12 MB standard Image storage memory 16 MB standard Resolution 600 x 600 dpi L...

Page 17: ...separator mailbox eject unit feedshift unit paper feed desk large paper deck finisher key counter key card add on memory SIMM bypass unit original cover fax board printerboard and network board Option...

Page 18: ...2AR CONTENTS 1 2 Handling Precautions 1 2 1 Drum 1 2 1 1 2 2 Developer and toner 1 2 1...

Page 19: ...abrupt changes in temperature and humidity Avoid exposure to any substance which is harmful to or may affect the quality of the drum Do not touch the drum surface with any object Should it be touched...

Page 20: ...ction 1 3 3 1 3 3 Drive system 1 3 4 1 3 4 Mechanical construction 1 3 6 1 Paper feed section 1 3 6 2 Main charging section 1 3 10 3 Optical section 1 3 13 4 Developing section 1 3 19 5 Transfer and s...

Page 21: ...cover 5 Paper transfer section cover release lever 6 Left 1 cover 7 Left 2 cover 8 Toner cartridge 9 Toner cartridge release lever 0 Paper feed section knob 1 Front cover Upper drawer Lower drawer Con...

Page 22: ...or Paper select key Preset R E enter key Copy exposure adjustment keys Copy exposure indicators Auto Exp key indicator Copy quality selection key Photo text photo indicators Manual cursor up key Curso...

Page 23: ...hine cross section 1 Paper feed section page 1 3 6 2 Main charging section page 1 3 10 3 Optical section page 1 3 13 4 Developing section page 1 3 19 5 Transfer and separation section page 1 3 29 6 Cl...

Page 24: ...4 Drive system 1 Drive motor gear 2 Gear 67 20 3 Drum drive belt 4 Drum drive pulley 5 Gear 92 35 6 Cleaning drive gear 7 Gear 30 8 Gear 16 9 Gear 53 37 0 Gear 30 Gear 32 Gear 30 Fixing drive gear Gea...

Page 25: ...25 Gear 25 Upper paper feed clutch gear Gear 30 Feed idle gear 1 Feed idle gear 2 Feed gear 25 Feed clutch 2 gear Gear 25 Gear 25 Gear 25 Lower paper feed clutch gear Feed idle gear 3 Feed idle gear 4...

Page 26: ...condary feed subsections Primary feed conveys paper from the upper drawer or lower drawer to the left and right registration rollers at which point secondary feed takes place and the paper travels to...

Page 27: ...tical paper conveying guide Lower feed guide Duplex junction guide Feed guide Transfer guide Right transfer guide Upper paper feed clutch PFCL U Lower paper feed clutch PFCL L fi Feed clutch 1 FCL1 fl...

Page 28: ...he forwarding pulley and paper feed pulley The separation pulley prevents multiple sheets from being fed at one time via the torque limiter EPCB CN10 A5 RCL PFCL U PFCL L FCL1 FCL2 FCL3 FSW2 FSW3 FSW1...

Page 29: ...e to start primary paper feed B At the same time as the leading edge of the paper turns feed switch 1 FSW1 on feed clutch 1 FCL1 turns on and the right feed roller rotates C 88 ms after the leading ed...

Page 30: ...he drum and the main charger assembly The main charger assembly charges the drum so that a latent image is formed on the surface the shield grid ensuring the charge is applied uniformly Tungsten wire...

Page 31: ...n charger front lid 3 Main charger rear lid 4 Tungsten wire 5 Charger spring 6 Charger terminal 7 Charger pin 8 Shield grid GRID CONT MC REM MC ALM 24 V DC MC Grid Drum HVTPCB CN1 2 CN1 1 CN1 3 CN1 10...

Page 32: ...y 100 ms 500 ms 200 ms 518 ms A B C Timing chart 1 3 2 Main charging A 100 ms after the start key is pressed the drive motor DM turns on B 500 ms after the drive motor DM turns on main charging MC REM...

Page 33: ...ning and the laser scanner unit for printing 4 2 5 6 7 3 1 9 8 0 Figure 1 3 10 Optical section 1 Scanner 2 Mirror frame 3 Mirror 1 4 Mirror 2 5 Mirror 3 6 Exposure lamp EL 7 Reflector 8 Image scanning...

Page 34: ...ine to scan from side to side The speed of the mirror frame is half the speed of the scanner When the SRDF is used the scanner and mirror frame stop at the DF original scanning position to start scann...

Page 35: ...sed the scanner motor SM reverses for 270 pulses and then rotates forward B 414 pulses after the scanner motor SM starts rotating forward the FVSYNC signal turns on for 9921 pulses for scanning C The...

Page 36: ...edly turning the laser on and off the laser scanner unit forms a latent image on the drum surface Laser scanner unit 1 23 4 0 5 6 9 7 8 Figure 1 3 12 Laser scanner unit 1 1 Laser diode laser diode PCB...

Page 37: ...5 Lens Corrects for non linearity of the laser beam scanning speed on the drum surface keeps the beam diameter constant and corrects for the vertical alignment of the polygon mirror to ensure that th...

Page 38: ...tating drum forming a static latent image on the drum The static latent image of the letter A for example is formed on the drum surface as shown in Figure 1 3 15 Electrical charge is dissipated on the...

Page 39: ...e 1 3 16 Developing section The developing unit consists of the developing roller where a magnetic brush is formed the doctor blade and the developing spirals that agitate the developer In the toner r...

Page 40: ...2AR 1 3 20 Cleaning spiral Toner recycling assembly Flow of the recycled toner Toner recycle spiral Left developing spiral Right developing spiral Figure 1 3 17 Toner recycling...

Page 41: ...agnet roller and the position of the doctor blade A developing bias voltage generated by the high voltage transformer HVTPCB is applied to the developing roller to provide image contrast 1 3 2 4 7 6 5...

Page 42: ...nsor detects the ratio of toner to carrier in the developer near it and converts it into a voltage As more toner is used the ratio of toner to carrier decreases increasing the toner sensor output volt...

Page 43: ...oner empty detection inhibit time the toner feed motor TFM turns on to replenish toner B As toner is replenished the toner sensor output voltage falls until it drops below the toner feed stop level an...

Page 44: ...rtridge the toner feed motor TFM turns on to replenish toner F When toner is replenished the toner sensor output voltage falls until it drops to the toner feed stop level The toner being replenished m...

Page 45: ...data 2 0 4 0 10 0 20 0 32 0 Absolute humidity g m3 A B C D E Figure 1 3 21 Correction based on the absolute humidity A When the absolute humidity is between 0 and 2 0 g m3 a constant value of 10 is a...

Page 46: ...detected by the humidity sensing element into a voltage and sends it to the engine PCB EPCB The main PCB MPCB computes the absolute humidity based on this EHUMSENS signal and the temperature ETTH sig...

Page 47: ...the total drive motor time is cleared and the toner sensor control voltage correction data becomes 0 B When the total drive motor time is between 150 and 300 min the correction data is decreased accor...

Page 48: ...ed on the absolute humidity and fixing temperature B Accumulated drive time from the main switch turning on total drive motor on time If the fixing temperature at the main switch turning on is 50 C 12...

Page 49: ...3 24 Transfer and separation section The transfer and separation section consists mainly of the transfer roller and drum separation claws A high voltage generated by the high voltage transformer PCB H...

Page 50: ...2AR 1 3 30 TC REM TC TC CONT 24 V DC CN1 6 CN1 8 CN1 10 CN9 9 CN9 7 CN9 5 EPCB HVTPCB Transfer roller Drum Figure 1 3 25 Transfer and separation section block diagram...

Page 51: ...aper feed end A B C Timing chart 1 3 4 Transfer A 250 ms after the registration clutch RCL turns on to start secondary paper feed transfer charging TC REM starts B 419 ms after the trailing edge of th...

Page 52: ...lade that removes residual toner from the drum surface after the transfer process and the cleaning spiral that carries the residual toner back to the toner recycling assembly 1 4 3 2 Figure 1 3 26 Cle...

Page 53: ...ction The cleaning lamp CL consists of 47 LEDs which remove residual charge from the drum surface Cleaning lamp CL Figure 1 3 27 Charge erasing section CN13 4 EPCB CL Drum CL REM Figure 1 3 28 Charge...

Page 54: ...arge erasing A 100 ms after the start key is pressed the drive motor DM and cleaning lamp CL turn on simultaneously to remove the residual charge from the drum surface after the residual toner has bee...

Page 55: ...Fixing unit front left guide 4 Fixing unit rear right guide 5 Fixing unit rear left guide 6 Heat roller 7 Press roller 8 Heat roller separation claws 9 Fixing heater M H1 0 Fixing heater S H2 Fixing u...

Page 56: ...by the fixing unit pressure springs so that the toner on the paper is melted fused and fixed onto the paper When the fixing process is completed the paper is separated from the heat roller by its sepa...

Page 57: ...TH 5 Fixing unit themistor FTH The heat roller is heated by fixing heaters M or S H1 or H2 inside it its surface temperature is detected by the fixing unit thermistor FTH and is regulated by the fixi...

Page 58: ...ame time cooling fan motors 1 and 2 CFM1 and 2 turn on When the fixing temperature is 100 C 212 F or lower at the main switch MSW turning on and the absolute humidity is 15 g m3 or higher cooling fan...

Page 59: ...er and the ambient temperature is 18 C 64 4 F or higher Copying is enabled at the earlier timing of either 41 s after fixing heater M H1 turning on or when the copier enters secondary stabilization Ot...

Page 60: ...separation Paper is separated in the fixing section by the separation claws as shown in Figure 1 3 32 Heat roller separation claws Heat roller Press roller separation claws Press roller Figure 1 3 32...

Page 61: ...3010 S M MCA ELECTRICAL SECTION II II Electrical Section...

Page 62: ...2AR CONTENTS 2 1 Electrical Parts Layout 2 1 1 Electrical parts layout 2 1 1 1 Copier 2 1 1...

Page 63: ...0 3 14 12 16 13 7 15 9 Figure 2 1 1 Copier PCBs 1 Main PCB MPCB Controls the other PCBs electrical components and optional devices modifies and modulates image signal SIMM Stores data during memory co...

Page 64: ...originals 9 Laser diode PCB LDPCB Generates and controls the laser light 10 Beam detection PCB BDPCB Detects the laser light 11 Humidity sensor PCB HUMPCB Detects the absolute humidity External humid...

Page 65: ...er switches and sensors in the scanning system 1 Scanner home position switch SHPSW Detects the scanner in the home position 2 Original detection switch ODSW Operates the original size sensor 3 Origin...

Page 66: ...he upper drawer 2 Lower paper switch PSW L Detects the presence of paper in the lower drawer 3 Upper paper length switch PLSW U Detects the length of paper in the upper drawer 4 Lower paper length swi...

Page 67: ...W L Detects the lower drawer lift reaching the upper limit 9 Feed switch 1 FSW1 Controls the feed clutch 1 drive timing 10 Feed switch 2 FSW2 Controls the feed clutch 2 drive timing 11 Feed switch 3 F...

Page 68: ...switch 1 SSW1 Breaks the safety circuit when the front cover is opened resets paper jam detection 4 Safety switch 2 SSW2 Breaks the safety circuit when left 1 cover is opened resets paper jam detectio...

Page 69: ...scanner 3 Upper lift motor CLM U Drives the upper drawer lift 4 Lower lift motor CLM L Drives the lower drawer lift 5 Toner feed motor TFM Replenishes toner 6 Paper conveying section fan motor Assists...

Page 70: ...Primary paper feed from the upper drawer 2 Lower paper feed clutch PFCL L Primary paper feed from the lower drawer 3 Feed clutch 1 FCL1 Controls the drive of the right feed roller 4 Feed clutch 2 FCL2...

Page 71: ...at roller 4 Fixing heater S H2 Heats the heat roller 5 Fixing unit thermostat TH Prevents overheating in the fixing section 6 Laser scanner unit LSU Writes image Polygon motor PM Drives the polygon mi...

Page 72: ...2AR CONTENTS 2 2 Detection of Paper Misfeed 2 2 1 Paper misfeed detection 2 2 1 2 2 2 Paper misfeed detection conditions 2 2 2...

Page 73: ...a message indicating a paper jam the jam location and the jam code on the message display in the operation unit To remove the jammed paper open the drawer front cover left 1 cover or left 2 cover as n...

Page 74: ...2AR 2 2 2 2 2 2 Paper misfeed detection conditions Figure 2 2 2 PFCL U FSW1 FSW2 PFCL L ESW RCL RSW Feedshift unit or eject unit optional FSSW 2AR 1...

Page 75: ...n on within 1270 ms of the retry Timing chart 2 2 1 No paper feed from copier lower drawer jam code 11 Feed switch 2 FSW2 does not turn on within 1369 ms of the lower paper feed clutch PFCL L turning...

Page 76: ...Multiple sheets in paper feed section jam code 21 When paper is fed from the upper drawer feed switch 1 FSW1 does not turn off within 3113 ms of turning on 3113 ms On Off FSW1 Timing chart 2 2 5 When...

Page 77: ...7 Feed switch 2 FSW2 does not turn off within 1369 ms of the lower paper feed clutch PFCL L turning on PFCL L 1369 ms On Off On Off FSW2 Timing chart 2 2 8 Multiple sheets in copier vertical conveying...

Page 78: ...time ms is for A4 lateral 81 2 11 paper Jam in registration transfer section jam code 30 The registration switch RSW does not turn off within 1448 ms of feed switch 1 FSW1 turning off RSW 1448 ms On...

Page 79: ...itch ESW does not turn on within 3762 ms of the registration clutch RCL turning on RCL 3762 ms On Off On Off ESW Timing chart 2 2 13 The feedshift switch FSSW does not turn on within 3888 ms of the re...

Page 80: ...2 3 2 Main PCB 2 3 3 2 3 3 Scanner control PCB 2 3 5 2 3 4 Engine PCB 2 3 6 2 3 5 Scanner motor PCB 2 3 7 2 3 6 Operation unit main PCB operation unit right PCB and operation unit left PCB 2 3 8 2 3 7...

Page 81: ...PCB TRC 21 PC 20 TRC 20 C37 C50 C40 C41 C51 5V 5V 5 V AC input Noise filter circuit L1 and L2 Rectifier circuit Fixing heater control circuit Switching control circuit IC1 24 V DC output circuit IC30...

Page 82: ...outputs a stable 24 V DC by the function of shunt regulator IC30 The output status of the 24 V DC is fed back to the PWM controller IC1 in the switching control circuit via the photo coupler PC1 Base...

Page 83: ...11 SIMM ISU LSU FCPCB PCPCB BUF BUF BUF EPCB LVD LVD MPCB Main CPU IC22 Communication processor 1 IC30 Communication processor 2 IC28 Bit map memory DRAMs IC14 to IC19 Scan data Memory image data Engi...

Page 84: ...ion in the CPU communication processor 1 IC30 and communication processor 2 IC28 The main CPU IC22 also controls the ASIC IC11 and CODEC IC20 during memory copying for sort and rotation copies The mai...

Page 85: ...Analog image signal even Buffer IC10 Figure 2 3 3 Scanner control PCB block diagram The scanner control PCB SCPCB consists of CPU IC5 MIP IC17 SHD IC11 and EPROM IC7 In accordance with the control pr...

Page 86: ...ia connectors serves to interface control signals between the engine CPU IC35 on the main PCB MPCB and each drive system unit The control signal from the main PCB MPCB controls the drive system units...

Page 87: ...ors DT1 and DT2 The current setting voltage SM Vref mode signals SM M1 SM M2 SM M3 and SM CWB phase switching clock signal SM CLK and drive stop signal SM ENABLE from the scanner control PCB SCPCB con...

Page 88: ...ection signal Serial communication Serial communication LCD INPCB LCD _RD _WR _RD Address bus Address bus Flash tool assembly detection signal Fax data ROM detection signal Data bus Data bus C F L VEE...

Page 89: ...unit PCB FAPCB consist of key switches and LEDs They are controlled by the scan signals and LED lighting signals from the operation unit main PCB OMPCB The LCD inverter PCB LCDINPCB is turned on off b...

Page 90: ...and CLK from the clock signal generator on the scanner control PCB SCPCB are sent to the CCD PCB CCDPCB where clock driver IC3 generates eleven clock signals to drive CCD IC1 Upon reception of clock s...

Page 91: ...he laser diode D1 on off according to the image data _DATA differentially transmitted from the main PCB MPCB transceiver to the laser diode PCB LDPCB transceiver IC2 Upon detection of laser beam from...

Page 92: ...3010 S M MCA III Set Up and Adjustment Section III SET UP AND ADJUSTMENT SECTION...

Page 93: ...rocedure 3 1 2 3 1 2 Setting initial copy modes 3 1 16 3 1 3 Installing the add on memory SIMM option 3 1 17 3 1 4 Installing the drawer heater service part 3 1 19 3 1 5 Installing the key counter opt...

Page 94: ...Choose a surface capable of supporting the weight of the machine Place the machine on a level surface maximum allowance inclination 1 Avoid air borne substances that may adversely affect the machine o...

Page 95: ...loper Install the optional devices Install a toner cartridge Install the transfer roller assembly Exit maintenance mode Start Adjust the fixing pressure Carry out initial developer setting maintenance...

Page 96: ...2AR Light source unit 1 pins Light source unit 2 pin Spacers Transfer roller assembly Figure 3 1 2 For 220 240 V specifications only Note The original cover is standard for 220 240 V specifications 2...

Page 97: ...book 3 Outer case 9 Transfer roller Spacers 1 4 Top pads assembly Power cord 1 5 Skid 0 Hinge joint Business reply mail 2 6 Inner frame Bar code labels 1 For 220 240 V specifications only 2 For 120 V...

Page 98: ...tape holding the left 1 cover 4 Remove the two tapes holding the power cord 5 Remove the three tapes holding the pins for light source units 1 and 2 Figure 3 1 4 Remove the tapes Drawers Left 1 cover...

Page 99: ...and bypass unit 7 Open the bypass table and remove the two spacers For 220 240 V specifications only Figure 3 1 5 8 Open the front cover and remove the tape holding the cartridge mount Figure 3 1 6 C...

Page 100: ...e the tape from each of them Figure 3 1 7 1 Remove the two pins for light source unit 1 and the pin for light source unit 2 Figure 3 1 8 Remove pins holding light source units 1 and 2 Light source uni...

Page 101: ...lation manuals or service manuals Note Be sure to install either the eject unit or feedshift unit Standard for 220 240 V specifications 1 Open the front cover left 1 cover and the paper transfer secti...

Page 102: ...3 1 10 2 Shake the developer bottle well to agitate the developer 3 While turning the magnet roller gear in the direction of the arrow in the diagram uniformly pour developer into the image formation...

Page 103: ...he direction of the arrow in the diagram Cleaning blade release lever Figure 3 1 12 2 Refit the image formation unit using the two screws 3 Connect the 12 pin connector 12 pin connector Figure 3 1 13...

Page 104: ...he front and rear of the fixing unit clockwise until each pin stops Caution Never turn the fixing pressure nuts Figure 3 1 14 Adjusting the fixing pressure 2 Close the paper transfer section cover and...

Page 105: ...y 2 minutes and the toner feed start level and toner sensor control voltage are automatically set The settings are displayed on the message display Display example INPUT 135 Toner sensor input level C...

Page 106: ...2 Shift the toner cartridge release lever to the right until it stops Figure 3 1 15 3 Shake the toner cartridge horizontally eight to ten times to agitate the toner Figure 3 1 16 Install a toner cartr...

Page 107: ...toner cartridge by fitting the projection on the cartridge bottom into the groove inside the machine 5 Secure the toner cartridge by shifting the toner cartridge release lever to the left until it st...

Page 108: ...3 1 15 2AR This page has been left blank intentionally 2AR 5...

Page 109: ...time Turning auto preheat energy saver function on off Switching copy operation at toner empty detection Changing the copy count timing Switching between duplex simplex copy mode Setting preheat ener...

Page 110: ...o the main PCB requires the following part Add on memory 16 MB or 32 MB 72 pin SIMM Procedure 1 Remove the eight screws holding the rear cover and then the cover 2 Remove the eleven screws holding the...

Page 111: ...ly be inserted into add on memory slot CN7 when a memory has already been inserted into memory slot CN6 If add on memory slot CN7 is used only the main PCB does not recognize the presence of the add o...

Page 112: ...120 V specifications Two 2 BVM4 6 bronze binding screws P N B1304060 ON OFF sticker P N 3A105020 Procedure 1 Remove the eight screws holding the rear cover and then the cover 2 Pull the upper and lowe...

Page 113: ...d insert the 2 pin connector of the drawer heater into the 2 pin connector of the relay cable Figure 3 1 22 6 Refit all removed parts 7 Affix the ON OFF sticker exactly onto the marked area above the...

Page 114: ...0 bronze TP A screws P N B4304200 One 1 M4 6 chrome TP A screw P N B4104060 Two 2 M3 6 bronze flat head screws P N B2303060 One 1 M3 bronze nut P N C2303000 Procedure 1 Fit the key counter assembly to...

Page 115: ...e upper right cover and then the cover 4 Cut out the aperture plate on the upper right cover using nippers 5 Pass the 4 pin connector inside the machine through the aperture Screws Screws Aperture 4 p...

Page 116: ...assembly inserted to the key counter cover retainer on the machine using the screw 4 pin connector 4 pin connector Key counter cover retainer 66060021 Key counter cover M4 10 screw B4304100 M4 20 scre...

Page 117: ...nal cable cover and then the cover Screws Signal cable cover Figure 3 1 27 2 Pull the 10 pin connector out of the machine remove the jumper and insert the connector into the 10 pin connector of the si...

Page 118: ...MMD host monitoring system device and tighten the two screws on the signal cable Screws Screw Screw Rear cover MMD host monitoring system device Figure 3 1 29 5 Insert one connector of the modular co...

Page 119: ...3 1 26 2AR 3 1 7 Installing the DF option Procedure 1 Insert the DF into the machine Figure 3 1 31 2 Close the DF Remove the two screws holding the cover and then the cover Figure 3 1 32 Screws Cover...

Page 120: ...xture Figure 3 1 33 4 Insert the tray assembly over the pin on the front of the DF 5 Fit the rear of the tray assembly to the DF using the tray mounting fixture removed in step 3 and the screw Figure...

Page 121: ...28 2AR 6 Insert the tray assembly connector into the DF connector Figure 3 1 35 7 Refit the cover removed in step 3 8 Insert the DF connector into the machine Figure 3 1 36 Connector Connector Connec...

Page 122: ...ssary see the SRDF service manual 11 If the leading or trailing edge of the copy image is skewed the lateral squareness is not correct adjust the lateral squareness of the DF Caution Before performing...

Page 123: ...justment screw in the direction of the white arrow e For copy example 2 rotate the adjustment screw in the direction of the black arrow b Yes No Press the start key to make a test copy End Is the imag...

Page 124: ...n the four screws loosened in step 2 5 Refit all removed parts Adjustment on a machine equipped with an adjustable hinge Figure 3 1 40 1 Open the SRDF 2 Loosen the screw securing the right leg of the...

Page 125: ...a maintenance item 3 2 1 2 Maintenance mode item list 3 2 4 3 Contents of maintenance mode items 3 2 8 3 2 2 Copier management 3 2 86 1 Executing a copier management item 3 2 86 2 Department manageme...

Page 126: ...ter the number of the maintenance item to be executed using the numeric or cursor up down keys Press the start key The maintenance item is run Press the stop clear key Enter 001 using numeric or curso...

Page 127: ...ms can be changed the item to be changed is selected by pressing the cursor up down keys 1 2 Correcting position of FOLIO U035 LENGTH DATA 330 WIDTH DATA 210 3 4 Metric 3 Start Stop Clear 4 Inch C Fig...

Page 128: ...Figure 3 2 2 1 Items Displays the selected item in reverse 2 Stop clear key Stops operation 3 Start key Starts operation Interrupt copy mode Outputting a test copy or PG pattern is required in some ma...

Page 129: ...eading edge registration of cooling image printing system Adjusting the leading edge registration of image printing for duplex copying Adjusting the center line of image printing Adjusting the center...

Page 130: ...ter moir reduction mode U091 Checking shading U092 Adjusting the scanner automatically U093 Setting the exposure density gradient Text text and photo photo mode U099 Checking the original size detecti...

Page 131: ...rd or key counter U206 Setting the presence or absence of the coin vender U208 Setting the paper size for the large paper deck U210 Reversing the LCD U243 Checking the operation of the DF motors solen...

Page 132: ...ion data Setting the self telephone number Setting the type of telephone line Setting the number of rings in fax telephone auto select mode Setting remote diagnostic transmission U604 Clearing data Cl...

Page 133: ...ing Setting the transmission intervals U608 Setting transmission Setting the method to process errors Setting the number of times of DIS signal reception Setting the reference for RTN signal output Se...

Page 134: ...time 10 PPS Make time 20 PPS U617 Outputting lists Settings list Action list Monitor list Own status report Protocol list U650 Setting the fax paper size Setting the number of lines to be ignored when...

Page 135: ...ounts by paper feed locations U903 Checking clearing the paper jam counts U904 Checking clearing the service call counts U905 Checking clearing counts by optional devices U907 Setting the paper eject...

Page 136: ...3 2 11 2AR 1 This page is intentionally left blank...

Page 137: ...g an item is displayed 2 Select the item to be output using the cursor up down keys The selected item is displayed in reverse Display MAINTENANCE JAM SERVICE CALL Output list List of the current setti...

Page 138: ...urrently set telephone number is displayed Setting 1 Enter a telephone number up to 16 digits using the numeric keys Move the cursor using the cursor left right keys and select a number or symbol usin...

Page 139: ...start key The currently set machine number is displayed Setting 1 Enter the last six digits of the machine number using the numeric key Do not enter the first two digits 3 and 7 2 Press the start key...

Page 140: ...ode screen Changes in the following settings can be made Paper feed locations Magnifications Simplex or duplex copy mode Number of copies continuous copying is performed when set to 999 Copy density K...

Page 141: ...ng all data Description Initializes all the backup RAM on the main PCB to return to the original settings Purpose Used when replacing the backup RAM on the main PCB Method 1 Press the start key The sc...

Page 142: ...specifications depending on the destination selected in U252 Purpose Used to return the machine settings to the factory settings Method 1 Press the start key The screen for executing is displayed 2 Se...

Page 143: ...d 1 Press the start key The screen for executing is displayed 2 Select SCANNER using the cursor up down keys 3 Press the start key 4 Select EXECUTE using the cursor up down keys It is displayed in rev...

Page 144: ...m is displayed in reverse and the operation starts Display MAIN EJECT FWD L EJECT FWD H EJECT REV L EJECT REV H Operation Drive motor turns on and developing bias turns on Feedshift motor rotates forw...

Page 145: ...on and off manually to check the status When the on status of a switch is detected that switch is displayed in reverse Display F1 F2 F3 F4 BYP RES EJE BRA DUP JOB Switches Feed switch 1 FSW1 Feed swi...

Page 146: ...y The selected item is displayed in reverse and the clutch turns on for 1 s Display PF1 PF2 PFBYP FEED1 FEED2 FEED3 BYPF RES DUPF Clutches Upper paper feed clutch PFCL U Lower paper feed clutch PFCL L...

Page 147: ...d to be operated using the cursor up down keys 3 Press the start key The selected item is displayed in reverse and the solenoid turns on for 1 s Display BRANCH1 SOL BRANCH2 SOL MAIN SW SOL Solenoids F...

Page 148: ...sed Method Press the start key The screen for selecting an item is displayed Setting 1 Select the item to be set using the cursor up down keys The selected item is displayed in reverse 2 Change the se...

Page 149: ...ng using the cursor left right keys Display MAIN MOTOR EJECT MOTOR POLYGON MOTOR Description Setting range Initial setting Drive motor speed adjust ment Feedshift motor speed adjustment Polygon motor...

Page 150: ...m B 260 1 3 mm U053 cont Figure 3 2 3 Adjustment 1 Output an A3 11 17 VTC pattern in interrupt mode 2 Measure A and B on the VTC pattern Figure 3 2 3 and perform the following adjustments if they are...

Page 151: ...using the cursor up down keys Display MODE 0 MODE 1 Operation Regular operation When the absolute humidity is 15 g m3 or higher copying is enabled 120 s after the main switch turning on When the abso...

Page 152: ...range Initial setting Density in text mode Density in text and photo mode Density in photo mode 0 to 23 0 to 23 0 to 23 12 12 12 Increasing the setting makes the density lower and decreasing it makes...

Page 153: ...aws or stains inside the shading plate To prevent this problem the shading position should be changed so that shading is possible without being affected by the flaws or stains Method 1 Press the start...

Page 154: ...magnification Adjustment See pages 3 3 38 and 39 U066 Adjusting the leading edge registration for scanning an original on the contact glass Adjustment See page 3 3 40 U067 Adjusting the center line fo...

Page 155: ...U070 U071 U072 U404 Method Press the start key Setting 1 Change the setting using the cursor left right keys Display CONVEY SPEED Description Change in value per step Initial setting Setting range Or...

Page 156: ...reen for selecting an item is displayed Setting 1 Select the item to be set using the cursor up down keys The selected item is displayed in reverse 2 Change the setting using the cursor left right key...

Page 157: ...t the registration as follows For copy example 1 increase the setting of LEAD EDGE ADJ For copy example 2 decrease the setting of LEAD EDGE ADJ U071 cont Figure 3 2 4 Completion Press the stop clear k...

Page 158: ...owing adjustments have been made in maintenance mode U053 U034 U402 U070 U071 U072 U404 Method Press the start key Setting 1 Change the setting using the cursor left right keys Description DF center l...

Page 159: ...Check the copy image and adjust the center line as follows For copy example 1 increase the setting For copy example 2 decrease the setting Figure 3 2 5 Completion Press the stop clear key The screen f...

Page 160: ...cursor left right keys Display ZOOM SIZE LAMP Operating conditions Setting range Magnification Paper size On and off of the exposure lamp 25 to 400 See below 0 off or 1 on Setting 8 9 24 36 39 40 41 P...

Page 161: ...rom the DF Method Press the start key Setting 1 Change the setting using the cursor left right keys Description DF input light luminosity Setting range Initial setting 0 to 8 4 Increasing the setting...

Page 162: ...the DF original scanning position is adjusted for the following originals Purpose Used to prevent appearance of black lines due to dust adhering in the original scanning position on the slit glass whe...

Page 163: ...DOT WIDTH When the setting is 8 8 dot data or larger is regarded as image and data of less than 8 dots is regarded as dust on the slit glass DENSITY The figure indicates the density in 256 levels of g...

Page 164: ...hod Press the start key The screen for selecting an item is displayed Setting 1 Select ON or OFF using the cursor up down keys The selected item is displayed in reverse Display ON OFF Description Moir...

Page 165: ...ecide the causes for fixing unevenness uneven density of the gray area of an image either due to optical shading or CCD or other problems Also to check the causes for a white or black line appearing l...

Page 166: ...rs the cause may be assumed based on the results of the scanning operation before shading if a white line appears they may be assumed based on the results of the scanning operation after shading Note...

Page 167: ...ayed 3 Press the start key Auto adjustment starts When adjustment is complete each adjusted value is displayed Display SCAN CENTER SCAN TIMING SUB SCAN Description Scanner center line Scanner leading...

Page 168: ...o be adjusted using the cursor up down keys 3 Press the start key The screen for the selected item is displayed Display TEXT MIXED PHOTO Description Density in text mode Density in text and photo mode...

Page 169: ...ER Figure 3 2 7 Exposure density gradient 3 Press the start key The value is set 4 To return to the screen for selecting an item press the stop clear key Interrupt copy mode While this maintenance ite...

Page 170: ...hecking the original width detection data Setting or checking the original width detection threshold Display DATA B W LEVEL Description Method to display the original width detection data 1 Place an o...

Page 171: ...ed by scanner data and original size sensor detection data Black no original data at the point on the boundary between original area and no original area White original present data at the point on th...

Page 172: ...ON or LASER ON OFF using the cursor up down keys 2 Press the start key The selected operation starts 3 To stop operation press the stop clear key Setting the grid control voltage 1 Select MC DATA usi...

Page 173: ...ET Description Setting the developing bias 1 Select the item to be adjusted using the cursor up down keys The selected item is displayed in reverse 2 Change the setting using the cursor left right key...

Page 174: ...TC TIMING setting makes the transfer voltage output timing later and improves paper separation performance 3 Press the start key The value is set 4 To check the transfer voltage output select TC ON u...

Page 175: ...before shipping do not clear it when installing Method Press the start key The drum counter count is displayed Clearing 1 Select CLEAR using the cursor up down keys 2 Press the start key The count is...

Page 176: ...Press the start key The drum drive time is displayed in minutes Clearing 1 Select CLEAR using the cursor up down keys 2 Press the start key The time is cleared and the screen for selecting a maintenan...

Page 177: ...er is set and the result is displayed Toner sensor output value Toner sensor control voltage Toner feed start level Absolute humidity Display INPUT CONTROL TARGET HUMID Description Supplement The foll...

Page 178: ...Method Press the start key The current setting for the toner sensor control voltage is displayed Setting 1 Change the setting using the cursor left right keys Description Toner sensor control voltage...

Page 179: ...s the start key Operation starts and the current data is dis played Toner is replenished until the toner sensor output value reaches the toner feed start level Toner sensor output value after start ke...

Page 180: ...when operation stops The screen for selecting a maintenance item No is displayed U155 Displaying the toner sensor output Description Displays the toner sensor output value and related data Purpose To...

Page 181: ...level 1 Select TARGET using the cursor up down keys 2 Change the setting using the cursor left right key 0 to 255 Description Toner feed start level Setting range Increasing the setting makes the ton...

Page 182: ...n To exit this maintenance item without changing the time press the stop clear key The screen for selecting a maintenance item No is displayed U158 Checking clearing the developing count Description D...

Page 183: ...the setting using the cursor left right keys Display CONT TEMP 1ST TEMP 2ND TEMP DUP TEMP RUN TIME Description Setting range Initial setting Normal stabilization fixing temperature Primary stabilizat...

Page 184: ...displayed To exit the forced stabilization mode turn the power off and on Completion To exit this maintenance item without executing forced fixing stabilization press the stop clear key U196 Turning t...

Page 185: ...ent temperature are displayed in centigrade C Completion Press the stop clear key The screen for selecting a maintenance item No is displayed U200 Turning all LEDs on Description Turns all the LEDs on...

Page 186: ...3 Operate the device following the instructions on the screen Completion Press the stop clear key on the basic status screen The screen for selecting a maintenance item No is displayed 1 2 3 4 5 Curs...

Page 187: ...on upper 00000008 2 Pulley forwarding upper 00000125 3 Pulley paper feed upper Maintenance parts check clear 17 Thermistor fixing unit 00000000 18 Separation claw heat roller 00000025 19 Separation cl...

Page 188: ...m using the cursor up down keys Start key Start key Ready to send Push start key Ready to send Push start key Transmission starts Basic status screen Phone number setting Phone number setting Select a...

Page 189: ...sing the numeric keys and press the start key Standard Enter the digits using the numeric keys and press the start key Standard Enter the digits using the numeric keys and press the start key Special...

Page 190: ...ey Initialization succeeded Initialization successful Basic status screen xxxx Reason for failure Start key MMD system problem No Screen depending on the reason for failure Yes 5 1 Select Retry initia...

Page 191: ...3 2 62 2AR 1 This page is intentionally left blank...

Page 192: ...e item to be operated using the cursor up down keys The selected item is displayed in reverse Display ADF RADF ADF NON P RADF NON P Operation With paper single sided original With paper double sided o...

Page 193: ...20 240 V specifications Method Press the start key Setting 1 Select the optional counter to be installed using the cursor up down keys The selected counter is displayed in reverse Display KEY CARD KEY...

Page 194: ...onal large paper deck Note that the setting cannot be changed on inch specification machines since the paper size for the large paper deck is fixed Purpose To change the setting when the size of paper...

Page 195: ...or selecting an item is displayed Setting 1 Select ON or OFF using the cursor up down keys Reverse Normal Display ON OFF Description Initial setting OFF 2 Press the start key The setting is set and th...

Page 196: ...3 2 61 2AR 1 This page is intentionally left blank...

Page 197: ...s the start key The operation starts Display F MOT C MOT FD CL EJ SL RJ SL FD SL RP SL Motors solenoids and clutch Operation Original feed motor OFM Original paper conveying motor OCM Original feed cl...

Page 198: ...es Volume switch Method for the on off switches 1 Turn the respective switches on and off manually to check the status If the on status of a switch is detected the corresponding switch is displayed in...

Page 199: ...screen for selecting an item press the stop clear key Completion Press the stop clear key at the screen for selecting an item The screen for selecting a maintenance item No is displayed Numerical valu...

Page 200: ...listing order use the cursor up down keys 6 To return to the screen for selecting an item press the stop clear key Completion Press the stop clear key at the screen for selecting an item The screen f...

Page 201: ...feed clutch 2 PFCL2 On for 5 s On for 1 s On for 1 s On for 1 s Display DESK MOT FEED CL UPP CL LOW CL Motors and clutches Operation Desk drive motor DDM Desk feed clutch DFCL Upper desk paper feed c...

Page 202: ...cation using the cursor up down keys Display MAIL BOX JOB SEPARATOR LEFT BIN OUTPUT Paper eject device Mailbox Job separator Ejection slot at the machine left finisher not installed 3 When selecting t...

Page 203: ...aintenance item without changing the current setting press the stop clear key The screen for selecting a maintenance item No is displayed U251 Checking clearing the maintenance count Description Displ...

Page 204: ...Metric Europe specifications Metric Asia Pacific specifications 2 Press the start key The setting is set and the machine automatically returns to the same status as when the power is turned on Complet...

Page 205: ...start key The screen for selecting an item is displayed Setting 1 Select double or single count using the cursor up down keys Double count for A3 11 17 paper only Single count for all size paper Disp...

Page 206: ...for selecting an item is displayed Setting 1 Select either ON or OFF using the cursor up down keys The selected item is displayed in reverse Auto start function on Auto start function off Display ON O...

Page 207: ...Method Press the start key The current setting is displayed Setting 1 Change the setting using the cursor left right keys Description Auto clear time Setting range Initial setting 0 to 270 90 The sett...

Page 208: ...he screen for selecting an item is displayed Setting 1 Select ON or OFF using the cursor up down keys The selected item is displayed in reverse Auto preheat energy saver function on Auto preheat energ...

Page 209: ...pying Display SINGLE MODE CONTINUE MODE Description Initial setting SINGLE MODE 2 Set the number of copies that can be made using the cursor left right keys Description Number of copies after toner em...

Page 210: ...er conveying or fixing sections when the number of copies is counted before the paper reaches those sections copying is charged without a copy being made To prevent this the copy timing should be made...

Page 211: ...ss the start key The screen for selecting an item is displayed Setting 1 Select ON or OFF using the cursor up down keys Duplex copy Simplex copy Display ON OFF Description Initial setting OFF 2 Press...

Page 212: ...tion panel is turned off The fixing control temperature is decreased by 80 C 144 F When the ambient tempera ture at main switch turning on is 18 C 64 4 F or higher the copier is forcibly stabilized 30...

Page 213: ...e is displayed Purpose To change the time to display the maintenance due indication Method Press the start key The current setting is displayed Setting 1 Change the setting using the numeric or cursor...

Page 214: ...for selecting an item is displayed Setting 1 Select ON or OFF using the cursor up down keys Detects the paper sizes in the drawers automatically Does not detect the paper sizes in the drawers automat...

Page 215: ...nd the screen for selecting a maintenance item No is displayed Completion To exit this maintenance item without changing the current setting press the stop clear key The screen for selecting a mainten...

Page 216: ...0 2 6 2 6 0 5 mm 0 5 mm 0 5 mm 0 5 mm Increasing the setting makes the margin wider and decreasing it makes the margin narrower DF leading edge margin 3 1 0 mm DF left margin 2 0 5 mm DF right margin...

Page 217: ...g the destination code is displayed Default USA 181 Europe 004 There is no operation necessary on this screen INI ALL DATA COUNTRY CODE 000 2 Press the start key The screen for entering the OEM code i...

Page 218: ...ination code is displayed Default USA 181 Europe 004 There is no operation necessary on this screen INI KEEP DATA COUNTRY CODE 000 2 Press the start key The screen for entering the OEM code is display...

Page 219: ...OM version is displayed after two seconds INI SHIP DATA COMPLETED 000 000 INI SHIP DATA COMPLETED V1 00 U603 Setting the user registration data Description Makes user settings to enable the use of the...

Page 220: ...rding to the user request used to increase or decrease the time required to switch to a fax 1 Change the setting using the numeric keys 0 to 15 Description Number of fax telephone rings Setting range...

Page 221: ...ted on the department control report transmission history for displaying the transmission results and other transmission history such as document numbers excluding items regarding the machine variatio...

Page 222: ...ring period Sets the one shot detection time for remote switching Sets the continuous detection time for remote switching Sets the initial condition of fax image scanning quality Display MEM FULL FIN...

Page 223: ...splay 1 ON 2 OFF Description 2 Press the start key The value is set 3 To return to the screen for selecting an item press the stop clear key Setting the addition of an image to the report Selects if a...

Page 224: ...cted for remote switching Used to change the setting if malfunction occurs due to external noise during remote switching 1 Change the setting using the numeric keys 0 to 255 ms Description One shot de...

Page 225: ...ess the start key The screen for selecting an item is displayed 2 Select an item using the cursor up down keys 3 Press the start key The screen for the selected item is displayed Sets the conditions u...

Page 226: ...ic keys to change the setting Resolution is initialized Resolution is not initialized Display 1 ON 2 OFF Description 2 Press the start key The value is set 3 To return to the screen for selecting an i...

Page 227: ...Display INTERVAL TIMES VOICE RES TX SPEED RX SPEED F NET REMOTE CALL INT Description Setting the auto redialing interval Change the setting to prevent the following problems fax transmission is not p...

Page 228: ...setting 1 Change the setting using the numeric keys V 17 14400 bps V 17 9600 bps V 27ter 4800 bps V 27ter 2400 bps Display 1 144 2 96 3 48 4 24 Description 2 Press the start key The value is set 3 To...

Page 229: ...of telephone connected to the machine 1 Enter 1 or 2 using the numeric keys to change the setting One shot detection Continuous detection Display 1 ONE 2 CONT Description 2 Press the start key The va...

Page 230: ...FREQ Description Setting the method to process errors Selects if transmission is to be treated as in error if a RTN or PIN signal is received If it is treated as in error an alarm sounds and a transm...

Page 231: ...a DIS signal is received Used when problems occur due to echoes at the sender 1 Enter 1 or 2 using the numeric keys to change the setting Sends a DCS 500 ms after receiving a DIS Sends a DCS 200 ms af...

Page 232: ...rity than image quality 1 Enter 1 or 2 using the numeric keys to change the setting ECM reception is enabled ECM reception is disabled Display 1 ON 2 OFF Description 2 Press the start key The value is...

Page 233: ...r international communication 1 Enter 1 or 2 using the numeric keys to change the frequency 2100 Hz 1100 Hz Display 1 2100 2 1100 Frequency of the CED signal 2 Press the start key The value is set 3 T...

Page 234: ...T0 time out time Sets the time before detecting a DIS signal after a dialing signal is sent Depending on the quality of the exchange or when the auto select function is selected at the destination uni...

Page 235: ...t time or fax mode is selected automatically when the time elapses In fax telephone auto select mode change the setting when fax reception is unsuccessful or a telephone fails to receive a call 1 Chan...

Page 236: ...ting 1 to 255 s 60 2 Press the start key The value is set 3 To return to the screen for selecting an item press the stop clear key Setting the Td time out time Sets the length of the time required to...

Page 237: ...isplay SGL LEVEL MODEM SGL OUTPUT ADJ VOICE RES LEVEL Description Setting the modem output level To be set when installing the machine to adapt to the line characteristics 1 Change the setting using n...

Page 238: ...on 2 Press the start key The value is set 3 To return to the screen for selecting an item press the stop clear key Completion Press the stop clear key at the screen for selecting an item The screen fo...

Page 239: ...ed item is displayed Sets the DTMF high frequency group output level Sets the DTMF low frequency group output level Display DTMF TX LEVEL H DTMF TX LEVEL L Description Setting 1 Change the setting usi...

Page 240: ...for the selected item is displayed Adjusts the DTMF high frequency group output level Adjusts the DTMF low frequency group output level Display SGL LVL DTMF H SGL LVL DTMF L Description Setting 1 Cha...

Page 241: ...nnected to either a PBX or public switched telephone network 1 Enter 1 or 2 using the numeric keys to change the setting Connected to the public switched telephone network Connected to a PBX Display 1...

Page 242: ...the setting Detects busy tone Does not detect busy tone Display 1 ON 2 OFF Description 2 Press the start key The value is set 3 To return to the screen for selecting an item press the stop clear key...

Page 243: ...is displayed 2 Select an item using the cursor up down keys 3 Press the start key The screen for the selected item is displayed Make time 10 PPS Make time 20 PPS Display MAKE TIME 10 PPS MAKE TIME 20...

Page 244: ...list of software switches self telephone number confidential boxes ROM versions and other information Outputs a list of error history transmission line details and other information Outputs a list of...

Page 245: ...ions Display CUT LINE 100 CUT LINE AUTO CUT LINE A4 RX WIDTH 11 Description Setting the number of lines to be ignored when receiving a fax at 100 magnification Sets the maximum number of lines to be i...

Page 246: ...g the entire data on a page is further reduced so that it can be recorded on the same page 1 Change the setting using the numeric keys Description Number of lines to be ignored when receiving in auto...

Page 247: ...on mode Setting range Initial setting Change in value per step 0 to 22 3 6 lines Increase the setting if a page received in reduction mode is over reduced and too much trailing edge margin is left Dec...

Page 248: ...e If over the setting reception in rotation mode is disabled Purpose Increase the setting if reception in rotation mode is disabled However this can result in partially missing transmission data on th...

Page 249: ...em is displayed Sets the criteria for receiving a TCF signal 2 Sets the reception of short protocol transmission Sets the CNG detection times in fax telephone auto select mode Display TCF CHECK 2 SHOR...

Page 250: ...col transmission Ignores short protocol transmission Display 1 ON 2 OFF Description 2 Press the start key The value is set 3 To return to the screen for selecting an item press the stop clear key Sett...

Page 251: ...he setting V 34 transmission is available V 34 transmission is inhibited Display 1 ON 2 OFF Description 2 Press the start key The value is set Completion Press the stop clear key The screen for select...

Page 252: ...tem is displayed 2 Select an item using the cursor up down keys Performs tests on SRAM and DRAM Performs tests on optional memories Display BOARD MEMORY BOARD OP MEM Description Performing tests on SR...

Page 253: ...memory error B M Bitmap memory error If the test result is NG memory is not installed TEST OPTION MEMORY NG DRAM IMG IMG Image memory is not installed B M Bitmap memory is not installed 2 To return t...

Page 254: ...rawer Paper feed desk lower drawer Large paper deck Duplex unit Display BYPASS 2 FIRST SECOND THIRD 1 FORTH 1 LCF 1 DUPLEX 1 Paper feed locations 1 Optional 2 Optional for 120 V specifications only Wh...

Page 255: ...3 2 38 2AR 1 This page is intentionally left blank...

Page 256: ...top clear key The screen for selecting a maintenance item No is displayed U904 Checking clearing the service call counts Description Displays or clears the service call code counts by types Purpose To...

Page 257: ...of single sided originals that has passed through the DF in ADF mode No of double sided originals that has passed through the DF in RADF mode Display CHANGE ADF RADF Description SRDF DF No of copies t...

Page 258: ...reset after partial operation is performed due to problems in the drawers or other sections and the related parts are serviced Method 1 Press the start key 2 Select EXECUTE using the cursor up down ke...

Page 259: ...s the start key The screen for the selected item is displayed Setting 1 Select the paper eject location using the cursor up down keys Eject tray Job separator Display INNER TRAY JOB SEPARATOR Paper ej...

Page 260: ...the more frequently used mode Method Press the start key The screen for selecting an item is displayed Setting 1 Select the mode copier or fax to be given priority using the cursor up down keys 2 Pre...

Page 261: ...The time is set and the screen for selecting a maintenance item No is displayed Completion To exit this maintenance item without changing the accumulated time press the stop clear key The screen for s...

Page 262: ...hod 1 Press the start key The screen for selecting an item is displayed 2 Select the VTC PG pattern to be output using the cursor up down keys Display PG pattern to be output Purpose Center line adjus...

Page 263: ...ed 1 Executing a copier management item Press the language key Select Default and press the enter key Enter the management code Select Management and press the enter key see page 3 2 87 Select End and...

Page 264: ...the department code to be deleted 4 Press the enter key 5 Select Yes and press the enter key 6 Select End and press the enter key Altering the copy limit 1 Select Management setting and press the ent...

Page 265: ...n off 1 Select Management on off and press the enter key 2 Select On or Off 3 Press the enter key Printing management list 1 Set A4 11 81 2 copy paper 2 Select Printer management list and press the en...

Page 266: ...s the enter key 2 Adjust the exposure using the cursor left right keys 3 Press the enter key Exposure mode Selects auto or manual exposure to be given priority in initial mode 1 Select Exposure mode a...

Page 267: ...the enter key Border erase width Sets the default setting of the border width for sheet border erase copying or book border erase copying 1 Select Border Erase w and press the enter key 2 Select the...

Page 268: ...ort copy mode Setting is not available when the finisher is installed 1 Select Rotate sort and press the enter key 2 Select On or Off 3 Press the enter key Insert tray 1 Select Insert tray and press t...

Page 269: ...enter key 2 Set the auto preheat time Setting is possible within the range of 5 to 45 minutes in increments of 5 minutes 3 Press the enter key Auto drawer switching Sets if the auto drawer switching f...

Page 270: ...ed 1 Select Management code change and press the enter key 2 Enter the new management code using the numeric keys 3 Press the enter key Silent mode Sets if the silent mode is available 1 Select Silent...

Page 271: ...2AR 5 Language Switches the language to be displayed 1 Select the language to be displayed Available languages are as follows Metric English German French Italian Spanish Inch English French Spanish J...

Page 272: ...ing 3 3 19 9 3 Adjusting the center line of image printing 3 3 20 9 4 Adjusting the margins of image printing 3 3 21 9 5 Adjusting the amount of slack in the paper 3 3 22 3 3 3 Optical section 3 3 24...

Page 273: ...54 1 Detaching and refitting the cleaning blade 3 3 54 2 Detaching the drum separation claw assemblies and the cleaning lower seal assembly 3 3 56 3 3 9 Fixing section 3 3 57 1 Replacing fixing heater...

Page 274: ...stat Never substitute wire for thermostats as the copier may be seriously damaged When installing a thermostat ensure the correct clearance if specified using a thickness gauge Use the following teste...

Page 275: ...nter the maintenance item number using the numeric keys or the cursor up down keys The selected maintenance item is run Press the stop clear key Press the start key Start End Maintenance mode is enter...

Page 276: ...lleys as follows Procedure Removing the primary paper feed units 1 Remove the two pivot hinges holding the front cover and then the cover 2 Remove the upper and lower drawers 3 Remove the one screw fr...

Page 277: ...ing pulley 4 Remove the stopper 5 Raise the forwarding pulley retainer in the direction the arrow and remove from the primary paper feed unit Forwarding pulley retainer Stopper Figure 3 3 2 Detaching...

Page 278: ...orwarding pulley Figure 3 3 3 Detaching the forwarding pulley Removing the paper feed pulley 7 Remove the two stop rings 8 Pull the paper feed shaft toward the rear of the primary paper feed unit in t...

Page 279: ...ing Separation pulley Figure 3 3 5 Detaching the separation pulley 11 Replace the forwarding paper feed and separation pulleys Caution When fitting the forwarding pulley orient it correctly as shown i...

Page 280: ...the drawer Drawer Figure 3 3 7 2 Remove the two screws holding the 8 pin socket from the rear of the drawer and then the socket 3 Detach the 8 pin paper width switch connector from the 8 pin socket 4...

Page 281: ...Screws Desk paper width switch Figure 3 3 9 Detaching the paper width switch 7 Apply the specified grease to the printed surface of the new paper width switch shaded area in the diagram and fit the s...

Page 282: ...wire from the clamp and then detach the connector 3 Remove the two screws holding the upper paper feed clutch retainer and then the retainer 4 Remove the stop ring and then the upper paper feed clutc...

Page 283: ...paper feed clutch retainer and then the retainer 5 Detach the connector of the lower paper feed clutch 6 Remove the stop ring and then the lower paper feed clutch 7 Replace the lower paper feed clutch...

Page 284: ...he feed clutches from the clamps and then detach the connectors 3 Remove the stop rings and then the feed clutches 4 Replace the feed clutches 5 Refit all removed parts Caution When fitting the clutch...

Page 285: ...egistration clutch Stop ring Paper conveying duct Screws Figure 3 3 14 Replacing the registration clutch 3 Remove the two screws Remove the interlock switch retainer while raising it 4 Remove the pape...

Page 286: ...While lifting the paper transfer section cover release lever open the paper transfer section cover 3 Remove the stop rings and then the paper conveying arms from the machine front and rear Figure 3 3...

Page 287: ...e one screw from each of the left feed and left registration cleaner assemblies and then the assemblies Left registration cleaner assembly Left feed cleaner assembly Figure 3 3 16 Replacing the left f...

Page 288: ...ing the paper transfer section cover release lever open the paper transfer section cover 3 Remove the stop rings and then the paper conveying arms from the machine front and rear 4 Remove the two scre...

Page 289: ...r and then detach the connector 3 Remove the two screws holding the image formation unit and then the unit 4 Remove the screw holding the right registration cleaner assembly and then the assembly Scre...

Page 290: ...per and the copy image are aligned For output example 1 move toward the machine front For output example 2 move toward the machine rear Yes No Load paper in the drawer and make a test copy Start End I...

Page 291: ...Enter maintenance mode Enter 034 using the numeric keys Press the start key Press the interrupt key Press the start key and make a test copy Is the leading edge registration correct Press the start ke...

Page 292: ...ts have been made in maintenance mode Procedure Yes No Start Enter maintenance mode Enter 407 using the numeric keys Press the start key Press the interrupt key Press the start key and make a test cop...

Page 293: ...cedure Yes No Start Enter maintenance mode Enter 034 using the numeric keys Press the start key Press the interrupt key Press the start key to make a test copy Is the image correct Press the start key...

Page 294: ...inter left right margins 50 100 25 Printer trailing edge margin 50 100 45 The greater the value the wider the margin The smaller the value the narrower the margin Changing the value by 1 moves the mar...

Page 295: ...the image missing or varying randomly copy example 1 Is the copy paper Z folded copy example 2 Press the stop clear key Exit maintenance mode Decrease the value using the cursor right key Increase the...

Page 296: ...r Z folded copy example 2 Press the stop clear key Exit maintenance mode Decrease the value using the cursor right key Increase the value using the cursor left key Press the start key Setting range 30...

Page 297: ...t glass remove the contact glass 3 Move the scanner to the cutouts at the center of the machine Caution When moving the scanner do not touch the exposure lamp nor inverter PCB 4 Detach the exposure la...

Page 298: ...n the glass 4 Remove the screw holding the front middle cover and then the cover 5 Remove the three screws holding the operation unit lower cover and then the cover 6 Detach the clamp and two connecto...

Page 299: ...or 1 lower frame 11 Remove the mirror 1 lower frame from the scanner unit 12 Detach the round terminal of the scanner wire from the scanner wire spring on the left side of the scanner unit 13 Remove t...

Page 300: ...tools at the machine front and rear using the two screws for each 3 Hook the round terminal on one end of the scanner wire onto the left catch on the inside of the scanner unit 1 4 Loop the scanner w...

Page 301: ...e pulley at the left of the scanner unit winding from below to above 4 10 Loop the scanner wire around the front groove in the scanner wire pulley on the mirror 2 frame winding from below to above 5 1...

Page 302: ...rror 2 frame 20 While holding the scanner wire on the mirror 1 lower frame secure the wire retainers at the front and rear of the scanner unit using the two screws for each Screws Screws Screws Screws...

Page 303: ...e sure to perform 6 Adjusting the lateral squareness reference Procedure 1 Remove the screw and then the upper front cover 2 Open the left 1 cover and remove the optional feedshift unit or eject unit...

Page 304: ...sembly 6 Detach the 10 pin connector and remove the two pins two springs and the screw holding the laser scanner unit and then the unit Cooling duct assembly Connectors Connector Clamp Screws Pin Spri...

Page 305: ...are not to touch the shading plate or rear face of the contact glass remove the contact glass 3 Remove the eight screws holding the scanner control PCB cover and then the cover 4 Detach the two connec...

Page 306: ...the ISU 8 Fit the ISU with two positioning pins 9 Refit the four screws 10 Remove the two positioning pins Screws Screws ISU Positioning pin Positioning pin Figure 3 3 35 Fitting the ISU 11 Refit all...

Page 307: ...f squareness is not obtained perform the longitudinal squareness adjustment Procedure Yes No Press the start key and make a test copy at 100 magnification Start Remove the contact glass Loosen the two...

Page 308: ...aintenance mode Enter 993 using the numeric keys Press the interrupt key Press the stop clear key Exit maintenance mode Select VTC PG2 Retighten the screw to secure the laser scanner unit Loosen the s...

Page 309: ...2AR 3 3 36 As viewed from machine left Laser scanner unit LSU adjustment table Screw Figure 3 3 39 Adjusting the position of the laser scanner unit 2AR 1...

Page 310: ...and adjust the lateral squareness of the ISU by rotating the pin For copy example 1 rotate the pin in the direction of the black arrow For copy example 2 rotate the pin in the direction of the white...

Page 311: ...End Press the interrupt key Exit maintenance mode Place an original and press the start key to make a test copy Is the image correct Setting range 25 25 Initial setting 0 Changing the value by 1 chan...

Page 312: ...upt key Exit maintenance mode Place an original and press the start key to make a test copy Is the image correct Setting range 25 25 Initial setting 0 Changing the value by 1 changes the magnification...

Page 313: ...dure Is the leading edge registration correct Yes No Start Enter maintenance mode Enter 066 using the numeric keys Press the start key Press the interrupt key Place an original and press the start key...

Page 314: ...es No Start Enter maintenance mode Enter 067 using the numeric keys Press the start key Press the interrupt key Place an original and press the start key to make a test copy Is the center line correct...

Page 315: ...ed Setting range initial setting Scanner left margin 0 20 2 Scanner leading edge margin 4 20 4 Scanner right margin 0 20 2 Scanner trailing edge margin 0 20 6 Changing the value by 1 moves the margin...

Page 316: ...ft 1 cover and then while lifting the paper transfer section cover release lever open the paper transfer section cover 2 Open the front cover and then detach the connector 3 Remove the two screws hold...

Page 317: ...3 3 44 4 Remove the screw holding the charger assembly and then the assembly Charger assembly Screw Figure 3 3 48 Detaching the charger assembly 5 Replace the charger assembly 6 Refit all removed par...

Page 318: ...lowed by a dry cloth when replacing the tungsten wire Do not use organic solvents such as alcohol or thinner to clean the shield grid Procedure 1 Remove the two screws holding the image formation unit...

Page 319: ...k the other end of the charger spring onto the charger terminal of the main charger rear housing 8 Pass the tungsten wire through the V shaped notch in the tungsten wire retainer pin and stretch it ta...

Page 320: ...otect the surface from light Procedure 1 Open the left 1 cover and then while lifting the paper transfer section cover release lever open the paper transfer section cover 2 Open the front cover and th...

Page 321: ...uide Screw Drum Screws Cleaning lower seal assembly M3 retainer Drum shaft Screw M3 retainer Figure 3 3 52 Detaching the drum 6 Remove the two screws holding the cleaning lower seal assembly and then...

Page 322: ...efitting the drum separation claw assemblies take care not to lose the M3 retainer P N 33302080 Fitting the drum Procedure 1 Remove the one screw from each of the drum separation claw assemblies and t...

Page 323: ...lly Do not use organic solvents such as alcohol or thinner to clean the drum Required supplies Polishing cloth specified synthetic cotton Toner Procedure 1 Remove the drum from the image formation uni...

Page 324: ...the front cover and then detach the connector 3 Remove the two screws holding the image formation unit and then the unit 4 Remove the two screws holding the charger assembly and MC rail and then the a...

Page 325: ...ickness gauge Adjust the distances with the three screws until the correct measurements are obtained the 0 55 mm gauge should go into the gap and the 0 65 mm one should not The smaller the distance th...

Page 326: ...ction cover release lever open the paper transfer section cover 3 Remove the transfer roller assembly Caution Remove the transfer roller assembly carefully to prevent the residual toner in the transfe...

Page 327: ...ding the charger assembly and MC rail and then the assembly and rail 5 Remove the cleaning lower seal assembly and the transfer right guide see page 3 3 48 6 Loosen the cleaning blade release lever se...

Page 328: ...all removed parts and secure the cleaning blade release lever When installing the cleaning blade take care not to trap the sponges at either end Cleaning blade Sponge Sponge Figure 3 3 59 Installing...

Page 329: ...ch of the drum separation claw assemblies and then the assemblies 5 Remove the drum separation claws from the drum separation claw assemblies 6 Remove the two screws holding the transfer right guide s...

Page 330: ...paper transfer section cover 3 Loosen the screws at the front and rear of the fixing unit and remove the fixing unit stoppers Fixing unit Screw Screw Fixing unit stopper Fixing unit stopper Figure 3...

Page 331: ...he wires of fixing heaters M and S from the fixing unit front housing Then remove the two screws and the fixing unit front housing Screw Fixing unit front housing Fixing heater S Fixing heater M Clamp...

Page 332: ...rs blue Fixing unit rear housing Clamps Figure 3 3 64 Detaching the fixing unit rear housing 8 Remove and replace fixing heaters M and S When fitting place fixing heater M black wire on the lower side...

Page 333: ...amp of the fixing unit thermistor 3 Remove the screw holding the fixing unit thermistor and then the thermistor Connector Clamp fixing unit thermistor Screw Screw Fixing unit front right guide Figure...

Page 334: ...iously damaged Procedure 1 Detach the connectors of the fixing unit wire and fixing heater wire from the fixing unit thermostat 2 Remove the two screws holding the fixing unit thermostat and then the...

Page 335: ...cover 3 Remove the screw and two pins each at the front and rear of the paper transfer section cover and then the fixing unit left guide Paper transfer section cover Pins Press roller separation claw...

Page 336: ...roller separation claw retainer Spring Heat roller separation claw Figure 3 3 69 Detaching the heat roller separation claws 3 Remove the screw holding the heat roller separation claw retainer 4 Remove...

Page 337: ...n detaching and refitting the fixing pressure pins do not turn the nuts of the pins Also be sure to refit the pins to the front and rear respectively Front fixing pressure plate Fixing pressure pin Fi...

Page 338: ...the fixing heaters M and S see P 3 3 57 2 Remove the fixing unit right guide and press roller see p 3 3 64 3 Remove the two circlips 4 Remove the fixing unit gear heat roller bearings heat roller bus...

Page 339: ...the step on page 3 3 67 Procedure 1 Remove the fixing unit 2 Remove the fixing pressure pins and then adjust the distance between the two washers Fixing pressure 49 N common to machine front and rear...

Page 340: ...achine front or rear For copy example 1 turn the fixing pressure pin at the machine front For copy example 2 turn the fixing pressure pin at the machine rear Caution Never turn the nuts of the fixing...

Page 341: ...4 1 Replacing the main PCB 3 4 1 1 Replacing the main PCB only 3 4 1 2 Replacing the main PCB and backup RAM 3 4 1 3 4 2 Upgrading the firmware in the flash ROM operation unit main PCB 3 4 2 3 4 3 Adj...

Page 342: ...he current settings for maintenance items 3 Exit the maintenance mode 4 Turn the main switch off and disconnect the power plug 5 Replace the main PCB and backup RAM with the new ones After installing...

Page 343: ...or inserting connectors Do not allow the flash tool assembly to make contact with any metal parts of the copier during firmware upgrading Procedure 1 Enter the maintenance mode 2 Execute maintenance...

Page 344: ...ool assembly and fit the operation 2 ROM IC into the IC3 socket on the flash tool assembly 14 Turn the main switch on Upgrading of the operation 2 ROM IC starts and LED2 on the flash tool assembly fla...

Page 345: ...ble resisters VR The variable resistors listed below are set at the factory prior to shipping and should not be adjusted in the field High voltage transformer PCB VR101 VR102 VR201 VR301 and VR302 Pow...

Page 346: ...2AR CONTENTS 3 5 Self Diagnostics 3 5 1 Self diagnosis 3 5 1 1 Self diagnostic function 3 5 1 Self diagnostic codes 3 5 2...

Page 347: ...copying is disabled and the problem displayed as a code consisting of C followed by a number between 010 and 924 indicating the nature of the problem A message is also displayed requesting the user to...

Page 348: ...nication Problem to Fax Control PCB Communication between the operation unit main PCB and the Fax control PCB cannot be normally performed C006 Main PCB communication problem to Fax Control PCB Commun...

Page 349: ...and check for correct operation Replace the engine ROM IC37 on the main PCB and check for correct operation Replace the main PCB and check for correct operation Check the connection of con nectors CN5...

Page 350: ...CB and the continuity across the connector termi nals Remedy or replace if necessary Replace the main PCB and check for correct operation Replace the deck main PCB and check for correct opera tion Tur...

Page 351: ...in succession Poor contact of the connec tor terminals Defective main PCB Defective desk main PCB Poor contact of the connec tor terminals Defective copier main PCB Defective finisher main PCB Check...

Page 352: ...p DRAM Poor contact of the connec tor terminals Defective copier main PCB Defective mailbox main PCB Defective main PCB SIMM inserted incorrectly Defective main PCB Defective main PCB Check the connec...

Page 353: ...oblem still occurs replace the scanner home position switch Replace the ISU Reinsert the connector Also check for continuity within the connector cable If none repair or replace the cable Replace the...

Page 354: ...upper lift motor turning on During copying the upper lift limit switch does not turn on within 200 ms of the upper lift motor turning on Reinsert the connector Also check for continuity within the con...

Page 355: ...contact of the lower lift motor connec tor terminals Defective lower lift limit switch Poor contact of the lower lift limit switch connector terminals Replace the lower lift motor Check for continuit...

Page 356: ...sk upper lift motor connector terminals Defective desk upper lift limit switch Poor contact of the desk upper lift limit switch con nector termi nals Replace the desk upper lift motor Check for contin...

Page 357: ...the connec tor terminals Defective scanner home position switch Defective main PCB scanner control PCB or scanner motor PCB Defective scanner motor Replace the desk lower lift motor Check for continui...

Page 358: ...ontact of the polygon motor connec tor terminals Defective polygon motor Defective power source PCB Poor contact of the polygon motor connec tor terminals Defective polygon motor Defective power sourc...

Page 359: ...an the main charger assembly Check and reinstall if neces sary Check for continuity If none replace fixing heater M or S Check the connection of con nector CN13 2 on the engine PCB and the continuity...

Page 360: ...Measure the resistance If it is replace the fixing unit thermistor Check and reinstall if neces sary Check for continuity If none replace the fixing unit thermo stat Measure the resistance If it is r...

Page 361: ...ector cable If none repair or replace the cable Replace the humidity sensor PCB Reinstall the image formation unit connector if necessary Replace the image formation unit Reinsert the connector Also c...

Page 362: ...ternal tray is incor rectly inserted The tray eleva tion motor con nector makes poor contact The tray eleva tion motor mal functions Defective finisher main PCB Adjust the paper conveying belt so that...

Page 363: ...The front jogger motor connector makes poor contact The front jogger motor malfunctions The front jogger home position sensor connector makes poor contact The front jogger home position sensor malfunc...

Page 364: ...e rear jogger motor malfunctions The rear jogger home position sensor connector makes poor contact The rear jogger home position sensor malfunctions Defective finisher main PCB The stapler connector m...

Page 365: ...g motor PCB The deck paper convey ing motor does not rotate correctly the motor is over loaded Paper deck motor 1 con nector makes poor contact Paper deck motor 1 does not rotate correctly the motor i...

Page 366: ...tor 2 con nector makes poor contact Paper deck motor 2 does not rotate correctly the motor is over loaded Deck level switch 2 con nector makes poor contact Deck level switch 1 con nector makes poor co...

Page 367: ...21 Image is distorted at 32 mm from the trailing edge of the paper 3 6 13 1 3 6 2 Paper misfeeds 3 6 14 1 A paper jam in the paper feed or conveying section is indicated when the main switch is turned...

Page 368: ...es not operate 3 6 49 15 The registration clutch does not operate 3 6 49 16 The cleaning lamp does not turn on 3 6 49 17 The exposure lamp does not turn on 3 6 49 18 The exposure lamp does not turn of...

Page 369: ...3 6 55 2 No secondary paper feed 3 6 55 3 Skewed paper feed 3 6 55 4 The scanner does not travel 3 6 56 5 Multiple sheets of paper are fed at one time 3 6 56 6 Paper jams 3 6 56 7 Toner drops on the...

Page 370: ...e page 3 6 6 6 A black line appears longitudinally See page 3 6 6 7 A black line appears laterally See page 3 6 7 8 One side of the copy image is darker than the other See page 3 6 7 9 Black dots appe...

Page 371: ...g is poor See page 3 6 11 17 Image is out of focus See page 3 6 12 18 Image center does not align with the original center See page 3 6 12 19 Image is not square See page 3 6 13 20 Image contrast is l...

Page 372: ...the wire Reinsert the connector Also check for continuity within the connector cable If none repair or replace the cable Check if CN2 B53 on the main PCB goes low when maintenance item U101 is run If...

Page 373: ...low when maintenance item U100 is run If not replace the main PCB Check if CN9 14 on the engine PCB goes low when CN2 B58 on the main PCB goes low while maintenance item U100 is run If not replace the...

Page 374: ...e requesting toner replenishment replace the cartridge Check the number of copies made with the current developer If it has reached the specified limit replace the developer Clean the drum or if the m...

Page 375: ...charger wire 2 Foreign matter in the image formation unit 3 Flawed drum 4 Dirty shading plate Clean the main charger wire or if it is flawed replace it Check if the magnetic brush is formed uniformly...

Page 376: ...it Check if the exposure lamp light is distributed evenly If not replace the exposure lamp see page 3 3 24 Replace the drum see page 3 3 47 Clean any part contaminated with toner or carrier in the de...

Page 377: ...eaning blade Replace the cleaning blade see page 3 3 54 Causes 1 Scanner moves erratically 2 Deformed press roller 3 Paper conveying section drive problem Causes Check procedures corrective measures 1...

Page 378: ...pages 3 3 18 and 19 Readjust the scanner leading edge registra tion see page 3 3 40 12 The leading edge of the image is sporadically misaligned with the original Causes 1 Registration clutch or upper...

Page 379: ...orrective measures 1 Paper curled 2 Paper damp 3 Defective fixing unit pressure springs Causes 1 Defective cleaning blade Causes Check procedures corrective measures 1 Defective cleaning blade Replace...

Page 380: ...um condensation Clean the drum see page 3 3 50 4 Flawed drum Replace the drum see page 3 3 47 16 Fixing is poor Causes 1 Wrong paper 2 Defective fixing unit pressure springs 3 Flawed press roller Caus...

Page 381: ...Image is out of focus Causes 1 Defective image scanning unit Causes Check procedures corrective measures 1 Defective image scanning unit Replace the image scanning unit Causes 1 Misadjusted center li...

Page 382: ...3 3 37 20 Image contrast is low carrier scattering Causes 1 No developing bias output Causes Check procedures corrective measures 1 No developing bias output A Developing bias wire makes poor contact...

Page 383: ...ng edge of the paper Causes 1 Misadjusted fixing pressure Causes 1 Misadjusted fixing pressure Check procedures corrective measures Readjust the fixing pressure at the machine front or rear according...

Page 384: ...2AR 1 3 6 15 This page is intentionally left blank...

Page 385: ...B remains low when feed switch 3 is turned on and off If it does replace feed switch 3 With 5 V DC present at CN8 26 on the engine PCB check if CN8 25 on the engine PCB remains low when the registra t...

Page 386: ...r forwarding pulley of the lower drawer is deformed Broken feed switch 2 actuator Defective feed switch 2 Check if the lower paper feed clutch malfunctions Electrical problem with the lower paper feed...

Page 387: ...contact each other Check if the feed guides are deformed Check visually and replace the registration switch if the actuator is broken With 5 V DC present at CN8 26 on the engine PCB check if CN8 25 o...

Page 388: ...lectrical problem with the registration clutch Check if the left and right regis tration rollers contact each other Check if the left and right feed rollers contact each other Check if the fixing unit...

Page 389: ...nds or damage the board Do not touch PCBs containing ICs with bare hands or any object prone to static charge Store PCBs wrapped in aluminum foil conductive sponge rubber or similar material 1 Power s...

Page 390: ...EPCB output 3 24 3 13 5 V DC 5 V DC supply for SMPCB output 3 25 26 3 14 15 5 V DC 5 V DC supply for SCPCB output 3 27 3 14 15 3 4 V DC 3 4 V DC supply for SCPCB output 3 28 3 16 17 5 V DC 5 V DC sup...

Page 391: ...12 IC13 A K B12 B1 10 1 5 11 IC9 C4 20 KA D11 L8 CN6 Q6 Q7 Q9 Q11 Q13 Q15 Q17 Q8 Q10 Q12 Q14 Q16 Q18 B10 A10 B1 A1 C IC7 IC6 R2 R1 K Q5 A E 5 1 1 1 4 9 1 1 1 1 8 3 C3 D4 L4 5 9 1 4 1 4 1 4 1 4 1 4 1 4...

Page 392: ...FSM 1 coil energization pulse output A 2 12 2 11 24 V DC 24 V DC supply for FSPCB 1 output 2 14 2 13 5 V DC 5 V DC supply for FSPCB 1 output 2 15 2 13 0 5 V DC ESW 1 on off input 2 16 2 13 5 V DC 5 V...

Page 393: ...gnal output 3 A58 3 A24 TNS detection voltage output 3 A59 3 A24 0 15 V DC TNS control voltage input 3 A60 3 A24 0 5 V DC RSW on off output 3 B1 3 A24 24 V DC 24 V DC supply input 3 B4 3 A24 0 5 V DC...

Page 394: ...0 5 V DC pulse FSM 1 coil energization pulse input B 3 B41 3 A24 0 5 V DC pulse FSM 1 coil energization pulse input B 3 B42 3 A24 0 5 V DC pulse FSM 1 coil energization pulse input A 3 B43 3 A24 0 5...

Page 395: ...utput 8 1 8 7 24 V DC 24 V DC supply for CFM1 output 8 2 8 7 0 13 V DC CFM1 half speed full speed output 8 3 8 7 24 V DC 24 V DC supply for CFM2 output 8 4 8 7 0 13 V DC CFM2 half speed full speed out...

Page 396: ...11 10 B9 0 24 V DC FCL3 on off output 10 A12 10 B9 24 V DC 24 V DC supply for FCL3 output 10 B1 10 B9 0 24 V DC PFCL U on off output 10 B2 10 B9 24 V DC 24 V DC supply for PFCL U output 10 B3 10 B9 0...

Page 397: ...SW L DIG1 on off input 14 4 14 1 0 5 V DC PWSW L DIG0 on off input 14 5 6 14 1 24 V DC 24 V DC supply output 14 8 14 7 0 5 V DC PWSW U DIG2 on off input 14 9 14 7 0 5 V DC PWSW U DIG1 on off input 14...

Page 398: ...3 6 27 2AR 1 3 Main PCB CN9 CN5 CN2 CN3 CN4 IC11 IC12 CN1 CN8 CN10 CN11 CN6 CN7...

Page 399: ...5 V DC pulse MMD 2 serial signal output 2 A29 2 A24 0 5 V DC pulse MMD 2 serial signal input 2 A31 2 A24 0 5 V DC MMD 2 connected signal input 2 A32 2 A24 0 5 V DC MMD 2 count signal output 2 A46 2 A...

Page 400: ...2 B24 2 A24 0 5 V DC BYPPWSW 2 DIG2 on off input 2 B25 2 A24 0 5 V DC BYPLCL 2 on off output 2 B26 2 A24 0 5 V DC BYPPFCL 2 on off output 2 B27 2 A24 0 5 V DC JBESW 1 on off input 2 B28 2 A24 0 5 V DC...

Page 401: ...3 8 3 2 0 5 V DC Printer board control signal output 3 9 3 2 0 5 V DC Printer board control signal input 3 10 3 2 0 5 V DC Printer board control signal output 3 14 3 2 0 5 V DC Printer board control...

Page 402: ...DER signal output 5 A6 5 A3 0 5 V DC SCPCB SCN START signal output 5 A7 5 A3 0 5 V DC SCPCB SCN HEADER signal input 5 A8 5 A3 0 5 V DC SCPCB SCN ENABLE signal input 5 A9 5 A3 0 5 V DC SCPCB SMRE signa...

Page 403: ...Terminals CN Voltage Remarks 3 6 32 2AR 1 8 10 8 8 0 5 V DC LDPCB VIDEO signal output 8 11 8 8 0 5 V DC LDPCB ENABLE signal output 8 12 8 8 0 5 V DC LDPCB ADJUST signal output 3 6 30 2...

Page 404: ...9 4 0 5 V DC OMPCB RESET MAIN signal output 10 1 10 2 0 5 V DC pulse Serial signal from finisher input 10 3 10 4 0 5 V DC pulse Serial signal to finisher output 10 5 10 4 0 5 V DC Finisher F RESET sig...

Page 405: ...R170 RA60 RA61 C89 C88 C71 C79 RA89 3 4 4 12 12 1 25 38 37 L8 48 12 13 13 13 3 2 2 RA68 C140 C160 L26 RA44 RA42 R102 L19 R101 R169 R190 R191 R193 R195 R197 R196 C31 L12 L13 R192 R194 R108 C128 C129 C...

Page 406: ...4 5 0 V DC SHPSW on off input 3 1 3 2 0 5 V DC pulse CCD drive clock signal output 3 3 3 2 0 5 V DC CCDPCB RS signal output 3 5 3 4 0 5 V DC CCDPCB CLP signal output 3 7 3 6 0 5 V DC CCDPCB SHIFT sign...

Page 407: ...V DC OFM enable signal output 8 2 8 1 5 V DC 5 V DC supply for OSS output 8 3 8 1 0 5 V DC OSS on off input 9 A1 9 A10 0 5 V DC MPCB SOHSYNC signal output 9 A2 9 A10 0 5 V DC MPCB SOHSYNC signal outp...

Page 408: ...115 C114 14 1 L2 C11 C112 C110 J11 TP1 E C B DT2 L5 CN3 2 1 5 6 J12 C118 1 3 CN4 C113 C119 J4 J10 C5 C101 L3 J1 J2 C1 R12 R1 R7 R8 R9 R2 R3 R15 R16 JP7 JP8 R6 C6 C7 C8 C9 C3 C120 L4 JP101 JP100 JP16 J...

Page 409: ...voltage SM Vref input 1 14 1 1 0 5 V DC ODSW on off output 2 1 3 6 0 24 V DC pulse SM coil energization pulse output B 2 2 3 6 24 V DC 24 V DC supply for SM output 2 3 3 6 0 24 V DC pulse SM coil ene...

Page 410: ...14 R13 F1 R4 C5 C6 C8 C9 C4 C3 R3 E C B C16 C1 R1 R2 R7 C7 IC2 C28 IC3 R19 R12 F6 F5 R20 R21 R22 CN1 C2 TR1 RA1 R6 R5 R8 1 1 6 1 9 1 10 R9 5 R15 R16 R17 F9 CN2 F10 TR2 C26 F2 C E B C27 C29 R10 R11 F3...

Page 411: ...1 3 1 2 0 5 V DC CCDPCB RS signal input 1 5 1 4 0 5 V DC CCDPCB CLP signal input 1 7 1 6 0 5 V DC CCDPCB SHIFT signal input 1 9 1 10 5 V DC 5 V DC supply from SCPCB input 2 1 2 2 CCD control signal VO...

Page 412: ...B TR2 B C E TR7 TR8 TR9 TR11 R18 R7 R5 R6 TR10 TR13 E TR12 E L27L28 B26 B25 13 9 8 14 4 18 19 80 1 30 31 51 81 50 100 CN7 C4 C5 A2 L20 A1 B2 B1 A26 R1 R2 L3 L12 L21 A AK D1 X1 K L13 L14 L15 L16 L6 L5...

Page 413: ...5 V DC pulse ORPCB scan signal SCAN0 output 5 2 6 12 0 5 V DC pulse ORPCB scan signal SCAN1 output 5 3 6 12 0 5 V DC pulse ORPCB scan signal SCAN2 output 5 4 6 12 0 5 V DC pulse ORPCB scan signal SCA...

Page 414: ...8 7 8 12 0 5 V DC OMPCB DET SIG signal output 8 8 8 12 0 5 V DC OMPCB ERROR FROM MAIN signal input 8 9 8 12 0 5 V DC OMPCB ERROR FOR MAIN signal output 8 10 8 12 0 5 V DC OMPCB ACK FROM MAIN signal in...

Page 415: ...B scan signal SCAN3 input 3 6 GND 0 5 V DC pulse OLPCB scan signal SCAN2 input 3 7 GND 0 5 V DC pulse OLPCB scan signal SCAN1 input 3 8 GND 0 5 V DC pulse OLPCB scan signal SCAN0 input 4 1 GND 0 5 V D...

Page 416: ...5 5 6 12 0 5 V DC ORPCB KEY SENSE5 signal input 5 6 6 12 0 5 V DC ORPCB KEY SENSE4 signal input 5 7 6 12 0 5 V DC ORPCB KEY SENSE3 signal input 5 8 6 12 0 5 V DC pulse ORPCB scan signal SCAN7 output 5...

Page 417: ...C2 1 3 1 13 0 22 V DC LCD VO signal input 1 4 1 2 0 5 V DC LCD LP signal input 1 5 1 2 0 5 V DC LCD DISP OFF signal input 1 6 1 2 0 5 V DC LCD FLM signal input 1 7 1 2 0 5 V DC LCD CP signal input 1...

Page 418: ...ce the cable Check visually and replace the drive motor if necessary Run maintenance item U030 and check if the drive motor operates when CN11 A3 on the engine PCB goes low If not replace the drive mo...

Page 419: ...he scanner control PCB when maintenance item U073 is run If not replace the scanner control PCB Check for continuity across the coil If none replace the upper lift motor Reinsert the connector Also ch...

Page 420: ...for continuity within the connector cable If none repair or replace the cable Run maintenance item U135 and check if drive pulse signal is output across CN8 17 and CN8 18 on the engine PCB If not repl...

Page 421: ...tor cable If none repair or replace the cable Run maintenance item U032 and check if CN10 B1 on the engine PCB goes low If not replace the engine PCB Check for continuity across the coil If none repla...

Page 422: ...repair or replace the cable Run maintenance item U032 and check if CN10 A11 on the engine PCB goes low If not replace the engine PCB Check for continuity across the coil If none replace the registrat...

Page 423: ...the inverter PCB are high replace the inverter PCB If CN3 1 and CN3 2 on the scanner motor PCB are always low replace the scanner motor PCB Check for continuity across each heater If none replace the...

Page 424: ...copying If not replace the engine PCB If the level of CN5 2 on the scanner motor PCB does not change when the original detection switch is turned on and off replace the original detection switch Brok...

Page 425: ...Check the original and correct if necessary Reinsert the connector Also check for continuity within the connector cable If none repair or replace the cable Check if the original size sensor operates c...

Page 426: ...o check for continuity within the connector cable If none repair or replace the cable Check if CN12 15 on the engine PCB goes low when the upper paper length switch is turned on If not replace the upp...

Page 427: ...ck if CN15 5 on the engine PCB remains low when feed switch 1 is turned on and off If it does replace feed switch 1 With 5 V DC present at CN15 9 on the engine PCB check if CN15 8 on the engine PCB re...

Page 428: ...leys paper feed pulleys separation pulleys left right feed rollers feed rollers 1 2 and feed pulley Check if the paper feed pulleys or separation pulleys are deformed Check if the forwarding pulleys a...

Page 429: ...he contact between the heat roller and its separa tion claws is correct Check if the developing section of the image formation unit is extremely dirty Check if the pulleys rollers and gears operate sm...

Page 430: ...Main PCB 5 20 3 7 17 Main PCB 6 20 3 7 18 Main PCB 7 20 3 7 19 Main PCB 8 20 3 7 20 Main PCB 9 20 3 7 21 Main PCB 10 20 3 7 22 Main PCB 11 20 3 7 23 Main PCB 12 20 3 7 24 Main PCB 13 20 3 7 25 Main P...

Page 431: ...2AR General connection diagram 3 7 43 General wiring diagram 3 7 44 2AR 1...

Page 432: ...ers secondary stabilization Other than the above Copying is enabled at the later timing of either 69 s after fixing heater M H1 turning on or when the copier enters secondary stabilization 3 Other con...

Page 433: ...ON ODSW ON Rev rotation CN2 1 2 3 4 5 6 SHPSW CN4 2 SM Off Fwd rotation Scanner initialization SHPSW OFF ODSW OFF Rev rotation CN2 1 2 3 4 5 6 SHPSW CN4 2 120 P 43 P 76 P 120 P 94 P 43 P SM Off Fwd ro...

Page 434: ...ing operation Scanning an A3 11 x 17 original magnification ratio 100 ODSW ON SM Off Fwd rotation Rev rotation CN2 1 2 3 4 5 6 SHPSW CN4 2 FVSYNC signal 270 P 414 P 120 P 9921 P Scanning an A3 11 x 17...

Page 435: ...py paper from the bypass table magnification ratio 25 manual copy density control CN11 A3 CN10 A5 CN4 1 CN4 5 CN4 4 CN9 14 CN2 7 8 9 10 CN13 4 CN8 25 CN2 15 CN4 16 CN9 9 CN9 11 Start key DM RCL BYPPFC...

Page 436: ...1 81 2 copy paper from the copier upper drawer magnification ratio 100 auto copy density control Start key DM RCL FCL1 PFCL U MC REM FSM CL RSW ESW FSW1 TC REM DB REM 100 ms 500 ms 88 ms 419 ms 350 ms...

Page 437: ...drawer magnification ratio 100 auto copy density control ejection to the job separator CN11 A3 CN10 A5 CN10 A7 CN10 B1 CN9 14 CN2 7 8 9 10 CN2 3 CN2 5 CN13 4 CN8 25 CN15 5 CN2 2 CN11 B10 CN9 9 CN9 11...

Page 438: ...he copier lower drawer magnification ratio 400 manual copy density control CN11 A3 CN10 A5 CN10 A7 CN10 A9 CN10 B3 CN9 14 CN2 7 8 9 10 CN13 4 CN8 25 CN2 15 CN15 5 CN15 8 CN9 9 CN9 11 Start key DM RCL...

Page 439: ...rol CN11 A3 CN10 A5 CN10 A7 CN10 B1 CN10 B5 CN9 14 CN2 7 8 9 10 CN13 4 CN8 25 CN2 15 CN15 5 CN2 2 CN10 B7 CN9 9 CN9 11 Start key DM RCL FCL1 PFCL U DUPCL MC REM FSM CL RSW ESW FSW1 FSSW DUPPCSW TC REM...

Page 440: ...C REM DB REM CN11 A3 CN10 A5 CN10 A7 CN10 B1 CN10 B5 CN9 14 CN2 7 8 9 10 CN13 4 CN8 25 CN2 15 CN15 5 CN2 2 CN10 B7 CN9 9 CN9 11 100 ms 88 ms 30 ms 30 ms 40 ms 100 ms 250 ms 48 ms Min 78 ms 500 ms 419...

Page 441: ...N13 4 RSW CN8 25 ESW CN2 15 FSW1 CN15 5 FSW2 CN15 8 FSW3 CN15 11 TC REM CN9 9 DB REM CN9 11 88 ms 78 ms 110 ms 110 ms 48 ms Min 78 ms 100 ms 30 ms 30 ms 500 ms 250 ms 250 ms 1055 ms 1379 ms 419 ms 419...

Page 442: ...er magnification ratio 100 manual copy density control Start key DM CN11 A3 DDM CN4 6 RCL CN10 A5 FCL1 CN10 A7 FCL2 CN10 A9 FCL3 CN10 A11 DFCL CN2 1 DPFCL L CN1 13 MC REM CN9 14 FSM CN2 7 8 9 10 CL CN...

Page 443: ...G 24 V G 24 V 1 2 24 V G 24 V 1 For 120 V specification only 2 For 220 240 V specification only 1 2 3 4 5 6 24 V G 24 V G 5 V G 5 V 5 1 V 12 V 1 2 3 4 24 V G 24 V G 5 V 5 1 V TRC20 R20 R22 R25 R21 R2...

Page 444: ...17 CN2 18 CN2 20 CN2 21 CN2 22 CN2 23 L35 CN4 7 CN4 13 CN4 14 CN4 19 CN4 21 CN11 A5 CN11 B5 CN11 B7 CN11 B8 L12 CN12 1 CN12 4 CN12 7 CN12 10 CN12 14 CN12 16 CN14 1 CN14 7 L54 CN15 2 CN15 7 CN15 10 CN1...

Page 445: ...2C 2 5 1B 2B CN6 B7 S S 2E 4 1E 1 S G Q13 CN3 A35 L81 R122 R205 1C 2C 6 3 6 3 6 3 6 3 2 5 1B 2B CN6 B8 S S 2E 4 1E 1 Q14 CN3 A33 L80 R120 R204 1C 2C 2 5 1B 2B CN6 B10 S S 2E 4 1E 1 Q17 CN3 A20 L85 R1...

Page 446: ...IC1 1 2 VPL5 C1 NF2 IC2 C2 VCC3 VPL5 R17 R18 006 11I MMRE 002 04D OHSYNC_ R19 R20 GPL5 GPL0 SCAN OHSYNC_ SCAN I F 003 05A SRFAX_ 003 05B SELFAX_ 010 14B FF74VCC 014 04E 1 _CLR _PRE 4 6 _Q Q D CLK IC4...

Page 447: ...2D PRTID_ VPL5 R35 IC5 R36 RA022 RA4 VPL5 GPL8 C025 R37 R38 NF15 NF10 NF11 NF12 NF13 NF14 RA5 VPL5 CN3 CN4 R40 R39 CN4 VCC3 PVDA_ CN4 CN4 37 35 33 31 CN3 PRTBD_ PRTPVST_ PRI I F BD_ PRT I F 003 05C 00...

Page 448: ...06 11I 001 15G 006 11G FF74VCC 10 13 1 2 3 4 8 7 6 5 76 77 78 79 80 81 82 83 84 85 86 87 88 89 90 91 92 93 94 95 96 97 98 99 100 VSS15 PVCLK VSS16 LSUOUT NC4 VDD10 SCDE_ NSCDE_ SCLE_ NSCLE_ VSS17 RESE...

Page 449: ...C13 C12 NF26 1 2 3 4 5 6 7 1 2 4 3 14 13 12 11 10 9 8 VCC NC4 DOUT DOUT RIN RIN _RE DE DIN NC1 ROUT NC2 NC3 GND GPL8 R55 VTCBD_ PRTBDGEN_ VIDEO CN8 R56 R57 R58 R59 10 K G A 3 3 S1 D2 TR1 D1 NF30 1 CN8...

Page 450: ...235 236 237 238 239 240 241 242 243 244 245 246 247 248 249 250 251 252 253 254 255 256 257 258 259 260 261 262 263 264 265 266 267 268 269 270 271 272 273 274 275 276 277 278 279 280 281 282 283 284...

Page 451: ...1 2 3 4 RA39 RA40 RA16 1 2 3 4 1 2 3 4 8 7 6 5 8 7 6 5 RA18 RA17 280 281 283 284 287 288 290 291 8 9 10 11 12 13 14 15 19 1 2 3 4 5 6 7 8 9 0 1 2 3 4 5 6 7 18 17 16 15 14 13 12 11 0 1 2 3 4 5 6 7 IC12...

Page 452: ...27 26 25 24 23 20 19 18 17 11 12 15 16 32 9 8 7 6 5 4 3 2 1 0 D1 D2 D3 D4 D5 D6 D7 D8 D9 D10 D11 D12 D13 D14 D15 D16 LCAS0 UCAS0 RAS0 OE0 W0 VSS1 VCC1 VSS2 VCC2 VSS3 VCC3 A9 A8 A7 A6 A5 A4 A3 A2 A1 A0...

Page 453: ...9 2 10 1 11 4 12 3 13 2 14 1 15 4 0 3 1 2 2 1 3 4 4 3 5 2 6 1 7 PD 31 0 CDAK CDRD CDWR INTR VDD17 GND18 HD0 HD1 HD2 HD3 HD4 VDD18 GND19 HD5 HD6 HD7 TEST0 TEST1 VDD19 GND20 MCLK VDD20 GND21 RESET HRD H...

Page 454: ...29 13 30 14 31 15 VPL5 NF48 C56 C57 C192 C193 C194 C195 R102 008 15A CD 31 0 R103 R104 CN6 CN6 CN6 1 39 72 SM1GND SIMM SOCKET1 SM1GND SM1GND RA75 RA76 RA71 R101 9 8 7 10 6 5 4 3 2 1 0 5 6 7 8 5 6 7 8...

Page 455: ...L5 NF52 C66 C67 VPL5 14 7 VCC GND IC7 GPL5 NF55 C72 C73 VPL5 20 10 VCC GND IC13 GPL5 NF58 C78 C79 VCC3 20 10 VCC GND IC5 GPL5 NF53 C68 C69 VPL5 14 7 VCC GND IC5 GPL5 NF56 C74 C75 006 05H 006 05G 006 0...

Page 456: ...8 A9 A10 A11 A12 A13 A14 VCC VSS DQ0 DQ1 DQ2 DQ3 DQ4 DQ5 DQ6 DQ7 DE_ CE_ WE_ A0 A1 A2 A3 A4 A5 A6 A7 A8 A9 A10 A11 A12 A13 A14 VCC VSS DQ0 DQ1 DQ2 DQ3 DQ4 DQ5 DQ6 DQ7 DE_ CE_ WE_ A0 A1 A2 A3 A4 A5 A6...

Page 457: ...R177 R201 R185 R186 R187 R188 R189 R190 R191 R192 R193 R194 R195 R196 R197 R198 R199 R200 15 14 13 12 11 10 9 8 7 6 5 4 3 2 1 0 X5 1 3 2 R203 R204 R207 R205 R206 R208 R202 R174 R175 IC30 R176 018 05I...

Page 458: ...13 R215 R216 C103 IC31 IC31 GPL5 VPL5 R214 A7 CN5 NF70 R217 R219 R220 C104 IC31 IC31 GPL5 VPL5 R218 A2 CN5 NF71 R221 R223 R224 C105 IC1 IC1 GPL5 VPL5 R222 B11 CN5 NF72 R225 R227 R228 C106 IC32 IC32 GP...

Page 459: ...VSS2 AVSS VREF AVCC VCC2 P80_CLKS1_DA0 P81_CLK0 P82_RXD0_CLKS0 P83_TXD0 P84_DA1_INT4_ P85_CLK1 P86_RXD1 P87_TXD1 31 32 33 34 35 36 37 38 39 40 41 42 43 44 45 46 47 48 49 50 P40_HOLD_ BYTE CNVSS RESET...

Page 460: ...P12 7 6 5 4 3 2 1 0 7 6 5 4 3 2 1 R320 R289 R290 R291 014 11H ADE 7 0 014 11H AE 23 0 014 11F AE 23 0 014 08H WRE_ 014 05E INTSCC2 017 15B RXDF INISH 017 15C TXDF INISH 014 11H ADE 7 0 014 08I RDE_ 0...

Page 461: ...I RESIO_ 014 04F GPL5 IC44 IC44 NF98 C130 C131 VPL5 GPL5 GPL5 VPL0 RA97 RA98 RA99 IC43 IC45 R333 R334 FEED1SW 019 03D FEED2SW 019 03D FEED3SW 019 03D SBSIGFEED 019 03D EJECTSW 019 03D REGSW 019 03D BR...

Page 462: ...NF109 R356 R357 C139 R353 R352 4 3 NF110 R354 R445 R355 D5 D6 IC46 IC46 8 9 10 G 5 V M TXD G 5 V CN10 CN10 CN10 11 12 M DET M RESET CN10 CN10 5 FSW3 SIG FEEDSW 019 14H CN11 3 DECK RXD DESK RXD CN11 T...

Page 463: ...2 09D SCANFAX_ 012 09D PRITFAX_ 012 09C FAXRDY_ 012 09D FAX_MAINTXD FAX_MAINSTS_ FAX_RESET_ TXDFAX 012 13I MAIN_STS_ 011 06B RESFAX_ 012 10D 1 2 4 6 13 15 17 24 26 28 34 36 38 40 42 44 45 19 CN4 CN4 C...

Page 464: ...51 A59 B49 BRANCH2REM REGCLREM BRANCH1REM BRANCHFANREM TMOTP TMOTP_ 016 03C 016 03C 016 03C 016 03C 016 03C 016 03C UPSIGLIFT LOSIGLIFT SBSIGPE UPSIGPE LOSIGPE JOBEJECTSW JOBSIG UPLIFTREM LOLIFTREM MC...

Page 465: ...R425 R426 R427 R439 R440 R441 C177 C181 C182 C183 TP15 VCC3 VCC3 R429 LED1 LED2 R430 VPL5 VPL0 R431 GMI5 GMI5 GMI5 GMI5 GMI5 GMI5 R432 R433 R434 R435 R436 GPL0 IC34 IC42 IC1 IC34 IC33 VPL5 TP16 TP17 C...

Page 466: ...A14 A15 A16 A17 A18 A0 A1 A2 A3 A4 A5 A6 A7 A8 A9 A10 A11 A12 A13 A14 A15 A16 A17 A18 D0 D1 D2 D3 D4 D5 D6 D7 _CE _OE Vpp Vcc GND 12 11 10 9 8 7 6 5 27 26 23 25 4 28 29 3 2 30 31 13 14 15 17 18 19 20...

Page 467: ...116 115 114 113 112 111 110 109 108 107 106 105 104 103 102 101 100 99 98 97 96 95 94 93 92 91 90 R94 REFHO7 REFHO6 REFHO5 REFHO4 REFHO3 VSS REFHO2 REFHO1 REFHO0 DA7 DA6 DA5 DA4 DA3 DA2 DA1 DA0 REFLE...

Page 468: ...4 RA45 SD16 SD15 SD14 SD13 SD12 SD11 SD10 1 2 3 4 1 2 3 4 8 7 6 5 8 7 6 5 IO17 IO16 IO15 IO14 IO13 IO12 IO11 IO10 20 27 10 9 8 7 6 5 4 3 25 24 21 23 2 26 1 _OE 28 14 11 12 13 15 16 17 18 19 1 2 3 4 1...

Page 469: ...G C146 C113 R152 S S G C147 C114 R153 S S G C148 C115 R154 S S G C116 S G S G S G A G S G A G S G S G A G NO MOUNT R164 L73 F G R162 L72 F G R158 L70 F G R160 L71 F G R166 L74 C170 C151 C152 CN1 5 3 4...

Page 470: ...G 24 V G 24 V CN4 3 CN5 3 G 5 V G 5 V CN3 3 CN3 4 24 V 24 V SM M3 CN1 9 SM M4 CN1 8 SM M5 R3 CN1 7 SM CLK CN1 4 SM ENABLE R2 CN1 5 SM RET CN1 6 SM CWB S G S G S G S G S G S G S G S G S G S G S G B C E...

Page 471: ...C16 A G F G C32 A G S G C28 VDD VDD VDD VDD VGG VOUT_EVEN VOUT_ODD CP1_EVEN CP2_EVEN CP1_ODD CP2_ODD CP_LH_ODD CP_RS_ODD CP_CLP_ODD CP_ROG CP_LH_EVEN CP_RS_EVEN CP_CLP_EVEN NC NC NC NC NC NC NC GND GN...

Page 472: ..._RD _RD _WR _WR _Reset int_LDONX0 A15 A16 A17 A18 A19 1 2 3 4 5 6 7 8 9 11 10 I0 I1 I2 I3 I4 I5 I6 I7 I8 I9 GND IC3 O1 O0 O2 O3 O5 O6 O4 I 07 20 13 12 14 15 17 18 16 19 Vcc IC4 IC2 22 20 27 10 9 8 7...

Page 473: ...G F G P G S G F G P G S G S G S G S G S G S G S G F G P G S G S G S G S G S G S G S IC9 IC9 IC9 IC9 IC9 IC9 14 6 IC9 5 15 7 13 12 8 9 11 S S S S S S S LCDVdd2 LCDVdd3 LCDVdd4 LCDVdd5 LCDVdd6 LCDVdd7 L...

Page 474: ...a17 CN7 a18 _CSSEL _END _DET Fax Option _CE ROM OPT _CE Jig ROM4M CN7 a19 R42 R43 C B E TR1 R41 CN7 a20 CN7 a11 D1 D2 D3 D4 D5 D6 D7 D0 D1 D2 D3 D4 D5 D6 D7 D0 N C N C N C N C N C N C N C _CSSEL _END...

Page 475: ...CN4 PCB 1 key3 key6 key9 key14 key21 key20 key19 key24 L7 L14 L18 L19 L25 L29 L6 L13 L12 L17 L24 L28 L5 L21 L2 L9 L11 L16 L23 L27 L1 L8 L10 L15 L22 L26 L4 L3 L20 D1 D2 D3 D4 D5 D6 D7 D8 Operation unit...

Page 476: ...21 10 20 9 14 3 15 4 18 7 17 6 16 5 13 2 23 12 4 8 1 11 11 1 2 10 3 9 9 3 8 4 5 7 6 6 7 5 10 2 8 8 11 11 1 1 10 10 9 9 3 3 4 4 7 7 6 6 5 5 2 2 A A B B B B N C DFTSW OSLSW DFSSW1 DFSSW2 OSWSW DF SHORT...

Page 477: ...5 4 3 2 1 1 2 3 4 5 GY GY GY GY GY 5 4 3 2 1 24 V P G WE WE WE C32 2 C86 2 C87 2 RD BE C38 1 C38 2 YW BE BE OE GY GY GY GY GY GY GY GY GY GY GY GY GY GY GY GY GY GY GY GY GY GY GY GY GY GY GY BE OE G...

Page 478: ...alifornia 92618 7006 TEL 949 457 9000 FAX 949 457 9119 Southeastern Region 1500 Oakbrook Drive Norcross Georgia 30093 TEL 770 729 9786 FAX 770 729 9873 Southwestern Region 2825 West Story Road Irving...

Reviews:

Related manuals for PointSource Ai 3010