4-22
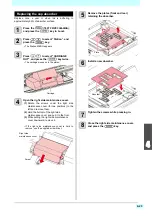
Replace the ink tank
To keep the ink in good quality in the ink tank, you need to
replace the ink tank annually. When an appropriate
warning message appears, be sure to replace tank in the
following procedure:
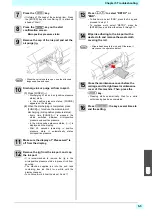
1
Press the
(MENU)
in LOCAL.
2
Press
to select [Maintenance],
and press the
key.
3
Press
to select [Replace Ink
Tank], and press the
key.
4
Press
to select a desired ink
tank, and press the
key.
• The display shows a confirmation screen
prompting to replace the ink tank and the type and
the expiration date (year and month) of the ink
contained in the ink tank to be replaced.
5
If there is no problem on the confirmation
screen, press the
key.
• This resets the ink charge information embedded
in this machine.
6
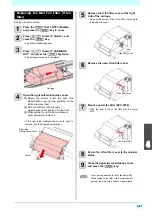
Remove the ink maintenance cover for the
ink tank selected in step 4.
• Loosen the screws attached to the ink
maintenance cover both sides, remove the screw
that is attached to the top surface.
7
Replace the ink tank.
• Cover the surrounding area with waste cloth for
protection against dirt before changing the ink
tank.
(1)
Remove the ink filter attached to the ink tank.
• Loosen the joints on the top of the ink filter,
and remove the filter.
(2)
Remove the ink tank.
• Take care not to tilt the ink tank greatly when
removing the tank. It may cause ink leakage
from the cap.
(3)
Set a new ink tank, and mount the ink filter.
• Tighten the joints on the top of the ink filter.
8
Refer to “Fill ink in the ink tank and
charging” on P.1-10, and refill with new ink.
• Be sure to wear the accompanying gloves and
protective goggles before working. The ink may
get in your eyes.
Screw
Screw
Ink maintenance
cover
• Do not tighten the joint too much. Otherwise, the
filter might be damaged. Be careful.
• Do not pour the ink remaining in the removed ink
tank into the new tank.
• Request that an industrial waste disposal
company process the disposal ink.
• When the tube and cover are in contact, there are
times when the amount of ink can not be
accurately detected. So as not to contact to the
utmost as shown in the figure below, please be
careful for the direction of the joint.
Ink filter
Joint
Ink tank
Ink filter unit
Summary of Contents for SIJ-320UV
Page 1: ...MIMAKI ENGINEERING CO LTD URL http mimaki com D202809 13 Original instructions ...
Page 14: ...xiii Warning labels ...
Page 28: ...1 14 Chapter 1 Before Use ...
Page 98: ...4 26 ...
Page 116: ...5 18 Chapter 5 Troubleshooting ...
Page 122: ...Chapter 6 Appendix 6 6 ...


