5-5
Chapter 5 Troubleshooting
1
2
2
2
5
7
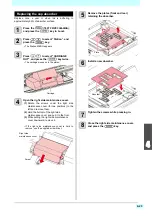
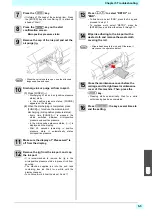
Press the
key.
• It informs of
◎
ahead of the selected item. Press
the [ENTER] key after confirming
◎
is attached
ahead of “Start”.
8
Press the
key on the start
confirmation screen.
Micropositive pressure starts.
9
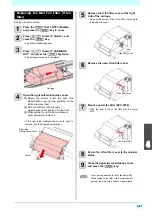
Remove the cap of the ink port and set the
air purge jig.
10
Discharge ink or purge air from inkport.
(1)
Press [FUNC2](
).
• Discharging of ink and air (positive pressure
status) starts.
• In the positive pressure status, [PURGE]
appears on the display.
(2)
When the discharging is completed, press
[FUNC2](
) to reduce the momentum of
discharging (micropositive pressure status).
• Every time [FUNC2](
) is pressed, the
status switches between micropositive
pressure and positive pressure.
• In the micropositive pressure status, [-----] is
displayed on the display.
• After 30 seconds remaining in positive
pressure state, it automatically states
micropositive pressure.
11
Make sure the display of “Please wait” is
off from the display.
12
Remove the jig from the ink port, and cap
the ink port.
• It is recommended to remove the jig in the
micropositive pressure status to prevent ink from
spouting.
• The machine supplies ink into the sub tank
containing less ink. Wait for a while until the
display changes.
• To continue work, follow the steps 10 and 11.
13
Press
to select “RETRY” or
“END”.
• To finish work, select “END”, press the A key, and
proceed to step 13.
• To continue work, select “RETRY”, press the
[ENTER] key, and follow the steps 8 through 11.
14
Wipe ink adhering to the ink port with a
waste cloth and remove the waste cloth
covering the rail.
15
Close the maintenance cover before the
carriage and the right lower maintenance
cover of this machine. Then, press the
key.
• Cleaning starts automatically. Wait for a while
until cleaning has been completed.
16
Press
the key several times to
end the setting.
• When the valve is hard to open, use the attached
longnose pliers and open.
• Wipe ink adhering to the ink port. Otherwise, it
may cause the operation defect.
Summary of Contents for SIJ-320UV
Page 1: ...MIMAKI ENGINEERING CO LTD URL http mimaki com D202809 13 Original instructions ...
Page 14: ...xiii Warning labels ...
Page 28: ...1 14 Chapter 1 Before Use ...
Page 98: ...4 26 ...
Page 116: ...5 18 Chapter 5 Troubleshooting ...
Page 122: ...Chapter 6 Appendix 6 6 ...

