background image

P/N 960-100189R_Rev. 4 {EDP #148850} 

© 2016, JAPAN CASH MACHINE CO., LTD. 

6 - 1 1

Calibration and Testing

VEGA™ Series Banknote Validator 

Section 6

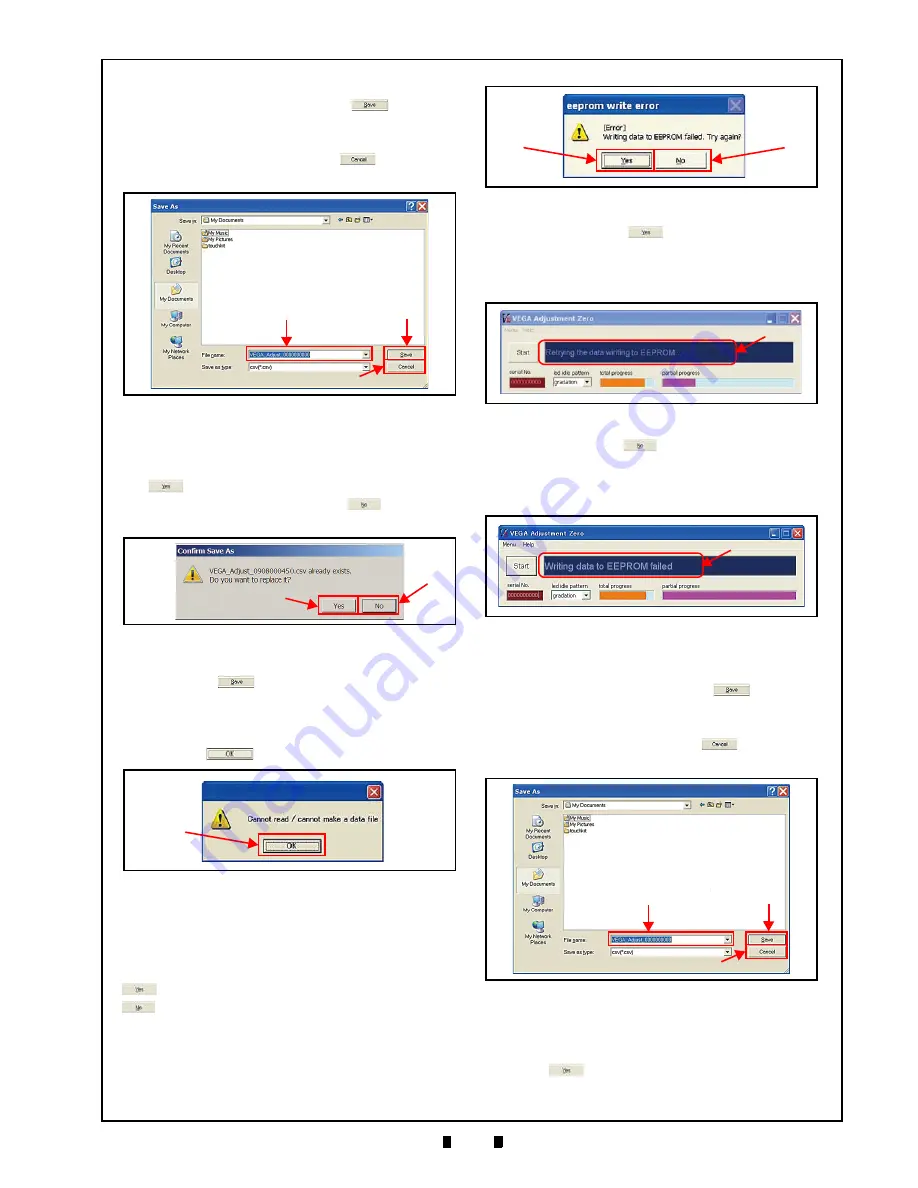
allow saving the Calibration Data with its errors 
onto the PC. Click on the “

Save

” 

Button 

(Figure 6-59 

a

) to retain the data for analysis. If 

saving the data (Figure 6-59 

b

) is unnecessary 

however, click on the “

Cancel

” 

Button 

(Figure 6-59 

c

) to discard the data. 

When the same name file exist on the PC, the “Con-
firm Save As” Message (Figure 6-60) will appear to 
confirm if overwriting is desired. Click “

Yes

” 

Button (Figure 6-60 

a

) to overwrite the data 

existing on the PC, or click “

No

” 

Button (Fig-

ure 6-60 

a

) and rename the File Name.

The file saved in same name is already open when 
the “

Save

” 

Button is clicked, the “

Cannot 

read/ cannot make a data file

” Message appears 

(Figure 6-61). In this case, the failed data is NOT 
saved and terminate the procedure with clicking on 
the “

OK

” 

Button (Figure 6-61 

a

). 

Adjustment Data Writing Failure

If the EEPROM writing fails, the “

[Error] Writing 

data to EEPROM failed. Try again?

” Dialog Mes-

sage appears. Select and click on the “

Yes

” 

Button (Figure 6-62


a

) or the “

No

” 

Button(Figure 6-62


b

) to proceed action.

•  

Click on the “

Yes

” 

Button

Start the EEPROM writing procedure again with the 
message “

Retrying the data writing to EEPROM

” in 

the Blue Message Field (Figure 6-63 

a

).

•  

Click on the “

No

” 

Button

Save the calibration result with the message “

Writing 

data to EEPROM failed

” in the Blue Message Field 

(Figure 6-64 

a

).

The “

Save As

” Screen will appear (Figure 6-65) to 

allow saving the Calibration Data with its errors 
onto the PC. Click on the “

Save

” 

Button 

(Figure 6-65 

a

) to retain the data for analysis. If 

saving the data (Figure 6-65 

b

) is unnecessary 

however, click on the “

Cancel

” 

Button 

(Figure 6-65 

c

) to discard the data. 

When the same name file exist on the PC, the 
“Confirm Save As” Message (Figure 6-66) will 
appear to confirm if overwriting is desired. Click 

Yes

” 

Button (Figure 6-66 

a

) to overwrite the 

Figure 6-59 

Save As Screen 

b

a

c

Figure 6-59 

Save As Screen

Figure 6-60 

Overwrite Confirmation 

a

b

Figure 6-60 

Overwrite Confirmation

Figure 6-61 

Failed Data Save Error 

a

Figure 6-61 

Failed Data Save Error

Figure 6-62 

Writing Error Screen 

a

b

Figure 6-62 

Writing Error Screen

Figure 6-63 

Retrying Writing Message 

a

Figure 6-63 

Retrying Writing Message

Figure 6-64 

Writing Failed Message 

a

Figure 6-64 

Writing Failed Message

Figure 6-65 

Save As Screen 

b

a

c

Figure 6-65 

Save As Screen

Summary of Contents for VEGA Series

Page 1: ...2016 JAPAN CASH MACHINE CO LTD Website http www jcmglobal com VEGA Series Banknote Validator Operation and Maintenance Manual Revision 4 P N 960 100189R_Rev 4 EDP 148850 Issue 4064 SME 01 04...

Page 2: ...labels REVISION HISTORY Rev Date Reason for Update Comment A 8 28 09 Initial Version 1 2 29 12 Added 24V DC Specifications a Magnetic Sensor Specifica tion and MDB Information 2 5 1 13 Added 24V DC S...

Page 3: ...ard Cash Box 1 8 Entire Unit Outside Dimensions Type SH with Large Cash Box 1 9 Entire Unit Clearance Dimensions Type SH with Large Cash Box 1 9 Entire Unit Outside Dimensions Type FM with Standard Ca...

Page 4: ...edure 2 5 Sensor and Roller Cleaning Procedure 2 5 Sensor and Roller Locations 2 6 Standard Interface Circuit Schematics 2 7 Operation Flowchart 2 8 Operation Flowchart Continued 1 2 9 Operation Flowc...

Page 5: ...essage 6 10 Adjustment Data Writing Failure 6 11 Menu Item Functions 6 12 Writing Serial Number 6 12 Reading a Serial Number 6 13 Reading ccTalk Encryption Code 6 13 Reading the ccTalk Address 6 13 Wr...

Page 6: ...14 SH Unit Bezel Parts List 7 15 SD SU Unit Bezel Type D Exploded View 7 16 SD SU Unit Bezel Type D Parts List 7 17 SD SU Unit Bezel Type N Exploded View 7 18 SD SU Unit Bezel Type N Parts List 7 19 S...

Page 7: ...dard Cash Box 1 12 Figure 1 14 VEGA Cash Box Outside Dimensions Type SD Large Cash Box 1 12 Figure 1 15 VEGA Cash Box Outside Dimensions Standard Cash Box 1 13 Figure 1 16 VEGA Cash Box Outside Dimens...

Page 8: ...4 16 Gear Box Motor Assembly Removal 4 5 Figure 4 17 Stacker Feed Motor Removal 4 5 Figure 4 18 Sub Sensor Board Removal 4 5 Figure 4 19 Lower Sensor Board Removal 4 6 Figure 4 20 Tension Pulley Unit...

Page 9: ...t Request Dialog 6 6 Figure 6 29 White Reference paper Removal Request Dialog 6 6 Figure 6 30 Request Writing Data to EEPROM 6 7 Figure 6 31 Writing EEPROM Data Progress 6 7 Figure 6 32 Save As Screen...

Page 10: ...Input 6 12 Figure 6 71 Writing Serial No Complete 6 13 Figure 6 72 Tool Bar Menu 2 6 13 Figure 6 73 Serial No Read Completion 6 13 Figure 6 74 Tool Bar Menu 3 6 13 Figure 6 75 Encryption Code Read Com...

Page 11: ...tor Figure 7 7 SH Unit Bezel Exploded View 7 14 Figure 7 8 SD SU Unit Bezel Type D Exploded View 7 16 Figure 7 9 SD SU Unit Bezel Type N Exploded View 7 18 Figure 7 10 SD SU Unit Bezel Type R Exploded...

Page 12: ...THIS PAGE INTENTIONALLY LEFT BLANK VEGA Series Banknote Validator P N 960 100189R_Rev 4 EDP 148850 2016 JAPAN CASH MACHINE CO LTD x...

Page 13: ...2 Performance Test DIP Switch Configuration Settings 6 17 Table 6 3 Feed Motor Abnormal Error Codes 6 18 Table 6 4 Stacker Motor Abnormal Error Codes 6 18 Table 6 5 Feeding Stacking Abnormal Error Co...

Page 14: ...THIS PAGE INTENTIONALLY LEFT BLANK VEGA Series Banknote Validator P N 960 100189R_Rev 4 EDP 148850 2016 JAPAN CASH MACHINE CO LTD xii...

Page 15: ...cifications Unit Dimensions Technical Contact Information In order to make operation this device and navigat ing within this manual easier the following illus trations are used Safety Instructions nee...

Page 16: ...rability 0 Standard 4 SUB Board 0 12V DC Power NO Magnetic Sensor 1 12V DC Power Magnetic Sensor W 2 24V DC Power NO Magnetic Sensor 3 24V DC Power Magnetic Sensor J 4 24V DC Power Magnetic Sensor W 5...

Page 17: ...t anything except Banknotes into the Insertion Slot Inserting Receipts Staples Tick ets Rubber Bands or Credit Card into the Unit may damage the Banknote Transport path 2 Do not inject liquids into th...

Page 18: ...ains the following primary fea tures The ability to replace an identical VEGA Unit installation e g a Unit having and SH specification or a SD SU specification into a wide range of target Host Machine...

Page 19: ...Component Names Figure 1 4 VEGA Component Names e a Upper Section b Bezel c Upper Section Open Close Buttons d Cash Box e USB Connector Receptacle Cover f Interface Connector Receptacle g Recycler RC...

Page 20: ...Accepted Long side 110 165mm 4 33 6 5 in Short side 60 82mm 2 36 3 23 in Insertion Direction Four 4 ways Validation Method Optical 5 wavelength transparency and reflection Processing Speed Based on E...

Page 21: ...VEGA RC Unit e g The VEGA RC 12V DC Specification Unit must be installed on the VEGA 12V DC Specification Unit and the VEGA RC 24V DC Specification Unit must be installed on the VEGA 24V Specificatio...

Page 22: ...h Standard Cash Box mounting space clearance dimensions Figure 1 5 VEGA Unit Outside Dimensions Type SH Standard Cash Box Figure 1 5 VEGA Unit Outside Dimensions Type SH Standard Cash Box 104 221 5 12...

Page 23: ...ash Box mounting space clearance dimensions Figure 1 7 VEGA Banknote Validator Unit Out side Dimensions Type SH Large Cash Box 247 8 221 5 12 104 NOTE All Dimensions are in Millimeters Figure 1 7 VEGA...

Page 24: ...space clearance dimensions Figure 1 9 VEGA Banknote Validator Unit Out side Dimensions Type FM Standard Cash Box 104 94 168 33 9 113 7 168 92 91 12 221 5 86 55 57 24 3 5xM3 5x 5 6 5x 5 6 112 57 5 100...

Page 25: ...igure 1 12 illustrates the entire VEGA SD Unit with Large Cash Box outside dimensions Figure 1 11 VEGA Banknote Validator Unit Outside Dimensions Type SD Standard Cash Box 249 9 110 8 20 169 2 NOTE Al...

Page 26: ...arge Cash Box Figure 1 14 illustrates the entire VEGA SD Unit with Large Cash Box outside dimensions Figure 1 13 VEGA Banknote Validator Unit Outside Dimensions Type SU Standard Cash Box 249 9 110 8 2...

Page 27: ...mensions Large Cash Box Figure 1 16 illustrates the VEGA Large Cash Box outside dimensions Figure 1 15 VEGA Cash Box Outside Dimen sions Standard Cash Box NOTE All Dimensions are in Millimeters 97 6 2...

Page 28: ...pe SH Figure 1 18 illustrates the VEGA Bezel type SH outside dimensions Figure 1 17 VEGA Cash Box Outside Dimen sions FM Cash Box NOTE All Dimensions are in Millimeters 231 5 225 2 97 6 6 3 110 2 Figu...

Page 29: ...1 20 illustrates the VEGA Bezel Type D outside dimensions Figure 1 19 VEGA Bezel Outside Dimensions Type N 3 94 X 83 100 30 5 13 14 95 22 31 3 NOTE All Dimensions are in Millimeters X 68mm EUR or 76mm...

Page 30: ...44 0 190 837 7834 Unit B Third Avenue Denbigh West Business Park Bletchley Milton Keynes Buckinghamshire MK1 1DH UK E mail support jcmglobal eu Asia and Oceania JCM GOLD HK LTD Phone 852 2429 7187 Fax...

Page 31: ...e color pattern as set by DIP Switch selection See DIP Switch Configura tions on page 2 2 SD SU Unit Installation 1 Set the VEGA DIP Switches for the proper com munication Mode See DIP Switch Configur...

Page 32: ...l Table 2 2 Then set DIP Switch Block DS1 Switches 2 through 8 to ON to select the desired Banknote acceptance inhibit settings Refer to the related Country s Software Information Sheet for further Sw...

Page 33: ...Code Initializa tion Instructions To set and save the Serial Number as the default ccTalk Encryption Code proceed as follows 1 Turn the VEGA Unit Power OFF 2 Set DIP Switch Block DS1 Switches 1 throu...

Page 34: ...l Ground 9 INHIBIT3 Soft R IN Serial data signal input line from Controller to Validator 10 INHIBIT4 IN Serial data signal input line from Controller to Validator 11 INHIBIT1 TTL RXD IN Serial data si...

Page 35: ...se a soft dry or slightly damp with water lint free Micro fiver Cloth Do not use any alcohol solvents citrus based prod ucts or scouring agents that may cause damage to the Validation Section Sensors...

Page 36: ...oth b Validation Sensors Prism c Side Sensors d Escrow Sensor Prism e Prism f Recycler RC Flap Sensor Blow area clean with compressed air jet Use a non flammable compressed air g Stacker Door Flap Sen...

Page 37: ...atic Diagram Figure 2 14 illustrates the VEGA ccTalk Interface Schematic Diagram Figure 2 12 VEGA Photo Coupler MDB Inter face Schematic Diagram VEGA SIDE CONTROLLER SIDE Figure 2 12 VEGA Photo Couple...

Page 38: ...note Validator Operational Flowchart Acceptance a Initializing b Stand by c Enable Accept d LED Display No Accept Pattern e LED Display shows Enable Accept Pattern f Is Banknote inserted g Banknote tr...

Page 39: ...ional Flowchart Stacking Figure 2 16 VEGA Banknote Validator Operational Flowchart Stacking b Complete Banknote Transportation a Banknote Transportation to Stacker c Vend Signal Output d Complete Stac...

Page 40: ...era tional Flowchart Reject Figure 2 17 VEGA Banknote Validator Operational Flowchart Reject a Reject Banknote b Complete Banknote Rejection c Try to Reject Again d Complete Banknote Rejection Now e S...

Page 41: ...Unit B Third Avenue Denbigh West Business Park Bletchley Milton Keynes Buckinghamshire MK1 1DH UK E mail support jcmglobal eu Asia and Oceania JCM GOLD HK LTD Phone 852 2429 7187 Fax 852 2929 7003 Un...

Page 42: ...P N 960 100189R_Rev 4 EDP 148850 2016 JAPAN CASH MACHINE CO LTD 3 2 Section 3 VEGA Series Banknote Validator Communications THIS PAGE INTENTIONALLY LEFT BLANK...

Page 43: ...the Upper Transport Unit Figure 4 1 d 3 Remove the four 4 Frame Mounting Screw from each side of the VEGA Unit s Frame Fig ure 4 2 a1 through a4 4 Separate the VEGA Unit Figure 4 2 b from the Lower Fr...

Page 44: ...and remove the right Figure 4 7 d and left Flap Lever from the Flap Axis end 13 Carefully remove the Flap 1 Figure 4 7 e and Flap 2 Figure 4 7 f up and off the Upper Trans port Unit Figure 4 3 Upper...

Page 45: ...c then lift the CPU Board up and off the Upper Transport Unit Figure 4 10 d Upper Sensor Circuit Board Removal To remove the VEGA Unit s Upper Sensor Board proceed as follows 1 Remove the two 2 Mounti...

Page 46: ...ugh a3 and unplug the three 3 Connectors Figure 4 15 b located on the back side of the Sub Circuit Board Figure 4 15 c 6 Lift the Sub Circuit Board up and off the Base Frame Figure 4 15 d Figure 4 12...

Page 47: ...remove the VEGA Unit s Sub Sensor Circuit Board proceed as follows 1 Unplug the single 1 Circuit Board Connector Figure 4 18 a attached to the Sub Sensor Board Figure 4 18 b 2 Lift the Sub Sensor Cir...

Page 48: ...the Carrier Base Figure 4 22 b Figure 4 19 Lower Sensor Board Removal b c d a1 a2 Figure 4 19 Lower Sensor Board Removal Figure 4 20 Tension Pulley Unit Removal a b c d1 d2 Figure 4 20 Tension Pulley...

Page 49: ...usher Unit Figure 4 26 e 7 Slide the Crank Drive Shaft Figure 4 26 f out of the Pusher Unit 8 Remove the two 2 Mounting Screws Figure 4 27 a1 a2 retaining the Right Cash Box Link Frame Figure 4 27 b t...

Page 50: ...t side of the Left Cash Box Link Frame Ceiling Board Assembling Caution When reassembling the Ceiling Board Assembly be careful not to damage the Stacker Belts Figure 4 29 a1 a2 by allowing them to ru...

Page 51: ...SR SENS SC SENS A5V 8V PGND M12V FG ST SP CW CCW PGND M12V FG ST SP CW CCW NC 1 2 3 4 5 1 2 3 4 5 6 BROWN RED ORANGE YELLOW GREEN BROWN RED ORANGE YELLOW GREEN A5V MAG AGND 1 2 3 1 2 3 4 5 6 7 8 9 10...

Page 52: ...3 4 5 1 2 3 4 5 6 BROWN RED ORANGE YELLOW GREEN BROWN RED ORANGE YELLOW GREEN A5V MAG AGND 1 2 3 1 2 3 4 5 6 7 8 9 10 11 12 13 14 15 16 1 2 3 4 5 6 7 8 9 10 11 12 13 14 15 16 BROWN RED ORANGE YELLOW...

Page 53: ...to the VEGA Unit 4 The Found New Hardware Wizard Screen shown in Figure 6 4 appears Click on the Radio Button located beside No not this time Figure 6 3 a and then Click on the Next Button Figure 6 3...

Page 54: ...the VEGA Operating Software Program Refer to Fig ure 6 1 and Figure 6 2 for the necessary Tool and Harness Connections and USB Cable Require ments Before downloading the VEGA Software Program copy the...

Page 55: ...verifying a CRC match between both Checksums Figure 6 12 a click on the OK Button Figure 6 12 b to close the UBA Downloader program Figure 6 9 UBA Download Screen a b c Figure 6 9 UBA Download Screen...

Page 56: ...15 b 2 Insert the Black Sponge Portion of the Reference Paper Figure 6 16 a into the Bezel Guide s opening Figure 6 16 b allowed for the Sponge width Approximately 5mm then align the lower part of ea...

Page 57: ...h Block DS1 Switch 1 to OFF The Front Panel LED will begin to flash in a Cyan White and Blue Color sequence 6 Launch the VEGA_Adjustment exe Program The VEGA Adjustment Screen Figure 6 19 will appear...

Page 58: ...Reference Paper to the Transport Sec tion and click on the Yes Button to begin the White Reference Paper Calibration confirmation Figure 6 28 a 18 When the White Reference Paper Calibration confirmati...

Page 59: ...uirements on page 6 1 4 Set DIP Switch DS1 Switches 1 2 3 and 5 to ON Figure 6 34 5 Turn the VEGA power ON The Front LED will slowly flash at a Green Color rate Set DIP Switch Block DS1 Switch 1 to OF...

Page 60: ...gure 6 42 a 19 Once the Black Reference Paper Calibration procedure is complete the Remove black reference paper Dialog Message Figure 6 43 will appear Remove the Black Reference Paper If clicking the...

Page 61: ...process by checking the Progress Bar Figure 6 50 a 27 Once the EEPROM data clearing process is complete the calibration result data will be written into the EEPROM Confirm the calibra tion result data...

Page 62: ...ile performing calibra tion of the VEGA Unit When the error Dialogue Message appears select Yes or No to perform desired action SENSOR ERROR MESSAGE If the Reference Papers the Sensors or the Motor Sp...

Page 63: ...No Button Figure 6 62 b to proceed action Click on the Yes Button Start the EEPROM writing procedure again with the message Retrying the data writing to EEPROM in the Blue Message Field Figure 6 63 a...

Page 64: ...number in 10 digits Mes sage appears click on the OK Button Figure 6 69 a to accept the read state reported 3 The SERIAL NO input Dialog Window will appear Figure 6 70 Type the new VEGA Serial Number...

Page 65: ...s Figure 6 75 Click on the OK Button Figure 6 75 a to accept the read state reported Reading the ccTalk Address To read the ccTalk Address proceed as follows 1 Select EEPROM ccTalk address Read D Fig...

Page 66: ...Bar Menu Selection 2 When the VEGA completely sent the Standby Color Indication data to the PC the read com plete Dialog Window appears Figure 6 82 Click on the OK Button Figure 6 82 a to accept the r...

Page 67: ...Reference Paper procedure is complete the Front Panel LED slowly flashes at a White Color rate Set the White Reference paper in place See Placing Reference Paper on page 6 5 8 Set DIP Switch DS2 Switc...

Page 68: ...dure is complete the Front Panel LED flashes at a Green Color rate 21 Turn the VEGA Unit power switch OFF This completes the Reference Paper Calibration procedures Performance Tests The VEGA Unit prov...

Page 69: ...ch Block 2 Switch 1 2 3 4 5 6 7 8 1 2 3 4 5 6 7 8 DIP Switch Test ON ON ON ON ON ON ON ON ON ON ON ON ON ON ON ON Feed Motor Normal Rotation Test ON OFF OFF OFF OFF OFF OFF OFF OFF OFF OFF OFF OFF OFF...

Page 70: ...est repeatedly performs basic Validator functions such as feeding transporting and stacking operations Perform the following steps to repeatedly test the VEGA Unit s basic feeding transporting and sta...

Page 71: ...l extinguish Sensor Confirmation will be Standby Mode 5 Table 6 6 lists the DIP Switch DS2 settings for the Sensor Test Configurations Select the intended Sensor from the Table and set DIP Switch DS2...

Page 72: ...P N 960 100189R_Rev 4 EDP 148850 2016 JAPAN CASH MACHINE CO LTD 6 2 0 Section 6 VEGA Series Banknote Validator Calibration and Testing THIS PAGE INTENTIONALLY LEFT BLANK...

Page 73: ...ts Upper Lower Transport Unit View and Parts Course Path Turning Unit View and Parts Cash Box Unit View and Parts SH Bezel Unit View and Parts SD SU Bezel Unit View and Parts Option Unit View and Part...

Page 74: ...SH MACHINE CO LTD 7 2 Section 7 VEGA Series Banknote Validator Exploded Views and Parts Lists VEGA Entire Exploded View SU SD Figure 7 2 VEGA Entire Unit Exploded View SU SD Figure 7 2 VEGA Entire Uni...

Page 75: ...216977 808 101087R VEGA Key Box Unit FD Standard 1 For Front Maintenance Specification 189836 808 101088R VEGA SD SU Box Unit Standard 1 149650 VEGA Cash Box Unit Large 1 206294 808 101089R VEGA Key B...

Page 76: ...Exploded Views and Parts Lists Upper Transport Unit Entire View Figure 7 3 Upper Transport Unit Exploded View Figure 7 3 Upper Transport Unit Exploded View Turn Back 101 102 103 104 105 105 106 107 10...

Page 77: ...Cover 1 109 145238 900 200303R Harness Cover 2 110 144607 900 200304R Pinch Roller 6 111 144608 200 200729R Flap Axis 1 112 144610 200 200730R Pinch Roller Shaft 3 113 144611 200 200731R Set Pin 11 2...

Page 78: ...ransport Unit Exploded View 231 SUB Board Turn Back 209 220 211 211 203 235 211 235 228 224 222 201 223 222 224 244 212 205 212 228 209 220 204 215 219 218 236 233 240 237 217 237 214 213 221 230 227...

Page 79: ...2 214 144627 900 200312R B Idle Gear 1 2 215 144631 900 200313R B Idle Gear 2 2 216 144633 900 200314R B Idle Gear 3 2 217 144636 900 200315R Idle Gear 3 2 218 144639 900 200316R U Stand Gear 2 219 1...

Page 80: ...300 200154R Sensor Board 1 196695 Sensor Board CHN 1 For China Specification 244 146118 186 266000R 2 6x6 Phillips Self Tapping Flat Head Screw Black 3 245 187322 300 000021R MAG Circuit Board W 1 wit...

Page 81: ...O LTD 7 9 Exploded Views and Parts Lists VEGA Series Banknote Validator Section 7 Course Path Turning Unit Exploded View Figure 7 5 Course Turning Unit Exploded View Figure 7 5 Course Turning Unit Exp...

Page 82: ...EDP No JAC No Description Qty Remark 301 144569 900 200320R Course Path Turning Guide 1 302 219639 900 200321R Course Path Turning Guide Cover 1 303 144581 900 200322R Course Path Turning Guide Cover...

Page 83: ...15 405 435 430 439 443 410 409 410 430 439 449 408 440 440 439 430 415 406 415 419 444 418 417 416 444 425 444 426 439 441 444 444 433 434 444 428 424 441 431 442 407 444 439 430 436 437 415 429 401 4...

Page 84: ...ress Plate 1 414 219640 900 200331R Safe Cover Cash Box Door Standard 1 219642 900 101179R Safe Cover 1000 Cash Box Door Large 1 415 144584 200 200755R Bearing 6 416 144652 900 200332R Cash Box Drive...

Page 85: ...c Tang 1 144606 900 200443R Cylinder Tang 1 For C 88 1 Undesignated Key Lock R 218670 900 200444R Cylinder Tang 1 For C 89 1 Key Lock FM 449 144607 900 200304R Pinch Roller 2 450 104081 186 266000R 2...

Page 86: ...JAPAN CASH MACHINE CO LTD 7 1 4 Section 7 VEGA Series Banknote Validator Exploded Views and Parts Lists SH Unit Bezel Exploded View Figure 7 7 SH Unit Bezel Exploded View Figure 7 7 SH Unit Bezel Expl...

Page 87: ...Type 3 71mm 1 148824 900 101186R Face Lower SH Guide Type 4 77mm 1 149615 900 101187R Face Lower SH Guide Type 5 67mm 1 194926 Face Lower CHN 1 For China Specification 503 147146 900 101197R Face Upp...

Page 88: ...LTD 7 1 6 Section 7 VEGA Series Banknote Validator Exploded Views and Parts Lists SD SU Unit Bezel Type D Exploded View Figure 7 8 SD SU Unit Bezel Type D Exploded View Figure 7 8 SD SU Unit Bezel Ty...

Page 89: ...101192R Face Upper SD SU Guide Type D2 71mm 1 149626 900 101193R Face Upper SD SU Guide Type D3 68mm 1 603 149623 900 101200R Face Lower SD SU Guide Type D1 67mm 1 149625 900 101194R Face Lower SD SU...

Page 90: ...LTD 7 1 8 Section 7 VEGA Series Banknote Validator Exploded Views and Parts Lists SD SU Unit Bezel Type N Exploded View Figure 7 9 SD SU Unit Bezel Type N Exploded View Figure 7 9 SD SU Unit Bezel Ty...

Page 91: ...Bezel SD SU Type N 1 702 149619 900 101198R Face Upper SD SU Guide Type N2 76mm 1 703 149620 900 101199R Face Lower SD SU Guide Type N2 76mm 1 704 110949 149 000010R 2 6x8 Phillips Self Tapping Flat...

Page 92: ...LTD 7 2 0 Section 7 VEGA Series Banknote Validator Exploded Views and Parts Lists SD SU Unit Bezel Type R Exploded View Figure 7 10 SD SU Unit Bezel Type R Exploded View Figure 7 10 SD SU Unit Bezel T...

Page 93: ...No JAC No Description Qty Remark 801 206149 Bezel SD SU Type R 1 802 206150 Bezel 2 SD SU Type R 1 803 206151 Face Upper SD SU Guide Type 71 RUS 1 804 206152 Face Lower SD SU Guide Type 71 RUS 1 805 1...

Page 94: ...LTD 7 2 2 Section 7 VEGA Series Banknote Validator Exploded Views and Parts Lists Option Unit Exploded View Figure 7 11 Option Unit Exploded View Figure 7 11 Option Unit Exploded View OP1 OP3 OP4 OP5...

Page 95: ...lips Self Tapping Binding Head Screw 2 OP6 149643 200 101168R Key Cover 1 OP7 149644 200 101169R Key Lever 1 OP8 149645 200 101170R Key Bracket 1 OP9 144606 900 200443R Key Tang 1 218670 900 200444R K...

Page 96: ...P N 960 100189R_Rev 4 EDP 148850 2016 JAPAN CASH MACHINE CO LTD 7 2 4 Section 7 VEGA Series Banknote Validator Exploded Views and Parts Lists THIS PAGE INTENTIONALLY LEFT BLANK...

Page 97: ...istings of A 3 Exploded View illustrations of 7 1 F Flowchart operation of 2 8 I Indication LED color patterns for 2 3 Installation procedure for 2 1 procedures for 6 1 J Jam Banknote clearing a 2 5 N...

Page 98: ...eries Banknote Validator Special Notes italic text highlights finger points to 1 1 Steps sequential numbering of 1 1 T Technical Contact Information location listing of 1 16 Troubleshooting instructio...

Page 99: ...s and then perform a Sensor re adjustment to complete the repair Fault Table Listings Table A 1 through Table A 3 list the various possi ble fault conditions that can occur and the neces sary actions...

Page 100: ...ne Check that the command from the Host Machine is correct and change the setting to be acceptable for use with the VEGA Unit Dirt or foreign objects adhering to the Sensors Clean the Sensors See Clea...

Page 101: ...eck that the following parts are properly assembled and or Harness connected Relative Parts Feed Motor If the error is not resolved change the above related part Red 3 300 White 5 300 Feed Motor High...

Page 102: ...e Position Sensor Validation Sensor If the error is not resolved change the above relative part or parts Red 3 300 Red 5 300 Cash Box Seating Problem Cash Box Sensors detect a Banknotes remaining in p...

Page 103: ...Banknote is in transport position where it can be returned reject the Banknote Solution Check that the following parts are properly assembled and or Harness connected and clean all of the Sensors Rel...

Page 104: ...e Sensor and Roller Cleaning Procedure on page 2 5 Needs Sensor calibration after disassembly reassembly or parts repair replacement perform the necessary Calibration Procedure s See Calibration on pa...

Page 105: ...r Mechanism is not presently at Home end position Solution Check that the following parts are properly assembled and or Harness connected and clean all of the Sensors Relative Parts Pusher Mechanism H...

Page 106: ...knote Validator Troubleshooting Maintenance Equipment This portion provides product information for the VEGA Maintenance Equipment Figure A 1 Additional Maintenance Equipment Requirements VEGA Mainten...

Page 107: ...ite KS 325 1 b 190875 Use EDP Reference Paper Black KS 326 1 c G00205 501 100218R UAC 1 d G00241 400 100669R UAC Adaptor Harness ID 003 1 For UAC G00249 Use G UAC Adaptor Harness ID0E3 1 e G00213 302...

Page 108: ...P N 960 100189R_Rev 4 EDP 148850 2016 JAPAN CASH MACHINE CO LTD A 1 0 Section A VEGA Series Banknote Validator Troubleshooting THIS PAGE INTENTIONALLY LEFT BLANK...

Page 109: ...f the Sensor Boards is replaced 6 4 4 ccTalk a Serial based Communications Protocol commonly used in control electronic pay ment and vending systems Developed by Money Controls Ltd the format enjoys w...

Page 110: ...f both the amount of hear temperature and the amount of moisture humidity present in an equipment operating environment This may effect the operating temperature range of the VEGA Banknote Validator 1...

Page 111: ...cations to allow the user to enable or se lect specific program functions or features 6 1 17 Recycler The VEGA RC Twin an optional add on device for the VEGA Banknote Validator The Recycler adds addit...

Page 112: ...kes VEGA an attractive choice for AWP Amusement with Prize Vending and Payment Terminal Markets 1 1 22 VEGA RC Twin a Banknote Recycler Unit option used in conjunction with the VEGA Unit The VEGA RC T...

Page 113: ...P N 960 100189R_Rev 4 EDP 148850 2016 JAPAN CASH MACHINE CO LTD VEGA Series Banknote Validator...

Page 114: ...VEGA Series Banknote Validator P N 960 100189R_Rev 4 EDP 148850 2016 JAPAN CASH MACHINE CO LTD Issue 4064 SME 01 04...

Reviews: