P/N 960-100189R_Rev. 4 {EDP #148850}
© 2016, JAPAN CASH MACHINE CO., LTD.
6 - 1 2
Section 6
VEGA™ Series Banknote Validator Calibration
and
Testing
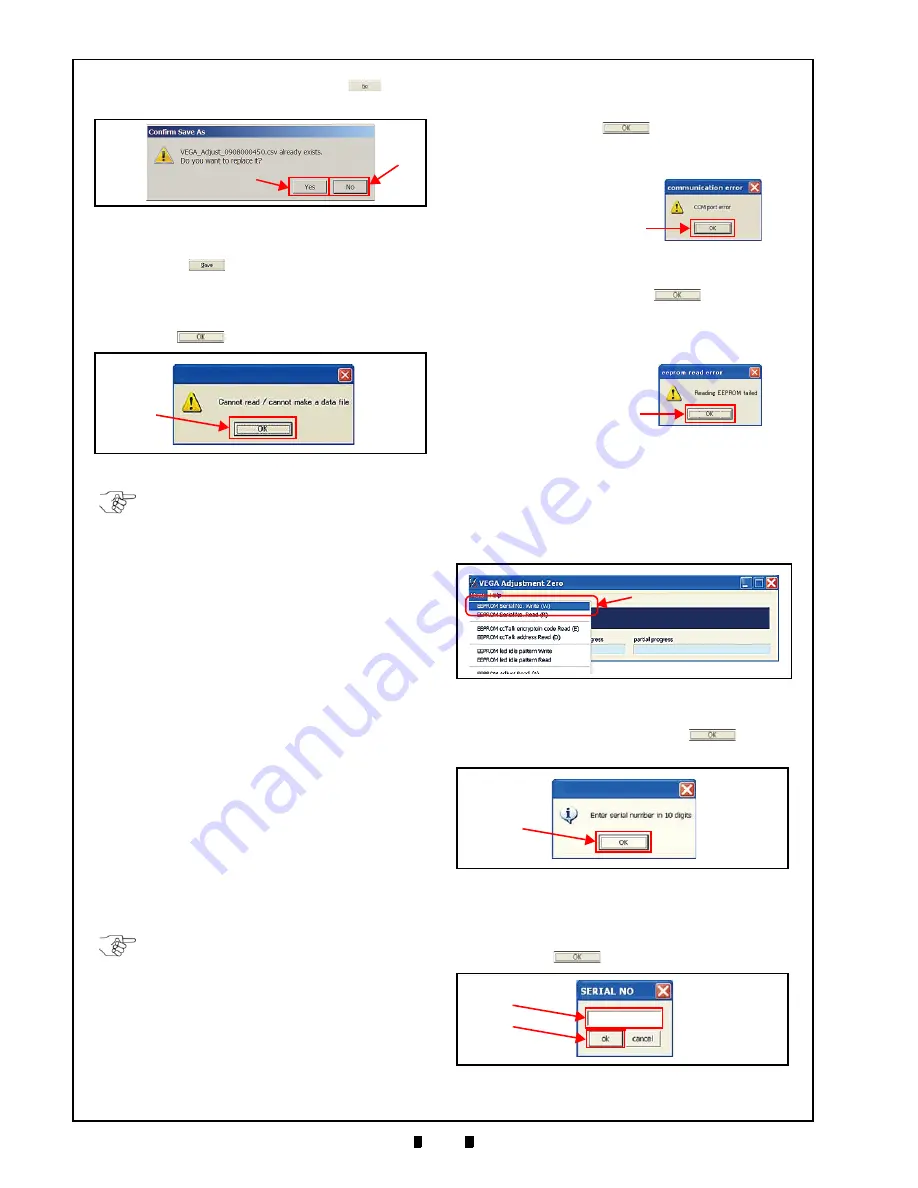
data existing on the PC, or click “
No
”
Button
a
) and rename the File Name.
The file saved in same name is already open when
the “
Save
”
Button is clicked, the “
Cannot
read/ cannot make a data file
” Message appears
(Figure 6-67). In this case, the failed data is NOT
saved and terminate the procedure with clicking on
the “
OK
”
Button (Figure 6-67
a
).
Menu Item Functions
The Menu contains the following eight (8)
functions:
1. Writing a Serial Number
(For only VEGA_Ajustment_Zero.exe)
2. Reading a Serial Number
3. Reading the ccTalk Encryption Code
4. Reading the ccTalk Address
5. Writing a Standby Indication
6. Reading a Standby Indication
7. Reading Adjustment Data
8. Reading the VEGA Software Version
The VEGA Calibration Program must be launched
to perform these eight (8) functions. Refer to Step 1
through 6 of the “Calibration Using a PC” on
page 6-5 to launch the VEGA Calibration Program.
Writing Serial Number
To write a Serial Number into EEPROM, proceed
as follows:
1. Select
“
EEPROM Serial No. Write (W)
a
) from the Pull Down Menu from the VEGA
Calibration Program Tool Bar Menu Selection.
2. When
the
“
Enter serial number in 10 digits
” Mes-
sage appears, click on the “
OK
”
Button
a
) to accept the read state reported.
3. The SERIAL NO input Dialog Window will
appear (Figure 6-70). Type the new VEGA Serial
Number as 10 digits (Figure 6-70
a
); then click on
the “
OK
”
Button (Figure 6-70
b
).
Figure 6-66
Figure 6-66
Overwrite Confirmation
a
b
Figure 6-67
a
Figure 6-67
Failed Data Save Error
NOTE: In case the Calibration Result data
performed is NOT completely written into
the EEPROM, the previous data may be
replaced. Also, if writing data into EEPROM
fails, the previous data in memory may also
be deleted causing the VEGA Unit to cease
operating.
NOTE: Set the DIP Switches according to
the procedure specified by “Calibration
Preparation” on page 6-4. Other settings
may cause the VEGA Unit’s performance to
stop operating.
If opening a COM Port fails, the “
commu-
nication error
” Dialog Message will appear.
Click on “
OK
”
Button and ensure
that the USB Cable is connected and/or the
desired COM Port is correctly assigned.
If reading EEPROM data fails, the
“
eeprom read error
” Dialog Message will
appear. Click on “
OK
” Button
and
ensure that the USB Cable is connected
and/or the desired COM Port is correctly
assigned.
OK Button
OK Button
Figure 6-68
a
Figure 6-68
Tool Bar Menu 1
a
Figure 6-69
Serial No. Window Request
Figure 6-70
a
b
Figure 6-70
SERIAL NO Input


