P/N 960-100189R_Rev. 4 {EDP #148850}
© 2016, JAPAN CASH MACHINE CO., LTD.
6 - 2
Section 6
VEGA™ Series Banknote Validator Calibration
and
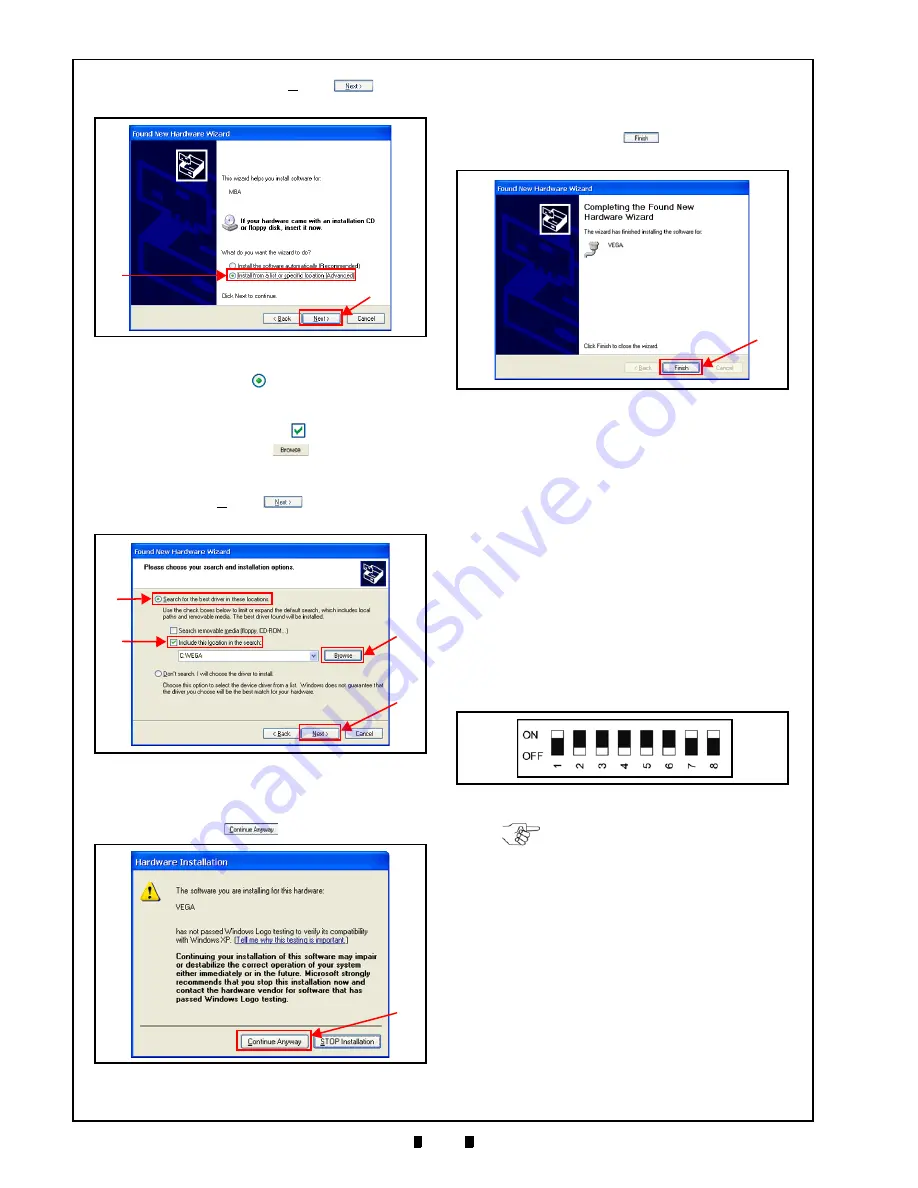
Testing
a
), and then click on the “
Next>
”
Button
b
).
6. Click on the Radio
Button located next to
“
Search for the best driver in these locations.
”
a
) and check the “
Include this location
in the search:
” Checkbox
b
).
7. Click on the “
Browse
”
Button (Figure 6-5
c
) and select the new VEGA Folder [C:\VEGA]
recently created on the PC.
8. Click on the “
Next>
”
Button (Figure 6-5
d
) to display the next screen.
9. Confirm that the “
Hardware Installation
” Message
Screen appears, and then click select the “
Con-
tinue Anyway
”
Button (Figure 6-6
a
).
10. When software installation is complete, the
“
Completing the Found New Hardware Wizard
”
Screen will appear (Figure 6-7).
11. Click on the “
Finish
”
Button (Figure 6-7
a
)
to close the Screen.
This completes the VEGA USB Driver Software
installation.
Software Download Procedure
Perform the following steps to download the
VEGA Operating Software Program (Refer to Fig-
ure 6-1 and Figure 6-2 for the necessary Tool and
Harness Connections and USB Cable Require-
ments). Before downloading the VEGA Software
Program, copy the Downloader program (UBA
®
Downloader Version 2.10: Specified), and the
VEGA Operating Software Download into the
VEGA Folder (
[C:\VEGA]
) created on the PC.
1. Turn the VEGA power
OFF
.
2. Set DIP Switch Block DS1, Switches #1, #7 and
#8 to
ON
3. Turn the VEGA power
ON
.
4. Confirm that the Front Panel LED flashes at a
Green
Color rate.
5. Launch the copied Downloader Program from the
PC VEGA Folder and confirm that the program
Download Screen appears (Figure 6-9).
Figure 6-4
Installation Path Selection Screen
a
b
Figure 6-4
Installation Path Selection Screen
Figure 6-5
a
d
b
c
Figure 6-5
Install Option Screen
Figure 6-6
a
Figure 6-6
Installation Warning Screen
Figure 6-7
a
Figure 6-7
Hardware Wizard Completion Screen
Figure 6-8
DIP Switch DS1 Initial Setting
Figure 6-8
DIP Switch DS1 Initial Setting
NOTE: DIP Switch Block DS2 and
DS3 settings are not required for this
Software Download.


