background image

62/72

7.1. Laver trois fois les récipients 

phytosanitaires vides

AVIS: Even Même les récipients considérés vides contiennent 
des résidus chimiques. Par conséquent, en rejetant les conte-
neurs sans se laver les résidus est extrêmement dangereux pour 
l’homme, les animaux et l’environnement. Dans le cas de réci-
pients métalliques, en plastique et en verre chimiques, chaque 
récipient doit être rincé trois fois pour s’assurer que les résidus 
sont complètement éliminés. Ce manuel décrit comment tirer le 
triple lavage d’une manière correcte, sûre et effi

  cace.

1. 

Immédiatement après avoir vidé le récipient, vous devez 
garder à l’ouverture à l’envers sur l’ouverture de la cuve du 
pulvérisateur ou sur le seau que vous utilisez pour préparer 
le mélange de produits chimiques pendant au moins 30 
secondes, jusqu’à ce que ne reste aucun résidu dans le réci-
pient, lorsque les gouttes tombent dans de longs intervalles.

2. 

Maintenez le récipient en position verticale et de le remplir 
avec de l’eau jusqu’à un quart. Par exemple: dans un réci-
pient de 1000 ml, mettre 250 ml d’eau.

3. 

Monter le bouchon du réservoir et serré, il suffi

   t d’éviter les 

fuites pendant l’agitation.

4. 

Agiter le récipient fermement par tous les moyens (hori-
zontales et verticales), pendant environ 30 secondes pour 
éliminer les résidus qui se trouvent sur les parois internes 
des conteneurs.

5. 

Prenez le bouchon du réservoir et versez délicatement hors 
de l’eau de rinçage dans la cuve du pulvérisateur.

6. 

Maintenez le récipient sur l’ouverture du réservoir de pul-
vérisation pendant environ 30 secondes jusqu’à la dernière 
goutte. 

7. 

Répétez cette opération deux fois plus. De cette façon, vous 
avez terminé le triple lavage.

8. Eff ectuez les récipients en plastique et métalliques inutiles 

en les transperçant avec un instrument pointu du fond des 
récipients. De cette manière, les étiquettes ne sont pas en-
dommagés à des fi ns d’identifi cation.

IDENTIFICATION

(Part nº. - Description)

FILTRE (Mesh)

TYPE DE 

BEC 

(1197536) JEF 11002

JAUNE

(1197476) JSF 11002 

JAUNE

(1197535) JEF 110015

VERT

80  (Jaune Zinc)

50 (Violet)

50 (Violet)

80  (Jaune Zinc)

50 (Violet)

50 (Violet)

50 (Violet)

50 (Violet)

50 (Violet)

50 (Violet)

50 (Violet)

50 (Violet)

80  (Jaune Zinc)

80  (Jaune Zinc)

50 (Violet)

(1197475) JSF 110015  

VERT

(1197537) JEF11003

BLEU

(1197477) JSF11003

BLEU

Herbicides

30

30

0.49

0.49

30

30

0.65

0.65

30

30

0.58

0.98

APPLICA-

TION

PRESSION

(psi)

TAUX DE 

FLUX
(l/min)

(1197565) JHC 8002

JAUNE

45

0.80

(1198892) JHC 8004

ROUGE

45

1.60

(1198893) JHC 8005

BRUN

45

2.00

(1197486) JDF 04

ROUGE

(1197497) JAI 120015  

VERT

(1197488) JDF 06

GRIS

(1197501) JAI 12003

BLEU

(1197487) JDF 05

BRUN

(1197499) JAI 12002 

JAUNE

15

20

0.92

0.42

15

20

1.15

0.57

15

20

1.39

0.85

Fongicide, 

insecticide 

et fertilisants 

foliaires

Herbicides 

et fertilisants 

foliaires

Herbicides

Herbicides

Approximatif données basent en l’andain du spray pour becs 
uniques à une hauteur de 50 cm de la cible.

8. Mode d’emploi

Les étapes suivantes décrivent comment utiliser en toute sécu-
rité le pulvérisateur.

8.1. Choissez le bec correct

8.2. Calibrage des pulvérisateurs à dos

Procèdé

1. 

Emploi de la bouteille de calibrage.

2. 

Positionnez la lance à la hauteur du service et mesurez la 
largeur de la bande d’application.

3. 

D’après la largeur de la bande d’application, on doit par-

REMARQUE: Ce pulverisateur a le bec JSF-11002 assemble dans  
la lance. Autre becs remarquent dans cet manuel sont facultatifs, 
donc ils n’accompagnent pas le pulverisateur.

11/72

8.12. Total labor time indicator

The Total Labor Time Indicator shows how many hours the spray-
er has been working since the fi rst use. The hours are only in-
cremented in the Total Labor Time Indicator when the electronic 
interface is on.

To view the total labor time:

1. 

Turn on the electronic interface, by pressing the Green 
Button once.

2. 

Press Green Button and Red Button together and hold 
them pressed for 10 seconds.

3. 

The lights (the same lights used for pressure level indica-
tion) will blink according to the code below:

•  No lights blinking = Total labor hour is less than 300 h.

•  One light blinking = Total labor hour is more than 300 h and 

less than 700 h.

•  Two lights blinking = Total labor hour is more than 700 h and 

less than 1000 h.

•  Three lights blinking = Total labor hour is more than 1000 h 

and less than 1300 h.

•  Four lights blinking = Total labor hour is more than 1300 h 

and less than 1600 h.

•  Five lights blinking = Total labor hour is more than 1600 h.

NOTE: Press any button to return to normal operation mode. If 
none of the buttons are pressed, the electronic interface will au-
tomatically exit the Total Labor Time Indicator after 15 seconds.

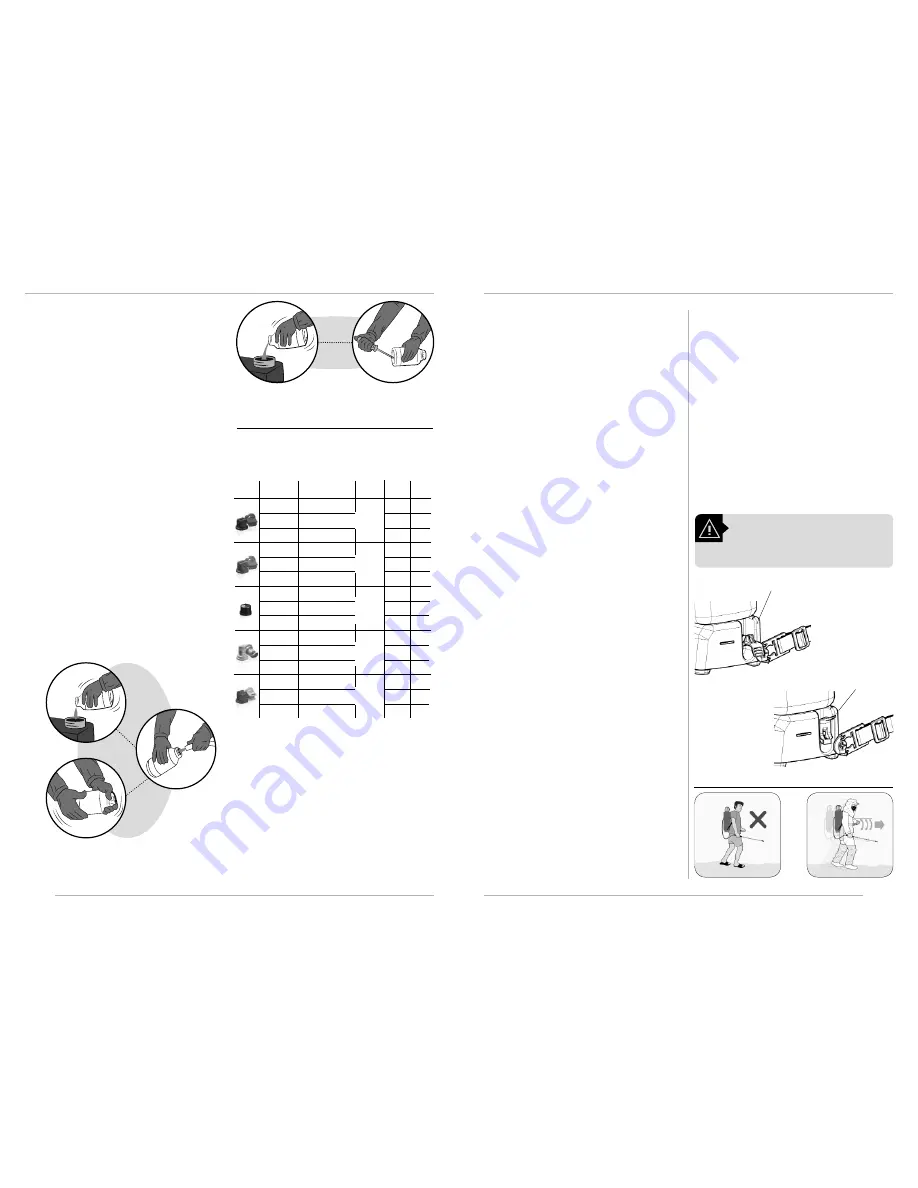
8.13. Activate/Deactivate agitation system

The Agitation System ensures that there is no signifi cant varia-
tion between initial concentration of agrochemical (when tank is 

full) and fi nal concentration (when tank is almost empty). This is 
especially important if wettable powder agrochemicals are used. 
When the agitation is activated, part of the pump’s fl ow will be 
directed to the tank, forcing the mixture to circulate.

Basic recommendations:

•  Turn on the Agitation System by moving the agitation lever 

to the horizontal position, as shown in A. It is recommended 
that agitation is kept on while transporting the sprayer from 
the fi lling area to the area being sprayed. This will maintain 
uniform chemical concentration until the beginning of the 
application.

• Turn off  the Agitation System to begin spraying by returning 

the lever to the vertical position, as shown in B. This ensures 
higher pressure at the end of the nozzle.

•  Periodically turn on the Agitation System when spraying wet-

table powder or chemical products that easily settle out of 
solution.

NOTE: Pressure in the spraying nozzle will be weaker while the 
Agitation System is activated.

WARNING!

The sprayer may not work properly if this 
procedure is not performed.

A

B

The Walking Pace function is a useful timer that can assist user 
to calibrate the sprayer or keep a uniform walking speed while 
spraying. When the Walking Pace function is activated, user will 
notice an audible beep, indicating the correct moment to step 
forward (as an example). The audible beeps can be used for oth-
er purposes, such as spot chemical application. In this case, the 
beep can indicate the correct moment to proceed to another 
plant.

To set up the Walking Pace timer:

1. 

Press Red Button once. An audible beep will be heard and 
it corresponds to a speed of 1 km/h.

2. 

Press Red Button again to adjust the Walking Pace to 2 
km/h.

3. 

Press Red Button again to adjust the Walking Pace to 3 
km/h.

4. 

Press Red Button again to adjust the Walking Pace to 4 
km/h.

5. 

Press Red Button again to turn-off  the Walking Pace func-
tion.

8.14. Application

Wear appropriate protective clothing

Summary of Contents for PJB-20/16

Page 1: ...omposants qui ne soient pas fournis par JACTO Alt ration du pulv risateur ou des caract ristiques du projet ori ginal 12 4 Exclusionsdelagarantie Pi ces qui pr sentent de l usure ou de la fatigue par...

Page 2: ...rie jusqu ce que le chargeur LED indicateur soit vert Chargeur pas d origine JACTO Utilisez le chargeur JACTO d origine Pompe pas d origine surcharge Utilisez la pompe d origine Chargeur ou cables end...

Page 3: ...the instructions contained in this manual before using your sprayer This equipment was designed for spraying plants protection products approved by regulatory authorities to be used in knap sack spra...

Page 4: ...the safety of the power tool is maintained b Use personal protective equipment Always wear eye protection Protective equipment such as dust mask non skid safety shoes hard hat or hearing protection us...

Page 5: ...tripped over or otherwisesubjectedtodamageorstress Do not use an extension cord unless it is absolutely necessary Use of improper extension cord could result in risk of fire electric shock or electroc...

Page 6: ...anyreason Ifbatterypackcaseiscrackedor damaged donotconnecttocharger Donot crush dropordamagebatterypack Donot use a battery pack or charger that has been dropped run over or damaged in any way i e p...

Page 7: ...ufacturer s recommendations High pressure present at end of nozzle and inside sprayer base Turn off the sprayer completely and release pressure before attempting to repair or replace parts of the spra...

Page 8: ...l utilisateur calibrer le pulv risateur ou maintenir une vitesse de marche uniforme pendant la pulv risation Lors que la fonction INDICATEUR DE MARCHE est activ l utilisateur ne remarquera un bip sono...

Page 9: ...serrer la bretelle tirez sur la languette vers le haut 8 7 Installation et retrait de la batterie Pour installer la batterie 1 Localiser le bo tier de la batterie sur la partie inf rieure de la base d...

Page 10: ...pressed nor when the sprayer is turned off nor when the bat tery is removed To activate the Pressure Lock 1 Select the desired pressure level 1 to 5 2 Press Green Button and hold it pressed for 10 se...

Page 11: ...pulverisateur a le bec JSF 11002 assemble dans la lance Autre becs remarquent dans cet manuel sont facultatifs donc ils n accompagnent pas le pulverisateur 11 72 8 12 Total labor time indicator TheTot...

Page 12: ...la base du pulv risateur teignez compl tement le pulv risateuretrel cherlapressionavantde tenter de r parer ou de remplacer les pi ces du pulv risateur Ne pas diriger pulv risation qui a lieu Vaporis...

Page 13: ...D branchez le cordon du chargeur de la prise Recharge batteries d charg es d s que possible apr s l utilisationoulaviedelabatteriepeuvent trefortement diminu s Pour une dur e de vie de la batterie ne...

Page 14: ...ATTENTION Risquedebr lure Pour r duire le risque deblessures lachargequed sign JACTO batteries D autres types de batteries peuvent clater et causer des blessures et des dommages Souscertainescondition...

Page 15: ...mettra d assurer que la s curit de l outil de puissance est maintenue 3 3 La s curit personnelle a Restez alerte regarder ce que vous faites et faites preuve de bon sens lorsque vous utilisez un outil...

Page 16: ...MES Les symboles ci dessous sont utilis es pour vous aider reconna tre cette information 2 Sp cifications 3 Avertissements de s curit g n raux pour l outil Mod le PJB 20 16 Dimensi n m xima A x L x A...

Page 17: ...la garantie 72 12 5 G n ralit s 72 17 72 Malfunction Status Cause Action Battery charge is not lasting as usual or is not charging at all New battery Battery is not being fully charged Charge battery...

Page 18: ...tion of the equipment or any characteristic of the original design 12 4 This warranty shall exclude Parts which show wear and tear due to use spray nozzle fil ters seals rechargeable battery hydraulic...

Page 19: ...espalda Mantenimiento preventivo correctivo dado por personas no autorizadas Empleo de piezas y componentes no suministrados por JACTO Alteraci n del equipo o de cualesquiera caracter sticas de proyec...

Page 20: ...cador LED de la bater a se quede verde Cargador JACTO no es original Utilice cargador JACTO original No es bomba original carga excesiva Utilice bomba original Cargador o cables enchufes del cargador...

Page 21: ...eu pulverizador Leia atentamente e siga as instru es contidas neste manual antes de utilizar seu pulverizador Este equipamento foi projetado para pulveriza o de produtos para prote o de plantas aprova...

Page 22: ...ferramenta el trica com uma pessoa quali ficada que utilize somente pe as de reposi o id nticas Isto garantir que a seguran a da ferramenta el trica seja man tida 3 3 Seguran a pessoal a Fique alerta...

Page 23: ...ia GUARDE ESTAS INSTRU ES Este manual cont m instru es im portantes de seguran a para carregadores de bateria Antes de utilizar o carregador leia todas as instru es a respeito do carregador bateria e...

Page 24: ...omada Baterias descarregadas devem ser recarregadas assim que poss vel ou a vida da bateria pode diminuir de forma acen tuada Para maior vida til da bateria n o descarregue as baterias totalmente reco...

Page 25: ...bateria inadvertidamente entrarememcontato com materiais condutores tais como chaves moedas ferramentas manuais e afins Certos regulamentos pro bem o transporte de baterias em avi es ou seja embalado...

Page 26: ...Una luz parpadeando horas de trabajo total es mayor que 300 y menor que 700 h Dos luces parpadeando horas de trabajo total es mayor que 700 y menor que 1000 h Tres luces parpadeando horas de trabajo t...

Page 27: ...de la correa a los acopladores de pl s tico situada en el lado de la base del pulverizador como se muestra en la posici n B 3 Por fin ajuste la hebilla intermediaria como desee como se muestra en C P...

Page 28: ...nta segure a fi vela firme com uma m o e puxe a al a para baixo com a outra m o Para afrouxar a cinta segure a fivela firme com uma m o e puxe a cinta para cima com a outra m o 8 7 Instalando e remove...

Page 29: ...enor que 700 h Duas luzes piscando total de horas de trabalho maior que 700 h e menor que 1000 h Tr s luzes piscando total de horas de trabalho maior que 1000 h e menor que 1300 h Quatro luzes piscand...

Page 30: ...ornillos llaves etc Eltransportede bater as puede provocar incendios si los terminales de bater a inadvertidamente entraren en contacto con materiales conductores como llaves monedas herramientasdeman...

Page 31: ...el cargador en una toma de corriente apropiada antes de insertar la bater a Aseg rese de que el cable del enchufe est bien conectado al cargador 3 Conecte el enchufe del cargador al conector de la bat...

Page 32: ...utilizar el cargador lea todas las instrucciones del car gador de la bater a y del producto que utilice la bater a ADVERTENCIA NO intente cargar el pack de la bater a con cualquier cargador que no sea...

Page 33: ...mente piezas de repues to originales Estoasegurar quesemantengalaseguridadde la herramienta el ctrica 3 3 Seguridad personal a Est atento y observe cuidadosamente lo que est ha ciendo cuando este oper...

Page 34: ...e refiere a la protecci n de SU SEGURIDAD y la PREVENCI N DE PROBLEMAS Los siguientes s mbolos se muestran para ayudarle a re conocer esta informaci n 2 Especificaciones T cnicas 3 Advertencias Genera...

Page 35: ...uncionamento Status Causa A o Carga da bateria n o dura como de costume ou n o est carregando Bateria nova Bateria n o est sendo carregada completamente Carregue a bateria at que o indica dor LED da b...

Page 36: ...equipamento ou de qualquer caracter stica do projeto original 12 4 Itens exclu dos da garantia Pe as que apresentam desgaste ou fadiga pelo uso bicos filtros veda es bateria recarreg vel bomba hidr ul...

Reviews: