background image

To save a single/multiple snapshot(s) to the local/removable media, do the following:

1.

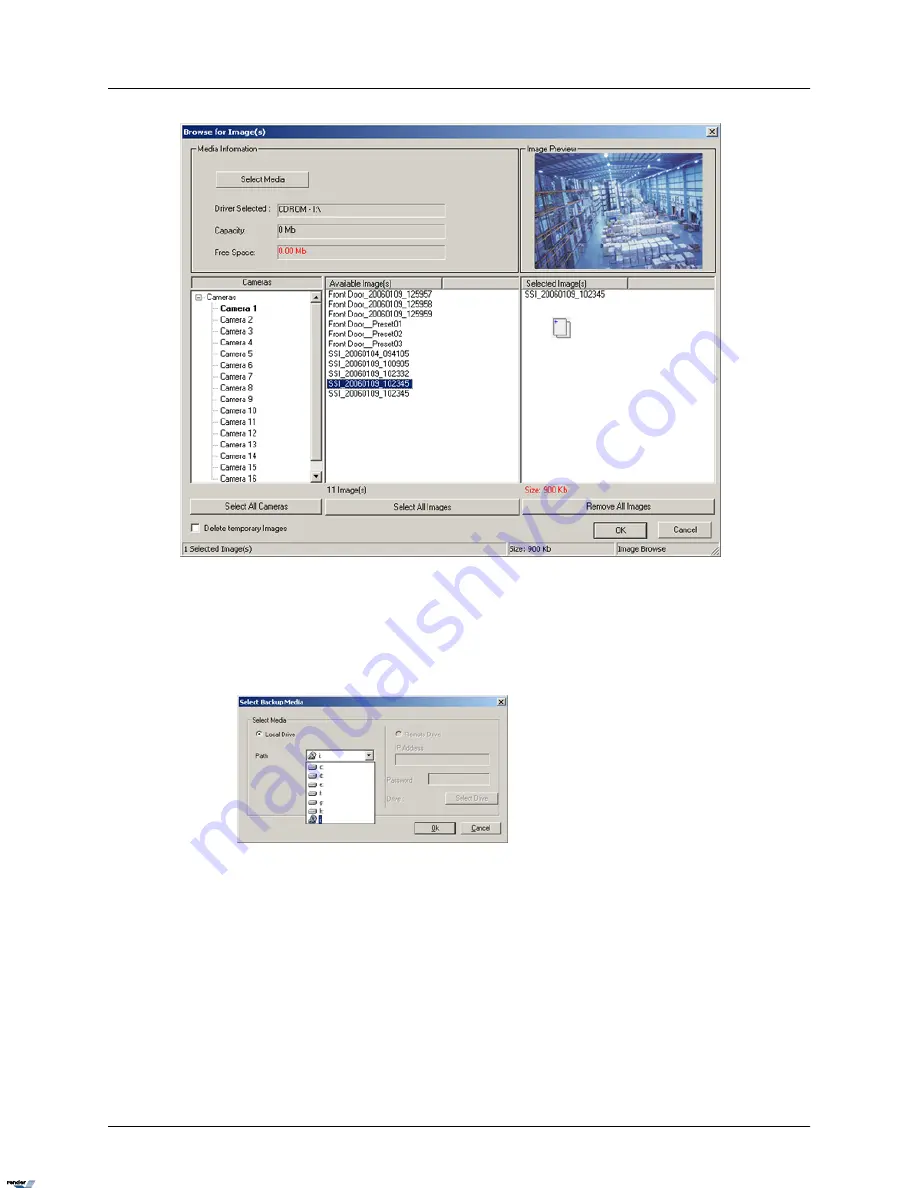
Click Select Media to choose the type of media to save the snapshot to.

2.

Choose the local or removable drive for the Snapshot backup. The snapshot file will be
saved to the root catalogue of the selected drive.

3.

Click on the '+' sign to expand the list of available cameras.

4.

Select the desired camera from the list. Once the specific camera is selected, the system
accesses the default folder configured in the Snapshot Setup and displays the list of all
available images in the middle. To select all images from all cameras, click Select All
Cameras
.

5.

To preview, select the image from the list. In the example above, SSI_20060109_102345
is displayed in the Image Preview in the top right corner.

6.

To copy the desired image to the configured media, select the image in the Available
Image(s) list and drag-and-drop it to the Selected Image(s) list on the right. To select all
images from the selected camera, click Select All Images.

118

Backup on i³Server

XML to PDF by RenderX XEP XSL-FO Formatter, visit us at 

http://www.renderx.com/

Summary of Contents for i3-SRX Series

Page 1: ...INNOVATIONS AT THE SPEED OF THOUGHT 2007 i DVR International Inc The contents of this user manual are protected under copyrights and computer program laws Series User Manual v 4 023...

Page 2: ...i DVR User Manual v4 023 Bob Hoang Training Manager Mykone Saunders Creative Producer Olga Alexeenko Technical Writer...

Page 3: ...opyright 2007 i DVR International Inc All rights reserved No part of this manual may be reproduced or trasmitted in any form or by any means electronic or mechanical including photocopying recording o...

Page 4: ...e Preset Touring Alarm Preset 20 Hardware Setup Restart 22 Motion Setup 22 Schedule Setup Simple Mode 27 Schedule Setup Advanced Mode 30 Screen Division 30 Communication Setup 31 Server Information 33...

Page 5: ...site 141 Using Multi Site tool 142 Disconnecting from the Remote Site 143 Configuring i Remote 143 About i Remote 144 Configuration Setup 144 Communication Setup 146 Other Setup 147 Search on i Remote...

Page 6: ...rver software This Flash manual was designed with an End User in mind Only the basic and most important features of our powerful software will be demonstrated This tutorial is divided into four sectio...

Page 7: ...the following 1 Press Stop button to pause the presentation 2 Press the Play button to resume the presentation 3 Press the Rewind button to rewind one step 4 Press the Fast Forward button to skip to t...

Page 8: ...cludes costs for initial technical adjustments setup which are the responsibility of the dealer from whom you purchased the unit It also excludes damages due to misuse or neglect Damages resulting fro...

Page 9: ...eeded Windows 2000 Professional operating system is used All i DVM systems come with pre installed i DVR Software i Server i Remote PACDM Please do not install additional software on our system to be...

Page 10: ...fore installing the system 5 Make sure all the parts listed below have been included i DVR Back View The following diagram displays the back of the DVMS Connecting the Watchdog Cable The following fun...

Page 11: ...h i DVR effortless and efficient Usually the i Server starts automatically if it doesn t click the i3DVR Server icon on the Desktop When logging in for the first time the i DVR License Agreement will...

Page 12: ...Setup for more information In case if the username and or password were lost contact the local dealer for information on how to reset them To log into the i Server do the following 1 Click Login 2 The...

Page 13: ...ation 16 Rotate Cameras 10 PAC 4 Server ID 17 Full Screen 11 Storage Hard Drive Meter 5 Date and Time 18 Screen Division 12 Camera panel 6 Login Logout i Server Main Screen Features About Displays the...

Page 14: ...file backup by time date camera object search etc Setup displays the i Server Setup menu Panic the Panic button acts as an Active Sensor Backup When Panic is clicked or the sensor is activated the sy...

Page 15: ...selected cameras instead of the first available cameras E g The 4 cameras Screen Division button can be customized to display Cameras 2 8 10 and 11 instead of Cameras 1 4 The Screen Division buttons...

Page 16: ...list To access the PTZ mode do the following 1 Locate a PTZ camera in the main i Server window 2 Click on the image The PTZ window will be displayed PTZ cameras can be controlled from 1 i Server auth...

Page 17: ...u 7 Pan Tilt Speed 8 Pan Tilt Setup 9 Focus 10 Zoom 11 Close Exits the PTZ Mode 12 Preset Touring 13 Preset Setup 14 Snapshot Same as in the main screen 15 Rotate Cameras Same as in the main screen 16...

Page 18: ...h select Use Control window for Panasonic WV CS854 camera The Control window is in OSD mode To switch select Use Control window for i3DVR SD cameras and Pelco D The Control window is in OSD mode To sw...

Page 19: ...he PTZ mode by clicking on the PTZ camera on the main screen 2 Locate the Preset menu in the bottom of the screen 3 Click Get Preset The button will become Program Preset 4 Program the desired Preset...

Page 20: ...rver i Server Setup Save and Close buttons Every i Server Setup page has Save and Close buttons The Setup tabs that require user input have a Virtual Keyboard button Click Save before closing the Setu...

Page 21: ...meras do not have a Cam ID Note The BNC connector number does not have to match the Cam ID number 3 Label the cameras for easy identification e g Front Door 4 Enter the Sensor number to be associated...

Page 22: ...b Related Topics PTZ mode Sensor Setup External Monitor Motion Detection Schedule Setup Screen Division Password Setup Hardware Setup Sensor Setup Overview In the Sensor Setup the user can configure t...

Page 23: ...fter the Sensor is activated or after the detected motion stops Note Motion and Schedule Setups must be configured To customize the Alarm for Sensor activation do the following 1 Record the sound file...

Page 24: ...talled controls 2 Give each control a descriptive Name 3 Set the Active Time for each control if required In the above example Control 1 Open the Door is always off Control 2 Turn on the Light is cont...

Page 25: ...onitor Each camera will be shown for 1 second If the Ext Monitor Follows Main Screen option is checked the configured camera sequence will be ignored The External monitor will display the camera curre...

Page 26: ...de 6 In Hardware Setup enter the Working Time value This will configure the time that the PTZ camera will remain at each preset In the above example the PTZ camera will remain at each preset for 5 sec...

Page 27: ...ox The default restart time is 2 AM every Monday Related Topics Camera Setup Motion Setup Overview Motion Setup allows for the configuration of up to 5 motion detection zones for each camera Video dis...

Page 28: ...n an image will have to be dramatic to be detected as motion This function only works properly in doors The natural changes in the outdoor environment e g clouds can cause false alarms 3 Check the Ala...

Page 29: ...zones can be configured 3 Adjust the area if necessary 4 Click Area Clear to reset all motion detection zones on a specified camera 5 Click Area Draw to set the entire camera screen for motion detect...

Page 30: ...ersonal esthet ical preferences When the motion is detected on a specific camera the triggered motion detection zone will be highlighted on the main screen in the chosen color 5 Set the cameras to be...

Page 31: ...he cameras facing most important locations or locations where most activity occurs Increasing the fps on specific cameras will decrease the fps number on the rest of the cameras in order to preserve t...

Page 32: ...ps 3 Configure the Resolution for each camera 4 Configure the Recording Quality for each camera 5 Configure the Transfer Quality for each camera 6 Click Reset to reset all changes Click Ok to save the...

Page 33: ...sor has to be enabled and be associated with the specific camera in Hardware Setup Object Sensor recording can be used on its own or can be combined with Pre alarm recordings When combined with M Moti...

Page 34: ...n Object Sensor Motion and Prealarm Ob ject Sensor and Prealarm or Motion Sensor and Prealarm Creating a custom holiday Note The holiday schedule will be identical to the Sunday schedule 1 Click Custo...

Page 35: ...s and custom holidays 12 00AM 2 59AM continuous recording Sundays and custom holidays 4 00AM 4 59AM continuous recording Notice that there is NO recording on Sundays and custom holidays 3 00AM 3 59AM...

Page 36: ...fault All otherwise only 4 cameras will be displayed in the 16 cameras screen division Related Topics Main Screen Communication Setup Overview Communication Setup contains the Phone numbers and IP add...

Page 37: ...available connection speed to transfer data If No limit is selected the Server might be slowed down in cases where multiple users are dialing into the system at the same time 3 Define the Frequency o...

Page 38: ...Emergency IP Address to receive an alert on the Emergency Monitor soft ware installed on the same or another system 7 Set Transfer Time Transfer Time specifies the time in seconds between the detected...

Page 39: ...can consist of up to 7 alphanumeric characters When trying to connect to the server from a remote location the system will check the Server ID user Name and Password together If any of these variables...

Page 40: ...checked the sensor status bar is displayed on the main screen Display Motion Detection Grid If checked the motion detection grid will be displayed on the main screen when motion is detected The motio...

Page 41: ...ent user In the example above the current user will be logged out of the system after 10 minutes of no activity DVMS Information This part of the menu contains the following information about the DVMS...

Page 42: ...ll be displayed on the main screen in Hardware and Communication Setup tabs Export Import Settings All user settings can be exported to a folder of choice for future use In case of multiple servers th...

Page 43: ...t the time in the Windows operating system If the time is set forward in the Server it will automatically be applied to the Windows system time If the time change has been successful the following win...

Page 44: ...ion DVMS automatically creates an administrative account i3dvr It is recommended to change the password for this account or to create at least one other Master User account to set up accounts for othe...

Page 45: ...has the list of all i Server setup tabs main screen and other functions that can be blocked from the individual users PAC When unchecked hides the PAC button from the main screen Enable MainScreen Fu...

Page 46: ...from the main screen Creating new users Note Only master users can create other master users 1 Click Add User 2 Enter User Name and Password Confirm Password 3 Check the Master User checkbox to creat...

Page 47: ...8 Click Save The new user will appear on the list Deleting existing users To delete an existing user do the following 1 Click the user account to select it 2 Click Delete 3 Click Save Audio Settings...

Page 48: ...in the Associate Audio with Camera menu 2 Check the Enable Audio Playback checkbox To test the audio channel do the following 1 Select the camera in the Audio out test menu 2 Check the Enable Audio O...

Page 49: ...k Choose the most convenient time for the customer If the system freezes it will be restarted by the I O board If however the system is running smoothly without freezing it can work for months without...

Page 50: ...Please note that the video recordings and snapshots made with i Server are always watermarked regardless of the user configuration of this menu In the Watermark menu select one of the following only o...

Page 51: ...the program 4 Click File Open and choose the saved watermarked snapshot The snapshot will be either in bmp or jpeg format depending on the customer settings in the Server Inform ation Setup tab 5 Cli...

Page 52: ...nsor is triggered or Panic is clicked an encrypted video backup will be performed onto a CD R Note Make sure the CD R DVD R is in the CD ROM drive Please avoid using CD RW DVD RW The Scheduled backup...

Page 53: ...down menu choose from Immediately 1 2 3 or 4 hours 7 Click Add Media to choose backup destination More than one medium can be added to the list Video can be saved to the Local or Remote Drive Saving...

Page 54: ...th drop down menu once the connection has been established The recording will be saved to the RemoteDrive kdb backup f Click OK g Click OK in the Select Backup Media window to close its 8 Check the Ov...

Page 55: ...o the following 1 Select the schedule from the list left click with the mouse 2 Click Delete Panic and Sensor Backup Note This feature is NOT available on i Remote To associate the backup with a speci...

Page 56: ...e manual backup can be associated with one or more sensors Each time the sensor is triggered 5 minutes of video recorded prior to sensor activation as well as the number of minutes set by the user of...

Page 57: ...p down menu to be associated with the video loss In this example if there is video loss detected on one of the cameras the Control 1 will turn on e g turn on a the light 4 Set the Working Time for the...

Page 58: ...vailable on i Remote Choose a video format from NTSC North America most of South America Japan or PAL Europe most other countries Related Topics Sensor Setup Control Setup Storage Structure Setup Note...

Page 59: ...he hard drive after the drive is re allocated but they will no longer contain any video data All days that previously contained video data in the Search window on the Server will appear blank Allocati...

Page 60: ...rage do the following 1 Click Modify Storage Structure 2 Click Yes in the warning window 3 Close Setup and restart the i Server 4 When the server restarts the Storage Structure dialog box shown below...

Page 61: ...ordings i e will be filled with bix and box files 6 Click Proceed to start the allocation process 7 The Format confirmation window will appear Click Yes to proceed with formatting 8 The Select file sy...

Page 62: ...ars on the main screen and allows quick access to the desired camera by simply clicking on its representative icon Clicking on a camera s icon will display that camera in full screen mode E map does n...

Page 63: ...raw a map of the building in any available image editor or follow the instructions for the Paint editor below Make sure to save the map in bmp format 1 On the Desktop click Start Programs Accessories...

Page 64: ...e below 6 To draw the outline of the building room warehouse bring the mouse cursor to the desired starting point in the Paint Editor Hold down the left mouse button and drag it to form the box of the...

Page 65: ...ap tab 2 Click Enable E map to activate the E Map on the main screen 3 Choose the Screen Division in which the E Map will appear 4 Choose the Position No screen number in which the E Map will appear o...

Page 66: ...d the bitmap image to load into the E Map 6 Click Go to copy the selected image to the drawing area The Image will appear on the left side of the Setup window 7 In the Setting menu choose Camera Contr...

Page 67: ...lable from the list c After choosing the control number and type click on the E Map bitmap image where the control is positioned The control icon will be added onto the image Sensor To add the camera...

Page 68: ...Delete Image checkbox in the Setting menu 2 Click on the E Map bitmap image on the left side of the Setup tab 3 Click Save No image will be displayed in the E Map Setup tab 4 Click Find choose the new...

Page 69: ...deo data can be erased from the DVMS however there is no way to alter the Log Records Log Records track the following activities changes in any of the setup tabs sensor activation sent E mails video l...

Page 70: ...lick the plus sign next to the desired month to view all entries for that month 3 Select the log filename to view a particular day yyyy mm dd 4 The activity log will appear on the right hand panel 5 C...

Page 71: ...8 To view the log text file locate the exported log file in the destination folder and double click it The log file will open in the Notepad application 66 i Server...

Page 72: ...ensor s Select appropriate sensors in the Enable Email for Sensor menu Whenever any of the selected sensors are triggered an e mail alert will be sent to the configured e mail address Note Make sure t...

Page 73: ...mails according to the set schedule In this example every hour Configuring Email Setup 1 Check the Enable Email checkbox 2 Fill in the Send To section Enter the Email Address of the recipient Optiona...

Page 74: ...st SMTP servers have a default port For more information on default Ports please contact the email account manager c Enter the Login Method None is the default method otherwise please contact the emai...

Page 75: ...veillance motion detection mode is the default option for the DVMS with no PACDM installed The Surveillance type of motion detection can trigger an audio alarm an emergency E mail or a phone call in r...

Page 76: ...rd is best used in an environment with little color variation For instance if the monitored object is placed on a one color background any change e g intruder will be noticeable therefore easily detec...

Page 77: ...et zone is currently selected To switch between target zones select the chosen target zone by clicking on its green box in the live view screen 1 Define the target zones in the live view screen on the...

Page 78: ...er the size of the block the more sensitive will Intelli Guard become and the smaller the size of the objects that will set off the alarm For instance assume that a bird occupies 10 pixels in a resolu...

Page 79: ...o alarm a In the Area menu locate the Sound Wave File field b Click the Browse button to locate the wav sound file that will play every time that the alarm is triggered c Click Open d Check or Uncheck...

Page 80: ...ew screen 13 To delete all defined target zones click Reset 14 To delete all defined target zones and select the entire camera view for motion monitoring click Reset Add All Count target zone Gate con...

Page 81: ...rames equals d In order to be counted as a single object the distance that the object travels between 2 frames has to be smaller than the Object Speed parameter value If the distance traveled exceeds...

Page 82: ...k Reset Suggestions for using Object Speed 1 To detect slow moving objects the Object Speed has to be set to a lower value 2 To detect fast moving objects the Object Speed has to be set to a larger va...

Page 83: ...ler This number will be shown at the ruler s beginning 4 In the Degree menu enter the End Point value of the ruler This number will be shown at the ruler s end 5 In the Degree menu enter the Division...

Page 84: ...the height or the area covered in the camera view 2 Draw a mark s on that area to signify the start and end points of the ruler 3 Using the mouse move the cursor to the live view sceen in the Virtual...

Page 85: ...the camera to intelligently pan tilt or zoom to a specified preset The i Server will automatically detect if that camera has P T Z features and adjust the pan tilt or zoom settings where applicable I...

Page 86: ...amera Setting up Intelli Zone target areas To Set up Intelli Zone target areas do the following 1 Draw a target zone on the selected camera up to 10 zones can be defined per camera a Place the cursor...

Page 87: ...ted camera will go to once motion is detected in the target area In the example above If a change of at least 5 blocks 5 of the total target area occurs in the target area labeled Door Camera 1 will g...

Page 88: ...right cannot exceed 360 degrees If the sum of both values exceeds 360 degrees then the value will be adjusted automatically b Click Screen Value to get the current camera position c Click Enable to ac...

Page 89: ...g pre selected response depending on the nature of the behaviour To use VideoLogix module your system must meet the following requirements For 1 channel of VideoLogix CPU Pentium 4 2 4 GHz or above RA...

Page 90: ...ettings do the following 1 Click the desired camera number The selected camera will be displayed in the live view screen on the left 2 Check the Enable VideoLogix checkbox to enable the VideoLogix mod...

Page 91: ...order to be detected by VideoLogix By default this value is set to the absolute minimum value of 10 pixels Any objects smaller than the selected object minimum size will not be recognized 8 If necess...

Page 92: ...ion is checked Configuring Area alarm The Area alarm detects the human vehicle object presence in the defined area and initiates an alarm Please note that the Area alarm option will not be available f...

Page 93: ...ea 5 Configure the Alarm Output Setting for the selected detection zone a Check the Send Email checkbox to send an emergency Email every time that the alarm is triggered in this detection zone The ema...

Page 94: ...arm will be triggered only if the specified number of persons vehicles objects is met in the defined area c In the Condition drop down menu choose greater or equal to in the drop down menu and enter t...

Page 95: ...nge the direction of the CrossWire detection zone e Click Undo to delete the last detection zone f Click Clear to delete all detection zones for the selected camera g Name the detection zone in the Ar...

Page 96: ...ge Percent number should be set to a lower value Configuring Stop alarm The Stop alarm detects a human vehicle and initiates an alarm if the detected human vehicle stops in the defined area for a peri...

Page 97: ...the left mouse button and drag the cursor to set the end point The arrow should point in the desired direction c To adjust the detection zone position on the screen hold the left mouse button down an...

Page 98: ...ction zones along with the assigned names Once the alarm is triggered in one of the specified zones in one of the specified zones the Alarm icon is displayed on the screen Snapshot Setup Note This fea...

Page 99: ...he Snapshot Setup the Snapshot button on the main screen will not work 2 Set the File Name Extension to File Name Suffix or Prefix This feature allows custom izing the snapshot name for easy classific...

Page 100: ...K In this example the file name is Yesterday The text entered in the Prefix field will be inserted in the beginning of the file name In the example below the snapshot name for Camera 1 will start with...

Page 101: ...he embedded text can be customized for each individual camera The embedded text will be positioned in the bottom left corner of the snapshot The date and time are automatically embedded in the top rig...

Page 102: ...DVR technology much more efficient as it eliminates hours of video screening a task which is not uncommon with conventional VCR technology To browse through the recorded video click Search on the main...

Page 103: ...ected for a search A day highlighted in yellow indicates the current day of recording The red box highlights the day that the cursor is pointed to In this example There is recorded video data on Janua...

Page 104: ...tation of the recorded video data The recorded data is represented by multi colored bars The color of the bar indicates the type of the video recording motion sensor pre alarm or continuous The timeli...

Page 105: ...vation buttons allow for a choice of specific cameras for each search These buttons display camera custom labels as configured in the Hardware Setup To select a camera for a search click the Camera Ac...

Page 106: ...on sensor activity from 12 30 AM to 6 50 AM Playback Control Panel Playback buttons are located on the bottom right corner of the Search Window Skip to the beginning of the recorded data View previous...

Page 107: ...reen Refresh Click the Refresh button to refresh the timeline to display the recently recorded video Print Click the Print button to print the still image on the connected printer Audio Setup Click th...

Page 108: ...tiple cameras screen division stop the playback click on the display screen and resume playback Snapshot Function The Snapshot function allows taking snapshots on a single or multiple cameras during t...

Page 109: ...rogression count the number of frames in a second etc To use the Panorama function do the following 1 Select a camera 2 Set the start time in the Clock window or by clicking directly on the timeline 3...

Page 110: ...e step 6 5 Stop the video recording by clicking the Stop button in the Playback Control panel 6 On the Tools panel select the plus sign to zoom in or minus sign to zoom out To switch between zoom in z...

Page 111: ...e to simplify the search process later on To use the bookmark do the following 1 Select the date of the recording in the Calendar window 2 Set the start time in the Clock window or by clicking directl...

Page 112: ...recording and gives quick access to the specific frames where detected motion triggered sensors or pre alarm recording took place The camera sensor numbers that have recorded video data will be highl...

Page 113: ...Recording schedule for Camera 1 is either O S M S O S P or M S P Example 2 In the example above All types of video recording are currently selected for display The following is known from this exampl...

Page 114: ...search all available video recordings starting at the selected start time until midnight of the same day An Index Search can only be performed within one calendar day 3 Select the Sensor number that...

Page 115: ...orded E g Time 11 57 00 750 The list will be updated instantly when the settings in the Search Option panel are changed E g If the start time is changed to 11 58 from 11 58 all frames recorded before...

Page 116: ...ght the selected search area 6 Click the Object Search Output button to hide display the separate Object Search window 7 Highlight the area to be searched Click on the screen Hold the left mouse butto...

Page 117: ...cases the Object detection instance will have the time stamp displayed To view the instance in the display window left click on either the image thumbnail example on the left or the text line example...

Page 118: ...image Deskew Images may sometimes be off centered by a few degrees The Deskew option is used to correct such skews Click the right left icon to rotate the image clockwise counterclockwise Gamma correc...

Page 119: ...ckup Configured in the i Server Setup menu 4 Panic Sensor Backup Configured in the i Server Setup menu Quick CD Backup Quick CD Backup allows quickly saving a portion of the video recording onto the C...

Page 120: ...d Time on the Timeline has been marked with the broken red line the segment of the recording between Start and End time lines has been highlighted in blue 9 To backup in encrypted format select Start...

Page 121: ...3 megabytes and 2 5 megabytes depending on the recording settings 4 Email a single frame or a 1 min long video will be e mailed as an attachment Note Please avoid using CD RW DVD RW Snapshot Backup Sn...

Page 122: ...alogue of the selected drive 7 In the Watermark Checker Copy window click Yes if this program has not been previ ously saved on the hard drive Click No if it has been previously saved on the local dri...

Page 123: ...camera is selected the system accesses the default folder configured in the Snapshot Setup and displays the list of all available images in the middle To select all images from all cameras click Sele...

Page 124: ...hot backup 10 All selected images will be saved into the Snapshot_Backup folder on the selected drive Click OK to complete the snapshot backup Related Topics Snapshot Setup Encrypted Backup Encrypted...

Page 125: ...e to estimate the size of the encrypted backup file Note One minute of Encrypted Video Recording is 66 megabytes 6 Select the desired cameras for backup in the Camera field By default all cameras are...

Page 126: ...the i Remote local Search mode i Select Remote Drive to save the encrypted video recording to a remote drive ii Enter the IP Address of the remote computer iii Enter the password to access remote comp...

Page 127: ...D ROM drive 9 Set the priority of this backup process High Low If set to High this backup will have priority over other backup processes e g scheduled backup 10 Click OK to start the backup process Th...

Page 128: ...to be running Video recording from each camera input is saved as a separate file with an avi extension AVI backup files can only be opened with the AVI viewers e g Window Media Player Quick Time Real...

Page 129: ...d on the video recording settings The size of a one minute AVI video recording can fluctuate between 1 3MB and 2 5MB 6 Select the desired camera for backup in the Camera field 7 Click Select Media to...

Page 130: ...played under Backup Data category in the i Remote local Search mode i Select Remote Drive to save the AVI video recording to a remote drive ii Enter the IP Address of the remote computer iii Enter pas...

Page 131: ...example 2 AVI backup files were created for cameras 1 and 5 10 Select the video codec for the AVI backup from the Select Compressor field Select the codec name displayed for the list of all available...

Page 132: ...ghout the backup process 14 If saving onto a CD R DVD R wait for the backup to complete In the Backup window click Yes to burn the backup onto a CD R DVD R immediately or No to burn later see Multi CD...

Page 133: ...ail addresses to the Recipients List The still image AVI video will be sent to all recipients on the list a Click ADD b Type in the Recipient s e mail address c Click Save Exit to add the e mail to th...

Page 134: ...l an AVI video file do the following 1 Click the Backup button on the Tools panel 2 Choose Email in the Type field 3 Choose AVI backup 4 Select the desired single camera from the Camera list 5 Select...

Page 135: ...aption positions 8 Add recipients e mail addresses to the Recipients List The still image AVI video will be sent to all recipients on the list a Click ADD b Type in the Recipient s e mail address c Cl...

Page 136: ...window 4 Click No to temporary save the current backup onto the hard drive 5 The following Multi CD buttons will appear in the Search Window The Del Backup button allows deleting all backup processes...

Page 137: ...location search the recording database or access the PACDM database from the comfort of their home Most of the features provided in i Server are available in i Remote though these software products ar...

Page 138: ...in 4 To change the password for i Remote do the following a Click Change Password b Enter old password c Enter new password d Re enter new password to confirm it e Click OK to save the new password Wh...

Page 139: ...emote Site Connection To create a new Server connection do the following 1 Click Connections on the main screen 2 In the Server Connect LAN window click Add 3 The Insert to new site window will appear...

Page 140: ...the remote Server ID as entered in the Server Information Setup 6 Enter a Server Name a descriptive name for the server E g toronto office 7 Enter the Server IP Address This must match the remote Ser...

Page 141: ...ew site setup window without saving 14 To delete an individual site choose it in the Connections list and click Delete 15 To delete the entire group choose the group from the list and click Delete Cli...

Page 142: ...connected cameras status on video loss and controls status on off Intelli Upgrader Allows for the upgrading of the i Server software on the connected remote sites sites must be configured in the Conne...

Page 143: ...de the Setup button gives access to the i Remote software setup menu When connected to the remote server the Setup button gives access to the remote i Server software setup menu Note The accessibility...

Page 144: ...9 and 16 cameras screen divisions Selects and displays the first 4 available cameras on the Main Display Screen in a 4 cameras screen division Selects and displays the first 9 available cameras on Mai...

Page 145: ...s on the i Remote main screen b Click the sign next to the group and choose the desired connection c Click Connect d The following window will appear to indicate that the i Remote software is urrently...

Page 146: ...ending on the number of selected cameras the video will be displayed in a 4 9 or 16 camera screen division 4 Click the desired camera on the main screen to display it in a 1 camera screen division Lef...

Page 147: ...l the arrows up and down in the Multi Site Selection Tool Using Multi Site tool The Multi Site tool allows for the viewing of cameras from multiple remote sites in the same Screen Division To use the...

Page 148: ...he arrows up and down 2 Click Stop to discontinue video transmission from the remote site 3 Click Disconnect 4 Click Yes in the warning window The connection with the remote site will be broken and th...

Page 149: ...hard drive space information 3 Processor type 4 RAM size 5 Windows operating system version 6 Service Pack version 7 i Remote software version Configuration Setup In the Configuration Setup the user...

Page 150: ...live video recordings on the selected local drive as they are viewed in the I Remote software b Check the Current Screen Data Save checkbox to save the live video recordings on the selected local dri...

Page 151: ...rm is triggered on the remote site 10 Configure the Duration of Sound Wave for the custom alarm 1 99 secs Communication Setup In Communication Setup configure the type of connection available on the s...

Page 152: ...el to exit without saving To change the time and date display click the Clock display format drop down menu The current time and date in the i Remote main screen will be displayed according to the for...

Page 153: ...ses i Remote software is installed in the manager s office All the encrypted backups made from the DVMS in the store to the manager s computer AND all the encrypted backups made on the manager s compu...

Page 154: ...earch Mode choose the backup type 4 Choose the local drive where the backup information has been stored 5 In the Server ID list select the appropriate backup file The backup files are additionally sor...

Page 155: ...yback control panel Except for the graphic aspect the Playback panel is identical to the Playback panel in i Server Search window See the Search on i Server for more information Skip Delay Same as in...

Page 156: ...e Advanced search options image editing and access to PACDM are not available in the i Remote Local Search window Searching a Connected Remote Site One of the main functions of i Remote software is se...

Page 157: ...emote sites by means of the Multi Site selection tool 3 2 Way Audio connection can be initiated through the i Remote Search window 4 No Advanced Search panel is available in the i Remote Search window...

Page 158: ...format onto the selected local drive Note In the local Search window the backup data made with the Current Screen Data Save option will be stored under the Server current screen category Automatic Bac...

Page 159: ...VI backup Note All Manual Backup files will be displayed under the Backup Data category in the i Remote local Search mode Snapshot Backup Snapshot backup allows saving the still image from the remote...

Page 160: ...g the backup process To perform the Encrypted Backup do the following 1 Click the Backup button on the Tools panel 2 Choose Encrypted in the Type field 3 Set the Start date and time from the Start men...

Page 161: ...ed to and discon nected from AVI Backup AVI backup files can only be opened with the AVI viewers e g Window Media Player Quick Time Real Player etc The video recording from each camera input is saved...

Page 162: ...Click Select Media to choose the destination for the AVI backup a Enter the descriptive File Name for the AVI backup file b Click Browse to select the local drive and folder for the AVI backup c Brow...

Page 163: ...older system with older codecs installed 10 Select the desired AVI Caption format for the AVI file Select the default caption format for the list of all available caption formats AVI Caption text will...

Page 164: ...er can see a The IP Address of the remote Server b The backup title c The path to the backup file d The backup progress e The list of remote sites the K Remote Backup Server has connected to and disco...

Page 165: ...text overlay 4 On the video window draw a rectangular box around the area for which you would like to see the text overlay 5 Select Black White for the text color Selecting Intelligent will set the te...

Page 166: ...e Text DelayTime If there is no text input for a long time the text will disappear automatically 14 In the Setup For All Cameras menu check off the Enable Data Collector checkbox to start collecting d...

Reviews: