background image

Analyzer/Points

Duty Cycle

This function allows the user to extend the duration of the tape advance interval. This is useful in
applications in which a background level of gas is expected in normal operation. This interval
can be configured for up to fifteen minutes. When in monitor mode, if the detector reaches its
maximum concentration for that window, it will not advance tape and stays at current window
until the duty cycle expires.

Power-up mode:

There are three options in power-up mode as below.

l

Power up in monitoring mode: Analyzer will start monitoring mode after it powers up.

l

Power up out of monitoring mode (default): Analyzer will stay at idle more after it powers
up. An operator manually starts monitoring mode.

l

Power up in last state: Analyzer remembers its last state and gets back to that state after it
powers up.

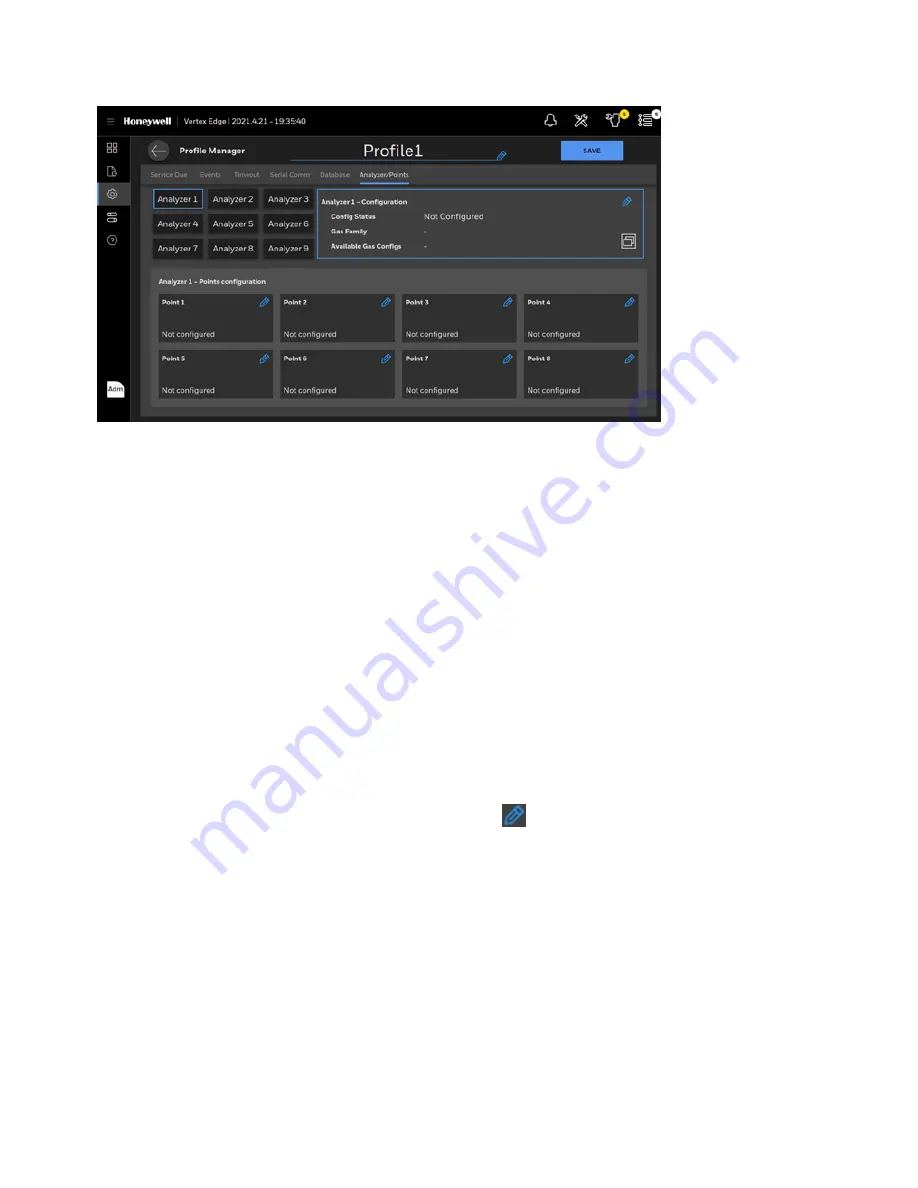
Select the analyzer to configure and tap on the EDIT

button.

Activate the selected analyzer and select the gas family. If you want to apply same configurations
to all analyzers, tap on the APPLY TO ALL button.

Vertex Edge System

55

User Manual

Summary of Contents for Vertex Edge

Page 1: ...Vertex Edge 72 POINT CONTINUOUS MONITOR ...

Page 2: ......

Page 3: ...ion System 20 Vacuum Pumps 23 Multiple Gas Monitoring 23 Control Systems 23 Data Acquisition Computer 24 Installation 26 Installation Step 1 Surveying the Installation Site 26 Optional Installation Step 2 Floor Mounting 29 Installation Step 3 Installing Sample Lines 30 Installation Step 4 Installing the Pump Exhaust Line 33 Installation Step 5 Electrical Power 34 Installation Step 6 Data Acquisiti...

Page 4: ...Optic Gate 75 Release the Analyzer Lock 76 Advance the Chemcassette Tape 77 Adjust the Optic Block 78 View Optic Status 79 Adjust Supply Vacuum 80 Adjust the Flow Rate 85 Sample Line Filter Replacement Counter 86 View and Export the Events History Listed By Time 88 Export the Events History 88 View and Export The Events History by Analyzer 91 View System Version Information 92 System Shutdown 96 M...

Page 5: ...ases 124 Maintenance Faults 130 Instrument Faults 133 Information Events 137 Transport Time 140 Manual Analyzer Override 141 Fix an Unresponsive Vertex Edge Touch Screen 142 Filter Compatibility 144 Nominal Transport Times 145 Replacement Parts Consumables 146 Network Interfaces and Options 149 Register Map of Modbus TCP IP 151 HMI PC Security Considerations 159 Warranty Statement 161 Contact Us 1...

Page 6: ......

Page 7: ...n provided by the equipment could be impaired WARNING Do not connect or disconnect anything from the Power Distribution Unit PDU while energized Continuous Monitor Symbols Symbol Description Lifting instructions low clearances slipping tripping hazards minor corrosive dangers Also used when defining personal protective equipment gloves dust masks etc Personal injury risk machinery hazards around g...

Page 8: ... Statement CAUTION Changes or modifications not expressly approved could void your authority to use this equipment This device complies with Part 15 of the FCC Rules Operation is subject to the following two conditions 1 This device may not cause harmful interference and 2 this device must accept any interference received including interference that may cause undesired operation Industry Canada St...

Page 9: ... cabinet earth ground is most important For discrete wire terminations pigtails to the cabinet connector ground should be extremely short no greater than three inches For multiconductor connector terminations only 360 shielded shells should be used Note Honeywell Analytics product testing uses 65 braid with foil around the bundle twisted pair stranded 24 AWG minimum wiring for all qualification an...

Page 10: ...on levels Also poorly constructed or improperly assembled connectors can be a high source of radiated noise and provide a path for external signals into the monitor Ethernet cables longer than 30M need to be shielded Ethernet cables less than 30M can be unshielded Vertex Edge System 9 User Manual ...

Page 11: ...2 m from the Vertex Edge System The system uses one or more of Honeywell Analytics Chemcassette analyzers to provide a monitoring system tailored to meet the requirements of the facility The Vertex Edge System incorporates a range of redundant and protective features for maximum uptime l Pumps are redundant l The system powers up in the same state as when powered down l A single analyzer can exit ...

Page 12: ...ing photos illustrate the Vertex Edge System views ports connections and controls Front view 1 Sample tubing connections 2 Exhaust and wiring port 3 System controls behind screen 4 Analyzer 5 Pump Vertex Edge System 11 User Manual ...

Page 13: ...nalyzer 3 Pump Exhaust and wiring ports 1 System Exhaust 0 5 in 12 7 mm tubing 2 AC Input 0 75 in pipe thread 3 Alarm Wiring Conduit Plates 1 5 in 38 1 mm x 3 NOTE Please note that exhaust tube is push to connect Vertex Edge System 12 User Manual ...

Page 14: ...Module Front Door Closed 1 Protective panel over touch screen 2 Analyzer Slot 3 Tier 1 4 Tier 2 5 Tier 3 6 Analyzer Status LED Vertex Edge System 13 User Manual ...

Page 15: ...Analyzer side panel Exterior 1 Needle Valve for flow adjustment 2 Optics Block 3 RFID reader 4 Take up reel 5 Tape encoder roller 6 Status LED Vertex Edge System 14 User Manual ...

Page 16: ...nel Interior 1 Analyzer Main Board 2 Sample pressure transducers 3 Sample flow transducers 4 Optic blocks 5 Tape advance motor 6 Status LED 7 Locking solenoid Sample tubing connections Vertex Edge System 15 User Manual ...

Page 17: ...rth Jumper 3 Analyzer Connectors 10 Exhaust Pressure Switch 4 Main Power Connector 11 Monitor Computer power 5 Pump 1 Power Connector 12 Pump Over temp sensor Fan power 6 Pump 2 Power Connector 13 Not Used 7 Ethernet Hub Power Connector 14 Modbus RTU 15 Modbus RTU Ground Screw AC connections System Control Unit Vertex Edge System 16 User Manual ...

Page 18: ...yzer status LED 2 Product label 3 Analyzer Release Slot Back of Analyzer 1 Internal Ethernet Communication Cable 2 Tubing Harness 3 Analyzer Power Connection 4 Securing screws for tubing harness Vertex Edge System 17 User Manual ...

Page 19: ...Chemcassette 1 Chemcassette directional flow Vertex Edge System 18 User Manual ...

Page 20: ...Edge System via a line Each of the 72 sample tubing connections on the Vertex Edge System corresponds to a point A sample line can be connected directly to a single point or multiple points The system draws air simultaneously from all locations Two different types of flow are Transport flow high velocity large volume air movement through the lines Sample flow air admitted to the Chemcassette detec...

Page 21: ...Analyzer modules use the Honeywell Analytics Chemcassette optical detection system Analyzer modules sample and detect a specific gas or family of gases Each eight point Analyzer module manages Chemcassette tape transport provides optical detection of stain directs sample flow through the Chemcassette to develop a better stain for better sensitivity and reliability and stores event data for retriev...

Page 22: ...ation the system detects and measures a specific gas or a family of gases in the sample The microprocessor in the analyzer module interprets the data and responds appropriately In the Closed Loop Optics CLO detection system a reference detector monitors and controls the intensity of the LED Vertex Edge System 21 User Manual ...

Page 23: ...n ppb or milligrams per cubic meter mg m3 Chemcassette Tapes Chemcassette tapes are tagged with a radio frequency identification RFID tag to automatically identify the following Serial number Gas family tape type Revision level Expiration date of the tape Chemcassette leader parameters The module uses a leader on the Chemcassette tape to allow calibration of the optics every time a new tape is ins...

Page 24: ...the pumps The Vertex Edge System draws cooling air in through a filter mounted on the pump module access door Multiple Gas Monitoring A Vertex Edge System equipped with Analyzers can monitor more than one gas or groups of gases such as hydrides or mineral acids at a location Each Vertex Edge Analyzer module can monitor only one gas family such as hydrides or mineral acids Control Systems The Verte...

Page 25: ...s the central processor for the Vertex Edge System It configures the analyzers stores data and provides a network interface for data transfer to other computers System display and operator control is through an on screen keyboard Vertex Edge System 24 User Manual ...

Page 26: ...nal Ethernet to network switch Please note when using the USB 3 0 ports to connect a USB flash drive please use caution when closing the panel door with this installed If the drive is physically too large it can become damaged when closing the door Do not use the USB 2 0 ports Vertex Edge System 25 User Manual ...

Page 27: ...n l Have sufficient ventilation for cabinet cooling l Have power available and l Be indoors in an area that is not subject to wide variations in temperature and humidity Note The humidity is 20 65 RH and a temperature between 59 F to 95 F 15 C to 35 C Placement of the Vertex Edge System Install the Vertex Edge System in an environmentally protected site remote from the manufacturing or storage loc...

Page 28: ... dust or moisture An external filter must be used in all locations Make sure you use the correct filter Dust may be a result of construction as well as manufacturing activities Moisture may result from rain entering a line at an outdoor sampling location or from condensation caused by temperature fluctuations Water condensation in the sample lines could cause false alarms Note Variables such as ai...

Page 29: ...Installation Drawings Vertex Edge System 28 User Manual ...

Page 30: ...the front and rear of the Vertex Edge cabinet including the supplied hardware 2 Anchor the bracket to the floor with the appropriate mounting hardware base on installation hardware not provided 1 Cabinet hardware 2 Floor 3 Cabinet side Vertex Edge System 29 User Manual ...

Page 31: ... Sample Line Installation Requirements Follow the general requirements listed below when installing sample lines Sample lines should not exceed 400 ft 122m in length Route all lines as direct as possible to improve transport time Avoid running sample lines through areas of great temperature extremes such as adjacent to steam or chiller lines Sample lines should not be crimped bent to less than a 1...

Page 32: ...l O ring and an external grab ring To install a tube into a sample line inlet insert the tube far enough into the fitting to ensure that the tube has passed through both the external grab ring and the internal O ring and is firmly seated against the stop The insertion depth for a correctly installed sampling line is 1 2in to 5 8in 12 mm 16 mm There is an insert depth guide hole near the inlet port...

Page 33: ...o the sampling end of the line for all locations CAUTION Excess amounts of dirt in the filters reduces the sample flow raises sample vacuum and may affect concentration readings of the analyzer See Specifications to determine the proper filter type to use with each target gas Vertex Edge System 32 User Manual ...

Page 34: ...g Varying exhaust pressure can induce pump failure or flow faults Exhaust Line Connection The instrument includes 50 ft 15 m of 0 375in 10mm I D x 0 5in 13 mm O D Teflon or Polypropylene tubing Insert the tubing into the exhaust port on the top of the unit to the depth of 0 9in 23mm CAUTION Leaks in the exhaust tubing connection can cause exposure to toxic gases from remote sample areas To ensure ...

Page 35: ...Connect ground wire to the threaded stud on the side rail of the rack NOTE Testing has shown that using 208 220VAC phase to phase power source instead of the recommended 230VAC phase to neutral can result in voltage excursions on the system ground The excursions can cause damage to components in the analyzers This type of damage is most likely to occur during system power cycles or in cases where ...

Page 36: ...eutral 5 Vertex Edge side prewired Verifying Proper AC Power Connection Before powering up the Vertex Edge system verify the connections using a multimeter to determine the connections are correct and correct voltages are present at the power connection Vertex Edge System 35 User Manual ...

Page 37: ...splay a voltage value of 230 VAC 10 NOTE All panel locks need to be in the lock position in order for rack to be properly grounded NOTE Shown is the locked position which provides ground to the panel NOTE After confirming line and neutral connections and the operating voltage is within the specified range power up the Vertex Edge and check the operating voltage again to assure the voltage under lo...

Page 38: ...eristics UL 3R enclosures for indoor and outdoor service Electrostatically shielded for quality power on sizes 1 KVA and larger UL class 180 C insulation system 115 C temperature rise under full load Conduit knockouts for side entry into wiring compartment Copper lead wire terminations Units are encapsulated with electrical grade silica sand Design Style HA Part Number Catalog Number KVA H W D Shi...

Page 39: ...nd H8 Secondary Voltage Interconnect Connect Lines to 240 X2 to X3 X1 and X4 Connect X4 to Ground and Shield Set Up wiring 0060 1021 as Step Up Transformer 208v to 240v 120 208 240 277 Volt Primary 120 240 Volt Secondary Taps None Vertex Edge System 38 User Manual ...

Page 40: ...has only two wires Overcurrent protection rating and location are shown as follows Primary Current Overcurrent Protection Rating Less than 2 amps 300 of maximum 2 to 9 amps 167 of maximum 9 amps or more 125 of rated primary current or next highest standard rating Example 2 If the branch circuit feeding the transformer has overcurrent protection to meet the individual protection requirements in Exa...

Page 41: ... Primary Current Secondary Cur rent Overcurrent Protection Rating 250 Primary Current Less than 9 amps 167 of maximum Not more than 250 9 amps or more 125 of rated primary current or next highest standard rating Example 4 If the branch circuit feeding the transformer has overcurrent protection to meet the individual primary overcurrent protection requirements in Example 3 then individual primary p...

Page 42: ...l By design the flux density is to be kept well below the saturation level to reduce audible sound level and minimize core losses The core volume shall allow operation at 10 above rated primary voltage at no load without exceeding the temperature rise of the unit Coils l Coil conductors shall be either aluminum or copper and continuous The entire core and coil assembly shall be impregnated with a ...

Page 43: ...ound levels caused from magnetostriction of the transformer core No externally located vibration dampening pads shall be used as they tend to increase audible noise Ventilated transformers are to be floor mounted to a concrete pad l The transformer enclosure must be grounded by the installer in accordance with the latest edition of the National Electric Code and any local codes or ordinances Perfo...

Page 44: ...System can be connected to an external Ethernet network at the port shown CAUTION Do not connect an external network to the Vertex Edge Ethernet hub Use only the external Ethernet connection on the back of the data acquisition computer Connecting an external network to the hub will impair monitoring capability Vertex Edge System 43 User Manual ...

Page 45: ...the display and mounted above the PDU NOTE To maintain EMC certification the ethernet cable should make 4 loops through the supplied ferrite cable clamp The clamp should remain on the outside of the Vertex Edge System enclosure Vertex Edge System 44 User Manual ...

Page 46: ......

Page 47: ... connected l Exhaust line connected l AC power connection l Sample Line Dust Filters installed l I O Connection Initial Startup Use this section to turn on yourVertex Edge System and to configure the analyzer modules for specific gas locations There are eight parts to this startup procedure l Power Up l Start Program l Log in the HMI program l Create a configuration profile l Replace the Chemcasse...

Page 48: ... may cause maintenance faults See Section See Acknowledge Notifications on page 70 for more information for instructions to clear faults NOTE Use the System Manager Region and time menu to change the time and date on your Vertex Edge System Vertex Edge System 47 User Manual ...

Page 49: ...tch touch screen door After 15 seconds the analyzer status LEDs sequence four times through all colors 1 Main Power ON OFF Switch 2 Analyzer Power Switches After the initial color sequence the Analyzer LEDs show system status The following chart matches analyzer status with LED signals NOTE Before the Vertex Edge System can begin monitoring you must create and install a configuration profile Verte...

Page 50: ...me may take several minutes and the default user is Viewer NOTE Any time the Vertex Edge System is powered up loss of communications may cause maintenance faults See Section See Acknowledge Notifications on page 70 for more information for instructions to clear faults NOTE Use the System Manager Region and time menu to change the time and date on your Vertex Edge System Vertex Edge System 49 User ...

Page 51: ...n the Add new profile window enter a profile name 4 After entering the profile name you can set or modify values such as Notification of service due Events Timeout Serial comm Database and Analyzers and points 5 After finishing creating the profile tap Profile Manager or tap SAVE to complete the Creating Profile process 6 Tap SAVE INSTALL whether you want to install this new profile in the system ...

Page 52: ...7 Tap INSTALL TO SYSTEM to complete installation Alternatively you can select the profile in the profile list and install it to the Vertex Edge system later Vertex Edge System 51 User Manual ...

Page 53: ...ents All events require to click Ack When selected all gas alarms and fault events will not be removed from the event list until an authorized user acknowledges the event Non Latching Gas Alarm A latching gas alarm activates when a gas concentration reaches a level 1 or level 2 alarm setting The latching gas alarm remains until an authorized operator resets the alarm Non Vertex Edge System 52 User...

Page 54: ...he Sub LDL limits while gas concentration remains zero as an informative event 1st TWA Time Use to set times for the beginning and end of each 8 hour Time Weighted Average TWA period Use this option to associate the TWA periods with shifts or any other regular event The system calculates and displays the TWA after each 8 hour TWA cycle The default setting is 04 00 indicating that the Vertex Edge w...

Page 55: ... remaining on the supply reel and triggers a low tape event when remaining tape is less than Days Before Due Choosing OFF disables the low tape event Set Timeout Values Authorized users may temporarily disable points or inhibits alarms from activating and points from monitoring A point or alarm that is disabled inhibited longer than the timeout limit will cause a maintenance fault which will call ...

Page 56: ...s Power up mode There are three options in power up mode as below l Power up in monitoring mode Analyzer will start monitoring mode after it powers up l Power up out of monitoring mode default Analyzer will stay at idle more after it powers up An operator manually starts monitoring mode l Power up in last state Analyzer remembers its last state and gets back to that state after it powers up Select...

Page 57: ...isplays concentrations in parts per million ppm or parts per billion ppb Select a target gas for the point and enter the gas location of the place where gas is sampled Alarm levels can be selected from the preset or entered When custom is selected alarm levels are edited manually Vertex Edge System 56 User Manual ...

Page 58: ... K factor is 1 2 5 8 5 1 16 1 2 when rounded to one decimal place When k factor is enabled gas levels will be multiplied by k factor automatically Alarm levels should be checked again after enabling the k factor NOTE When mg m3 is selected as a measurement unit k factor is not allowed to be ON Non Zero Warning When this option is ON and non zero gas concentration is detected an informative event w...

Page 59: ...Vertex Edge System 58 User Manual ...

Page 60: ... configure one analyzer and copy it to other analyzers to save time To copy analyzer point settings from one analyzer to other analyzers tap on the COPY button Select the source analyzer in the analyzer list and check the analyzers where same configurations are applied Vertex Edge System 59 User Manual ...

Page 61: ...e DAq Select the profile in the list and tap EXPORT to export it to USB flash drive Enter a profile name and select the location where the profile will be exported After selecting the location tap NEXT and profile exporting will be complete Vertex Edge System 60 User Manual ...

Page 62: ...ofile from USB flash drive tap IMPORT Select the profile in the Import Profile window and tap NEXT Selected profile will be imported and shown in the profile list of Profile Manager Vertex Edge System 61 User Manual ...

Page 63: ...Vertex Edge System 62 User Manual ...

Page 64: ...le of the currently logged user is shown on the bottom of the main menu 1 To log in tap on the user role icon at the bottom of the main menu and select Log In 2 Enter your user ID and password in Log In screen and tap on the Log In button 3 Once logged in the system checks your role As you use Vertex Edge menus only the pages to which you have access will be accessed The pages associated with func...

Page 65: ...ault user ID and password are Admin Admin for an administrator role and Operator Operator for an operator role NOTE Upon initial installation and login it is strongly recommended to change the password of the default users in accordance with the password complexity Vertex Edge System 64 User Manual ...

Page 66: ...tem Manager Security 2 To add a new user tap on the ADD button 3 Type a username password according to the password complexity and select an appropriate role to the user NOTE Passwords need to consist of at least 8 characters and include a lowercase an uppercase and a special character and a number Vertex Edge System 65 User Manual ...

Page 67: ...go to System Manager Security 2 To edit users select the target user in the list and tap on the EDIT USERS button 3 User role and password for the user can be changed by an administrator 4 Alternatively logged user can change one s password by tapping on the CHANGE PASSWORD button Vertex Edge System 66 User Manual ...

Page 68: ...red to the Analyzer The analyzer status and point status are represented graphically as below depending on the status and configuration To view service due of multiple analyzers tap on the at the bottom center of the Overview screen Service due of all connected analyzers will be shown graphically such as remaining CC tape life remaining days to Optic cleaning and remaining days to filter replaceme...

Page 69: ...Vertex Edge System 68 User Manual ...

Page 70: ...ew 2 Tap on the selected Analyzer name Point status of the Analyzer such as gas name gas concentration measurement unit location tag and point status will be displayed The graphical representations of the point status at the bottom of point status box are the same as the Overview screen 3 Tap the back overview button to return to the Overview screen Vertex Edge System 69 User Manual ...

Page 71: ... Live chart l Trend chart for up to 30 days l Scroll left and right on the gas chart l Tap on the chart to view the gas concentration value l Adjust the range using the slider l Change the time line l Export gas data of the trend chart 5 Tap the All Points back button to return to the selected Analyzer screen Acknowledge Notifications Acknowledge and clear gas alarms Instrument faults and Maintena...

Page 72: ...button on each notification or acknowledge or reset all notifications from selected panel by tapping on ACK ALL or RESET ALL button The acknowledged event moves to the bottom of the list and its color diminishes Alternate The Pump close to Due Date Alternate the pump every 6 months 1 From the main screen tap on the Pump maintenance button The pump icon is highlighted in yellow when pump uptime is ...

Page 73: ... button 5 Tap CONFIRM to reset the counted uptime days The highlighted uptime resets to zero 6 Optionally the temperature status in the pump module and high pressure status at exhaust line can be checked When there is any issue in temperature and exhaust pressure the text of Temperature and Exhaust condition will be highlighted in yellow Vertex Edge System 72 User Manual ...

Page 74: ...n ON or OFF a pump when all the analyzers are out of the monitor mode 1 In the left navigation panel tap OVERVIEW 2 Tap the pump button 3 In the Pump Maintenance window tap PUMP OFF or PUMP ON as needed Vertex Edge System 73 User Manual ...

Page 75: ...VERVIEW 2 Tap on the selected analyzer 3 In the Components status bar tap on the selected analyzer s gas family name 4 In the Operation Control window select Monitoring mode ON or OFF NOTE The Optic gate is closed when Monitoring mode is ON Vertex Edge System 74 User Manual ...

Page 76: ...Tap on the selected analyzer 3 In the Components status bar tap on the selected analyzer s gas family name 4 In the Operation Control window shift the Optic Gate slider to OPEN NOTE The Optic gate is closed when Monitoring mode is ON Vertex Edge System 75 User Manual ...

Page 77: ... navigation panel tap OVERVIEW 2 Tap on the selected analyzer 3 In the Components status bar tap on the selected analyzer s gas family name 4 In the Operation Control window tap RELEASE next to Analyzer lock Vertex Edge System 76 User Manual ...

Page 78: ...n the left navigation panel tap OVERVIEW 2 Tap on the selected analyzer 3 In the Components status bar tap on the gas family name 4 In the Operation Control window tap TAPE ADVANCE next to Chemcassette Vertex Edge System 77 User Manual ...

Page 79: ...ly tap NEXT 5 Alternate Step If the cleaning date has expired the Optic Block button is highlighted in yellow as well as the due date the Optic Drive and a Module status in the Optic Block window Tap ADJUST OPTICS and clean the Optics block by referring to Clean the Optics section in Maintenance first Tap ADJUST OPTICS and reset the count 6 Optional Step Tap the Reset Count button to Reset the con...

Page 80: ...g due 1 From the main menu tap Overview 2 Tap on the selected Analyzer name 3 In the Components status bar tap on the OPTIC Status button 4 Alternatively Tap ADVANCED DIAGNOSTIC to view LED drive levels for eight points and check whether the LED drive levels are within the recommended range Vertex Edge System 79 User Manual ...

Page 81: ...noid valve to provide vacuum to the analyzer A sample point failing to meet both the flow and vacuum conditions of step 6 indicates either a leak in the sample line or a faulty sample inlet connection To troubleshoot the condition disconnect the sample line at the inlet port at the top of the Vertex Edge cabinet Securely plug the inlet port and repeat the above leak check procedure If the sample p...

Page 82: ...2 In the left navigation panel tap OVERVIEW 3 Tap on the selected analyzer 4 In the Components status bar tap on the Flow Rate button Flow Adjust Screen Vertex Edge System 81 User Manual ...

Page 83: ...that the unit will not be in monitor mode Press Confirm 7 Continue through all analyzers populated in the system and Press Adjust Flow so that flow is turned on for all of the analyzers in the system 8 Once all analyzer flow is on press Vacuum Levels as shown below View of Vacuum Level Screen Vertex Edge System 82 User Manual ...

Page 84: ...alyzers will adjust as the supply vacuum adjust valve is turned 10 Once complete leave the flow on for all analyzers and move onto the Adjust Flow Rate section NOTE At higher altitudes with many analyzers installed and or a system on a 50Hz mains the system vacuum may not be able to achieve 11inHg In this case the maximum achievable sample point flow rate shown may be reduced by up to 20 CAUTION V...

Page 85: ...Supply vacuum should be readjusted whenever analyzer s are installed to or removed from the rack Vertex Edge System 84 User Manual ...

Page 86: ...to the needle valve on the side of the Analyzer if it is locked to access the needle valves 4 Turn the needle valve for the point that is to be adjusted until the flow reaches the target flow rate of 200 10cc min Once the flow is in this range the bar will change color to green 5 Repeat for all points in the analyzer that are out of range 6 Repeat for all analyzers until the entire system is compl...

Page 87: ...status bar tap on the Filter button Either the regular replacement window highlighted in green or the expired time window highlighted in yellow is displayed 4 End of sample line filters should be replaced on a regular interval of 3 months 5 Tap the Reset Count button to reset the replacement due days Vertex Edge System 86 User Manual ...

Page 88: ...line filters only NOTE Internal filters protecting the orifice should be inspected and cleaned on a regular interval of 6 months See the See Orifice Filter Inspection Cleaning Replacement on page 118 for more information Vertex Edge System 87 User Manual ...

Page 89: ...2 Tap in the Listed by time tab A list of all events is displayed 3 In the Listed by Time screen you can filter the information Export the Events History 1 Insert a USB flash drive to Vertex Edge HMI PC 2 Tap the Export icon to export the event histories to CSV file Vertex Edge System 88 User Manual ...

Page 90: ... name and touch NEXT button 4 Select a USB drive to export the event histories and touch NEXT button Once exporting is complete the Exporting is completed screen will be shown as below It may take several minutes depending on number of events to be exported Vertex Edge System 89 User Manual ...

Page 91: ...Vertex Edge System 90 User Manual ...

Page 92: ...nalyzer 1 In the left navigation panel tap Event History 2 Tap in the Listed by Analyzer tab A list of all analyzer events is displayed 3 Tap on the More Filters button to view the events of specific Points Vertex Edge System 91 User Manual ...

Page 93: ...rt numbers serial numbers and rack ID 1 From the main menu go to System Manager Version Manager 2 Tap on the HMI Version or PDU Version tab to view detailed version information of the system components 3 In Version Information tab the summary of version information is shown and can be exported to a CSV file Tap on the EXPORT button and enter file name to export a version Vertex Edge System 92 User...

Page 94: ...pdate SW files 1 From the main menu go to System Manager Version Manager 2 Insert the USB flash drive to any available USB port of the Vertex Edge HMI PC 3 Tap on the IMPORT button to copy an update file from USB flash drive to HMI PC 4 Select an analyzer update file If the selected update file is valid HMI will import it successfully as below Vertex Edge System 93 User Manual ...

Page 95: ...onfirm it 7 Tap on Stop Monitoring button and firmware update will be started The firmware update status will be shown using two green dots The first green dot indicates that the update file is transferred to Analyzer and the second green dot means that the firmware updated successfully If there is any communication error or any issue in updating the firmware the red dot will be shown instead 8 Ta...

Page 96: ...Vertex Edge System 95 User Manual ...

Page 97: ... 1 Go to Runtime Operation and stop monitoring mode for all analyzers 2 Go to Settings System Switch and touch System Shutdown Touch Proceed on the confirmation screen 3 Set all analyzer switches 2 on PDU to Off 4 Once all analyzers are off set the rack power switch 1 to Off Vertex Edge System 96 User Manual ...

Page 98: ...1 Main power ON OFF switch 2 Analyzer power switches Vertex Edge System 97 User Manual ...

Page 99: ...ive Filter Membrane end of Iine 1 month Teflon Corrosive Filter 3 months Pump vane replacement 9 24 months operation per pump Pump stem and o ring 6 months Valve filter 1 year Supply Vacuum Filters 3 6 months Alternate Pumps 6 months Optics Cleaning 1 year or as needed System File Maintenance 1 year or as needed Orifice Filter 3 6 months Vertex Edge System 98 User Manual ...

Page 100: ... navigation panel tap OVERVIEW 2 Tap on the selected Analyzer 3 In the Components status bar tap on the Chemcassette button 4 In the Chemcassette window tap REPLACE CC 5 Stopping monitoring mode confirmation screen pops up Tap CONFIRM 6 The tape replacement procedure gets started The Analyzer is released and the Optics gate opens 7 Pull out the Analyzer and remove old Chemcassette tape Vertex Edge...

Page 101: ...te leader is installed adjust the leader tape by verifying the Align mark on the leader tape is visible on either side of the optic blocks as seen in the picture below The HMI screen also shows the leader tape configuration The alignment is essential to adjust and verify the Optics module before gas monitoring Vertex Edge System 100 User Manual ...

Page 102: ... adjust Optics If Accept button is pressed it will accept the Chemcassette and update the tape information without optics adjustment If tape is not new out of the bag a leader tape can be used to run the Optics Adjust by pressing Adjust Optics The leader tape will need to come from a fully used tape Do not rewind the CC to reuse the leader tape If using the leader tape the user will need to manual...

Page 103: ...Optics adjustment Verification Tap NEXT 15 In the Start Monitoring Mode window tap START if you want to start the monitoring mode If not Tap IDLE The new Chemcassette information is displayed Vertex Edge System 102 User Manual ...

Page 104: ...ergized 1 Turn off monitoring mode for the Analyzer to be replaced In the left navigation panel tap Runtime Control 2 Tap on the Analyzer Monitor tab 3 In Runtime Operation tap on the Analyzer operation tab 4 Tap Release and pull out the analyzer as far as possible 5 Tap the open the gate command if you wish to remove the Chemcassette After removing the Chemcassette put the optics protection cards...

Page 105: ... on the corresponding switch on the PDU 8 Unscrew the two screws located at the top and bottom of the manifold bracket 9 Remove the tubing harness 2 carefully and remove internal Ethernet cable 1 and power connector 3 from the Analyzer Vertex Edge System 104 User Manual ...

Page 106: ...he latch on the top of the Analyzer as shown and pull out 11 After removing the Analyzer make sure exhaust port of the analyzer be blocked with plug as shown in the picture below Vertex Edge System 105 User Manual ...

Page 107: ...NOTE Failure to block the analyzer exhaust port will impact the flow system for the running unit Vertex Edge System 106 User Manual ...

Page 108: ...ables out of the way 3 Place analyzer on slides Push in until locks engage 4 Slide Analyzer out until fully extended 5 Reach behind the analyzer connect the tubing harness IMPORTANT The 2 screws need to be tightened to fully secure If these are not tightened the unit will leak 6 Connect the Analyzer internal Ethernet cable 1 and power connector 3 from the Analyzer Vertex Edge System 107 User Manua...

Page 109: ...eely and the slides lock Repeat in and out action to loosen slide Push analyzer into cabinet Return to Service 1 Turn analyzer power switch on 2 Re install the Configuration Profile 3 Install the Chemcassette 4 Return analyzer to monitor mode in Runtime Options Menu Vertex Edge System 108 User Manual ...

Page 110: ...while the other pump continues to operate NOTE You may replace a pump only when the system places it in off condition Do not replace an operating pump WARNING The pump to be disconnected must be off 1 Unscrew 2 screws securing the fan door 2 Open the fan door to the fully out of the way of the pump drawer Vertex Edge System 109 User Manual ...

Page 111: ...p 2 power connector can be removed with the drawer opened Power connector removal are in steps 4 5 4 Uninstall the electrical connector on the side of the pump a Pull the white tab out b Push down on the black tab and pull back on the connector Vertex Edge System 110 User Manual ...

Page 112: ...e pump cable is disconnected tuck it under the pump head on the pump plate 6 To open the pump drawer pull up on the two knobs securing the pump bed and twist to unlock them Vertex Edge System 111 User Manual ...

Page 113: ... drawer out 8 If replacing Pump 2 disconnect the power connector as covered in steps 4 5 9 The pump fittings are removed by pushing in on the silver plate and pulling up on the fitting at the same time Vertex Edge System 112 User Manual ...

Page 114: ... Disconnect the vacuum side silver fitting 11 Disconnect the exhaust side black fitting 12 Once disconnected the fittings can be placed to the side or on top of the pump Vertex Edge System 113 User Manual ...

Page 115: ...the locking pin holding the pump plate in place 15 While the locking pin is pulled up pull back on the pump plate to remove the pump Note The picture shown has the pump drawer opened and unlocked This orientation is to show the pump pin and plate This step should be performed in the locked position The locked position will prevent the drawer from moving while swapping out the pump Vertex Edge Syst...

Page 116: ...er opened and unlocked This is to show the pump drawer with pump 2 removed This step should be performed in the locked position The locked position will prevent the drawer from moving while swapping out the pump 17 Lift up the tubes and connectors then slide in a new pump assembly Vertex Edge System 115 User Manual ...

Page 117: ...talled unlock and pull out the pump drawer 19 With the pump drawer opened reconnect the vacuum exhaust and ac connector 20 Close the pump drawer 21 Close and secure the pump cooling fan door Vertex Edge System 116 User Manual ...

Page 118: ... Filters 1 Remove old filters by depressing the quick connect fitting 2 Pull out old filters and install new filters ensure the arrow on the new filter is point in towards the valve as shown Vertex Edge System 117 User Manual ...

Page 119: ...he event that the filter can not be cleaned it should be replaced l Replacement Part 1502A0155 NOTE This inspection should only take place on analyzers that are disconnected from the rack or if the ENTIRE rack is out of monitor mode 1 Release the Analyzer from the rack refer to See Release the Analyzer Lock on page 76 for more information 2 Remove the orifice Panel on the side of the Analyzer by u...

Page 120: ...bris on the surface of the filter 5 If there is any debris clean it with compressed air 6 Once cleaned replace the orifice into the cavity it came from l Check that the orifice is fully installed into the manifold Vertex Edge System 119 User Manual ...

Page 121: ...ned replace the orifice panel Clean the Touchscreen Clean the touch screen display with a lightly moistened towel Do not spray cleaner directly onto the glass Excess liquid will run down the screen and interfere with operation For further reference refer to the Touchscreen User Manual for any additional information Vertex Edge System 120 User Manual ...

Page 122: ...d air 6 Re secure side panel and reload the Chemcassette NOTE Remove and clean one port at a time to insure proper orientation of tubing Do not remove the capillary tubing microtubes After cleaning the Optics the cleaning counter should be reset to avoid unnecessary maintenance warning due to Optics cleaning due See Clean the Optics above for more information CAUTION Failure to replace and retight...

Page 123: ...ad 50 60Hz 15A single phase POWER CONSUMPTION Normal condition 1 1k Watt Maximum condition 1 4k Watt DISPLAY AND OUTPUTS Visual 15 6 wide screen monitor with capacitive touch interface Display gas reading alarm instrument status real time base Provide real time trend chart and gas event snapshot trend chart Event logging including maintenance instrument fault and gas alarm Multiple searching optio...

Page 124: ... in 12 7 mm O D x 3 8 in 9 5 mm I D Teflon tubing Exhaust length Up to 50 ft 15 m maximum OPERATING CONDITIONS Temperature 59 F to 95 F 15 C to 35 C Humidity 20 65 RH Altitude 1000 ft 305 m to 6000 ft 1829 m above sea level Pollution degree 2 WIRING REQUIREMENT Power Singe phase power Minimum 14 AWG Digital Modbus TCP IP CAT5 shielded cable or equivalent RJ45 connector Modbus RTU 2 wire stranded s...

Page 125: ... sec Alarm 50 ppb with 100 ppb AsH3 gas 2 Arsine XP AsH3 Low Level 5 ppb 0 5 ppb 0 3 ppb 2 5 ppb 5 ppb 0 50 ppb 0 5 1 9 ppb 2 4 9 ppb 5 9 9 ppb 10 50 ppb 300 150 60 30 60 sec 3 Diborane XP B2H6 100 ppb 15 ppb 10 ppb 100 ppb 200 ppb 0 1000 ppb 15 49 ppb 50 99 ppb 100 1000 ppb 60 45 30 45 sec 4 Germane XP GeH4 200 ppb 100 ppb 100 ppb 200 ppb 400 ppb 0 2000 ppb 100 149 ppb 150 199 ppb 200 2000 ppb 48...

Page 126: ...b 5 ppb 5 ppb 300 ppb 600 ppb 0 3000 ppb 5 3000 ppb 15 30 sec Alarm 50ppb with 100ppbPH3 gas 6 Silane XP4 SiH4 5 ppm 0 5 ppm 0 3 ppm 5 ppm 10 ppm 0 50 ppm 0 5 4 9 ppm 5 9 9 ppm 10 19 9 ppm 20 50 ppm 60 45 30 15 35 sec 7 Silane M XP4 SiH4 M 5 ppm 0 06 ppm 0 05 ppm 2 5 ppm 5 0 ppm 0 05 15 ppm 0 05 2 49 ppm 2 5 4 99 ppm 5 9 99 ppm 10 15 ppm 180 60 45 30 35 sec 8 Hydrogen Sulfide XP4 H2S 1 ppm 0 2 ppm...

Page 127: ...pm 0 05 2 49 ppm 2 5 4 99 ppm 5 9 99 ppm 10 15 ppm 180 60 45 30 35 sec 8 Hydrogen Sulfide XP6 H2S 1 ppm 0 2 ppm 0 1 ppm 1 ppm 2 ppm 0 10 ppm 0 2 0 4 ppm 0 5 0 9 ppm 1 1 9 ppm 2 10 ppm 45 30 15 10 20 sec 9 Hydrogen Sulfide XP6 H2S Low Level 1 ppm 20 ppb 15 ppb 500 ppb 1000 ppb 0 2000 ppb 20 99 ppb 100 199 ppb 200 399 ppb 400 2000 ppb 120 60 30 15 20sec Alarm 500 ppb with 1000 ppb H2S gas 10 Hydroge...

Page 128: ...05 0 99 ppm 1 0 10 0 ppm 45 30 100 sec Alarm 0 1ppm with 0 2ppm BF3 gas 2 Hydrogen Bromide XP4 HBr 2 ppm 0 3 ppm 0 2 ppm 2 ppm 4 ppm 0 20 ppm 0 3 1 9 ppm 2 20 ppm 45 30 50 sec 3 Hydrogen Bromide XP4 HBr Low Level 2 ppm 30 ppb 20 ppb 200 ppb 400 ppb 0 2000 ppb 30 99 ppb 100 399 ppb 400 2000 ppb 180 120 60 200 sec Alarm 0 2 ppb with 0 4 ppb HBr gas 4 Hydrogen Chloride XP4 HCl 2 ppm 0 2 ppm 0 2 ppm 2...

Page 129: ... 2 Dimethylamine XP6 DMA 5 0 ppm 0 5 ppm 0 5 ppm 5 0 ppm 10 0 ppm 0 50 0 ppm 0 5 2 4 ppm 2 5 50 0 ppm 15 10 30 sec 3 Tetrakis Dimethylamino Titanium XP6 TDMAT None Established 0 1 ppm 0 1 ppm 1 0 ppm 2 0 ppm 0 10 ppm 0 1 0 4 ppm 0 5 10 0 ppm 15 10 30 sec Alarm 1ppb with 2ppmHF gas 9 Phosgene 1295 0228 1 Phosgene XP COCl2 100 ppb 10 ppb 7 ppb 100 ppb 200 ppb 0 1000 ppb 10 49 ppb 50 99 ppb 100 199 p...

Page 130: ... 4 ppm 0 30 ppm 0 1 8 9 ppm 9 30 ppm 240 120 350 sec 13 Sulfur Dioxide 1295 0552 1 Sulfur Dioxide SO2 250 ppb 30 ppb 25 ppb 250 ppb 500 ppb 0 2500 ppb 30 249 ppb 250 2500 ppb 60 30 60 sec 14 Hydrogen Cyanide 1295 0222 1 Hydrogen Cyanide HCN 4 7 ppm 1 ppm 0 5 ppm 4 7 ppm 9 4 ppm 0 30 ppm 1 9 9 ppm 10 19 9 ppm 20 30 ppm 30 20 15 15 sec 15 XP4 Chlorine 1257 9308 1 Chlorine Cl2 0 1ppm 0 05 ppm 0 05 pp...

Page 131: ...r out of monitor Reset all alarms and faults and then return analyzer to Monitor Mode Out of Monitor time limit too short Change time limit in Configuration Profile 104 Run time point disable timeout Alarms were manually bypassed Restore point to alarm active mode Run Time Point Disable time limit too short Change time limit in Configuration Profile 105 Sample pressures greater than ambient Point ...

Page 132: ...er analyzer Verify the pump connects are connected Verify all analyzers enter monitor mode successfully 113 Pump Over Temperature Fan failure Check fans in pump module Line voltage less than 208 VAC or higher than 240VAC Verify main line voltage Check the connections to the Thermal Switch Sensor located behind the pumps 114 High Exhaust Pressure Kinked exhaust Check exhaust tubing for kinks or res...

Page 133: ...tains a different software revision than the other analyzers Upgrade analyzer Software 133 This Chemcassette is nearing its expiration date Chemcassette not used too long Replace Chemcassette 134 Chemcassette Type Not Matched Chemcassette with wrong gas family installed Reinstall Configuration Profile 135 Analyzer configuration failed Analyzer configuration failed Reinstall Configuration Profile 1...

Page 134: ...eration using Maintenance Analyzer Operations Open Gate or Close Gate Motor does not operate Check motor connections Analyzer PCB in analyzer Bad sensor or cable Check sensor connection to Analyzer PCB Contact Honeywell service 206 Gate motor driving failure Gate position sensor not activated before timeout Check motor operation using Maintenance Analyzer Operations Open Gate or Close Gate Motor d...

Page 135: ...flow setup Adjust flow to 200cc Tape tracking problem Reload Chemcassette Condensation in system Purge internal lines Clogged micro tube Replace tube Note Calibration required contact Service Gate not fully closing Gate adjustment loose pivot binding Optics block loose Tighten optics block fasteners Flow adjustment is unstable during adjusting Replace needle valves 215 Failed to stop Analyzers mon...

Page 136: ...hemcassette Bad RFID tag Load new Chemcassette Dirty optics block Clean and recalibrate Bad optics PCB Service or replace analyzer 225 Optics blocks fail at SPI communication Bad optics PCB Replace Optics Block Service or replace analyzer 226 Optics reference photodiode out of range Dirty Optics block Clean optics Contact Honeywell Analytics Service Hardware failure Contact Honeywell Analytics Ser...

Page 137: ...34 Internal Comm failure Hardware failure Contact Honeywell Analytics Service 235 Abnormal Az current consumption is detected Hardware failure Contact Honeywell Analytics Service 236 Internal fault at control module Hardware failure Contact Honeywell Analytics Service 237 Internal fault at PDU module Hardware failure Contact Honeywell Analytics Service 238 Analyzer SW corrupted Software installati...

Page 138: ...2005 Optics Auto Adjust Requested 2006 Optics Auto Adjust Success LED Drive Adjusted 2007 Accept new gas family 2008 Optics verification Started 2009 Optics verified Successfully 2010 Q factors set 2011 Test Optics requested 2012 Started gas monitoring 2013 Stopped gas monitoring 2014 Inhibited point run time 2015 Released the inhibited point 2016 Disabled a point run time 2017 Enabled the disable...

Page 139: ... Override Button Starts Monitoring 2030 Override Button Stops Monitoring 2032 Pump has been swapped per request 2033 Extra window pull because of flow problems 2034 Analyzer Programmed Successfully 2035 Analyzer Program Failed 2036 Optics Programmed Successfully 2037 Optics Program Failed 2038 Ctrl Module Programmed Successfully 2039 Ctrl Module Program Failed 2040 PDU Module Programmed Successful...

Page 140: ...file 2046 Failed to verify update file 2050 Reset Single Alarm Fault 2051 Reset All Alarms and Faults 2052 Reset All Alarms and Faults Modbus 2053 Analyzer Configuration updated 2054 Point Configuration updated Vertex Edge System 139 User Manual ...

Page 141: ...5 6 31 2 46 8 51 0 62 4 2 2 LPM 14 9 29 8 44 7 48 7 59 5 2 4 LPM 13 6 27 3 40 9 44 6 54 6 Altitude Flowrate decreases about 3 per 1000 feet Altitude ft Normal barometric pressure inHg Multiplier 0 29 92 1 00 500 29 39 0 98 1 000 28 86 0 96 1 500 28 33 0 93 2 000 27 82 0 91 2 500 27 32 0 89 3 000 26 82 0 89 3 500 26 33 0 88 4 000 25 84 0 86 5 000 24 9 0 83 6 000 23 98 0 80 Vertex Edge System 140 Us...

Page 142: ...e Vertex Edge HMI window If the clock is still advancing then the DAq CPU is not frozen locked up and your local Authorized Service Center needs to be contacted for assistance On occasion there may be the need to install a new Chemcassette to continue monitoring your facility or to reset alarms or faults If the DAq is not responding these tasks can be performed using the Manual Override button An ...

Page 143: ...o Exit Monitor and Open Gate press and hold button for 10 seconds and above To restart monitoring mode press and hold button for 4 to 9 seconds 5 Close and reattach the Analyzer cover reconnect the Ethernet Communications Cable and slide the Analyzer into the cabinet Fix an Unresponsive Vertex Edge Touch Screen Completely resetting the computer can resolve many issues that cause a frozen unrespons...

Page 144: ...r button 4 Wait until HMI application starts up 5 Check if touch screen is responsive and all connected analyzers are shown on Overview screen NOTE When this occurs the system will continue to monitor gas Vertex Edge System 143 User Manual ...

Page 145: ...on Teflon membrane contained in the Filter B housing P N 0235 1072 100 per pack should be replaced every 30 days Filters have an arrow on the side of the filter pointing in the direction of airflow toward the Vertex Edge System Replacement of filters is site dependent Filter A P N 780248 Filter B P N 1830 0055 Filter C P N 1991 0147 The following table shows sample filter requirements Symbol Gas N...

Page 146: ...AT Tetrakis Dimethylamino Titanium X X Nominal Transport Times The following table shows the time required for samples to move from the sampling point to the Vertex Edge System for various lengths of sample lines OD 0 25 Outside Diameter Tubing ID 0 190 Thin Wall ID Length in feet 100 200 300 327 400 Length in meters 30 61 91 100 122 Sample flow 1 6 20 5 40 9 61 4 66 9 81 9 2 1 15 6 31 2 46 8 51 0...

Page 147: ...MINES AMMONIA Extended Play 1295 0405 XP MINERAL ACIDS Extended Play 1295 0507 XP4 V for AMINES AMMONIA 1257 9309 XP4 V for CHLORINE 1257 9308 XP4 V for HYDRIDES 1257 9300 XP4 V for MINERAL ACIDS 1257 9310 XP4 V for PHOSGENE 1257 9307 XP6 V for Amines Ammonia 1507 9309 XP6 V for Hydrides 1507 9300 End of Line Particulate Sample Filters P N For non corrosive gases 780248 For corrosive gases 1830 00...

Page 148: ...90 3 16 I D x 0 250 1 4 O D 1000 ft roll 304m 0235 0109 Tubing FEP Teflon 0 190 3 16 I D x 0 250 1 4 O D 400 ft roll 121m 0235 0157 Tubing Teflon FEP 3 8 I D x 1 2 O D 20 ft roll 6m 0235 0278 Fan 230VAC 0220 0028 Ethernet Switch 0185 0086 Fitting union 1 4 inch 0235 0095 Transformer 480 230 VAC 60 Hz 5 KVA 0060 1020 Transformer 208 240 VAC 60 Hz 5 KVA 0060 1021 Needle Valve 0235 1219 Power Distrib...

Page 149: ...uum Fitting Assembly Exhaust 1295K0547 O RING NO 112 VITON BLUE TEFLON COATED 0235 0187 Unused Point Filter Kit Inlet Extension with Dust Filter 1295A0702 Blocking Plug 0235 1318 Orifice Filter Assembly 1502A0155 Vertex Edge System 148 User Manual ...

Page 150: ...r Disable l Baud rate User Selectable l 9600 l 19200 Default l Data bits l 8 bits l Parity User Selectable l None Default l Even l Odd l Stop Bits l 2 l 1 l Slave ID option l Used for each Analyzer Default 1 9 as shown Vertex Edge System 149 User Manual ...

Page 151: ...ld to ground both ends of the shielded cable Modbus TCP IP and Web interfaces l IP Configuration l DHCP Default l Static IP Static IP address Gateway DNS l Modbus TCP IP Enable or Disable l Web interface on port 80 l Enable l Disable Default l Encrypted web interface on port 443 l Enable l Disable Default Vertex Edge System 150 User Manual ...

Page 152: ... 3 Flt Az 2 1 Flt unsigned integer 1 40075 Az 2 2 Flt Az 2 3 Flt unsigned integer 1 40076 Az 3 1 Flt Az 3 2 Flt unsigned integer 1 40077 Az 3 3 Flt Heartbeat unsigned integer 1 40078 Az 1 1 Status unsigned Integer 1 Analyzer overall status l Bit 0 AZ enable status 0 disabled 1 enabled l Bit 1 monitoring status 0 idle 1 in monitoring mode l Bit 2 Alarm 1 0 normal 1 in gas alarm l Bit 3 Alarm 2 0 no...

Page 153: ...am CRC mismatch at power up 0x04 SPI protocol error 0x08 SPI Tx Rx overrun 0x10 SPI ISR timeout 0x20 SPI APP timeout 40383 Az 3 3 Optics1 Status unsigned integer 1 40384 Az 1 1 Optics2 Status unsigned integer 1 40392 Az 3 3 Optics2 Status unsigned integer 1 40393 Az 1 1 Pump1 Status Az 1 1 Pump2 Status unsigned integer 1 0 Unknown 1 Bad 2 good 3 Service required 40401 Az 3 3 Pump1 Status Az 3 3 Pu...

Page 154: ...d Bitfields MSB Pt8 LSB Pt1 40448 Az 1 3 PtEn Az 2 1 PtEn unsigned integer 1 40449 Az 2 2 PtEn Az 2 3 PtEn unsigned integer 1 40450 Az 3 1 PtEn Az 3 2 PtEn unsigned integer 1 40451 Az 3 3 PtEn unused unsigned integer 1 40452 Pt 1 1 1 AlarmThres1 Floating point 2 R W function code 0x10 40594 Pt 3 3 8 AlarmThres1 Floating point 2 R W function code 0x10 40596 Pt 1 1 1 AlarmThres2 Floating point 2 R W...

Page 155: ...2792 Pt 1 1 1 GasUnit string 6 3 Null terminated Up to 5 characters 43005 Pt 3 3 8 GasUnit string 6 3 Null terminated Up to 5 characters 43008 Az 1 1 Label string 26 13 43112 Az 3 3 Label string 26 13 43125 Az 1 1 GasFamily Byte 1 43133 Az 3 3 GasFamily Byte 1 43134 Az 1 1 Az SW Ver Byte 3 2 first byte major second byte minor last two bytes build number 43150 Az 3 3 Az SW Ver Byte 3 2 43152 Az 1 1...

Page 156: ...3 2 43575 HMI SW Ver Byte 3 2 First byte major second byte minor last two bytes build number 65001 Az 1 1 Reset alarms faults Unsigned Integer 1 Nonzero value 65009 Az 3 3 Reset alarms faults Unsigned Integer 1 Nonzero value Register Hi Byte Lo Byte Data Type Length Description 40001 Pt 1 Status Unsigned Integer 1 point enabled point inhibited status of alarm and fault Bit 0 point enabled 0 disabl...

Page 157: ... 40027 Pt 1 NormalizedConc Unsigned Integer 1 Not used for now 40034 Pt 8 NormalizedConc Unsigned Integer 1 40035 Pt 1 Flow Unsigned Integer 1 cc min 40042 Pt 8 Flow Unsigned Integer 1 40043 Az Optics1 Status Unsigned integer 1 Optic Status 5th 6th byte in optic communication Low byte 0x00 No faults 0x01 Watchdog reset 0x02 SW Error over range pointer buffer overflow switch case 0x04 ADC conversio...

Page 158: ...ion is available 40098 Pt 8 FullScale Floating point 2 40100 Pt 1 PtName string 26 13 null terminated Up to 25 characters 40191 Pt 8 PtName string 26 13 40204 Pt 1 GasName string 26 13 null terminated Up to 25 characters 40295 Pt 8 GasName Floating point 13 40308 Pt 1 Decimal Pt 2 Decimal unsigned integer 1 40311 Pt 7 Decimal Pt 8 Decimal unsigned integer 1 40312 Pt 1 GasUnit string 6 3 null termi...

Page 159: ...Ver Byte 3 2 First byte major second byte minor last two bytes build number 40358 Az CC SN string 26 13 Null terminated Up to 25 characters 40371 Az Serial Number string 26 13 Null terminated Up to 25 characters 40384 Az PDU ID string 26 13 Can be used same as rack ID null terminated Up to 25 characters 40397 Az PDU SW Ver Byte 3 2 First byte major second byte minor last two bytes build number 650...

Page 160: ...can be enabled via the General Network configuration page The default configuration of the Vertex Edge HMI PC external network connection is via DHCP However if desired a static configuration is possible via the General Network configuration page Care should be taken both in DHCP server configuration as well as in the static configuration that the network assigned to the external connection and th...

Page 161: ...ONLY for connection to a private network no connections from the internet should be allowed All services not explicitly named above are disabled and filtered via the iptables rules Access control is via users and roles defined in the security configuration By default anyone can view system state information but elevated permissions are required for any configuration control or maintenance NOTE Rou...

Page 162: ... charge an investigation fee If the product is found to be of no fault Honeywell reserves the right to charge an investigation fee and return same product to buyer after the investigation fee and transport cost are reimbursed in full The investigation fee in both cases will not exceed 320 In the case of a fixed installation or where it is not practical to return the product the buyer must submit a...

Page 163: ...nt parts due to the normal wear and tear of the product After the effective date this warranty supersedes all existing warranty statements and Honeywell makes no other warranty expressed or implied except as stated above Vertex Edge System 162 User Manual ...

Page 164: ...Boulevard Lincolnshire Illinois 60069 USA is gas techsupport honeywell com Tel 1 847 955 8200 Toll free 1 800 538 0363 Scan this code for further reference to Vertex Edge Systems on Honeywell Analytics website Vertex Edge System 163 User Manual ...

Page 165: ... September 2021 1998 2002_EN_RevA1_VertexEdge_UserManual Vertex Edge System 164 User Manual ...

Reviews: