background image


COMMUNICATION INTERFACE 

169 

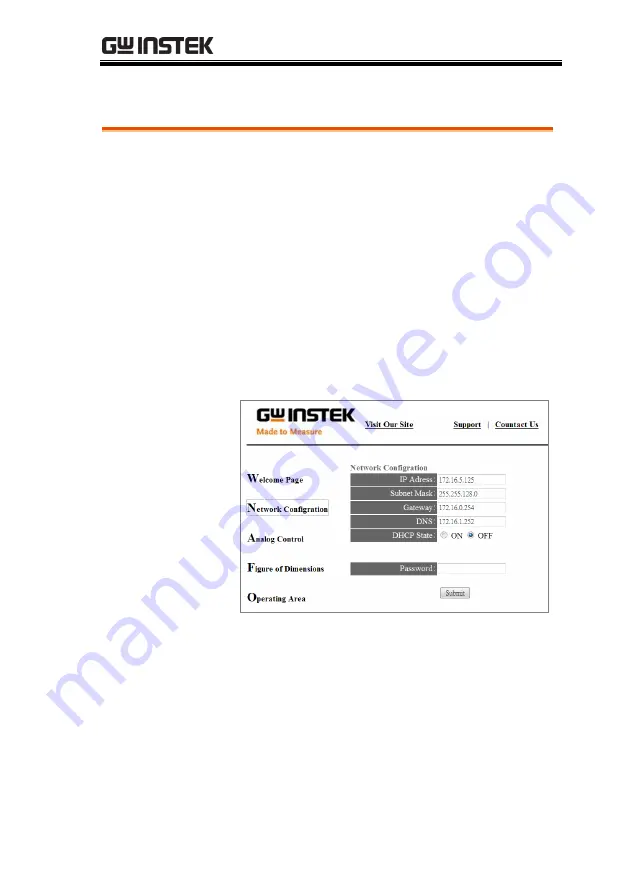
Web Server Remote Control Function Check 


Functionality 
check   

Enter the IP address of the power supply (for 
example: http:

//

 XXX.XXX.XXX.XXX) in a web 

browser after the instrument has been 
configured for LAN(page 167). 

The web interface allows you to: 


View the system and information and the 

network configuration. 


View the analog control pinout. 


View the dimensions of the unit.  


View the operating area  

Example: 


Summary of Contents for APS-7000 Series

Page 1: ...Programmable AC Power Source APS 7000 Series USER MANUAL ISO 9001 CERTIFIED MANUFACTURER ...

Page 2: ...er language without prior written consent of Good Will company The information in this manual was correct at the time of printing However Good Will continues to improve products and reserves the rights to change specification equipment and maintenance procedures at any time without notice Good Will Instrument Co Ltd No 7 1 Jhongsing Rd Tucheng Dist New Taipei City 236 Taiwan ...

Page 3: ...ced Settings 82 Miscellaneous 88 Trigger 95 Preset Settings 100 Arbitrary Waveform Function 104 Test Mode Function 112 REAR PANEL SIGNAL OUTPUTS 149 COMMUNICATION INTERFACE 153 Interface Configuration 154 FAQ 175 APPENDIX 177 Firmware Update 177 APS 7000 Default Settings 179 APS 7000 Specifications 181 APS 7000 Dimensions 187 Declaration of Conformity 191 INDEX 192 ...

Page 4: ...rument in the best possible condition Safety Symbols These safety symbols may appear in this manual or on the instrument WARNING Warning Identifies conditions or practices that could result in injury or loss of life CAUTION Caution Identifies conditions or practices that could result in damage to the APS 7000 or to other properties DANGER High Voltage Attention Refer to the Manual Protective Condu...

Page 5: ...surement categories EN 61010 1 2010 specifies the measurement categories and their requirements as follows The APS 7000 doesn t fall under category II III or IV Measurement category IV is for measurement performed at the source of low voltage installation Measurement category III is for measurement performed in the building installation Measurement category II is for measurement performed on the c...

Page 6: ...vity Pollution degree 1 No pollution or only dry non conductive pollution occurs The pollution has no influence Pollution degree 2 Normally only non conductive pollution occurs Occasionally however a temporary conductivity caused by condensation must be expected Pollution degree 3 Conductive pollution occurs or dry non conductive pollution occurs which becomes conductive due to condensation which ...

Page 7: ...nected to the terminal which is marked with the letter N or coloured Blue or Black The wire which is coloured Brown must be connected to the terminal marked with the letter L or P or coloured Brown or Red If in doubt consult the instructions provided with the equipment or contact the supplier This cable appliance should be protected by a suitably rated and approved HBC mains fuse refer to the rati...

Page 8: ...r describes the power source in a nutshell including its main features and front rear panel introduction APS 7000 Series Overview 9 Series lineup 9 Operating Area 9 Main Features 11 Accessories 12 Appearance 14 Front Panel 14 Rear Panel 19 Status Bar Icons 24 ...

Page 9: ...dels unless stated otherwise Model name Max Output Current Power Rating Output Voltage APS 7050 4 2A 2 1A 500VA 0 310 0 Vrms APS 7100 8 4A 4 2A 1000VA 0 310 0 Vrms APS 7200 16 8A 8 4A 2000VA 0 310 0 Vrms APS 7300 25 2A 16 8A 3000VA 0 310 0 Vrms Operating Area Voltage V Current A 0 1 2 0 3 4 5 100 200 300 400 500 600 120 155 240 310 480 600 4 2 3 23 2 1 1 62 1 05 0 83 APS 7050 Output Operating Area...

Page 10: ...0 480 600 8 4 6 45 4 2 3 23 2 1 1 67 155V Range 310V Range 600V Range APS 7100 Output Operating Area APS 003 Option Voltage V Current A 0 5 10 0 15 20 100 200 300 400 500 600 120 155 240 310 480 600 16 8 12 9 8 4 6 45 4 2 3 33 155V Range 310V Range 600V Range APS 7200 Output Operating Area APS 003 Option ...

Page 11: ... 9 7 6 3 5 0 155V Range 310V Range 600V Range APS 7300 Output Operating Area APS 003 Option Main Features Performance Low output ripple and noise Excellent and feature rich measurement capacity Standard maximum output voltage is 310Vrms Maximum output voltage and frequency of 600Vrms APS 003 Option 1000Hz APS 004 Option ...

Page 12: ...e ability to save and recall setup files Only 88mm 2U case height APS 7050 and APS 7100 models only Interface Standard Ethernet port USB host USB CDC APS 7200 and APS 7300 models only Optional GPIB RS 232 USB CDC APS 7050 and APS 7100 models only RS 232 APS 7200 and APS 7300 models only Accessories Standard Accessories Part number Description CD ROM User manual programming manual 82GW1SAFE0M 1 Saf...

Page 13: ...utput Voltage Capacity 0 600Vrms APS 004 Output Frequency Capacity 45 1000Hz Optional Accessories Part number Description GRA 423 APS 7050 and APS 7100 rack mount kit GRA 429 APS 7200 rack mount kit GRA 430 APS 7300 rack mount kit APS 001 GPIB interface card APS 002 RS 232 USB CDC interface card APS 7050 and APS 7100 only APS 007 RS 232 interface card APS 7200 and APS 7300 only GPW 004 Power Cord ...

Page 14: ...5 8 3 6 9 V Limit F Limit IPK Limit F I rms Cancel Shift Range Enter Lock ALM CLR IPK CLR Unlock Surge Dip Ramp Trigger ARB USB A port Power switch Front voltage output socket Menu Test Preset keys LCD display Function keys Display mode key Arrow keys Scroll wheel Voltage Frequency Current setting and limit Keypad Range Shift Cancel Enter Lock keys Output key APS 7200 APS 7300 Caster Adjuster foot...

Page 15: ... Maximum allowable output voltage and current are 250Vrms and 15Arms For voltages exceeding 250Vrms or current over 15Arms please use the rear output terminal Universal and EURO region plugs socket must be factory installed USB A Port The USB port is used for data transfers and upgrading software LCD Screen Displays the measured values or menu system Display Mode Select Key Display Selects between...

Page 16: ... digit power of a value that is being edited V V V Limit Used for setting the output voltage V Limit Shift V Used for setting the output voltage limit value F F F Limit Used for setting the output frequency F Limit Shift F Used for setting the output frequency limit value I rms I rms IPK Limit Used for setting the maximum output current IPK Limit Shift I rms Used to set the peak output current lim...

Page 17: ...y Shift Turns on the shift state which enables shortcut operations Output Key Output Turns the output on or off Number Pad 0 1 4 2 5 8 3 6 9 Lock Unlock 7 On Phase Surge Dip IPK CLR Off Phase Ramp ALM CLR ARB Trigger Local Used to enter values Local Mode Shift 0 Switches operation back to local mode from remote mode ARB Mode Shift 1 Sets the ARB function Trigger Mode Shift 2 Sets the JI port trigg...

Page 18: ...APS 7000 Series User Manual 18 Surge Dip Shift 8 Quick settings for Surge Dip control IPK CLR Shift 9 Clears peak current hold ...

Page 19: ...igger Out Trigger In 115 230V 15 50 60Hz 1 8kVA MAX SYNC SER NO LB L N 600Vac MAX Signal Output Trigger Out Trigger In Out On Off COM LAN J1 OUTPUT Fan GPIB Line voltage input GPIB RS232 RS 232 USB Device Sync Signal Output Rear panel voltage output terminal Remote control Ethernet port Line voltage input APS 7050 APS 7100 Opt int port ...

Page 20: ... Manual 20 Remote control Ethernet port Line voltage input APS 7200 GPIB G PI B R S232 RS 232 Fan Sync Signal Output Rear panel voltage output and sensing terminals Optional interface port Circuit breaker current USB port ...

Page 21: ...D 21 Remote control Ethernet port Line voltage input APS 7300 GPIB G PI B R S232 RS 232 Fan Sync Signal Output Rear panel voltage output and sensing terminals Optional interface port Circuit breaker current USB port ...

Page 22: ...ket Output voltage terminal APS 7050 L N OUTPUT APS 7100 OUTPUT INPUT L N N L APS 7200 7300 L N Sync Output Socket SYNC BNC socket This socket will output a signal of approximately 10V when the output is on Signal Output Signal output APS 7050 APS 7100 APS 7200 APS 7300 Connector for monitoring PASS FAIL and PROCESSING output signals when using the Program mode Remote Control Trigger Out Trigger I...

Page 23: ...unication RS 232 USB B communication and RS 232 communication Circuit breaker APS 7200 APS 7300 only I O Main power circuit current breaker Rating 40A APS 7200 63A APS 7300 Note Check the status of the power breaker before power on the APS 7200 or APS 7300 FAN Temperature controlled fan Remote sense APS 7200 APS 7300 only Compensation of the load wire drop ...

Page 24: ...unction is active Indicates that the Ramp function is active The alarm icon will appear on the status bar when one of the protection functions are tripped Applies to Over Power Over Irms Over Ipeak and Over Temperature protection Indicates that the APS 7000 is in remote mode Indicates that a USB drive is detected in the front panel host port Indicates that the LAN interface is activated ...

Page 25: ...GETTING STARTED 25 Indicates that the panel lock is active ARB Indicates that the ARB function is active ...

Page 26: ... Version and Serial Number 55 LCD Configuration 56 USB Driver Installation 57 Basic Operation 60 Setting the Voltage Range 60 Setting the Voltage Limit 61 Setting the Output Voltage 62 Setting the Frequency Limit 64 Setting the Output Frequency 65 Setting the Peak Current Limit 66 Setting the Current RMS Level 70 Setting the On Off Phase 73 Alarm Clear 74 Display Modes 75 Panel Lock 77 Turning the...

Page 27: ...Selecting an ARB Waveform 109 Test Mode Function 112 Simulate Mode Overview 114 Simulate Settings 118 Save a Simulation to Local Memory 121 Recall a Simulation from Local Memory 121 Manage Simulation Settings 122 Running a Simulation 124 Sequence Mode Overview 126 Sequence Settings 130 Save a Sequence to Local Memory 134 Recall a Sequence from Local Memory 134 Manage Sequence Settings 135 Running ...

Page 28: ...t or replace the power cord GW Instek part number 4300 31000101 use the procedure below Warning The following procedure should only be attempted by competent persons Ensure the AC power cord is not connected to power Removal 1 Turn off the power switch 1 APS 7100 2 Unscrew the power cord protective sheath on the rear output socket 3 Remove the 2 screws holding the power cord cover and remove ...

Page 29: ...power line inputs for the APS 7100 are on the outer cluster of terminals The terminals to the inner of the panel are the rear panel outputs Installation 1 Connect the AC power cord wires to the AC input terminals White Blue Neutral N Green Green yellow GND Black Brown Line L ...

Page 30: ...APS 7000 Series User Manual 30 APS 7100 OUTPUT INPUT L N N L 115 230V 15 Line Neutral Ground 2 Re install the power cord cover 3 Screw the power cord sheath back onto the cover APS 7100 2 3 ...

Page 31: ...part number 57RG 30B01801 that must first be inserted under the control panel before operation Steps 1 Pull outward as indicated in the arrow to detach the snap See below for details 2 Remove the cover 3 Remove the screws 4 Move the plastic frame in the direction indicated by the arrow ...

Page 32: ... filter with a new one 7 The unit is now ready to power up Note Please clean regularly to avoid damaging the internal components of the machine Warning The following procedure should only be attempted by competent persons Ensure the AC power cord is not connected to power ...

Page 33: ...ect the power cord to the input power terminals APS 7200 7300 see page 22 APS 7100 see page 28 2 Press the POWER key The splash screen will appear momentarily before the continuous mode screen appears with the settings loaded CAUTION The power supply takes around 10 seconds to fully turn on and shutdown Do not turn the power on and off quickly ...

Page 34: ... America Japan EURO CEE type universal plug WARNING Dangerous voltages Ensure that the power to the instrument is disabled before handling the power supply output terminals Failing to do so may lead to electric shock CAUTION For the front panel output the maximum output voltage is 250VAC and current is 10A Front Panel Output Connection 1 The front panel has a multi region power socket depending on...

Page 35: ...ear panel output is used to supply higher power DUTs The rear panel output connection is similar to the universal rear panel line input connection on the APS 7100 APS 7200 or APS 7300 1 Disconnect the unit from the mains power socket and turn the power switch off 2 Unscrew the power cord protective sheath APS 7050 and APS 7100 3 Remove the 2 screws holding the power cord cover and remove APS 7050 ...

Page 36: ... 7200 and APS 7300 have a dedicated bank of output terminals on the rear panel Installation 4 Connect the output AC power cord wires to the AC output terminals Black Neutral N Green GND Red Line L APS 7100 OUTPUT INPUT L N N L 115 230V 15 Line Neutral Ground Ground Neutral Line APS 7100 shown The input terminals are already connected and shows which output terminals are to be connected ...

Page 37: ...PS 7050 APS 7200 and APS 7300 Line Neutral Ground L N OUTPUT APS 7050 shown 5 Re install the power cord cover APS 7050 and APS 7100 6 Screw the power cord sheath back onto the cover APS 7050 and APS 7100 APS 7050 5 6 ...

Page 38: ... return on the neutral output It is suit for the medical industry that required between ground with neutral is 0V essentially And possible to mitigate ground loops that is ideal for reduce ground noise and isolate sensitive equipment from the effects of ground loops WARNING Because the neutral has been referenced to the chassis ground be careful electric shock by yourself ...

Page 39: ...re Gauge Nominal Cross Section Maximum Current 20 0 5 9 18 0 75 11 18 1 13 16 1 5 18 14 2 5 24 12 4 34 10 6 45 8 10 64 6 16 88 4 25 120 2 32 145 1 50 190 00 70 240 000 95 290 0000 120 340 The maximum temperature rise can only be 60 degrees above the ambient temperature The ambient temperature must be less than 30 degrees To minimize noise pickup or radiation the load wires and remote sense wires s...

Page 40: ...the chassis via the rear panel ground screw Even if noise is not a concern the load and remote sense wires should be twisted pairs to reduce coupling which might impact the stability of the power supply The sense leads should be separated from the power leads ...

Page 41: ... interface card APS 007 RS 232 interface card WARNING Dangerous voltages Ensure that the power to the instrument is disabled before handling the power supply output terminals Failing to do so may lead to electric shock CAUTION Ensure the power is off before installing any of the optional modules Installation 1 Turn off the power switch 1 2 Unscrew the two screws holding the options panel plate 2 A...

Page 42: ... User Manual 42 3 Slide the module PCB onto the rails on the inside of the module slot 4 Secure the module with the screws that were removed from step 2 4 3 APS 7100 shown 5 The module will be recognized upon startup ...

Page 43: ...e serial number of the APS 7000 unit The license key files used XXXXXX lis formatting where XXXXXX was the serial number of the unit the license key is intended for The new license keys are no longer tied to serial numbers These new license key files use XXXXXX lic formatting APS003 lic APS004 lic The new license keys can be exported and transferred to different units The old and new license keys ...

Page 44: ...ase The serial number on the APS unit must match the XXXXXXX lis filename or the upgrade will fail See page 55 for instructions on how to view your serial number Steps 1 Insert the USB flash drive into the USB port on front panel of the APS 7000 The USB drive should include the XXXXXX lis file in a directory named gw USB gw 2 Press the Menu key The Menu setting will appear on the display Menu 3 Us...

Page 45: ... firmware versions 1 08 or above on APS 7050 APS 7100 APS 7200 and APS 7300 equipments Do not attempt this installation procedure with older firmware The license keys APS003 lic APS004 lic can be exported and transferred to another APS 7000 power supply of the same model at anytime A license key can only be used with one machine at a time Steps 1 Insert the USB flash drive into the USB port on fro...

Page 46: ...e screen 7 Reset the power to the unit when prompted Invalid License 8 If the upgrade is not successful Invalid License will be displayed NEW LICENCE KEY EXPORT XXXXXX LIC format Note This guide will EXPORT the license key back to the USB flash drive so that the license key can be installed on a different unit The same USB flash drive that originally contained the lic license key must be used when...

Page 47: ...assword is 5004 5 Press F1 Export APS 003 or F2 Export APS 004 6 Reset the power to the unit when prompted 7 The APS003 lic or APS004 lic will now be in the GW directory of the USB flash drive Warning You can only export one license key at a time You cannot have two license keys on the same USB drive You cannot copy a license key to another USB drive Trying to do so will cause the file to be lost ...

Page 48: ...k Mount kit part number APS 7050 7100 GRA 423 APS 7200 GRA 429 APS 7300 GRA 430 The APS 7050 and APS 7100 are designed to fit into a 2U rack height The APS 7200 is designed to fit into a 7U rack height The APS 7300 is designed to fit into a 9U rack height Please see your distributor for further rack mount details Rack mount diagram APS 7050 or 7100 ...

Page 49: ... APS 7200 Rack mount diagram APS 7300 CAUTION Ensure adequate ventilation is provided when using the rack mount Ensure at a gap of at least 50mm is given for the side air intakes Failure to do so may cause the instrument to overheat ...

Page 50: ... is performed using the menu keys and function keys on the front panel The following section will explain some of these concepts in detail Selecting Menu Items 1 Turn the scroll wheel to select parameters in menus and lists The selected parameter will be highlighted in orange The scroll wheel is also used to increment decrement setting values 2 Press the Enter key to edit the parameter or to enter...

Page 51: ... the Keypad to edit parameter values When editing a value the keypad can be used to directly enter the desired value 1 Type the value of the parameter using the keypad 0 1 4 2 5 8 3 6 9 Lock Unlock 7 On Phase Surge Dip IPK CLR Off Phase Ramp ALM CLR ARB Trigger Local 2 Press the Enter key to confirm the edit Enter Example Parameter ...

Page 52: ... wheel to edit the value by that power 1 Use the arrow keys to move the cursor to the digit of the desired power 2 Turn the scroll wheel to edit the value by the resolution of the selected digit Cursor 3 Repeat the steps above for all the relevant digits 4 Press the Enter key to confirm the edit Enter Note By default the cursor starts at the lowest power digit ...

Page 53: ...rent menu or operation 1 Press the function key that corresponds to the setting directly to its left 2 The setting or parameter is immediately executed Function keys APS 7050 AC Power Source Display Programmable Output Long Push Menu Test Preset V Local Off Phase On Phase 0 1 4 7 2 5 8 3 6 9 V Limit F Limit IPK Limit F I rms Cancel Shift Range Enter Lock ALM CLR IPK CLR Unlock Surge Dip Ramp Trigg...

Page 54: ...s can be restored from the Menu key settings See page 179 for the default factory settings Steps 1 Press the Menu key The Menu settings will appear on the display Menu 2 Use the scroll wheel to go to item 10 Default Setting 3 Press Enter x2 to restore the default settings Default settings ...

Page 55: ...formation setting displays the serial number and version number Steps 1 Press the Menu key The Menu setting will appear on the display Menu 2 The system information should now be listed on the display If not use the scroll wheel to go to item 1 System Information System Information ...

Page 56: ...ttings will appear on the display Menu 2 Use the scroll wheel to go to item 9 LCD Configuration and press Enter 3 Set the brightness contrast and saturation Contrast 1 100 Default 50 Brightness 1 100 Default 50 Saturation 1 100 Default 50 Exit 4 Press Exit F4 to exit from the Ramp Control settings Default Settings 5 Press Default F3 to set all the LCD settings to 50 LCD settings Default settings ...

Page 57: ... is located on the CD Rom that accompanied this user manual Alternatively the driver can be downloaded from the GW Instek website For information on the USB interface see page 154 Steps 1 Connect the rear panel USB B port on the APS 7000 to the PC using a USB Type A to B cable 2 Go the Windows Device Manager For Windows 7 Start Control Panel Hardware and Sound Device Manager ...

Page 58: ...s User Manual 58 3 The APS 7000 will be located under Other Devices in the hardware tree Right click the APS 7XXX and choose Update Driver Software 4 From the hardware wizard choose Browse my computer driver software ...

Page 59: ...path to the location of the USB driver click Next and finish the driver installation 6 In APS 7000 will now be located in the Ports node of the hardware tree in the Windows Device Manager if the driver installation was successful ...

Page 60: ...ting the Current RMS Level from page 68 Setting the On Off Phase from page 73 Clearing the Alarm from page 74 Setting the Display mode from page 75 Panel lock from page 77 Turning the Output on off from page 78 Using the remote sense APS 7200 APS 7300 from page 79 Before operating the power supply please see the Getting Started chapter page 8 Setting the Voltage Range Background The Range setting ...

Page 61: ...55V to 600V the Irms and IPK values will automatically be changed to a lower value If the range is changed from 600V to 155V the Irms and IPK values remain the same If the voltage range is changed when the output is on the output will be automatically turned off Setting the Voltage Limit Background Setting the voltage limit allows the output voltage to be set to any level within the voltage limit ...

Page 62: ...h voltage range 155V 310V 600V has an independent voltage limit Before change volt limit setting if ACV setting value is bigger than desire volt limit value so that the volt limit value can t be change Setting the Output Voltage The voltage setting sets the voltage level of the power supply Background Before setting the power supply voltage level set the voltage range and voltage limit Steps 1 Pre...

Page 63: ...y 4 Press the V key and set the desired voltage with the scroll wheel keypad Range 0 volts full scale of voltage range 5 Press and hold the DEF1 or DEF2 soft key until Saved to DEF1 2 is displayed This will save the voltage setting to the DEF1 or DEF2 soft key Note Trying to set the voltage outside of the voltage limit range will result in a voltage setting error being displayed on the screen The ...

Page 64: ...the frequency limit with the scroll wheel keypad or with the F3 F4 soft keys The MAX and MIN soft keys set the frequency limit to the maximum and minimum respectively Range 45 00 500 0Hz 1000Hz option Soft keys MAX MIN 3 Press Enter to confirm the limit setting Example Freq Limit Min Max settings F3 F4 Note Before change freq limit setting if FREQ setting value is bigger than desire freq limit val...

Page 65: ...t keys DEF1 DEF2 MAX MIN 3 Press Enter to confirm the frequency setting Preset Settings The DEF1 and DEF2 preset settings are user defined settings By default they are set to 50 00Hz and 60 00Hz respectively The MAX and MIN soft keys set the frequency to the maximum and minimum respectively 4 Press the F key and set the desired frequency with the scroll wheel keypad Range 45 00 500 0Hz 1000Hz opti...

Page 66: ... the output is on Setting the Peak Current Limit Background Setting the peak current limit sets a limit on the current that can be sourced by the power supply Once the output current over the setting the output will set to off Note When the peak current limit is tripped an alarm will sound Press Shift 9 to clear the Ipk alarm Shift 6 can also clear the Ipk alarm See page 74 for details Steps 1 Pre...

Page 67: ...alue depends on the selected voltage range Soft keys MAX MIN 3 Press Enter to confirm the peak current setting Example Ipeak Min Max settings F3 F4 Delay Time Settings The Delay Time setting essentially defines how long the measurement of the peak current must be sustained for before it is recognized By default the delay time is turned off Load on Ipk Limit reached I Pk Limit Delay I Ipk Limit ack...

Page 68: ...eys MAX MIN 3 Press Enter to confirm the delay time setting Example Delay Time Min Max settings F3 F4 IPK Measurement Range Settings The IPK Range settings allow you to manually set the peak current measurement range By default this setting is set to AUTO 1 Press Shift I rms and then press IPK Range F1 2 Set the desired range with the scroll wheel Range AUTO 0 28A 1 4A 14A 70A APS 7050 APS 7100 AU...

Page 69: ...ettings Note When using manual IPK range setting Irms measure range as below Model RMS Current Measurement APS 7050 APS 7100 2 00 70 00mA 0 28A Range 2 0 350 0mA 1 4A Range 0 020 3 500A 14A Range 0 02 17 50A 70A Range APS 7200 APS 7300 0 100 3 500A 14A Range 0 10 35 00A 140A Range ...

Page 70: ... current over the setting the output will set to off Steps 1 Press I rms to access the I rms menu I rms Ipk Limit 2 Set the I rms level with the scroll wheel keypad or with the F3 F4 soft keys The MAX and MIN soft keys set the I rms level to the maximum and minimum respectively Range 0 00 full scale A dependant on the voltage range Soft keys MAX MIN 3 Press Enter to confirm the current setting Exa...

Page 71: ...ned for before it is recognized By default the I rms delay time is turned off Load on Irms Limit reached Irms Limit Delay I Irms Limit acknowledged protection triggered T Irms Limt 4 Press I rms and then press DELAY F2 5 Set the desired delay time with the scroll wheel keypad or with the F3 F4 soft keys The MAX and MIN soft keys set the delay time to the maximum and minimum respectively Range 0 of...

Page 72: ... this mode the voltage level will remain constant while the current level may vary This is the normal operating mode When the current level reaches the Irms limit the APS 7000 will act as a constant current source In this mode the current is constant and the voltage level varies When the current subsides below the Irms limit again the unit will again act as a constant voltage source When OC Fold i...

Page 73: ...etting sets the starting phase of the voltage output The off phase setting sets the ending phase of the voltage output Steps 1 Press Shift 7 or Shift 4 the On Phase or Off Phase respectively Shift 7 On Phase or 4 Off Phase 2 Set the On Phase or Off Phase setting with the scroll wheel keypad or with the F3 F4 soft keys The MAX and MIN soft keys set the phase to the maximum and minimum respectively ...

Page 74: ...kground The ALM CLR Alarm Clear function will clear any Over Power Over Irms Over Ipeak Over Temperature Output Short alarms and Remote Sense Error Applicable Alarms OVER POWER OVER IRMS OVER IPEAK OVER TEMPERATURE OUTPUT SHORT REMOTE SENSE ERROR Steps 1 Press Shift 6 to clear any alarms Shift 6 ALM CLR Example Alarm message ALM indicator ...

Page 75: ... The simple display mode shows all measurement items available on the APS 7000 Steps 1 Press the Display key 2 The display mode will toggle each time the key is pressed Display Standard Mode Settings Measurements Configurable measurements Hold measurement Simple Mode Measurement Items Hold measurement Configuring the Standard Mode Measurements 1 Press the Meas Item1 Item2 or Item3 soft key ...

Page 76: ...nt item to Voltage Hold Measurement The Hold function will hold the current measurements on the display Measurements won t be updated on the display until the function is released Press HOLD F4 to toggle hold on or off When APS 7000 rear terminal has detected reverser current the display would change as follow Reverse Current Mode ...

Page 77: ...terface the panel lock is automatically enabled See page 153 for remote control details Activate the panel lock Press the Lock key to active the panel lock Keys locked appears on the display A lock icon will appear in the top corner when the panel keys are locked Lock Unlock Disable the panel lock Hold the Lock key for 3 seconds to disable the panel lock Keys unlocked will appear on the display an...

Page 78: ...uts at the same time is not supported Using the front and rear outputs are the same time could cause dangerous operating conditions See page 34 for details about using the output terminals or sockets Turn Output On Press the Output key The Output key will light up and ON will be displayed in the status bar to indicate that the output is on Output Turn Output Off Press the Output key The Output key...

Page 79: ...t sensing cables when the output is on Electric shock or damage to the power supply could result Remote sense connectors overview The remote sense connectors are located at the rear panel of the APS 7200 and APS 7300 Local Sense Local sense operation When using local sense the sensing terminals are not used No compensation of any possible voltage drop seen on the load cables is performed Local sen...

Page 80: ...is off before handling the remote sense connectors Use sense cables with a voltage rating exceeding the isolation voltage of the power supply Never connect sensing cables when the output is on Electric shock or damage to the power supply could result 1 Configure the remote sense setting to ON page 93 2 Connect the Neutral terminal of the remote sense terminal block to the Neutral terminal of the l...

Page 81: ...OPERATION 81 Connection example OUTPUT terminal block Sensing terminal block Load cables Sensing cables Sensing points Load APS 7200 7300 ...

Page 82: ...e surge dip voltage ACV the start time T1 and testing duration T2 of the surge dip voltage period The nominal voltage and frequency settings are based on the Basic Operation section Parameter Settings Mode Auto When the output is on this mode will automatically generate a trigger at 0ºto keep the surge or dip event repeatedly on site Manual When the output is on this mode will wait for the TRIG F4...

Page 83: ...99ms Manual Mode 100mS Fixed 100mS delay after triggering Steps 1 Press the Menu key The Menu setting will appear on the display Menu 2 Use the scroll wheel to go to item 2 Surge Dip Control and press Enter Alternatively use the short cut key shift 8 3 Go to the Mode setting using the scroll wheel and press Enter Select the desired mode and press Enter again to confirm The Manual mode will allow y...

Page 84: ... the manual mode the surge dip site is determined by a manual trigger 1 Configure the nominal voltage and frequency settings See the Basic Operation chapter for details Page 62 64 2 Turn the output on The nominal settings above will be output Page 78 3 Press Shift to arm the trigger Press TRIG F4 to generate the trigger manually via the front panel Shift Or Alternatively pulse the Trigger In pin o...

Page 85: ...ting allows you to set the ramp time as ms Vrms Tup ramp up time 1Vrms Tdn ramp down time 1Vrms 1Vrms 1Vrms Tup Tdn Voltage The Voltage setting allows you to set the ramp time as Vrms ms Vup voltage up 1ms Vdn voltage down 1ms Vup Vdn 1ms 1ms Steps 1 Press the Menu key The Menu setting will appear on the display Menu 2 Use the scroll wheel to go to item 3 Ramp Control and press Enter Alternatively...

Page 86: ...e or Time and press Enter again to confirm Mode Voltage Time 4 For Voltage mode set Vup and Vdn Vup 0 01 99 99Vrms Vdn 0 01 99 99Vrms 5 For Time mode set Tup and Tdn Tup 0 1 999 9ms Tdn 0 1 999 9ms Exit 6 Press Exit F4 to exit from the Ramp Control settings 7 Upon exiting the ramp icon will appear in the status bar ...

Page 87: ...OPERATION 87 Example Settings Mode Time Tup 1 msec VAC 100V Freq 50Hz Ramp output on Ramp up Tup 1msec Example Settings Mode Voltage Vdn 2Vrms VAC 100V Freq 50Hz Ramp output off Ramp down Vdn 2Vrms ...

Page 88: ... the hold time for the peak current measurement After the output is turned on the APS 7000 will delay starting the peak current measurement by this hold time Output on Ipeak Hold time I Begin the peak current measurement T Steps 1 Press the Menu key The Menu setting will appear on the display Menu 2 Use the scroll wheel to go to item 4 MISC Configuration and press Enter 3 Go to the T Ipeak hold ms...

Page 89: ...OPERATION 89 Exit 4 Press Exit F4 to exit from the MISC Configuration settings Example Settings ...

Page 90: ...lay Menu 2 Use the scroll wheel to go to item 4 MISC Configuration and press Enter 3 Go to the Power ON Output setting using the scroll wheel and press Enter Select a setting and press Enter to confirm ON Set Output ON OFF Set Output OFF SEQ Execute the sequence that was loaded before the unit was last turned off SIM Execute the simulation that was loaded before the unit was last turned off PROG E...

Page 91: ...The Menu setting will appear on the display Menu 2 Use the scroll wheel to go to item 4 MISC Configuration and press Enter 3 Go to the Buzzer setting using the scroll wheel and press Enter Turn the setting on or off and press Enter again to confirm Buzzer ON OFF Exit 4 Press Exit F4 to exit from the MISC Configuration settings Example Settings ...

Page 92: ...es by emulating the remote commands of the EXTECH units Steps 1 Press the Menu key The Menu setting will appear on the display Menu 2 Use the scroll wheel to go to item 4 MISC Configuration and press Enter 3 Go to the SCPI Emulation setting using the scroll wheel and press Enter Choose the SCPI emulation mode and press Enter again to confirm SCPI Emulation GW EXTECH N A Exit 4 Press Exit F4 to exi...

Page 93: ...on can compensate a maximum of 10 of the output voltage The maximum output voltage when compensation is used is limited by the rated voltage Steps 1 Press the Menu key The Menu setting will appear on the display Menu 2 Use the scroll wheel to go to item 4 MISC Configuration and press Enter 3 Go to the Remote Sense setting using the scroll wheel and press Enter Select the unit and press Enter to co...

Page 94: ...he symbol SV is displayed next to the voltage reading on the standard and simple mode display Display Warning Before connecting the remote sense cables turn off the output and peripherals Please see page 79 for more information on the remote sense cabling instructions If the remote sense wires are loose or falling the display would show a message as below ...

Page 95: ...her details Pin Assignment APS 7050 and APS 7100 Trigger Out Trigger In Out On Off COM J1 Pin Assignment APS 7200 and APS 7300 Trigger Out Trigger In Out On Off COM J1 Trigger Control Settings The trigger control menu sets both the trigger in and the trigger out behavior of the J1 connector Note The following trigger control settings are not applicable when in the Simulation test mode or the Seque...

Page 96: ...scroll wheel and press Enter Choose what will happen when the Trigger In pin is pulsed high 5V and then press Enter to confirm None No action is taken Remote trigger commands are accepted Output Turns the output on or off when triggered Setting Sets a user defined voltage and frequency setting when triggered Preset Loads a preset setting when triggered SurgeDip Triggers the surge dip control 3 Go ...

Page 97: ... choose what function or test mode will be able to the trigger the output pin to pulse high None No source is able to use the trigger output Remote trigger commands are accepted Output The trigger output pin is activated when the output is turned on or off Setting When the settings change the trigger output pin is activated Preset When a preset is loaded or saved the trigger output pin is activate...

Page 98: ...u can choose the output pin polarity with the Level parameter This setting will pull the output pin high or low when source condition is true This setting is not available when Width is set to 1 60ms Level HI 2V LO 0 8V Exit 10 Press Exit F4 to exit from the Trigger Control settings ...

Page 99: ...m CONFigure TRIGger INPut MODE SYSTem CONFigure TRIGger INPut SOURce SYSTem CONFigure TRIGger INPut SOURce SYSTem CONFigure TRIGger OUTPut MODE SYSTem CONFigure TRIGger OUTPut MODE SYSTem CONFigure TRIGger OUTPut SOURce TRIGger OUTPut SOURce TRIGger OUTPut SOURce TRIGger OUTPut IMMediate TRIGger MEMory SOURce TRIGger MEMory SOURce TRIGger MEMory IMMediate TRIGger TRANsient SOURce TRIGger TRANsient...

Page 100: ...memory Steps 1 Press Preset and then hold a number key 0 9 to save the present settings to the corresponding memory number Preset 0 9 hold Presets M0 M9 2 Press the Preset key again to exit from the preset mode Example For example pressing Preset holding 1 will save the present settings to memory slot 1 saved to M1 Note The preset key will become green when active A beep will be heard Buzzer set t...

Page 101: ... 9 to load the corresponding memory number Preset 0 9 Presets M0 M9 2 Press the Preset key again to exit from the preset mode Example For example pressing Preset 1 will recall the saved settings from memory slot 1 recalled from M1 Note The preset key will become green when active A beep will be heard and a message will be displayed when the settings are recalled ...

Page 102: ...ple the file preset0 set can only be recalled to memory number M0 The files can only be recalled from the USB gw directory Steps 1 Press the Menu key The Menu settings will appear on the display Menu 2 Use the scroll wheel to go to item 12 Save Recall Files and press Enter 3 Go to the Type setting using the scroll wheel and press Enter Select Preset and press Enter to confirm 4 Go to the Action se...

Page 103: ...elect the preset memory number to perform the operation on Press Enter to confirm Memory No 0 9 M0 M9 Execute File Operation 6 Press Exe F1 to perform the file operation Exit 7 Press Exit F4 to exit from the Save Recall Files settings Example Settings ...

Page 104: ...the Simulate and Sequences modes but cannot be used with the Program test modes When the WAVE parameter is set to any waveform other than SINE ARB will be shown in the status bar when in the BASIC operation Simulate mode or Sequence mode to indicate that the ARB function is active when in these modes Note The output will always be turned off if the ARB waveform is changed It is not possible to kee...

Page 105: ...nding on the chosen waveform Setting Screen Overview Waveform type Attributes for the selected waveform Visual representation of the waveform shape and its attributes F4 Exit ARB Waveform Overview The following describes each of the 7 basic waveforms Sine This is the default waveform used for the APS 7000 No settable attributes ...

Page 106: ...ettable number of percentage Attributes Sym 0 100 Staircase The staircase waveform has a settable number of step levels Attributes Stairs 1 100 Clip Outputs a clipped sinewave The degree to which the sine wave is clipped is settable Attributes Ratio 0 50 0 99 RMS RATIO KEEP ...

Page 107: ... The crest factor is settable Attributes CF 1 4 10 0 Surge The surge waveform has a settable ACV base level site size and site shape Attributes Type Sine Square site waveform type Acv 0 100 base waveform ampl Site 0 100 site waveform width ...

Page 108: ... function simply adds a number Fourier series terms to create an arbitrary waveform Attributes Type 1 22 Number of selectable ARB waveforms The numerical figures shown under the Type parameter shows which Fourier series terms are used and their bn coefficients ...

Page 109: ...gle Stair Clip CF Surge ARB 3 Use the scroll wheel and Enter key to select any other attributes for the selected waveform and press Enter to confirm any settings Other Attributes Sine Wave None Triangle Wave None Stair Stairs 1 100 Clip N ACV 1 10 CF CF 1 4 10 0 Surge Type Sine Square ACV 0 100 Site 0 100 Exit 4 Press Exit F4 to exit from the ARB settings Common Settings 5 Press Menu to go back to...

Page 110: ...he Basic Operation chapter for setting details Page 60 Note When the WAVE parameter is set to any waveform other than SINE ARB will be shown on the display when in the BASIC operation Simulate mode or Sequence mode to indicate that the ARB function is active when in these modes Standard Mode Example Simple Mode Example Sequence Example ...

Page 111: ...OPERATION 111 Simulate Example ...

Page 112: ...ogram function runs different memory steps sequentially Each step of a program is a preset memory configuration M01 M50 The Program function can also perform pass fail testing Simulate Mode Overview from page 114 Simulate Settings from page 118 Save Simulation to Local Memory from page 121 Recall Simulation from Local Memory from page 121 Manage Simulation Settings from page 122 Run Simulation fro...

Page 113: ...OPERATION 113 Program Mode Overview from page 139 Save a Program to Local Memory from page 146 Recall a Program from Local Memory from page 146 Manage Program Settings from page 147 ...

Page 114: ...est mode V RANGE Recall test Save test Run test ON OFF phase Trigger output level Step Frequency Step voltage Step time Step Step Overview The Simulate function is comprised of 6 steps Each step is run sequentially in the following order Initial Normal1 Trans1 Abnormal Trans2 Normal2 Initial Initial The Initial step is used as the initial and final settings of the waveform simulation This is the s...

Page 115: ...al conditions for the simulation Trans2 This step configures the transition from abnormal to normal conditions Normal2 This step configures the normal conditions that supersede the abnormal conditions Abnormal Trans1 Normal1 Init Trans2 Normal2 Init Parameter Overview The following table shows which parameters are available for each step Step Parameter Initial Normal1 Trans1 Abnormal Trans2 Normal...

Page 116: ...tion ON Phs Sets the starting phase of the waveform for the step Not applicable for the Trans 1 2 steps OFF Phs Sets the off phase of the waveform after the output has been turned off Not applicable for the Trans 1 2 steps Fset Sets the frequency of the step Not applicable for the Trans 1 2 steps Vset Sets the voltage of the step Not applicable for the Trans 1 2 steps Trig Out Sets the polarity of...

Page 117: ...ION 117 The following diagram illustrates the relationship between each of the parameters in a step Time ON Phs ON Phs additional time Output off OFF Phs Trigger out position Fset OFF Phs additional time Vset ...

Page 118: ...Mode F1 Mode Steps 3 Use the scroll wheel to go to the Step setting and press Enter 4 Use the scroll wheel to select one of the simulation steps and press Enter Steps Initial Normal1 Trans1 Abnormal Trans2 Normal2 5 Go to the Time setting and set the duration of the step Time 0 01 999 99s 0 Trans 1 and Trans2 Note For Trans1 and Trans2 it supports a value of 0 which will skip the step ...

Page 119: ...olution 1º 8 Press the Range key repeatedly to set the voltage range for the Vset parameter The range will be shown in the top corner which indicates that the simulation will be executed within this voltage range Range Range LO 155V MD 310V HI 600V optional 9 Go to the Vset setting and set the Vrms level of the step If you input a Vset value that is not within the voltage range the input value wil...

Page 120: ...tional 11 Go to the Trig Out setting and set the state of the trigger out pin at the start of each step Trig Out HI LO 12 Lastly go to the Repeat parameter select the number of times the simulation will repeat the Normal1 Trans1 Abnormal Trans2 Normal2 sequence of steps A value of 0 will set the number of repetitions to infinite Repeat 1 9999 0 infinite ...

Page 121: ...s a number key when prompted 2 A message will appear when the save is successful Save SIM0 SIM9 Recall a Simulation from Local Memory Recall a Simulation Simulation settings can be recalled from one of 10 memory slots SIM0 SIM9 Steps 1 Press Recall F2 and then press a number key when prompted 2 A message will appear when the settings are recalled successfully Recall SIM0 SIM9 ...

Page 122: ...m the same memory number For example the file sim0 sim can only be recalled to memory number SIM0 The files can only be recalled from the USB gw directory Steps 1 Press the Menu key The Menu settings will appear on the display Menu 2 Use the scroll wheel to go to item 12 Save Recall Files and press Enter 3 Go to the Type setting using the scroll wheel and press Enter Select SIMULATE and press Ente...

Page 123: ...to the Memory No setting and select the simulation memory number to perform the operation on Press Enter to confirm Memory No 0 9 SIM0 SIM9 Execute File Operation 6 Press Exe F1 to perform the file operation Exit 7 Press Exit F4 to exit from the Save Recall Files settings Example Settings ...

Page 124: ...ements Note Ap of readback measurements that is mean peak current Apk Steps 1 Press Output Output 2 Press Run F4 The test will start to run The settings of the current step will be shown at the top of the screen and the measurement readout will be shown on the bottom of the screen The top right of the screen will display the current step number of the simulation 1 5 Normal1 2 5 Trans1 3 5 Abnormal...

Page 125: ...utput is turned off When the test has finished stopped the screen will return to the original settings screen If the OFF phase has been set the output will continue until the OFF phase setting is satisfied Hold Test To pause the test mid way press Hold F3 Continue Test To continue a paused test press Conti F3 ...

Page 126: ...mode V RANGE Recall test Save test Run test Trigger polarity OFF Phase Voltage On Phase Step Termination Frequency Branch 1 Jump To Step number Step time Jump count Branch 2 Sequence Parameter Overview The Sequence function is comprised of a minimum of 2 steps that are executed in user defined sequences Each step can have different step times voltage levels start phases stop phases and frequencies...

Page 127: ...Step termination setting for the step Jump Cnt Determines the number of times to loop the jump step Branch1 Branch2 The Branch settings allow you to make a selectable branch within the sequence when the sequence is running or on hold The branch1 or branch2 actions are enabled by pressing the F1 or F2 function keys or by using the TRIG SEQ SEL EXEC remote control command After the branch step s hav...

Page 128: ...n on the J1 connector when the step is running ON OFF Phs Sets the start and stop phase of the AC waveform The ON Phs setting sets the starting phase of the step OFF Phs sets the off phase for the output when the output if turned off Vset Sets the AC voltage level There are 4 secondary voltage settings that determine how the voltage is output Constant Sets the voltage level of the step immediately...

Page 129: ...xample Time of step Time of next step ON Phs completion time ON Phs ON Phs Step 1 Jump Cnt 0 Step 1 Jump Cnt 1 Time of step Output off OFF Phs Sequence Flow Example Step 1 Jump To Branch 1 Go to StepX Go to StepX Cnt 0 Branch 2 Jump to StepX On Off On Off On Off Jump Cnt On Off Go to the next step Term END CONTI HOLD Stop test Wait for user input Jump Cnt Cnt 0 Step 0 ...

Page 130: ...e the scroll wheel to go to the Step setting and press Enter 4 Use the scroll wheel to select the step number 0 is always the starting step for the sequence Step 0 255 5 Go to the Time setting and set the duration of the step Time 0 01 999 99s 6 Go to the Jump To setting and choose which step to jump to or turn the setting off Step ON OFF 0 255 7 Go to the Jump Cnt setting and set the number of ti...

Page 131: ... of the step END will return to step 0 HOLD will stay at the current step until you allow the sequence to continue to the next step Term CONTI END HOLD 10 Go to the Trig Out setting and set the output state of the trigger out pin when the step has started Trig Out HI LO 11 Go to the ON Phs setting and set the starting phase of the step ON Phase ON OFF ON Phase 0 359º Resolution 1º 12 Go to the OFF...

Page 132: ...the selected voltage range an Over Range alarm will appear during Sequence At this time the output voltage maintains on the previous setting voltage value Vset 0 310V range dependent 600V optional Secondary settings CT Constant KP Keep SP Sweep Note Step 0 can only be set to CT or SP Note When output has been executed under Standard Mode press the Test key to enter Sequence Mode and then execute s...

Page 133: ...ep 0 Step3 Step1 Step2 Step0 Sweep Keep Const Vset 110V 90V Const The example above shows how the secondary voltage settings affect how the voltage is output in each step Step no 0 1 2 3 Vset V 0 110 90 N A 2nd Setting CT CT SP KP ...

Page 134: ...long press a number key when prompted 2 A message will appear when the save is successful Save SEQ0 SEQ9 Recall a Sequence from Local Memory Recall a Sequence Sequence settings can be recalled from one of 10 memory slots SEQ0 SEQ9 Steps 1 Press Recall F2 and then press a number key when prompted 2 A message will appear when the settings are recalled successfully Recall SEQ0 SEQ9 ...

Page 135: ...e memory number For example the file seq0 seq can only be recalled to memory number SEQ0 The files can only be recalled from the USB gw directory Steps 1 Press the Menu key The Menu settings will appear on the display Menu 2 Use the scroll wheel to go to item 12 Save Recall Files and press Enter 3 Go to the Type setting using the scroll wheel and press Enter Select SEQUENCE and press Enter to conf...

Page 136: ...ory 5 Go to the Memory No setting and select the sequence memory number to perform the operation on Press Enter to confirm Memory No 0 9 SEQ0 SEQ9 Execute File Operation 6 Press Exe F1 to perform the file operation Exit 7 Press Exit F4 to exit from the Save Recall Files settings Example Settings ...

Page 137: ...of the current step will be shown at the top of the screen and the measurement readout will be shown on the bottom of the screen The top right of the screen will be display the current step number by the total number of steps current step total steps 3 The test will continue to run until the last step has run or Stop F4 is pressed When the test has finished stopped the screen will return to the or...

Page 138: ...ing the BRN1 F1 branch 1 soft key or the BRN2 F2 soft key branch 2 Alternatively the TRIG SEQ SEL EXEC command can also be used evoke a conditional branch Hold Test 5 To pause the test mid way press Hold F3 Continue Test 6 To continued a paused test press Conti F3 ...

Page 139: ...memories A program will run each memory sequentially which in turn will run each step in the memory sequentially until the program is terminated or a step in the program is programmed to end Each memory each step and even each program can also be programmed to loop a user defined number of times The diagram below shows the basis of a program Memory 1 Step 2 Step 1 Memory 2 Step 3 Memory 50 Step 9 ...

Page 140: ...e Memory cycle Memory number Step number Step cycle Next End step Settings Screen Parameter Overview The following list describes the parameters on the settings screen Memory number Sets the current memory number Memory cycle Sets the number of cycles for the selected memory number Step number Sets the current step for the current memory number Step cycle Sets the number of cycles for the selected...

Page 141: ...C or 600VAC the APS 003 option only When set to HI the unit range is set to 310VAC or 600VAC if the APS 003 option is installed VSET Sets the output voltage for the current step FSET Sets the frequency for the current step SD_SITE Surge Dip site position T1 time SD_TIME Surge Dip time T2 time SD_VOLT Surge Dip voltage ACV SD_CONT Surge Dip trigger control Manual or Auto Example Dip Surge T2 T2 T1 ...

Page 142: ...es Delay The delay time introduces a delay time before testing pass fail limits The delay timing starts as soon as a step has started Dwell The dwell time sets the total execution time of the step Prompt Sets a user defined text message for the current step Note The Enter soft key must be used to exit out of the text input screen On screen keyboard Enter soft key ...

Page 143: ... is pressed Run Mode When set to MANUAL mode only Memory number VSET FSET H IRMS A SD VOLT SD SITE SD_CONT and SD TIME will be enabled When set to PROGRAM mode all the parameters are available Single Step Sets the program to run only one step at a time After a step is run the program is held until the Output key is pressed after which the program will go to the next step Alarm Turns the alarm buzz...

Page 144: ...es how many times the program itself will loop M1 through M50 V Limit Sets the voltage limit F Limit Sets the frequency limit Phase Sets the ON phase and OFF phase of the step Results Configures how the results are displayed ALL Shows all the step results on the screen Example LAST Only displays the last result ...

Page 145: ...P F If one of the test results is judged a fail then FAIL is displayed on the screen Fail Example Pass Example Surge Dip Turns the Surge Dip function on off OC Fold Turns OC Fold on off Contrast Sets the LCD contrast ...

Page 146: ...all F3 and then long press a number key 2 A message will appear when the save is successful Save PROG0 PROG9 Recall a Program from Local Memory Recall a Sequence Sequence settings can be recalled from one of 10 memory slots PROG0 PROG9 Steps 1 Press Recall F2 and then press a number key 2 A message will appear when the settings are recalled successfully Recall PROG0 PROG9 ...

Page 147: ...me memory number For example the file prog0 pro can only be recalled to memory number PROG0 The files can only be recalled from the USB gw directory Steps 1 Press the Menu key The Menu settings will appear on the display Menu 2 Use the scroll wheel to go to item 12 Save Recall Files and press Enter 3 Go to the Type setting using the scroll wheel and press Enter Select SEQUENCE and press Enter to c...

Page 148: ...ry 5 Go to the Memory No setting and select the program memory number to perform the operation on Press Enter to confirm Memory No 0 9 PROG0 PROG9 Execute File Operation 6 Press Exe F1 to perform the file operation Exit 7 Press Exit F4 to exit from the Save Recall Files settings Example Settings ...

Page 149: ...has 3 signal output connectors These connectors are used for external triggering synchronization and test judgment state The following chapter will give a brief overview each of these connectors J1 Connector Overview 150 Signal Output Overview 151 SYNC Output Overview 152 ...

Page 150: ...ls on the trigger control settings Pin Assignment Trigger Out Trigger In Out On Off COM APS 7050 and APS 7100 Trigger Out Trigger In Out On Off COM APS 7200 and APS 7300 Pin name Pin Description Trigger Out Outputs a high signal 5V according to the Trigger Out settings in the Trigger Control menu Trigger In Applying a high level signal to the Trigger In pin performs an action according to the sett...

Page 151: ... FAIL and Processing conditions Each of these conditions are isolated from the APS 7000 with internal relays Pin Assignment 2 4 6 5 3 1 Remote relay contact 2 4 6 5 3 1 APS 7050 APS 7100 APS 7200 APS 7300 Pin name Pin number Description 1 Pass pin 2 Pass return pin 3 Processing pin 4 Fail pin 5 Processing return pin 6 Fail return pin Pass Connect between Pin1 and Pin2 Fail Connect between Pin4 and...

Page 152: ... 152 CAUTION The internal relays allow for a maximum voltage of 250VAC and maximum current of 3A SYNC Output Overview Overview The SYNC output outputs a 10V signal when the output is turned on Pin Assignment SYNC GND SYNC output ...

Page 153: ...ed via the USB LAN RS 232 GPIB interface the panel lock is automatically enabled Interface Configuration 154 USB Remote Interface Optional APS 7050 and APS 7100 only 154 RS 232 Remote Interface Optional 155 RS 232 USB Remote Control Function Check 158 Using Realterm to Establish a Remote Connection 159 Configure GPIB Interface Optional 162 GPIB Function Check 163 Configure Ethernet Connection 167 ...

Page 154: ...rface card APS 002 must first be installed before the USB interface can be used for remote control Please see page 41 for installation details Steps 1 Connect the Type A Type B USB cable from the PC to the rear panel USB B port 2 Press the Menu key The Menu setting will appear on the display Menu 3 Use the scroll wheel to go to item 6 Rear USB and press Enter 4 Go to the Speed setting and set the ...

Page 155: ...e card must be installed to remotely control the APS 7000 via the serial port RS 232 configuration Connector BD 9 male Parameters Baud rate data bits parity stop bits Pin Assignment 12 34 5 6789 2 RxD Receive data 3 TxD Transmit data 5 GND 4 6 9 No connection Pin Connection Use a Null Modem connection RS 232C cable as shown in the diagram below APS PC RxD Pin2 RxD Pin2 GND Pin5 GND Pin5 TxD Pin3 T...

Page 156: ...rear panel RS 232 port 2 Press the Menu key The Menu setting will appear on the display Menu 3 Use the scroll wheel to go to item 7 Serial Port and press Enter 4 Go to the Function Active setting and turn the serial port connection on Function Active ON OFF 5 Set the remaining serial port settings Baud rate 1200 2400 4800 9600 default 19200 38400 57600 115200 Data bits 7 8 default Parity None defa...

Page 157: ...COMMUNICATION INTERFACE 157 Exit 6 Press Exit F4 to exit from the serial port settings ...

Page 158: ...r For example in WinXP go to the Control panel System Hardware tab Note If you are not familiar with using a terminal application to send receive remote commands from the serial port or via a USB connection please see page 159 for more information Run this query command via the terminal after the instrument has been configured for RS 232 USB remote control page 155 154 IDN This should return the M...

Page 159: ...is used as an example to establish a remote connection any terminal program can be used that has similar functionality Note Realterm can be downloaded on Sourceforge net free of charge For more information please see http realterm sourceforge net Operation 1 Download Realterm and install according to the instructions on the Realterm website 2 Connect the APS 7000 via USB page 154 or via RS 232 pag...

Page 160: ...tart Realterm on the PC as an administrator Click Start menu All Programs RealTerm realterm Tip to run as an administrator you can right click the Realterm icon in the Windows Start menu and select the Run as Administrator option 6 After Realterm has started click on the Port tab Enter the Baud Parity Data bits Stop bits and Port number configuration for the connection The Hardware Flow Control So...

Page 161: ...COMMUNICATION INTERFACE 161 Note For USB the baud rate should be fixed to 115 200 7 Click on the Send tab In the EOL configuration check on the LF check boxes Enter the query idn Click on Send ASCII ...

Page 162: ... card must first be installed Note The GPIB interface card APS 001 must first be installed before the GPIB interface can be used for remote control Please see page 41 for installation details GPIB Configuration 1 Connect a GPIB cable from the PC to the GPIB on the interface card GPIB 2 Press the Menu key The Menu setting will appear on the display Menu 3 Use the scroll wheel to go to item 8 GPIB a...

Page 163: ...n each device Unique address assigned to each device At least 2 3 of the devices turned On No loop or parallel connection GPIB Function Check Functionality check Please use the National Instruments Measurement Automation Controller software to confirm GPIB LAN functionality See the National Instrument website http www ni com for details Note For further details please see the programming manual av...

Page 164: ...es User Manual 164 Operation 1 Start the NI Measurement and Automation Explorer MAX program Using Windows press Start All Programs NI MAX 2 From the Configuration panel access My System Devices and Interfaces GPIB0 ...

Page 165: ...th the address the same as that configured on the APS 7000 5 Double click the Instrument 0 icon 2 3 4 5 6 Click on Visa Properties 7 Click on Open Visa Test Panel 7 6 8 Click on the Input Output icon 9 Under the Basic I O tab ensure IDN is written in the Select or Enter Command text box 10 Click on the Query button to send the IDN query to the instrument ...

Page 166: ...Manual 166 11 The instrument identification string will be returned to the buffer area GWINSTEK APS 7050 GEXXXXXXX XX XX XXXXXXXX manufacturer model serial number software version 8 9 11 10 12 The function check is complete ...

Page 167: ...ually configured Ethernet Parameters MAC Address display only DHCP IP Address Subnet Mask Gateway DNS Address DNS Server Socket port fixed at 2268 Ethernet Configuration 1 Connect a LAN cable from the PC to the Ethernet port on the rear panel LAN 2 Press the Menu key The Menu setting will appear on the display Menu 3 Use the scroll wheel to go to item 5 LAN and press Enter 4 If the LAN cable is in...

Page 168: ...S 7000 Series User Manual 168 6 If DHCP was set to OFF configure the remaining LAN parameters IP Address Subnet Mask Gateway DNS Server LAN configuration Exit 7 Press Exit F4 to exit from the LAN settings ...

Page 169: ... the power supply for example http XXX XXX XXX XXX in a web browser after the instrument has been configured for LAN page 167 The web interface allows you to View the system and information and the network configuration View the analog control pinout View the dimensions of the unit View the operating area Example ...

Page 170: ...ww ni com via a search for the VISA Run time Engine page or downloads at the following URL http www ni com visa Requirements Operating System Windows XP 7 8 8 1 Functionality check 1 Start the NI Measurement and Automation Explorer MAX program Using Windows press Start All Programs NI MAX 2 From the Configuration panel access My System Devices and Interfaces Network Devices 3 Press Add New Network...

Page 171: ...TERFACE 171 2 3 4 Select Manual Entry of Raw Socket from the popup window 4 5 Enter the IP address and the port number of the APS 7000 The port number is fixed at 2268 6 Double click the Validate button and press Next ...

Page 172: ...ure the Alias name of the APS 7000 connection In this example the Alias is APS 8 Click finish 7 8 9 The IP address of the power supply will now appear under Network Devices in the configuration panel Select this icon now 10 Press Open VISA Test Panel ...

Page 173: ...cter The termination character should be set as Line Feed n 11 12 Click the Input Output icon Under the Basic I O tab make sure IDN n is entered in the Select or Enter Command drop box 13 Click Query The APS 7000 will return the machine identification string into the buffer area GWINSTEK APS 7050 GEXXXXXXX XX XX XXXXXXXX ...

Page 174: ...APS 7000 Series User Manual 174 13 12 Note For further details please see the programming manual available on the GW Instek web site www gwinstek com ...

Page 175: ...does not match the specification Make sure the device is powered On for at least 30 minutes within 18 C 28 C This is necessary to stabilize the unit to match the specification The display shows fuse broken message The internal protection fuse is open Contact your local dealer or GW Instek The display shows output shorted message Make sure the DUT is correctly connected to the APS 7000 output termi...

Page 176: ...that is mean over the specification of APS 7000 series Even set Irms is equal to 0 Purchasing more higher power AC Source please The display shows Remote Sense Error message Remote Sense Error message be occurred that is mean remote sense connection has mistake Double check connection please For more information contact your local dealer or GWInstek at www gwinstek com marketing goodwill com tw ...

Page 177: ...Ensure the output is off 1 Insert a USB Flash Drive into the USB port on front panel of the APS 7000 The USB drive should include the gw sbt file in a directory name gw USB gw Steps 1 Press the Menu key The Menu setting will appear on the display Menu 2 Use the scroll wheel to go to item 11 Special Function and press Enter 3 Key in the password when prompted and then press Enter The password is 50...

Page 178: ...APS 7000 Series User Manual 178 Exit 5 Wait for the unit to update Upon completion the unit will automatically reset Example Password setting screen ...

Page 179: ...00 Range 155V ACV 0 00V FREQ 60 00Hz IRMS 4 20A 8 40A 16 80A 25 20A ON PHS 0º OFF PHS 0º V limit 155 0Vrms F Limit 500 0Hz Ipeak Limit 16 80A 33 60A 67 20A 100 8A Simulation Mode APS 7050 APS 7100 APS 7200 APS 7300 Step Initial Repeat 1 Time 0 10s ON Phs ON 0 Vset 0 00 OFF Phs ON 0 Fset 50 00 Trig Out LO Range HI Sequence Mode APS 7050 APS 7100 APS 7200 APS 7300 Step 0 Time 0 10s Jump To ON 1 Jump...

Page 180: ...7300 Not applicable Configuration Menu APS 7050 APS 7100 APS 7200 APS 7300 Surge Dip Control OFF Ramp Control OFF T ipeak hold msec 1ms Power ON Output OFF Buzzer ON SCPI Emulation GW Program Timer SEC seconds Remote Sense N A N A OFF OFF LAN Rear USB Serial Port GPIB N A LCD Contrast 50 LCD Brightness 50 LCD Saturation 50 ...

Page 181: ...VA or less Power Factor 0 7 Typ AC Output Power Rating 500 VA 1000 VA 2000 VA 3000 VA Output Voltage 0 155Vrms 0 310 0 Vrms Output Frequency 45 00 500 0 Hz Maximum Current r m s 1 0 155 Vrms 4 2 A 8 4 A 16 8 A 25 2 A 0 310 Vrms 2 1 A 4 2 A 8 4 A 12 6 A Maximum Current peak 0 155 Vrms 16 8 A 33 6 A 67 2 A 100 8 A 0 310 Vrms 8 4 A 16 8 A 33 6 A 50 4 A Phase Single Phase Two Wire 1P2W Total harmonic ...

Page 182: ...e angle Range 0 359 Resolution 1 Accuracy 1 only 45 65 Hz Measurement 3 Voltage r m s Range 0 20 38 75 Vrms 38 76 77 50 Vrms 77 51 155 0 Vrms 155 1 310 0 Vrms Resolution 0 01 V at 0 00 99 99 Vrms 0 1 V at 100 0 310 0 Vrms Accuracy 4 0 5 of reading 2 counts Frequency Range 45 500 Hz Resolution 0 01 Hz at 45 00 99 99 Hz 0 1 Hz at 100 0 500 0 Hz Accuracy 0 1 Hz Current r m s Range 2 00 70 00 mA 60 0 ...

Page 183: ...ading 1 count Power W Resolution 0 01 W 0 1 W 1 W 0 1 W 1 W Accuracy 0 6 of reading 5 counts 0 20 99 99 W 0 6 of reading 5 counts 100 0 999 9 W 0 6 of reading 2 counts 1000 9999 W 0 6 of reading 5 counts 0 2 999 9 W 0 6 of reading 2 counts 1000 9999 W Apparent Power VA Resolution 0 01 VA 0 1 VA 1 VA 0 1 VA 1 VA Accuracy 1 of reading 7 counts 0 20 99 99 VA 1 of reading 7 counts 100 0 999 9 VA 1 of ...

Page 184: ...re range 10 70 C Operating humidity range 20 80 RH no condensation Storage humidity range 80 RH or less no condensation LCD Display 4 3 inch 480 RGB x 272 Dimensions mm W 430 430 430 430 H 88 88 312 400 D 400 560 650 650 Weight 24Kg 38Kg 90Kg 128Kg Sequence Simulation Function Number of Memories 10 0 9 numeric keys Number of Steps 255 max for 1 sequence Step Time Setting Range 8 0 01 999 99 S Oper...

Page 185: ... at 100 0 600 0 Vrms Accuracy 6 0 5 of setting 2 counts Measurement 3 Voltage r m s Range 0 2 600 0 Vrms Resolution 0 01V at 0 00 99 99 Vrms 0 1V at 100 0 600 0 Vrms Accuracy 0 5 of reading 2 counts APS 004 Option Output Frequency 45 1000 Hz Model APS 7050 APS 7100 APS 7200 APS 7300 Setting Frequency Range 45 00 1000 Hz Resolution 0 01 Hz at 45 00 99 99 Hz 0 1 Hz at 100 0 999 9 Hz 1 Hz at 1000 Hz ...

Page 186: ...working voltage 120Vrms 240Vrms 2 45 Hz to 500 Hz 10 or higher of the rated output voltage the maximum current or lower 3 All of measurement accuracy is at 23 5 C 4 In the case of 15 V to 155 V 30 V to 310 V sine wave no load 5 Maximum output current at working voltage 480Vrms 6 In the case of 60 V to 600 V sine wave no load 7 45 Hz to 1000 Hz 10 or higher of the rated output voltage the maximum c...

Page 187: ...APPENDIX 187 APS 7000 Dimensions APS 7050 402 545 5 430 110 4 87 9 Scale mm ...

Page 188: ...APS 7000 Series User Manual 188 APS 7100 561 6 705 5 430 110 4 87 9 Scale mm ...

Page 189: ...APPENDIX 189 APS 7200 402 5 310 5 429 8 682 4 649 2 Scale mm ...

Page 190: ...APS 7000 Series User Manual 190 APS 7300 491 5 399 5 429 8 682 4 649 2 Scale mm ...

Page 191: ...ass A Surge Immunity EN 61000 4 5 2006 Voltage Fluctuations EN 61000 3 11 2000 Conducted Susceptibility EN 61000 4 6 2014 Electrostatic Discharge EN 61000 4 2 2009 Power Frequency Magnetic Field EN 61000 4 8 2010 Radiated Immunity EN 61000 4 3 2006 A2 2010 Voltage Dip Interruption EN 61000 4 34 2007 A1 2009 Electrical Fast Transients EN 61000 4 4 2012 Low Voltage Equipment Directive 2014 35 EU Saf...

Page 192: ...Disposal instructions 6 EN61010 measurement category 5 pollution degree 6 Environment safety instruction 6 Ethernet interface 167 Filter installation 31 Firmware update 177 Frequency limit 64 Frequency output 65 Front panel diagram 14 Ground symbol 4 I rms 70 Ipk measurement range 68 Ipk range 68 Ipk Limit 66 Irms Delay time 71 J1 connector pin assignment 150 LCD configuration 56 Line voltage 1000...

Page 193: ...operation about disassembly 5 contact 176 Signal output pin assignment 151 Socket server function check 170 Specifications 181 Start stop phase 73 Surge dip control 82 SYNC output pin assignment 152 System version view 55 T Ipeak 88 Test Overview 112 Program Overview 139 Recall 146 Save 146 Sequence Overview 126 Recall 134 Run 137 Save 134 Settings 130 Simulation Overview 114 Recall 121 Run 124 Sa...

Reviews: