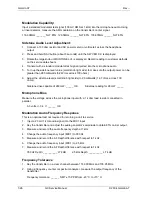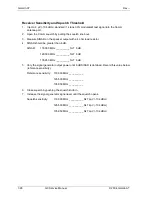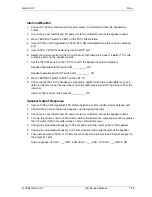
Garmin AT
Rev --
7-14
GX Service Manual
© 2004 Garmin AT
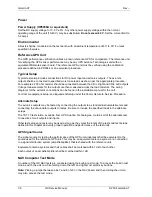
11. GPS Performance
Setup:
Connect the unit under test and the UPS Aviation Technologies-certified
reference unit to an antenna or signal source as defined in the GPS Signal
Source section on page 7-6.
Note
This test requires that the seed position, time, and date have been correctly set.
Refer to the System Initialization and Seed Position, Time and Date paragraphs
on page 7-8 and 7-9.
Operation:
Turn on power to the GX unit and monitor the GPS status/position pages to
determine time to first fix. Check the lat/lon position accuracy by comparison to
the UPS Aviation Technologies-certified reference unit. Compare the signal
levels of matching satellites to the reference unit. After the unit has acquired the
satellites, the GPS Sensor pages will be updated.
Verification:
Verify that the acquisition time is less than 2 minutes.
Verify that the position is within 0.05 NM of the reference unit.
Verify that the signal levels of the unit under test for the same PRN as the
reference unit are similar (normalized reference unit signal level, ± 13) compared
to the normalized signal levels of the reference unit.
Verify elevation and azimuth on the unit under test agrees with the reference to
ensure that the almanac is updated.
Verify that the signal level for each tracked satellite is equal to or greater than the
normalized signal levels of the reference unit.
Verify navigation by entering a direct-to waypoint on both the test and reference
units and seeing that the bearing and range to the selected waypoint matches
the reference unit.
Notes:
This test requires that the seed position is set to within 60 NM of the source, and
time and date have been set to within 5 minutes of the source. The specification
allows for a ± 5% tolerance margin between the normalized reference unit and
the unit under test. The acquisition time may take longer than two minutes if the
GPS receiver does not have current almanac data. If this is the case, after the
unit has acquired current almanac data, it may take up to 25 minutes to acquire a
complete almanac once the receiver has started tracking a satellite. The
acquisition time should be re-verified to meet the two-minute specification.
12. Equipment Marking
Description:
The configuration and marking for the GX unit is defined on the unit configuration
drawing and the unit assembly drawing. The versions of all assemblies must be
valid as described on the drawings.
Setup:
N/A
Operation:
Using the current unit configuration drawing, check the hardware configuration
and the equipment marking (UC tag).
Verification:
Verify the hardware/software configuration is valid and the UC tag marking is
correct. Verify that labels are installed as defined on the unit assembly drawing.
Summary of Contents for APOLLO GX SERIES
Page 8: ...Garmin AT Rev viii GX Service Manual 2004 Garmin AT This Page Intentionally Left Blank...
Page 12: ...Garmin AT Rev 1 4 GX Service Manual 2004 Garmin AT...
Page 24: ...Garmin AT Rev 2 12 GX Service Manual 2004 Garmin AT...
Page 26: ...Garmin AT Rev 3 2 GX Service Manual 2004 Garmin AT...
Page 27: ...2004 Garmin AT GX Service Manual 4 1 Chapter 4 Antenna Installation Guides...
Page 28: ...Garmin AT Rev 4 2 GX Service Manual 2004 Garmin AT...
Page 32: ...Garmin AT Rev 5 4 GX Service Manual 2004 Garmin AT...
Page 96: ...Garmin AT Rev 7 58 GX Service Manual 2004 Garmin AT...
Page 98: ...Garmin AT Rev 8 2 GX Service Manual 2004 Garmin AT Figure 8 1 GX55 Assembly Board Locations...
Page 122: ...Garmin AT Rev 8 26 GX Service Manual 2004 Garmin AT...
Page 130: ...Garmin AT Rev 9 8 GX Service Manual 2004 Garmin AT...
Page 140: ...Garmin AT Rev 10 10 GX Service Manual 2004 Garmin AT Figure 10 5 Comm Board Block Diagram...
Page 152: ...Garmin AT Rev 10 22 GX Service Manual 2004 Garmin AT...
Page 158: ...Garmin AT Rev 11 6 GX Service Manual 2004 Garmin AT...
Page 160: ...Garmin AT Rev 12 2 GX Service Manual 2004 Garmin AT...
Page 162: ...Garmin AT Rev 13 2 GX Service Manual 2004 Garmin AT...
Page 165: ......
Page 166: ......


