17 - 18
SIA - Extended Report Window
This Window allows you to select a SIA Record, set a reporting Delay of 0 to 99 seconds, set a combination of two
phone numbers to be used to report the record to the central station, and to set the Priority.
All Panel SIA commands can be Uploaded or Downloaded from this Window using the Functions Buttons.
Note: To change any SIA records, you must first connect to the Panel and Upload all SIA commands.
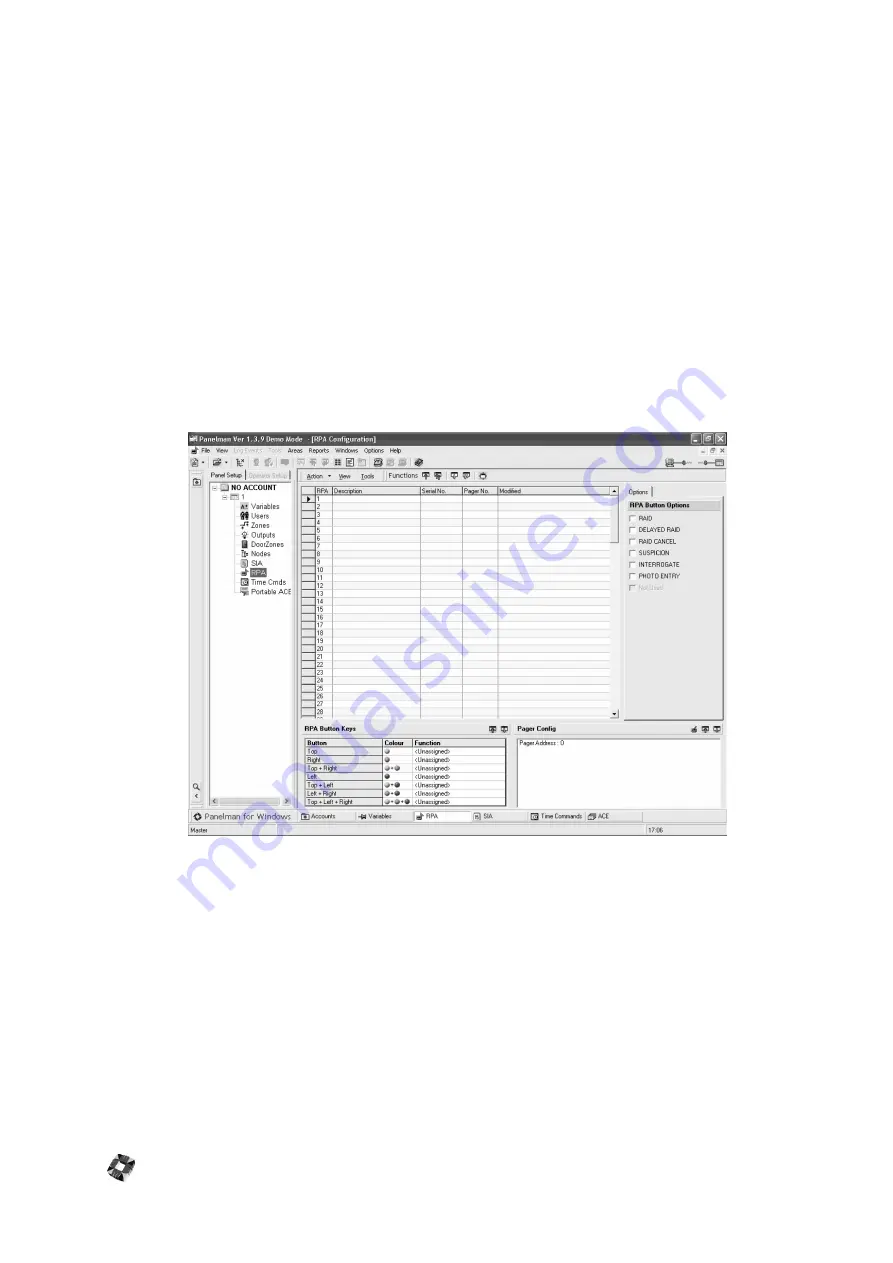
RPA Configuration Window
This Window allows you to assign RPA's to a Panel. To change RPA Description, Serial No. and Pager No. click in the
relevant text-boxes of the RPA to be modified and add required data. To assign RPA Button Options simply check
the relevant options required for each RPA under "RPA Button Options". Upload and Download Individual or All can
be performed by using the Functions Buttons.
Assigning RPA Button Keys: To Assign RPA button Keys, double click the relevant text-box under "Function" for the
relevant RPA Button. The following form will appear:
Select the button option required from drop-down list and click "Save" to assign this option to this button. Note that
two different RPA buttons (or combinations of buttons) cannot have the same option assigned. To download Button
options to Panel, click on "Download Button Assignment" button on the toolbar.
Setting Pager Address: Pager Address can be set by double clicking on "Pager Address: 0" in the "Pager Config" box,
or by clicking on the icon. This will bring up the following form:
Type in New Pager Address Number and click on "Save". To download this to Panel, click on the "Download Pager
Address" button on the toolbar.
Summary of Contents for 3GS
Page 4: ...Introduction iv...
Page 12: ...Introduction 8...
Page 14: ...1...
Page 18: ...System Overview 1 6...
Page 20: ......
Page 26: ......
Page 34: ......
Page 38: ...Intelligent PSUs 4 6...
Page 40: ......
Page 97: ...Issue 4 5 August 2005 Nodes 5 59...
Page 98: ...Issue 4 5 August 2005 Nodes 5 61...
Page 100: ......
Page 106: ...3GS Technical Manual...
Page 116: ...3GS Technical Manual 7 12 Programming Overview Issue 4 5 August 2005 3GS Initial Setup Menu...
Page 118: ...3GS Technical Manual...
Page 146: ...3GS Technical Manual Issue 4 5 August 2005 Programming Menus 8 31 Node Configure Inputs Menu...
Page 153: ...3GS Technical Manual Issue 4 5 August 2005 8 38 Programming Menus Service Mode Test Menu...
Page 155: ...3GS Technical Manual Issue 4 5 August 2005 8 40 Programming Menus Service Mode Monitor Menu...
Page 217: ...3GS Technical Manual Issue 4 5 August 2005 8 108 Programming Menus...
Page 218: ...3GS Technical Manual Issue 4 5 August 2005 Programming Menus 8 109...
Page 220: ......
Page 222: ...3GS Version 5 User Guide 9 5 3GS SYSTEM KEYPAD DISPLAY...
Page 254: ...3GS Version 5 User Guide 9 37 Some examples of Alert Messages...
Page 264: ......
Page 265: ...I n t h i s c h a p t e r HHT Overview 10 3 Main Menu 10 5 HAND HELD TERMINAL HHT 10...
Page 266: ......
Page 280: ......
Page 288: ......
Page 290: ......
Page 293: ...Issue 4 5 August 2005 DM1200 Digital Communicator Modem 12 5...
Page 302: ......
Page 304: ...Network Router 13 4 SAMPLE CONNECTION DIAGRAM SCENARIOS...
Page 308: ...Network Router 13 8...
Page 310: ......
Page 318: ......
Page 338: ...Issue 4 5 August 2005 Technical Specifications 15 23...
Page 340: ...1...
Page 346: ......
Page 366: ...17 22...
Page 367: ...I n t h i s c h a p t e r Introduction to CiTeC II 18 3 CITEC II INSTALLATION 18...
Page 368: ......
Page 370: ...CiTeC II Installation 18 4...
Page 377: ...Issue 4 5 August 2005 19 7...
Page 378: ...19 8...
Page 385: ......
Page 386: ......


