17 - 11
Assigning Literal Files to Installation
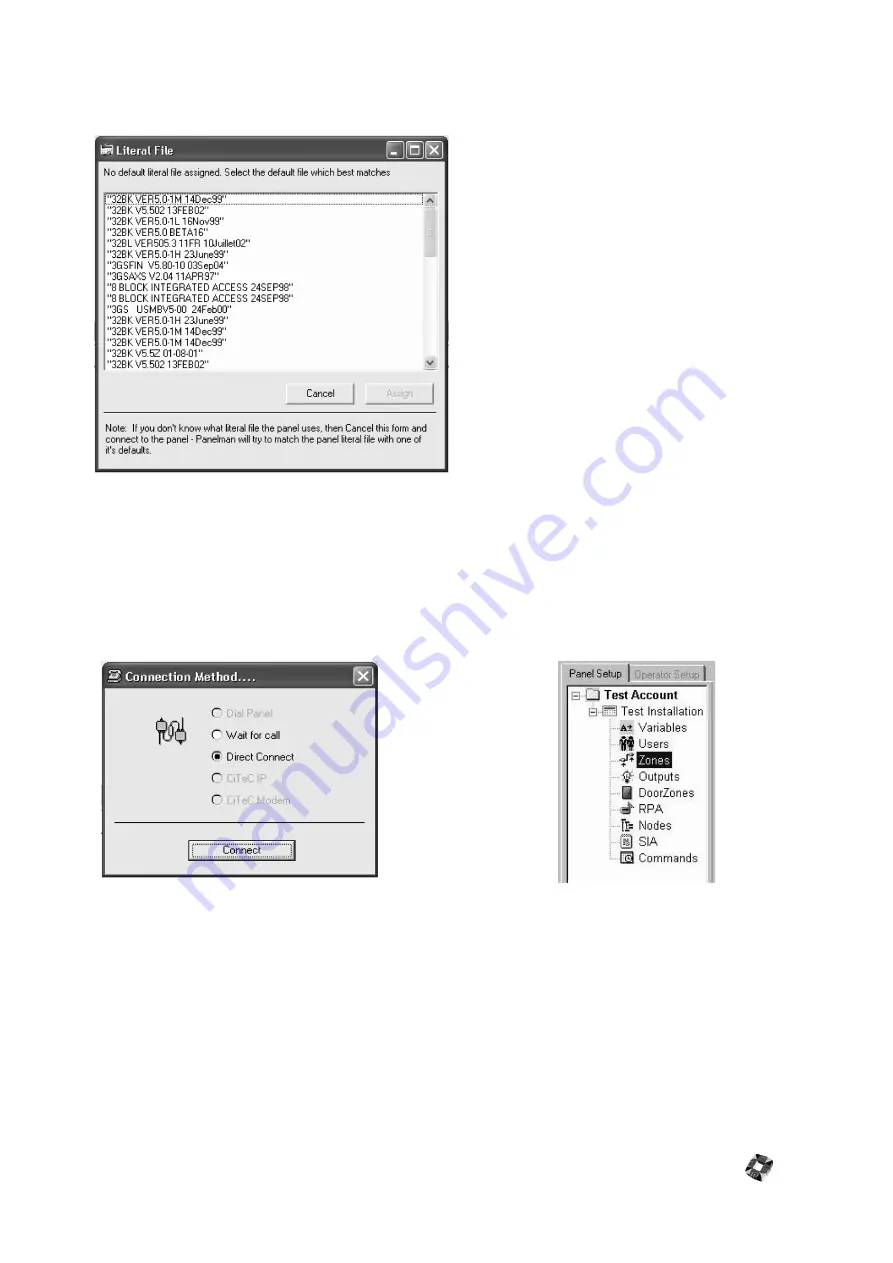
Once the installation has been loaded into Treeview, double-clicking it will bring up the following window:
Choose the default file that best matches the Panel
Software, highlight it by left clicking it, and Assign it by
clicking the "Assign" button.
Once this step has been completed successfully,
connection to the panel can now take place.
Alternatively, if you are unsure which default file best
matches the panel file, click "Cancel" on above form and
Connect to Panel. Panelman will then try to match the
panel literal file with one of it's defaults.
Connecting to the Panel
To connect to panel, highlight installation to be connected to by left-clicking it, then click the Connect icon in the
Toolbar. The connection method window (below left) will be displayed. Choose the Connection Method and then click
"Connect".
The Treeview can now be extended by double clicking the installation, or by clicking the "+" symbol beside the
installation name. The tree view will appear as shown above (right). Clicking now on Variables, Users, Zones etc. will
bring up the corresponding work windows. These are detailed in the Operation Windows section.
Working Offline
It is not necessary to connect to panel in order to configure an installation. The installation can be set up offline once a
default literal file has been assigned, and this information can be downloaded to the panel at a later time.
Note however that Node and SIA information cannot be altered offline. Connection must take place first and this
information must be uploaded from Panel.
Summary of Contents for 3GS
Page 4: ...Introduction iv...
Page 12: ...Introduction 8...
Page 14: ...1...
Page 18: ...System Overview 1 6...
Page 20: ......
Page 26: ......
Page 34: ......
Page 38: ...Intelligent PSUs 4 6...
Page 40: ......
Page 97: ...Issue 4 5 August 2005 Nodes 5 59...
Page 98: ...Issue 4 5 August 2005 Nodes 5 61...
Page 100: ......
Page 106: ...3GS Technical Manual...
Page 116: ...3GS Technical Manual 7 12 Programming Overview Issue 4 5 August 2005 3GS Initial Setup Menu...
Page 118: ...3GS Technical Manual...
Page 146: ...3GS Technical Manual Issue 4 5 August 2005 Programming Menus 8 31 Node Configure Inputs Menu...
Page 153: ...3GS Technical Manual Issue 4 5 August 2005 8 38 Programming Menus Service Mode Test Menu...
Page 155: ...3GS Technical Manual Issue 4 5 August 2005 8 40 Programming Menus Service Mode Monitor Menu...
Page 217: ...3GS Technical Manual Issue 4 5 August 2005 8 108 Programming Menus...
Page 218: ...3GS Technical Manual Issue 4 5 August 2005 Programming Menus 8 109...
Page 220: ......
Page 222: ...3GS Version 5 User Guide 9 5 3GS SYSTEM KEYPAD DISPLAY...
Page 254: ...3GS Version 5 User Guide 9 37 Some examples of Alert Messages...
Page 264: ......
Page 265: ...I n t h i s c h a p t e r HHT Overview 10 3 Main Menu 10 5 HAND HELD TERMINAL HHT 10...
Page 266: ......
Page 280: ......
Page 288: ......
Page 290: ......
Page 293: ...Issue 4 5 August 2005 DM1200 Digital Communicator Modem 12 5...
Page 302: ......
Page 304: ...Network Router 13 4 SAMPLE CONNECTION DIAGRAM SCENARIOS...
Page 308: ...Network Router 13 8...
Page 310: ......
Page 318: ......
Page 338: ...Issue 4 5 August 2005 Technical Specifications 15 23...
Page 340: ...1...
Page 346: ......
Page 366: ...17 22...
Page 367: ...I n t h i s c h a p t e r Introduction to CiTeC II 18 3 CITEC II INSTALLATION 18...
Page 368: ......
Page 370: ...CiTeC II Installation 18 4...
Page 377: ...Issue 4 5 August 2005 19 7...
Page 378: ...19 8...
Page 385: ......
Page 386: ......


