3GS Technical Manual
Issue 4.5 August 2005
8-6 Programming Menus
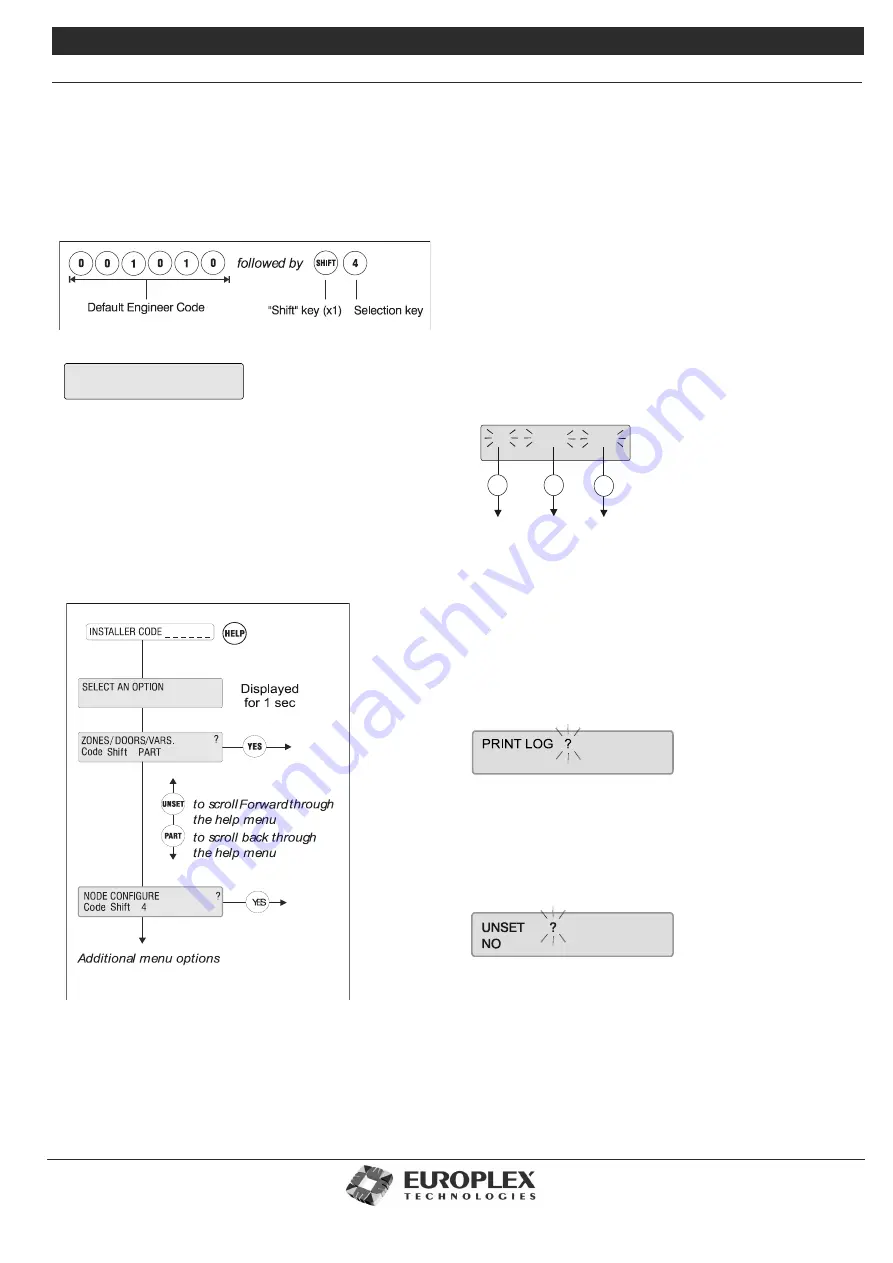
Direct access
You can select an option directly by entering its particular
code. For example, to select the Node Configure option,
enter the following:
For certain options, you need to press the SHIFT key twice
before pressing the selection key.
See “Installer Menu Options.” on page 8-9 and “Master
Menu Options” on page 8-10 for further information.
Help Menu Access
The Help menu allows you to scroll through all available
options using the following keys on the keypad:
• UNSET
to scroll forward through menu options.
• PART
to scroll back through menu options.
• YES
to select an option.
• NO
to exit the menu.
Only options which have been assigned to you are displayed.
You have 90 seconds in which to make a selection.
Scrolling Through Options
Use the following keys when viewing options that do not
require input:
• UNSET
to scroll forward.
• PART
to scroll back.
3 way Display Options
Certain displays will present three flashing sub-options. Sub-
option selection is determined by the option’s position on
the display:
•
The UNSET key selects the left option.
•
The HALF key selects the middle option.
•
The HELP key selects the right option.
Answering a Question
On the following display, the flashing “?” indicates that the
system is waiting for an answer:
Press YES or NO as required.
Pressing # (or any key other than YES) is interpreted as a NO
by the system.
In some cases, an option may be presented with YES or NO
displayed underneath, like this:
Select YES or NO as appropriate.
The system will automatically move to the next option.
When complete, press # to accept all data entered.
Entering Numerical Values
In a display where you have to enter a number, a flashing
NODE CONFIGURE
HALF
HELP
UNSET
ID.S OPTIONS NAMES
To select
Options
To select
IDs
To select
Names
Summary of Contents for 3GS
Page 4: ...Introduction iv...
Page 12: ...Introduction 8...
Page 14: ...1...
Page 18: ...System Overview 1 6...
Page 20: ......
Page 26: ......
Page 34: ......
Page 38: ...Intelligent PSUs 4 6...
Page 40: ......
Page 97: ...Issue 4 5 August 2005 Nodes 5 59...
Page 98: ...Issue 4 5 August 2005 Nodes 5 61...
Page 100: ......
Page 106: ...3GS Technical Manual...
Page 116: ...3GS Technical Manual 7 12 Programming Overview Issue 4 5 August 2005 3GS Initial Setup Menu...
Page 118: ...3GS Technical Manual...
Page 146: ...3GS Technical Manual Issue 4 5 August 2005 Programming Menus 8 31 Node Configure Inputs Menu...
Page 153: ...3GS Technical Manual Issue 4 5 August 2005 8 38 Programming Menus Service Mode Test Menu...
Page 155: ...3GS Technical Manual Issue 4 5 August 2005 8 40 Programming Menus Service Mode Monitor Menu...
Page 217: ...3GS Technical Manual Issue 4 5 August 2005 8 108 Programming Menus...
Page 218: ...3GS Technical Manual Issue 4 5 August 2005 Programming Menus 8 109...
Page 220: ......
Page 222: ...3GS Version 5 User Guide 9 5 3GS SYSTEM KEYPAD DISPLAY...
Page 254: ...3GS Version 5 User Guide 9 37 Some examples of Alert Messages...
Page 264: ......
Page 265: ...I n t h i s c h a p t e r HHT Overview 10 3 Main Menu 10 5 HAND HELD TERMINAL HHT 10...
Page 266: ......
Page 280: ......
Page 288: ......
Page 290: ......
Page 293: ...Issue 4 5 August 2005 DM1200 Digital Communicator Modem 12 5...
Page 302: ......
Page 304: ...Network Router 13 4 SAMPLE CONNECTION DIAGRAM SCENARIOS...
Page 308: ...Network Router 13 8...
Page 310: ......
Page 318: ......
Page 338: ...Issue 4 5 August 2005 Technical Specifications 15 23...
Page 340: ...1...
Page 346: ......
Page 366: ...17 22...
Page 367: ...I n t h i s c h a p t e r Introduction to CiTeC II 18 3 CITEC II INSTALLATION 18...
Page 368: ......
Page 370: ...CiTeC II Installation 18 4...
Page 377: ...Issue 4 5 August 2005 19 7...
Page 378: ...19 8...
Page 385: ......
Page 386: ......


