background image

Installation Instructions for Wi-Q™ Technology 45HQ Mortise Locks

BEST

a Product Group of dormakaba USA Inc.

11

Installation Instructions for Wi-Q™ Technology 45HQ Mortise Locks

Completing the installation

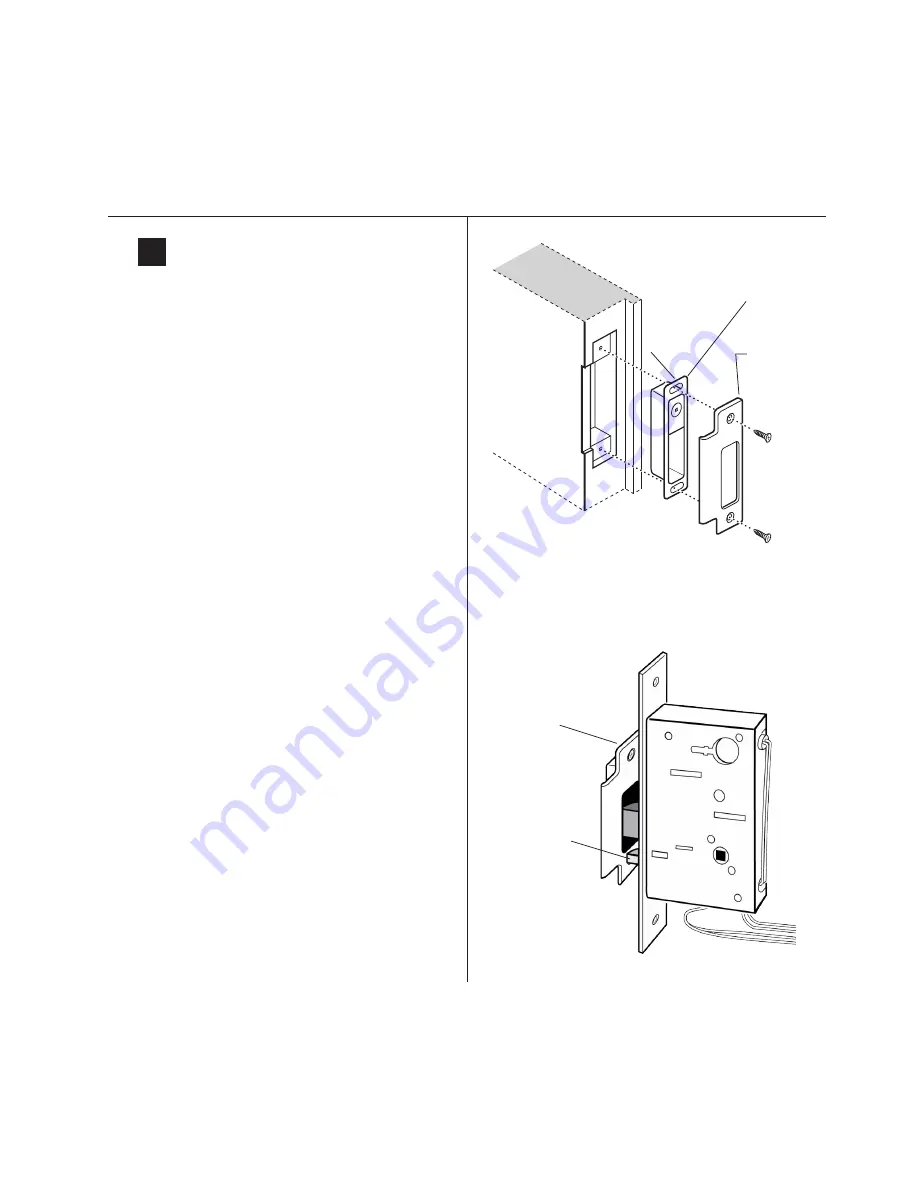
Figure 19b


Positioning the strike

19

Install strike box and strike plate

1  Insert the strike box into the mortise in the door 

jamb. Place the strike plate over the strike box and 

secure the strike with the screws provided.

2  Check the position of the auxiliary bolt against the 

strike plate.

Caution:  The auxiliary bolt must make contact 

with the strike plate. The auxiliary bolt dead-

locks the latchbolt and prevents someone from 

forcing the latch open when the door is closed. 

If the incorrect strike is installed, a lock-in can 

occur.
Note: 

The recommended gap between the door and 

jamb is 1/8



 Figure 19a Installing the strike box and strike plate

Strike 

box with 

magnet

Strike 

plate

Door jamb

Make sure to 

position the 

magnet at 

the top.

Strike plate

Auxiliary bolt

Summary of Contents for BEST Wi-Q ONGUARD

Page 1: ...Wireless Intelligence That Stands Alone Wireless Intelligence That Stands Alone BEST WI Q ONGUARD I N T E R F A C E U S E R G U I D E ...

Page 2: ... form or by any means electronic or mechanical including photocopying recording or information storage and retrieval systems for any purpose without the express written permission of dormakaba USA Inc This document is distributed as is without warranty of any kind either express or implied respecting the contents of this book including but not limited to implied warranties for the publication s qu...

Page 3: ...ry to correct the interference by taking one or more of the following measures Reorient or relocate the receiving antenna Increase the separation between the equipment and receiver Connect the equipment into an outlet on a circuit different from that to which the receiver is connected Consult the dealer or an experienced radio TV technician for help THIS DEVICE COMPLIES WITH INDUSTRY CANADA LICENC...

Page 4: ...tennas are listed below and antennas not included in this list are strictly prohibited for use with these devices UL Evaluation Not evaluated by UL for use with Mercury Controller Board or Wireless Door Controller Evaluated by UL for supplemental use i e not in the path of the access control decision making between the Listed Access Control Equipment and a supplemental monitoring station for monit...

Page 5: ...roduct is not intended for outside wiring as covered by Article 800 in the National Electrical Code NFPA 70 Category 5e cabling is the minimum performance category recommended The minimum conductor gauge permitted to connect between the PSE or power injector and the PD shall be 26 AWG 0 13 mm2 for patch cords 24 AWG 0 21 mm2 for horizontal or riser cable Connected through standard eight pin RJ 45 ...

Page 6: ...ardware Task 8 29 Sign on Controllers Task 9 32 3 Software Installation Gather and Organize Segment Data Task 3 36 Prepare Your Computer Task 4 37 Install Wi Q Interface Software Task 5 51 4 Software Configuration and Use Wi Q Interface Configuration Tool Overview 66 Configure Wi Q Gateways Task 6 67 Configure Software Task 10 70 Firmware Updates 98 5 Advanced Troubleshooting Status Flags in the F...

Page 7: ...A Glossary Glossary 109 B Lock Installation Lock Installation 113 ...

Page 8: ...The information in this guide is presented in a linear manner however tasks to install hardware and software and configure the system for the first time do not necessarily progress in a linear manner You will find a Setup Checklist at the end of this section to take you through the initial setup and configuration tasks in a logical sequence If you are unfamiliar with the terms used in wireless tec...

Page 9: ...y and 4 a Wireless Controller at the door Figure 1 is a simple diagram showing these four components Figure 1 Four Basic Components 1 Server with System Software Existing systems and operators can continue to work with OnGuard as normal to control Wi Q wireless components Note The System Software must be installed and operational prior to the installation and operation of the Wi Q components 2 Wi ...

Page 10: ...asic Operation The system works very simply A user enters a pass code at a Wireless Controller either using an access card or by entering a code on a keypad If the controller recognizes the credential from the configured settings downloaded from the Host via the Wi Q Gateway to the controller the door opens The controller also sends regular signals beacons to the Wi Q to let it know that it s work...

Page 11: ... Some tasks are performed at the Host computer and some at the segment site It is appropriate to perform some tasks concurrently For example you may have someone prepare your computer and install the software concurrently with site plan development and hardware installation However you must have the software installed and Wi Q Gateways online before you can sign on controllers Note System setup do...

Page 12: ...12 Task 7 Install Wi Q Gateways See page 25 Task 8 Install Door Hardware See page 29 Task 9 Sign on Controllers See page 32 Task 10 Configure Software See page 70 ...

Page 13: ...ftware Therefore it is appropriate to install Wi Q Interface Software before or concurrent with hardware installation For more information see Sign on Controllers Task 9 on page 32 Figure 2 is a block diagram showing various configurations Wi Q Interface supports all Wi Q Technology Wireless Controllers via Wi Q Gateways A and existing Prox Wiegand RQE door strike and door monitor switch configura...

Page 14: ...er s All communications are via secure AES 128 Bit encrypted 2 4 HGz using spread spectrum RF Radio technology The Wi Q Gateway communicates to the host computer through web services via either Ethernet 10 100 BaseT or an approved commercial RF carrier enabling a wireless solution end to end Transmit range from Wi Q Gateways will vary based on building construction Directional antennas are also av...

Page 15: ...llers You can also use this device to connect other I O devices to the system About the size of a standard double gang box electrical box these controllers operate on standard 12V DC or an optional 12 24 V DC power supply sealed lead acid battery pack They seamlessly integrate existing door hardware into the Wi Q Interface system supporting Wiegand compatible keypad controller inputs Note Please c...

Page 16: ...d supplied in the Wi Q Interface Software package You will also need the appropriate magnetic stripe or proximity USB enrollment reader to create a proximity sign on credential Locksets to be installed on doors including cores and keys supplied with specific model Installation instructions for specific lockset brand and model Wi Q Gateways Access to standby power for 120 VAC non switch circuit for...

Page 17: ...iguration The Host A is located in Building 1 The Building 1 Wi Q Gateway B is located near the electrical panel in the communications electronics room The Building 2 Wi Q Gateway C is positioned next to the electrical panel With 48 rooms in this three story dorm front and rear access doors and access to the elevator on three floors this gateway provides coverage to 53 controllers Its range extend...

Page 18: ...orm Rooms 101 148 Double Occupancy 96 Students 200 ft 102 103 104 105 106 107 108 109 101 110 111 112 113 114 115 116 Parking Garage Stair Elevators Wi Q Gateway D 50 ft Building 1 Lecture 1 Admin 6 Staff Lecture 2 Housekeeping 10 Staff B A 250 ft Host Electrical Panel Box 150 ft Wi Q Gateway ...

Page 19: ...We recommend creating a temporary label for each device that includes the MAC address device name location capacity and type of antenna so that installers on the site will have a reference for installing the correct device in a location Interference Wi Q Technology transfers information between devices in the form of data packets over the 2 4 GHz ISM band This band frequency is very heavily used i...

Page 20: ...ength and packet ratio transfer ratio Using the Wi Q Gateway for a Stand alone Site Survey The Wi Q Gateway can be used standalone without an ACS to perform a Site Survey to determine the Gateway antenna placement in approximation to the Wi Q Controllers and the number of Gateway s needed for adequate coverage as well as troubleshooting signal and packet transfer ratio issues Using a Wireless Smar...

Page 21: ...back in and return to the Survey Mode page to perform Standalone Survey Mode operations 8 The Current Sign on Key field will fill with a 6 dig it sign on key 987654 to sign a demo reader onto the Gateway 9 Noting the Gateway s sign on key sign on the Wi Q Con troller s with a keypad On the keypad enter 5 6 7 8 immediately fol lowed by the 6 digit sign on key in the segment tab The LED s on the WDC...

Page 22: ...tal RSSI value is below the limit please reposition the Gateway or the antennas to improve signal strength It may also be possible that another Wi Q Gateway is required for adequate coverage Reader Signal Strength The Reader RSSI value indicates how well the reader is receiving signal from the Wi Q Gateway and should be at least 65dB or better denoted on the chart with the red dashed line If the R...

Page 23: ...less environment and the placement of the Gateway and its antennas during planning The Gateway communicates on the 2 4 GHz frequency using the ZigBee channels If the location has other wireless devices or networking using the 2 4 frequency please orient the antennas away from these devices to manage interference It may be required to work with local personnel to manage the wireless environment to ...

Page 24: ... from a transformer plugged into a dedicated power source If this is not possible ensure they are plugged in to a 24 7 power circuit than cannot be turned off at a switch such as a light switch that might be turned off by a cleaning crew Wi Q Gateways may also be powered with PoE instead of using the AC wall adapter To make your final determination you must also consider the following Access to Et...

Page 25: ...mmon installation site is inside an existing protected area such as a locked room or other secure enclosure or above ceiling level If you are installing inside a dealer supplied locked enclosure refer to the instructions provided with that equipment Figure 7 shows a Wi Q Gateway positioned in a protected area Figure 7 Installing a Wi Q Gateway in a protected area Approx 5 6 High eye level Wi Q Gat...

Page 26: ...all outlet if power over Ethernet is unavailable see Figure 8 2 Insert the Ethernet cable into the Ethernet connection on the bottom of the Gateway see Figure 8 The link status light at the top of the Gateway will flash red while the Gateway is booting When it flashes green it is ready to be configured Please see the table below for a complete list of the various LED indications and what they mean...

Page 27: ... be obsolete or unable to handle additional controller inputs It supports Wiegand compatible keypad controllers and is configured and monitored in the Wi Q Interface Software just like a standard controller Note Please check with your dormakaba representative for a list of compatible controllers Using the Wireless Access Controller Figure Wireless Access Controller on page 28 you can add controlle...

Page 28: ...or or protected area For other applications such as outdoor use contact the factory for the appropriate NEMA enclosure Changes or modifications not expressly approved by dormakaba could void the user s authority to operate the equipment Wireless Access Control Wiring The Wireless Access Controller WAC can be installed with its own 12 VDC power supply or slaved to the existing installation Figure 1...

Page 29: ...structions for installing locks are packaged with the hardware You will also find instructions for BEST Wi Q Technology BEST 45HQ Mortise locks BEST 9KQ Cylindrical Locks and BEST EXQ Trim as Appendices to this manual Before You Begin Before you begin take a few moments to review the following considerations Record device MAC address before installing device You will need this when configuring the...

Page 30: ... the steps appropriate for your controller type Magnetic Card Proximity Card or dual validation with keypad If the system does not operate properly see Troubleshooting at the end of the section Magnetic Card Check If your system has a magnetic card reader mag card you will need the Temporary Operator Card supplied with the controller and Sign on Card supplied in the Wi Q Interface Software package...

Page 31: ... Keypad Check If your Wi Q Technology controller is a keypad type perform the following steps 1 At the keypad enter the default Programmer ID 1234 The green light on top of the card reader will flash once and the lock will unlock then during the open delay time it will flash green five times Once this occurs the controller red light will flash and the lock will relock 2 While unlocked check for pr...

Page 32: ...d sign on the controllers To complete controller sign on you must perform steps at the Host and the controllers At the Host Once you have installed Wi Q Interface Configuration Tool and created a segment a sign on key number is generated You will need this number when you return to the site and sign on the controllers Table 3 Troubleshooting EXQ Exit Hardware Trim LEDs Sounder You should Single re...

Page 33: ...he controllers will appear in the Wi Q Interface Hardware Segment tree and Controllers tab Note The following sequence is timed Be sure to have your segment sign on key ready to enter at the appropriate time 1 Have your six digit segment sign on key number ready 2 At a keypad controller press the following number sequence on the keypad 5678 Wireless Door Controller or 5678 WAC The green light will...

Page 34: ...ard to sign on each card reader in the system Verify Signal Strength Voltage and Packet Transfer Ratio If you used the Wi Q Technology Site Survey Kit you have already verified basic controller signal strength Once the controllers are signed on you can use the Alarm Monitoring application to further measure controller performance including controller voltage battery level and the packet ratio the ...

Page 35: ...35 This chapter will guide you through performing the following tasks Task 3 Gather and Organize Segment Data Task 4 Prepare your Computer Task 5 Install Wi Q Interface Software 3 Software Installation ...

Page 36: ...on about each user such as User Type User Group Shift and so on Following is a very simple example What User Groups will help you manage security Do you have shift workers who are allowed on site only during certain days or hours Will there be areas off limits to certain groups Do some users need extra time to pass through a door such as to accommodate a food cart or wheel chair Start thinking abo...

Page 37: ...ting system database and server Configure your Windows Firewall Ports Obtain your Wi Q Gateway Accessory Add On Stop your Communication Server if required Install your Wi Q Gateway Accessory Add On It is recommended that you follow the tasks above in the order that they are presented in this guide Note You must have administrative rights on your computer to perform many of the tasks listed here ...

Page 38: ...Windows Firewall Ports Several ports must be enabled in your Windows firewall settings to allow proper communication in the Wi Q Interface The following ports must be enabled Port 80 Port 443 Port 1433 Port 1434 Port 8000 Port 5353 If your firewall is disabled then all ports are open by default If the firewall is on perform the following steps in order to add the required ports listed above Elemen...

Page 39: ...ough the firewall settings in other editions of Windows will be slightly different 1 Navigate to your Windows Firewall settings from your PC s control panel See Figure 12 Then click on Advanced settings Figure 12 Windows Firewall Navigate to Windows Firewall Click on Advanced settings ...

Page 40: ...40 2 Select Inbound Rules Figure 13 Inbound Rules Select Inbound Rules ...

Page 41: ...41 3 Right click on Inbound Rules to open an option menu Select New Rule from the menu Figure 14 New Rule Select New Rule ...

Page 42: ...42 4 In the New Inbound Rule Wizard window select Port Click Next to continue Figure 15 Create Port Rule Select Port Click Next ...

Page 43: ...43 5 Enter the following ports into the Specific local posts field 80 443 1433 1434 8000 5353 Then click Next to continue Figure 16 Enter Ports Ports 80 443 1433 1434 8000 5353 Click Next ...

Page 44: ...44 6 Select Allow the connection Click Next to continue See Figure 17 Figure 17 Allow the Connection ...

Page 45: ...45 7 De select the Public option Click Next Figure 18 De select Public ...

Page 46: ...46 8 Give the new rule a name that can be easily identified by an administrator Once finished click Finish See Figure 19 Figure 19 Name the Rule ...

Page 47: ...On Before you can install the Wi Q Interface software you must obtain a BEST Wi Q Gateway Accessory Add On from dormakaba Technical Support s secure file share available to all Wi Q Certified technicians This package contains necessary add on components that enable BEST Wi Q Gateway support Contact dormakaba Technical Support directly at dhw support us dormakaba com ...

Page 48: ...e 21 Figure 21 Navigate to Services Next locate LS Communication Server in the list of services Figure 22 If the Status column reads as Started right click on the line and select Stop This step will be followed only when the LS Communication Server is run as a Service Figure 22 Stop Communication Server Navigate to Administrative Tools Click to Open Services ...

Page 49: ...rt Double click to install 2 The Accessory Add On InstallShield Wizard will open Read the license agreement carefully then click Next See Figure 23 Figure 23 Accessory Add On InstallShield Wizard 3 The Add On package will begin to install 4 Next you will be prompted to input the Login ID and password The default case sensitive Login ID and password are Login ID LENEL Password MULTIMEDIA or Secur1t...

Page 50: ...ST Wi Q Interface must be installed next Click OK See Figure 25 Figure 25 Accessory Add On Installation Reminder 6 The InstallShield Wizard should now be complete Click Finish to exit the wizard See Figure 26 Figure 26 Accessory Add On Installation Complete Click OK Click Finish ...

Page 51: ...less Controllers and run Firmware Updates BEST Wi Q Interface Database Contains the tables that are installed within the Access Control Database that are used by the Wi Q Interface and Wi Q Interface Configuration Tool Once the software is installed you can access this application from the Windows Start Menu Perform the following steps to install the Wi Q Interface Software 1 If you have not alrea...

Page 52: ...52 Figure 27 Wi Q Interface Setup Wizard Click Next ...

Page 53: ...se agreement then press Next Figure 28 Figure 28 Wi Q Interface License Agreement 5 In the Database server that you are installing to field enter the computer name of your Server Figure 29 Item A If needed you may browse to the server by selecting Browse Click to accept terms of license agreement Click Next ...

Page 54: ...ee Item C If needed you may browse to the database name by selecting Browse 8 Click Next Figure 29 Item D Note If you receive an error message like Figure 30 there may be an error in your database server information Click OK correct your information as needed and press Next to continue If you receive the error message again and you have verified that all of your information is correct contact dorm...

Page 55: ...Figure 31 Selecting Complete will install the BEST Wi Q Interface the BEST Wi Q Interface Configuration Tool and the BEST Wi Q Interface Database Selecting Custom will allow you to choose which components to install Once you ve made your selection press Next to continue Figure 31 Choose Setup Type ...

Page 56: ... Custom Setup Figure 32 Custom Setup Clicking on the icons to the left of each component will bring up installation options Figure 33 If you decide on a Custom Setup you must select an installation option for each component Then click Next to continue Click Next ...

Page 57: ...57 Figure 33 Custom Setup Options Click Next ...

Page 58: ...58 10 The wizard is now ready to begin installation Click Install Figure 34 Begin Installation Click Install ...

Page 59: ...Wi Q Gateways on the network Click Next to begin installing Bonjour Note If performing a Custom Setup Bonjour will only be installed if the Wi Q Interface Configuration Tool is being installed Figure 35 Bonjour Print Services Installer 12 Read the License Agreement To continue with the installation click on I accept the terms in the license agreement then press Next Click Next ...

Page 60: ...60 Figure 36 Bonjour Print Services License Agreement 13 Read the information about Bonjour Print Services Then press Next Click to accept terms of license agreement Click Next ...

Page 61: ...nt Services Information 14 In the Installation Options section decide whether or not to create a desktop shortcut and or schedule automatic updates for Bonjour Choose your destination folder and then select Install Click Next ...

Page 62: ...62 Figure 38 Bonjour Installation Options 15 Once the Bonjour Print Services Installation is complete press Finish Click Install ...

Page 63: ...63 Figure 39 Bonjour Print Services Installation Complete 16 The Wi Q Interface components now begin to install Once installation is complete press Finish Click Finish ...

Page 64: ...64 Figure 40 Wi Q Interface Installation Complete 17 You may now start up your Communication Server again See Stop Communication Server on page 48 for more information on how to access it Click Finish ...

Page 65: ...r will guide you through Task 6 Configure Wi Q Gateways and Task 10 Configure Software and Firmware Updates It will also provide a useful term comparison chart for events and transactions in Alarm Monitoring and the Wi Q Interface Configuration Tool ...

Page 66: ...dropdown Contains two options 1 Wi Q Gateways and 2 Firmware Reprogram The Portals tool is used to add and configure Wi Q gateways The Firmware Reprogram tool is used to send firmware updates to your wireless hardware 3 Segments tree Provides a visual representation of which Wi Q Gateways are associated with which segment and which Wireless Controllers are associated with which Wi Q Gateways Right...

Page 67: ...webpage can be accessed with IP address 192 168 3 200 for configuration only when connected to gateway WiFi When configuring a Wi Q Gateway it is best to connect directly to the Wi Q Gateway before placing it on the network This removes the possibility of duplicate IP addresses on the network Note You will need to create and reserve a range of IP addresses for your Wi Q Gateways before proceeding ...

Page 68: ...68 Figure 42 Configure Wi Q Gateway 3 The Portal Configuration window lists the BEST Wi Q Gateways on the network Figure 43 Portal Configuration Tool Hardware Config ...

Page 69: ...ool with PG 5 At this point you may change the IP address from the factory setting to one from the range you ve created Select Update IP Configuration button and change the Portal Config Service port to 8000 click OK button Figure 45 Update IP Address Update IP Configuration ...

Page 70: ...he order presented here 1 Add Wi Q Gateways as Access Panels in OnGuard 2 For Wireless Card Readers only Add Segment Sign on Credentials in Wi Q Interface Configuration Tool 3 Add signed on Wireless Controllers to Readers and Doors 4 Configure Wi Q Gateways and Controllers in Wi Q Interface Configuration Tool Also in this section you will find additional notes for configuring Cardholder Options Ca...

Page 71: ...istration User Guide Note A Access Panel corresponds to a single BEST Wi Q Gateway By default in OnGuard the controller capacity is set to 64 controllers 1 Open System Administration and navigate to the Access Panels module Access Control Access Panels 2 Click on the Other tab then click Add Figure 47 Figure 47 Add Access Panel 3 In the Name field type a unique name for your Wi Q Gateway Figure 48...

Page 72: ...Set the Address field to a number between 0 and 7 6 From the Access Panel Type dropdown list select BEST Wi Q Gateway 7 Next click on the Access Panels Connection tab 8 Select LAN and enter the unique IP address of the Wi Q Gateway See Figure 49 Figure 49 Access Panels Connection Tab 3 4 5 6 7 8 9 ...

Page 73: ...Ns longer than 6 digits Figure 50 Access Panels Options Tab 12 Then click OK Once you have created Access Panels in OnGuard to match the Wi Q Gateways that you configured in the Wi Q Interface Configuration Tool and your Wi Q Gateways are on the network the Wi Q Gateways will become visible in the Segments Tree and Portals tab of the Wi Q Interface Configuration Tool See Portals Tab on page 78 11 ...

Page 74: ... are no limitations to the number of segments Note The option to delete a segment from the Segment tree becomes available when you right click from within the tree Figure 51 Segments Tree For each segment the Wi Q Interface Configuration Tool creates a unique Segment Sign On Key that is used to sign Wireless Controllers onto a segment This Sign On Key is used when signing on Wireless keypad contro...

Page 75: ...75 To add a new Sign On Credential 1 Select Add Figure 52 Add Segment Sign On Credential 1 ...

Page 76: ... 5 Enter an issue code in the Issue Level field if applicable 6 If needed check the Enforce Expiration checkbox to enforce an expiration date 7 Select Save This will trigger your Wi Q Gateway s to download the saved information To sign on your card readers see Sign on Controllers Task 9 on page 32 Once you ve signed on your Wireless Controllers they will be visible in the Wi Q Interface Configurat...

Page 77: ...r Controller The name must contain the MAC Address of the Controller within parenthesis For example Upstairs IT Closet 123456780006 2 From the Panel dropdown select the Wi Q Gateway to which the Controller is being assigned 3 From the Type dropdown select Generic Reader 4 From the Port dropdown select a unique port number if needed 5 In the Address field provide a unique address if needed 6 In the...

Page 78: ...uration Tool Portals Tab The Portals List tab displays a list of BEST Wi Q Gateways along with their MAC address and current firmware version Figure 55 The Status Legend Item A shows the two levels of configuration that exist for Wi Q Gateways 1 Configured but parametrics NOT retrieved 2 Configured and parametrics retrieved Clicking the checkboxes next to the icons in the Status Legend will displa...

Page 79: ...tion about it in the Details tab Figure 56 Figure 56 Portals Detail Tab The Details box Item A displays the selected Wi Q Gateway s Firmware version Model number Controller Capacity MAC Address and Panel ID Clicking on Edit Item B will open the Channel Selection window Figure 57 A B ...

Page 80: ...nels selected for the Wi Q Gateway must be enabled for the Controller as well Channels 25 and 26 are selected by default If you change the channel configuration select Save to trigger the interface to send the updated information to your wireless hardware ...

Page 81: ...ing the checkboxes next to the icons in the Status Legend will display Controllers matching those configurations in the Controllers list Item B below Note Controllers are locked to a Wi Q Gateway the first time they are signed into the system They can be forced to another Wi Q Gateway using the Wi Q Interface Configuration Tool if needed See Moving a Controller to a Different Wi Q Gateway on page ...

Page 82: ...prioritized The Enabled column enables disables the transaction at the controller level so if the checkbox is not checked transactions of that type will not be sent The Priority column enables disables the transaction priority which indicates whether or not the transaction is sent immediately or on the next beacon cycle For a comparison chart of terms used here and in Alarm Monitoring see Events T...

Page 83: ...to unlock the door when the first valid badge is presented to the controller If you enable this feature it must also be enabled in Readers and Doors See Add Signed On Wireless Controllers to Readers and Doors on page 77 Selecting Edit Item F opens the Channel Selection window Figure 60 Figure 60 Controllers Channel Selection Window The channels selected for the controller must be enabled at the Wi...

Page 84: ...he Wi Q Gateway Controller Unlock Association with Wi Q Gateway Unlocks the Controller from the Wi Q Gateway to which it is currently assigned This option does not automatically remove it from the Wi Q Gateway Controller Lock Association with Wi Q Gateway Locks a Controller to a Wi Q Gateway Selecting this option will bring up a Wi Q Gateway dropdown list Moving a Controller to a Different Wi Q Ga...

Page 85: ...ateway to a Different Segment If you need to move a Wi Q Gateway to a different Segment perform the following steps in System Administration 1 Make sure that you have segmentation enabled in Administration Segments Segment Options 2 Add additional segments as needed See the System Administration User Guide for more information on adding segments 3 In the Access Panels module navigate to the Wi Q G...

Page 86: ...ment and select the segment to which the Wi Q Gateway must be moved See Figure 61 Figure 61 Change Segment 8 Check the Online checkbox again so that the Wi Q Gateway will go back online 9 When finished click OK Change Segment ...

Page 87: ...n information for System Administration Cardholder Options Figure 62 Cardholder Options Due to the translation of badges and PINs between OnGuard and Wi Q you must select the Unique Pin Code option Figure 62 Item 1 If Allow Edit of PIN Code is enabled Item 2 see Changing PIN values on page 93 1 2 ...

Page 88: ...e will recognize them as Wiegand format cards All card formats supported by Wi Q hardware must have IDs that range between 1 and 8 Wi Q card formats match standard card formats See the System Administration User Guide for more information on Card Formats If you need to add a new Magnetic card format or modify an existing one for your Wi Q hardware in your existing OnGuard system make sure to provi...

Page 89: ...r application 2 Facility Code Add your facility code 3 Total Characters on Track X Set this to the number of characters on the given track Note This field corresponds with the track number in the Access Control Track field 4 Field Length and Field Order Fill in these fields for Facility Code Card Number and Issue Code ...

Page 90: ...rmation Figure 64 Figure 64 Wiegand Type Card Format Configuration 1 Name Provide a unique name for your application 2 Total Number of Bits on Card Change this field to the number of bits used 3 Starting Bit and Number of Bits Fill in these fields for Facility Code and Card Number Note A Starting Bit offset is not required 4 Issue Code This field is not supported by Wi Q hardware 1 2 3 4 ...

Page 91: ... Guide for more information on setting up Timezones Figure 65 Timezones 1 End OnGuard only allows hours and minutes to be set The Wi Q Interface appends 0 seconds to the start and end times with the exception of 23 59 which translates to 24 00 00 1 ...

Page 92: ...ser Guide for more information on timezone reader modes Figure 66 Timezone Reader Modes 1 End Reader Mode This feature is not supported by Wi Q Interface The controller will default back to the online reader mode set in the Readers and Doors configuration 1 ...

Page 93: ... the old PIN removed from the controller 1 Navigate to the Cardholders screen in System Administration See Figure 67 Select the Badge tab and click Modify for the badge on which you re changing the PIN 2 From the Status dropdown list select Lost Then click OK This will trigger a Delete Badge event and remove the badge from all associated controllers You must wait for an Updated Credential Paramete...

Page 94: ...llers Note You must change the PIN value before you click OK Failure to do so will cause the old PIN to be sent back to the controllers Segments See the System Administration User Guide for more information on segments Figure 68 Segments The boxes checked in Figure 68 are the only configurations supported by BEST Wi Q Other configurations may yield unexpected system behavior ...

Page 95: ...his option is available when right clicking on a Controller or Wi Q Gateway in the System Status Tree Update Hardware Status will retrieve the current status of the selected Wi Q Gateway or Controller online or offline and it will retrieve the current access mode of the selected Controller 2 Reader Access Modes Selecting a Reader Access Mode in Alarm Monitoring will override the Controller s acces...

Page 96: ... REX or shunt Net Connect Attempt Sign on attempt Network connection was attempted 5678 or card Net Connect Pass Sign on success Controller associated with portal Set Clock Set Clock The date and time have been set at the controller This is determined by the communication server s date and time Anti Tamper Anti Tamper Maximum invalid attempts 6 has been reached Valid Remote Access Remote Entry Rem...

Page 97: ...ge Disabled Access Level Disabled Group Access level changed Update User Parameters Updated credential parameters This unit has updated its Users Update Facility Parameters Updated segment information The unit has received the segment information Update Timezones Updated timezones This unit has updated its Timezones Update Input Points Updated I O This unit has updated its I O Update Card Formats ...

Page 98: ...ration date on credential ged ged Users segment information Timezones I O Formats Controller Configuration been updated g alarm m alarm mportance level of normal mportance level of warning mportance level of alarm vised input is faulted ervised input is faulted Wi Q Event Transaction Comparison Event Name Wi Q Transaction Name Generic Message Text Description REX Supervision Fault Request To Exit ...

Page 99: ... name version number and device type are automatically populated Note The version number of a Wi Q Gateway firmware file is visible in the path to the file 3 Provide a unique description of the firmware file in the Description field If you are uploading a Controller firmware file it is recommended that you build either Boot or Application into your description name depending on the file type 4 Cli...

Page 100: ...th the latest firmware files Perform the following steps 1 Inside the Configuration Tool click on Hardware Config at the top left of the screen and select Firmware Reprogram See Figure 71 Figure 71 Navigate to Firmware Reprogram 2 The following message will pop up to remind you that your Wi Q Gateways must be turned offline in OnGuard If you have not done so already mark them offline and confirm t...

Page 101: ...ent firmware version See Figure 73 Figure 73 Firmware Reprogram 4 If you are reprogramming a Wi Q Gateway select the Portal and click Reprogram You may reprogram multiple Portals simultaneously but you must select them individually and click on Reprogram for each one If you are reprogramming a Controller select the Portal that your Controller is associated with and click Get Controllers A list of ...

Page 102: ... 5 A window will pop up with a dropdown list of available firmware files Select your file and press OK Note If you are reprogramming both the Bootloader and Application files on a Controller you must update the Bootloader file first 6 Hardware reprogramming can take between three and five minutes Wi Q Gateway update progress is visible in the Portal State section Controller update progress and sta...

Page 103: ...c Wi Q Gateway in one of two ways Inside the Portal Configuration Module locate the desired Portal in the list and click on its hyperlink See Figure 44 on page 69 Type your desired Wi Q Gateway s IP address directly into your internet browser Your browser will display the status of your Wi Q Gateway and associated devices See Figure 74 on page 104 ...

Page 104: ...st time Wi Q Gateway was reset or rebooted 2 Radio and Channel Shows the channel associated with each radio in the Wi Q Gateway 3 a Associated Controllers on Gateway in the Details section b Wireless Controllers section will display the complete details of associated controllers Shows which devices are associated with the Wi Q Gateway 4 MAC Address Column shows the MAC Address of the Wi Q Gateway ...

Page 105: ...Wi Q Gateway This signal strength ranges from 18 highest to 91 lowest 11 Reader RSSI Column shows the signal strength of the Wi Q Gateway as received at the Controller This signal strength ranges from 18 highest to 91 lowest 12 FLAGS Column shows the current operational status of the associated device 13 Pending Message Column shows the abbreviation of the message currently in operation 14 Package...

Page 106: ...sassociate Controller when it receives the next beacon Bit 6 CONTROLLER_VALID_INTERVALS Set when Controller interval assignment has been received from the PC Communication Service Bit 7 NOT USED 0 Bit 8 CONTROLLER_RETRY_LIMIT_EXCEEDED Set when the retry limit on any command has been hit used to limit downloads to firmware only Bit 9 NOT USED Bit 10 NOT USED Bit 11 NOT USED 2 Bit 12 NOT USED Bit 13...

Page 107: ...mware Version The current version of door controller firmware on the Wi Q Device Portal RSSI Wi Q Gateway RSSI is the how well the Gateway received a signal from the Wi Q Door Controller The signal strength ranges from 18 highest best to 91 low est worst Ideally this value should be 75dB or better Reader RSSI Reader RSSI is the how well the Wi Q Door Controller receives a signal from the Gateway T...

Page 108: ...has a firmware update pending 38043 Controller is receiving a firmware update 32207 Controller completed the firmware update and is waiting for updates from the Wi Q Gateway Pending Messages The letters in the pending messages column are update messages that are being sent to the controller S Segment information pin length DST Times C Card formats L Controller configuration beacon time settings ch...

Page 109: ...a cardholder s data badge ID Part of the access control information that is encoded to a token This information usually numerical is unique to a particular credential holder card format The way that data is arranged and ordered on the card cardholder An individual who is issued a particular credential chassis type The designation that defines the physical lock type Three types exist cylindrical mo...

Page 110: ... out to a lock to reprogram it Host the computer on which Wi Q Interface software is installed and set up to integrate Wi Q gateways and readers into OnGuard IP address The numeric address like 192 168 1 1 that identifies each device in a TCP IP network input A hardware connection point used for status reporting of a particular sensor issue code Part of the access control information contained on ...

Page 111: ...ign on key Number generated within Wi Q Interface Software to establish the connection between the readers and the Wi Q Gateway and ultimately to a segment in the software site survey kit The Wi Q Technology Site Survey Kit tool used to determine optimum Wi Q Gateway location to verify signal strength before permanently installing the Notes hardware time interval A specific range of time which cor...

Page 112: ...ology Provides efficient online access control decisions at the door wireless access controller Wireless access controller provides additional capability to connect stand alone controllers and locks wireless controller The wireless lockset that controls user access at the door and grants user requests according to how they are configured in OnGuard ...

Page 113: ...B Lock installation ...

Page 114: ...rements for ANSI BHMA 156 25 to 66 C This product meets the following Full Indoor test require ments for ANSI BHMA 156 25 Side of door Range Outside 31 F to 151 F 35 C Side of door Range Inside and out side 32 F to 120 F 0 C to 49 C Components checklist Use the following checklist to make sure that you have the items necessary to install your Electronic Wireless Cylin drical Lock Components provid...

Page 115: ...line of the door edge Note The recommended height from the floor to the centerline of the crossbore or chassis hole is 38 2 Fold the Q05 Template Installation Template for 93KQCylindricalLocks on the dashed line and carefully place it in position on the high side of the door bevel Note For steelframe applications alignthe template s horizontal centerline for the latch with the horizontal centerlin...

Page 116: ...hole door status switch hole 1 diameter meets harness hole anti rotational hole see Use drill jig to drill through bolt holes on page 5 5 16 diameter through door Note 1 To locate the center of a hole on the opposite side of the door drill a pilot hole completely through the door Note 2 For holes through the door it is best to drill halfwayfrom each side of the door to prevent the door from splint...

Page 117: ...net hole This hole should be directly opposite the door status switch reader harness hole when the door is closed 2 Drill a 1 diameter hole for the magnet at least 1 3 4 deep 3 Insert the magnet in the hole 4 Insert the door status switch assembly into the door status switch hole in the edge of the door feeding the connectors out the harness hole to the inside of the door as shown in Figure 4 Insi...

Page 118: ...ngaging it with the latch tube prongs see the close up in Figure 5 Make sure the front edge of the jig is parallel with the door edge 2 Drill the through bolt holes 5 16 diameter halfway into the door 3 Turn over the drilljig and repeat steps 1 and 2 from the opposite side of the door Note Replace the drill jig after 10 door preparations Inside of door Figure 5 Installing the drill jig and drillin...

Page 119: ...te 3 Insert the strike box and secure the strike with the two screws provided 4 Check the position of the deadlocking plunger against the strike plate Caution The deadlocking plunger of the latchbolt must make contact with the strike plate as shown in Figure 6b The plunger deadlocks the latchbolt and helps prevents someone from forcing the latch open when the door is closed Door jamb Figure 6a Ins...

Page 120: ...ure 7 Note You cannot remove the lever if the screwdriver blade is inserted too far past the keeper 4 Slide the lever or knob off of the sleeve Caution Be careful that you do not disconnect the lever keeper spring 8 Adjust for door thickness 1 Determine the door s thickness 2 Pull the rose locking pin and rotate the outside rose liner until the proper groove on the through bolt stud lines up with ...

Page 121: ...es the retractor 10 Install the trim hole insert bushing and hub washer on outside of door 1 On the outside of the door insert the trim hole insert into the upper trim hole as shown in Figure 10 2 Insert the bushing into the harness hole 3 Slide a hub washer over the chassis sleeve soit rests on the hub Inside of door Figure 9 Installing the lock chassis and engaging the retractor in the latch Lat...

Page 122: ... in the door as shown in Figure 12 Caution Make sure that the motor wire is pulled toward the top of the fire plate and avoid routing it over any surface that could damage the sleeving or wire insulation 2 Install the through bolts through the rose liner and door in the top and bottom holes Caution Make sure that there is clearance for the motor wire between the rose liner and the door 3 Tighten t...

Page 123: ...he holes at the top and bottom of the fire plate 3 Tighten the mounting screws until the fire plate is securely mounted to the door 14 Route wires on fire plate 1 Route the motor connector wire RQE connector and door status connector underneath the side tabs as shown in Figure 14 2 Route the battery connector and antenna wire above the side tabs See Figure 15 for additional detail Figure 13 Feedin...

Page 124: ...e the wires as shown in Figure 15 See Figure 15 for additional detail Caution When making the motor connection make sure there are no loose wire connections where the wires are inserted into the connectors the connectors are firmly mated Wire connection Color No of wires No of pins Motor Yellow Gray 2 2 RQE Orange Brown 2 3 Door status White 2 2 Figure 15 Routing the wires view of the inside escut...

Page 125: ...ttom cover in place 17 Install battery holder 1 Position the battery wires against the fire plate side wall as shown in Figure 17 2 Slide the battery holder behind the fire plate side tabs until it rests on the bent battery holding tabs Caution When routing the battery wires make sure the wires are not routed across any sharp edges or over any surface that could damagetheir sleeving or wire insula...

Page 126: ...tside ofdoor Figure 78 Installing the levers Core Figure 19a Installing the throw member Figure 79bInstalling the core 13 Installation Instructions for Wi Q Technology 9KQCylindrical Locks Completing theinstallation IE Install inside and outside levers Note To use a core andthrow member from a manu facturer other thanBEST with aElectronicStand a one Lock see the Installation Instructions for 9K No...

Page 127: ...cover down toward the bottom cover as shown in Figure 20b Caution As you slide the top cover onto the fire plate feed the antenna wire down into the bottom cover Be sure not to pinch the antenna wire on the bottom cover as you slide the top cover into place 3 Use two cover screws to secure the cover to the side of the fire plate as shown in Figure 20b Note PhillipsType2andT20Torxoptionsareavailabl...

Page 128: ...ermanent cards have been programmed for the lock the temporary card should be deleted 1 Use the temporary operator card to activate the lock Note If the lock has a proximity card reader it may have already been activated by the presence of an object near the card reader 2 Use the temporary operator card to access the lock 3 The green light flashes and the locking mechanism unlocks 4 Turn the lever...

Page 129: ...BEST a Product Group of dormakaba USA Inc 2019 a Product Group of dormakaba USA Inc T82619 Rev E 3109013 ER 7991 12 November 2019 ...

Page 130: ...and Figure 1 to deter mine the holes to be drilled for the lock function Functions DV TV Holes by Function Holes to drill I S O S I S O S A Forged trim 2 holes Through door Through door B Harness Through door Through door C Standard cylinder D Sensor motor wire 2 holes F Thumb turn G Trim mounting 2 holes Determine trim holes based on trim type Because these holes pass through the mortise pocket i...

Page 131: ...n the door edge template as a guide position the appropriate door template on each side of the door You need to take the bevel into account Tape the templates to the door 3 Center punch and drill holes 1 Center punch the necessary drill points See the instructions on the template 2 Drill the holes Note 1 Tolocatethecenterofaholeontheoppositeside of the door drill a pilot hole completely through th...

Page 132: ...s 2 If you need to rotate the latchbolt insert a flat blade screwdriver into the latch access point approxi mately 1 2 into the case and press to extend the latch out of the case See Figure 4 3 Rotate the latchbolt 190 degrees slightly past 180 degrees and allow it to retract into the case 6 Position hub toggles if necessary 1 Check whether the hub toggles are in the proper position for the lock S...

Page 133: ... the two sensor motor wire holes to the inside of the door as shown in Figure 7 Note The armored front of the mortise case self adjusts to the door bevel 3 Secure the mortise case with the case mounting screws 8 Install trim mounting plates 1 Insert the outside trim mounting plate through the door and mortise case 2 Position the inside trim mounting plate opposite the outside trim mounting plate a...

Page 134: ...w 3 Insert the control key into the core and rotate the key 15 degrees to the right 4 With the control key in the core insert the core into the cylinder 5 Rotate the control key 15 degrees to the left and withdraw the key Caution The control key can be used to remove cores and to access doors Provide adequate security for the control key 10 Install trim hole insert and bushing 1 Insert the trim ho...

Page 135: ...that the core is flush with the outer surface of the escutcheon c Secure the cylinder in the mortise case with the cylinder clamp screw 4 Rest the outside escutcheon on the door by insert ing the trim studs into the trim holes 12 Install fire plate 1 From the inside of the door feed the wiring through the fire plate harness hole 2 Position the fire plate on the door so that the inside mounting pla...

Page 136: ...e wire harness To avoid this mistake connect only the connectors with matching wire colors Caution When making the motor connection and sensor connections make sure there are no loose wire connections where the wires are inserted into the connectors the connectors are firmly mated connections Wire connection Colors No of wires No of pins Motor Yellow gray 2 2 Gray 2 3 Blue 2 3 Orange brown 2 3 Key...

Page 137: ... shown in Figure 13 2 Optional for Thumb Turn option only Make sure that the Thumb Turn is in the upright position as shown in Figure 13 3 Making sure that the cover does not pinch the wires guide the bottom cover over the chassis onto the fire plate Note Phillips Type 2 and T20 Torx options are avail able for the cover mounting screws Inside of door Figure 13 Installing the bottom cover Bottom co...

Page 138: ...nectors the connectors are firmly mated Install inside and outside levers 1 Unscrew the inside spindle one full turn to allow the spindles to turn freely 2 With the handle pointing toward the door hinges insert the outside lever and spindles assembly into the lock from the outside of the door 3 Slide the inside lever onto the inside spindle and secure it with the set screw 4 Making sure that the c...

Page 139: ...ch the antenna wire on the bottom cover as you slide the top cover into place 3 Use two cover screws to secure the cover to the side of the fire plate as shown in Figure 17 Note Phillips Type 2 and T20 Torx options are avail able for the cover mounting screws 18 Install mortise case faceplate 1 Secure the mortise case faceplate to the mortise case with the faceplate mounting screws 2 Check the loc...

Page 140: ...d secure the strike with the screws provided 2 Check the position of the auxiliary bolt against the strike plate Caution The auxiliary bolt must make contact with the strike plate The auxiliary bolt dead locks the latchbolt and prevents someone from forcing the latch open when the door is closed If the incorrect strike is installed a lock in can occur Note The recommended gap between the door and ...

Page 141: ...e temporary card should be deleted 1 Use the temporary operator card to activate the lock Note If the lock has a proximity card reader it may have already been activated by the presence of an object near the card reader 2 Use the temporary operator card to access the lock The green light flashes and the locking mechanism unlocks 3 Turn the lever and open the door If the mechanism doesn t unlock re...

Page 142: ...rind d Von Duprin is a registered trademark of Von Duprin Inc Rim Surface Vertical Concealed Vertical Sargente e Sargent is a registered trademark of Sargent Mfg Co Rimf f Latch must have lift type trim input 8863 Contents These instructions cover the following topics Planning the installation 1 Preparing the door 3 Installing the exit hardware and trim 7 Completing the installation 16 Site survey...

Page 143: ...tical 2800 Von Duprin Rim Surface Vertical Concealed Vertical Site survey Use the following survey to record information about the installation site and hardware application Exit hardware type Door handing and bevel Left hand reverse bevel LHRB Right hand reverse bevel RHRB Door type Door thickness inches 1 3 4 to 2 1 4 Components checklist Use the following checklist to make sure that you have th...

Page 144: ...nterlines to the out side of the door face Note When measuring from the edge of the door take into account the door bevel if any 2 Determine required door prep 1 Determine which template is applicable Q08 for Preci sion and Sargent Q07 for Von Duprin and discard the other one 2 Based on the kind of exit device you have use the table below to locate the appropriate door preparation 3 On the templat...

Page 145: ...cheon mount ing holes 7 16 diameter thru door F Door sensing switch magnet hole in door frame or opposing door leaf 1 diameter hole drilled 1 3 4 deep NOT SHOWN G Cylinder hole Precision 1 3 8 dia meter thru door for 2300 only into mortise cavity Von Duprin 2 diameter thru door H Lift finger slot Precision Sargent 1 1 8 diameter slot thru door Von Duprin 3 4 diame ter slot thru door Figure 2 Outsi...

Page 146: ...door Outside of LHRB door A B D E G H E mortise cavity Figure 5 Outside door prep for use with Von Duprin exit hardware Rim with RQE only Outside of RHRB door Outside of LHRB door E G C D E H A B Figure 6 Outside door prep for use with Sargent 8863 exit hardware Outside of RHRB door Outside of LHRB door A B D E H E Figure 7 Outside door prep for use with Von Duprin exit hardware Use for all Von Du...

Page 147: ...tcheon is mounted using the four lock stile case mounting holes A holes these holes must be 7 16 in diameter and drilled com pletely through the door 2 Tape the template to the OUTSIDE of the door in the properly aligned position 3 Center punch the necessary drill points Refer to the instructions on the template and the figures of the previous step 4 Mortise for mortise case and faceplate mortise ...

Page 148: ... 1 Clip off the purple wires and connector and remove 2 Clip off the connector from the white door sensing harness with black sleeving and leave as much wire as possible See Figure 9 These wires will be butt spliced to the sensing harness from the trim See Route sensor wires on page 14 3 Route the door sensing switch wires through the chan nel and out through the wire routing hole to the exit devi...

Page 149: ...hen follow the applicable steps below to re route the sensor harness Figure 10 Variations of EXQ Trim rear view PHI Rim 2100 PHI Vertical 2200 2700 2800 PHI Mortise 2300 Sargent 8800 Von Duprin Rim LHRB Von Duprin Rim RHRB Von Duprin Verticals Antenna cable Primary harness Sensor harness Antenna cable Primary harness Sensor harness Antenna cable Primary harness Sensor harness Antenna cable Primary...

Page 150: ...the handing of the trim if necessary Do so by removing the four threaded guide pins and retaining ring as shown in Figure 11 pulling out and flipping the lever 180 degrees and then reassembling For Precision 2100 devices 4 Re route the sensor harness out through the alternate wire routing hole as shown in Figure 12 5 Reattach the backplate ensuring that the springs are properly seated and wires ar...

Page 151: ...backplate ensuring that the springs are properly seated and wires are not pinched 6 Reapply the gasket For Von Duprin Rim devices with RQE 4 Re route the sensor harness around the cylinder hole and around the escutcheon boss then out through one of the alternate wire routing holes based on handing as shown in Figure 15 5 Reattach the backplate ensuring that the springs are properly seated and wire...

Page 152: ...will engage correctly with the latching mechanism If necessary break off themounting screws as shown in Figure 17 2 From the front of the escutcheon insert the cylinder into the cylinder opening 3 Holding the cylinder in position in the escutcheon insert the cylinder mounting sleeve through the back of the escutcheon over the cylinder 4 Orient the cylinder and clamp plate as shown in Figure 17 Fro...

Page 153: ...o the mounting holes 11 Install cylinder Precision devices For rim and vertical rod exit device installations rim cylinder 1 To determine the correct spindle length try the cylin der in the door while holding the escutcheon and lock stile case in place Then break off the spindle at the groove where it will engage correctly with the latching mechanism Break off the mounting screws at the groove whe...

Page 154: ...the front part of the chassis as shown in Figure 22 This hole is used to pass the sensor harness and door position switch wires into the chassis area For all exit devices 1 Make any adjustments to the exit hardware necessary for compatibility with lever function outside trim 2 Install the exit hardware lock stile case touch bar assembly latches and rods if applicable and related hardware follow th...

Page 155: ...length that is remove the excess to leave minimal slack after the spliced connections 3 Strip the wire ends for connection using the butt splices 4 Make wire connections as detailed in Figure 24 or Fig ure 25 using the butt splices provided Note For Sargent devices connect the door position switch to the two white sensor harness wires Note In the case of unused wires be sure to cover the ends with...

Page 156: ...d 2800 exit devices use cable ties in addition to the tape to hold wires as shown in Figure 26 7 Install the case cover Org NC Blue Tan COM Red Wht Wht Wht Wht Red Blue Touchbar switch EXQ Trim Door position switch NO Yellow Not used Figure 25 Schematic diagram for connecting Von Duprin sensor harness wires Butt splices Sensor harness Not used NO Normally Open NC Normally Closed COM Common TOP Fig...

Page 157: ...s and to access doors Provide adequate secu rity for the control key 15 Install mortise case faceplate mortise exit devices only 1 Secure the mortise case faceplate to the mortise case follow the instructions provided by the exit hardware manufacturer 2 Check the lock for proper operation 16 Install strike s Note If retrofitting the trim to an existing exit hardware installation skip this task 1 I...

Page 158: ...ws provided Note For doors less than 2 in thickness use the 1 1 4 screws For doors 2 or greater use the 1 3 4 screws Caution When routing the wire harness make sure the wires are not routed across any sharp edgesor over any surface that could damage their sleeving or wire insulation Keep away from any moving parts 3 Tape all wires to the bracket using the tape provided Note For Precision 2300 Sarg...

Page 159: ...he battery pack fit will be snug Make sure you do not damage the sleeving on the bat tery pack Doing so may cause the batteries to drain 3 If installing with a surface vertical rod device dress the wire harness inside the bracket to the left of the rod so that the harness will not interfere with the movement of the rods We recommend that you loosely coil the harness and use a cable tie to secure t...

Page 160: ...nside the battery cover Caution Carefully bend but do not twist or kink the antenna wire Doing so may significantly reduce or completely interrupt signal transmis sion 4 Making sure that the battery antenna cover does not pinch any wires place the battery antenna cover over the bracket and battery 5 Secure the battery cover with the provided self tap ping screws Caution Tighten screws firmly but d...

Page 161: ...ard to activate the lock 2 Use the temporary operator card to access the lock The green light flashes and the locking mechanism unlocks 3 Turn the lever or knob and open the door 4 With the door closed insert and turn the key to unlatch the door If the mechanism doesn t unlock refer to the follow ing table Important When the trim and exit hardware installation is complete perform all testing speci...

Page 162: ...er with antenna Batteries Documentation Optional components Indoor ceiling mount omni directional antenna Indoor wall mount directional antenna Outdoor mount directional antenna Outdoor mount omni directional antenna Enclosure 1 Mount Wireless Access Controller The standard WAC comes with a small antenna but you may need a supplemental antenna for your appli cation See the Site Survey Tool Quick R...

Page 163: ...ti vated SHUNT COM Return path for the shunt relay SHUNT NO Normally open terminal for the shunt relay KEY Detects and reports a key over ride event GND Return path for the key over ride switch and RQE RQE Request to exit input DS Door status input GND Return path for door status and latch status LS Latch status input WIEGAND 0 Wiegand D0 terminal GND Ground the wiegand reader must be grounded at ...

Page 164: ...C Relay 2 SHUNT COM Relay 2 SHUNT NC Relay 2 KEY I O GND RQE I O DSM I O GND DLS I O WIEGAND 0 I O GND WIEGAND 1 I O RED GND GRN ANT DO NOT USE GND 3 3V 10mA MAX DO NOT USE DC 9 24V DC 9 24V DC 9 24V DC 9 24V 12 VDC Connect as required Output device example shown horn Input switch GND Power Power 3 Installation Instructions for BEST Wi Q Technology WQX WAC Wireless Access Controllers Planning the ...

Page 165: ... the green LED on the WAC blinks three times At this point the WAC should appear under the New Facility Item folder in AMS it may take up to 2 minutes for this to occur 5 Test WAC For Wireless Access Controller with keypad only To test the WAC for proper operation before It s pro grammed follow these instructions 1 Press 1234 2 Press The green light flashes and the locking mechanism unlocks or you...

Page 166: ... the card at a moderate speed Three red flashes Use the temporary operator card provided with the lock WAC on board LEDs You should Using the soft reset function Hold the reset button until the green LED flashes five times and then release See Figure 3 Lights will alternate red green rapidly The WAC is restored to its previous functionality Using the hard reset function Caution Use this procedure ...

Page 167: ...Installation Instructions for BEST Wi Q Technology WQX WAC Wireless Access Controllers 6 BEST a Product Group of dormakaba USA Inc ...

Page 168: ...6161 East 75th Street Indianapolis IN 46250 USA Phone 1 800 392 5209 https dhwsupport dormakaba com hc en us 172713 S3 ...

Reviews: