Installation Instructions for Wi-Q Technology™ EXQ Exit Hardware Trim
BEST
a Product Group of dormakaba USA Inc.
9
Installation Instructions for Wi-Q Technology™ EXQ Exit Hardware Trim
Installing the exit hardware and trim
1 Carefully peel the black gasket off of the back of the
trim. Set it aside to be re-applied later.
2 Remove the backplate from the trim by removing the
four screws that attach it.
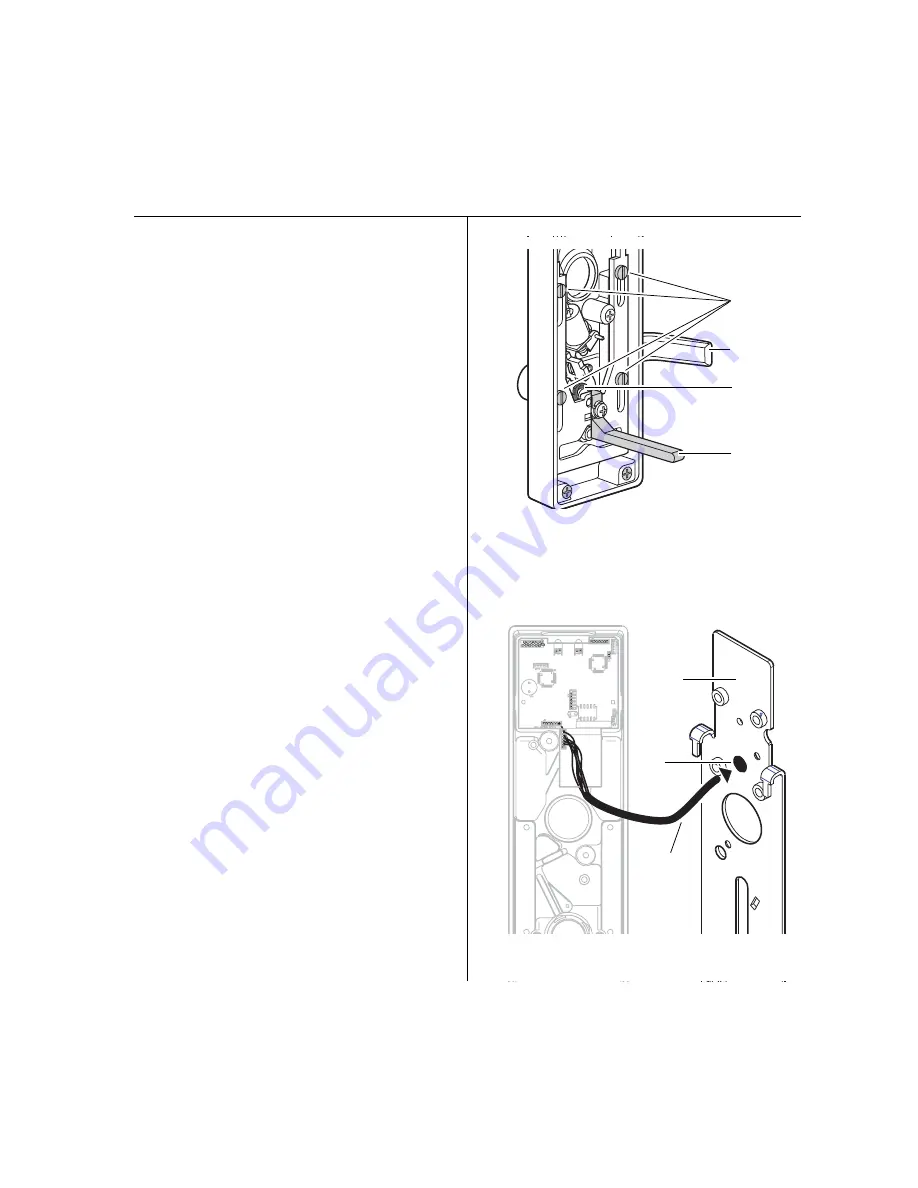
3 While the gasket and backplate are removed, change
the handing of the trim if necessary.
Do so by removing the four threaded guide pins and
retaining ring as shown in Figure 11, pulling out and
flipping the lever 180 degrees, and then reassembling.
For Precision 2100 devices
4 Re-route the sensor harness out through the alternate
wire-routing hole as shown in Figure 12.
5 Reattach the backplate ensuring that the springs are
properly seated and wires are not pinched.
6 Reapply the gasket.
Figure 11 Changing the hand of the trim (if needed)
Retaining
ring
Guide pins
Lever
Yoke finger
Figure 12 Re-routing the sensor harness for Precision
2100 exit devices
Route
sensor
harness
here
Backplate
Sensor
harness
Summary of Contents for BEST Wi-Q ONGUARD
Page 7: ...A Glossary Glossary 109 B Lock Installation Lock Installation 113 ...
Page 40: ...40 2 Select Inbound Rules Figure 13 Inbound Rules Select Inbound Rules ...
Page 45: ...45 7 De select the Public option Click Next Figure 18 De select Public ...
Page 52: ...52 Figure 27 Wi Q Interface Setup Wizard Click Next ...
Page 57: ...57 Figure 33 Custom Setup Options Click Next ...
Page 75: ...75 To add a new Sign On Credential 1 Select Add Figure 52 Add Segment Sign On Credential 1 ...
Page 113: ...B Lock installation ...


