32
ENGLISH
The channel whose channel level is adjusted
lowest can be faded to –12 dB using the fader
function.
If the channel levels are adjusted separately after
adjusting the fader, the fader adjustment values
are cleared, so adjust the fader again.
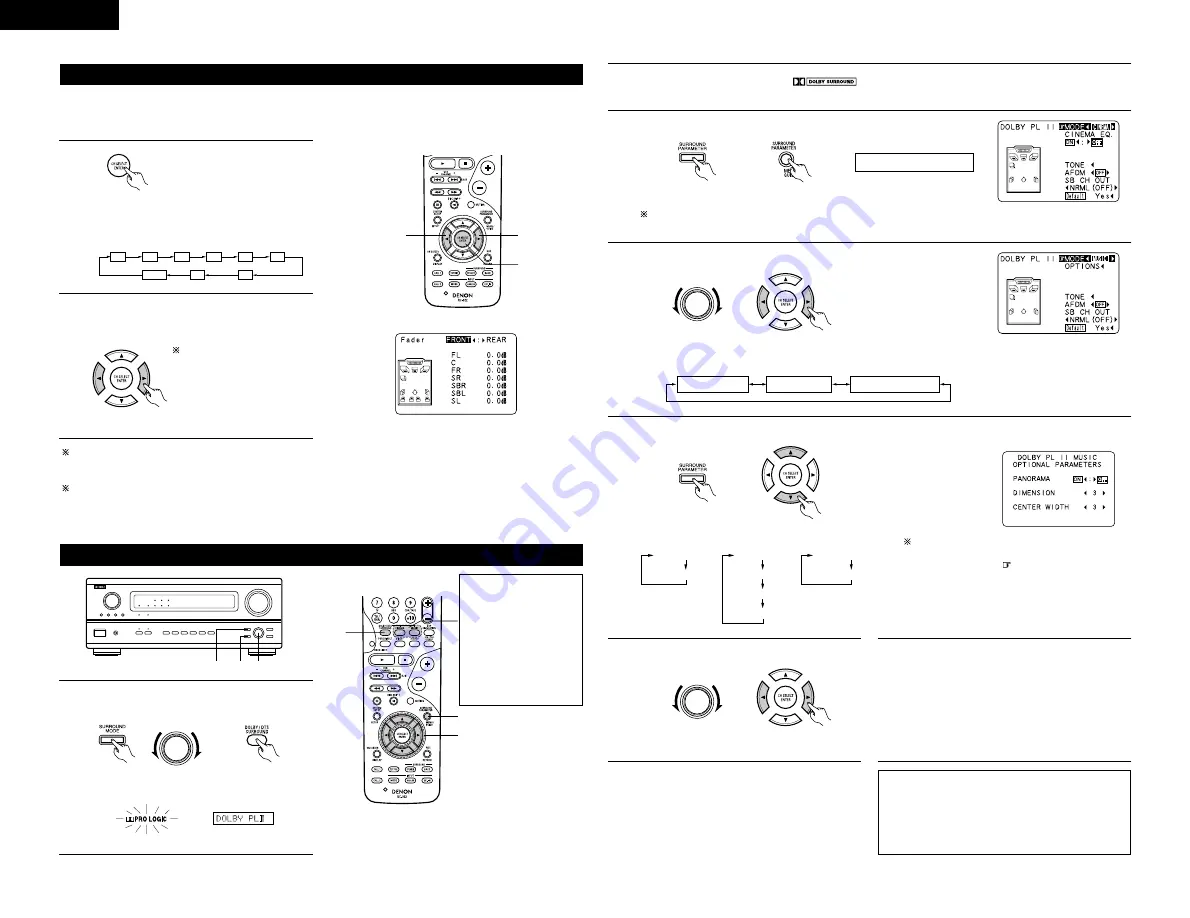
Fader function
• This function makes it possible to lower the volume of the front channels (FL, C and FR) or the rear channels
(SL, SR, SBL and SBR) together. Use it for example to adjust the balance of the sound from the different
positions when playing multi-channel music sources.
1
Select “FADER”.
This is only displayed when setting the fader control.
2
2
1
FL
C
FR
SR
SBR
SBL
SL
SW
FADER
(Remote control unit)
The channel switches in the order shown
below each time this button is pressed.
2
Press the
0
button to reduce the volume of
the front channels, the
1
button to reduce the
volume of the rear channels.
(Remote control unit)
The fader function does
not affect the SW channel.
Dolby Surround Pro Logic
II
mode
1
Select the Dolby Surround Pro Logic
II
mode.
• The Dolby Pro Logic indicator lights.
Light
(Main unit)
(Remote control unit)
2
Play a program source with the
mark.
• For operating instructions, refer to the manuals of the respective components.
1
3, 5 1, 4, 6
SELECT
1
3
4, 5, 6
Display
The Dolby Surround
Pro Logic
II
Cinema or
Music mode can be
chosen directly by
pressing the CINEMA
or MUSIC button on
the remote control
unit during playback in
the Dolby Surround
Pro Logic
II
mode.
NOTE:
• There are four Dolby Surround Pro Logic modes
(NORMAL, PHANTOM, WIDE and 3 STEREO).
The AVR-3803 sets the mode automatically
according to the types of speakers set during the
system setup process (page 10).
3
Set the surround parameter mode.
(Main unit)
(Remote control unit)
MODE cinema
Display
The on-screen display differs according to whether the operation is
performed from the main unit or the remote control unit.
4
Select the play mode.
SELECT
(Main unit)
(Remote control unit)
Display
MODE cinema
MODE music
MODE emulation
5
Select the various parameters. (See “Surround parameters
q
” for a description of the various parameters.)
(Main unit)
(Remote control unit)
MODE EMULATION
CINEMA EQ
MODE CINEMA
CINEMA EQ
MODE MUSIC
PANORAMA
DIMENSION
CENTER WIDTH
When set with the on-screen display using
the remote control unit while in the MUSIC
mode, set the “
” mark to “OPTION
0
”
using the
•
and
ª
cursor buttons, then press
the
0
cursor button.
Press the ENTER button to return to the
previous screen.
6
Set the various surround parameters.
SELECT
(Main unit)
(Remote control unit)
7
When the surround parameters are set using
the buttons on the main unit, stop operating
buttons after completing the settings. The
settings are automatically finalized and the
normal display reappears after several seconds.
When the settings are made using the buttons
on the remote control unit, press the
SURROUND PARAMETER button to finish.
This is the screen when operated with
the remote control unit.
This is the screen when operated with
the remote control unit.


