15
ENGLISH
[2] Setting the Video Input Mode
1
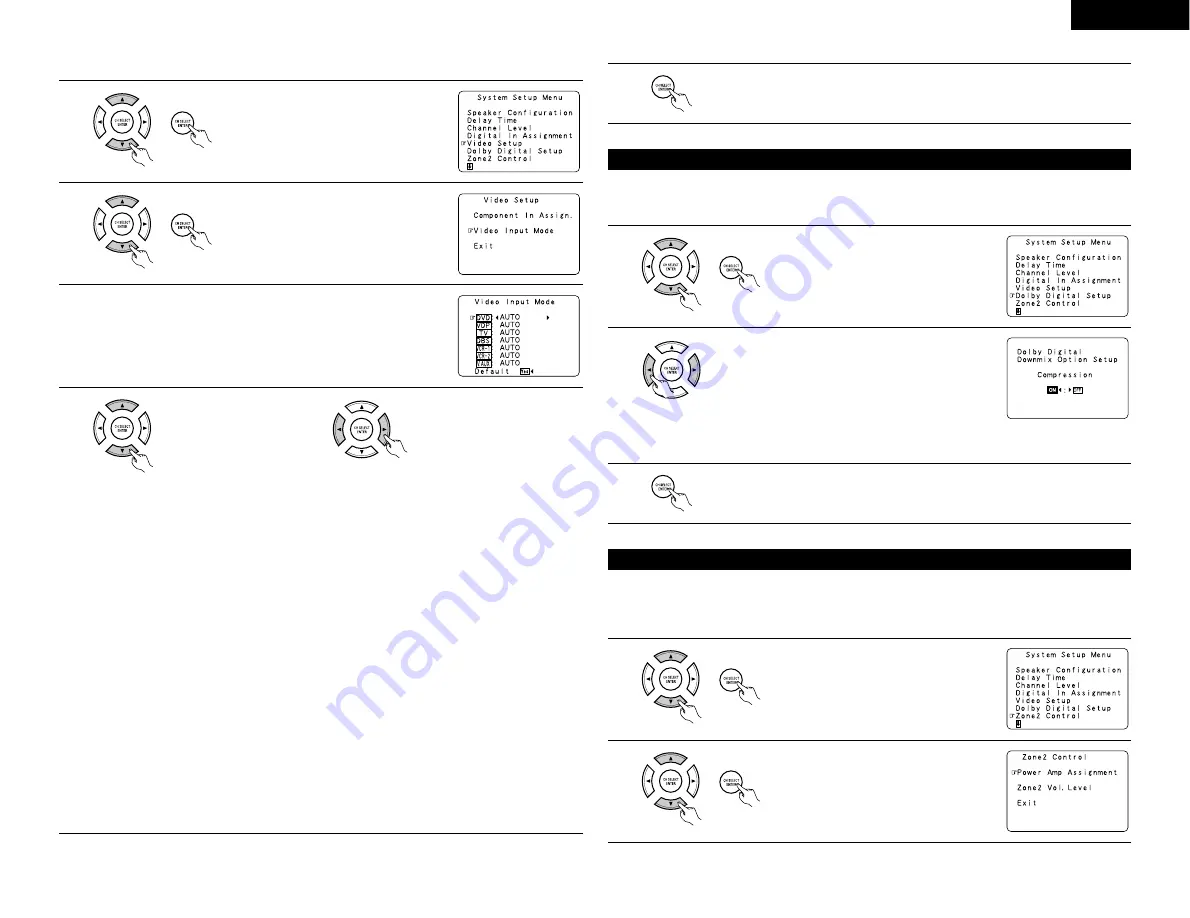
At the System Setup Menu select “Video
Setup” and press the ENTER button.
2
The “Video Setup” screen appears.
Select “Video Input Mode” and press the
ENTER button.
3
Switch the Video Input Mode screen.
4
q
Select the input source for
which you want to set the
Video Input Mode.
q
Select the mode.
AUTO:
When there are multiple input signals, the input signals are detected and the input signal to
be output from the video monitor output terminal is selected automatically in the following
order: component video, S-Video, composite video.
Component: The signal connected to the component video terminal is always played.
Video conversion is not conducted, so no image is output from the monitor output terminal
when there is no input signal to the component terminal.
S-Video:
The signal connected to the S-Video terminal is always played.
The S-Video input signal is converted and output from the composite and component
monitor output terminal.
Video:
The signal connected to the composite video terminal is always played.
The composite video input signal is up-converted and output from the S-Video and
component monitor output terminals.
NOTE:
Down-converting from the component video signal to the S-Video and composite video signal is not
possible, so when not using the component video monitor output terminal connect the player using the
S-Video or composite video input terminal.
Cautions on the video conversion function:
When the component video terminals are used to connect the AVR-3803 with a TV (or monitor, projector,
etc.) and the video (yellow) or S video terminals are used to connect the AVR-3803 with a VTR, depending
on the combination of the TV and VTR the picture may flicker in the horizontal direction, be distorted, be
out of sync or not display at all when playing video tapes.
If this happens, connect a commercially available video stabilizer, etc., with a TBC (time base corrector)
function between the AVR-3803 and the VTR, or if your VTR has a TBC function, turn it on.
5
Enter the setting.
At the “Video Setup” screen, select “Exit” and press the ENTER button.
The System Setup Menu reappears.
Sets the down-mixing method when not using a center speaker or surround speakers.
OFF: The dynamic range is not compressed.
ON: The dynamic range is compressed automatically according to the combination of speakers being used.
Setting the Dolby Digital Setup
1
At the System Setup Menu select “Dolby
Digital Setup” and press the ENTER button.
2
Select “ON” if you want to use the Compression, “OFF”
if you do not want to use it.
3
Enter the setting.
The System Setup Menu reappears.
[1] Setting the power amplifier assignment
Make this setting to switch the power amplifier for the surround back channel to ZONE2.
If ZONE2 is selected, the signal that selected at ZONE2 is output at “SURR. BACK/ZONE2 PREOUT”
terminals.
Setting the ZONE2 Control
1
At the System Setup Menu select “Zone2
Control” and press the ENTER button.
2
The “Zone2 Control” screen appears.
Select “Power Amp Assignment” and press
the ENTER button.
NOTE:
When not using a center speaker or surround speakers,
the sound is played from the front speakers. If the sound
should seem distorted because the input level exceeds the
allowable input for the front speakers, set “Compression”
to “ON”.


