Chapter 10 Digital Keypad
CP2000
10-30
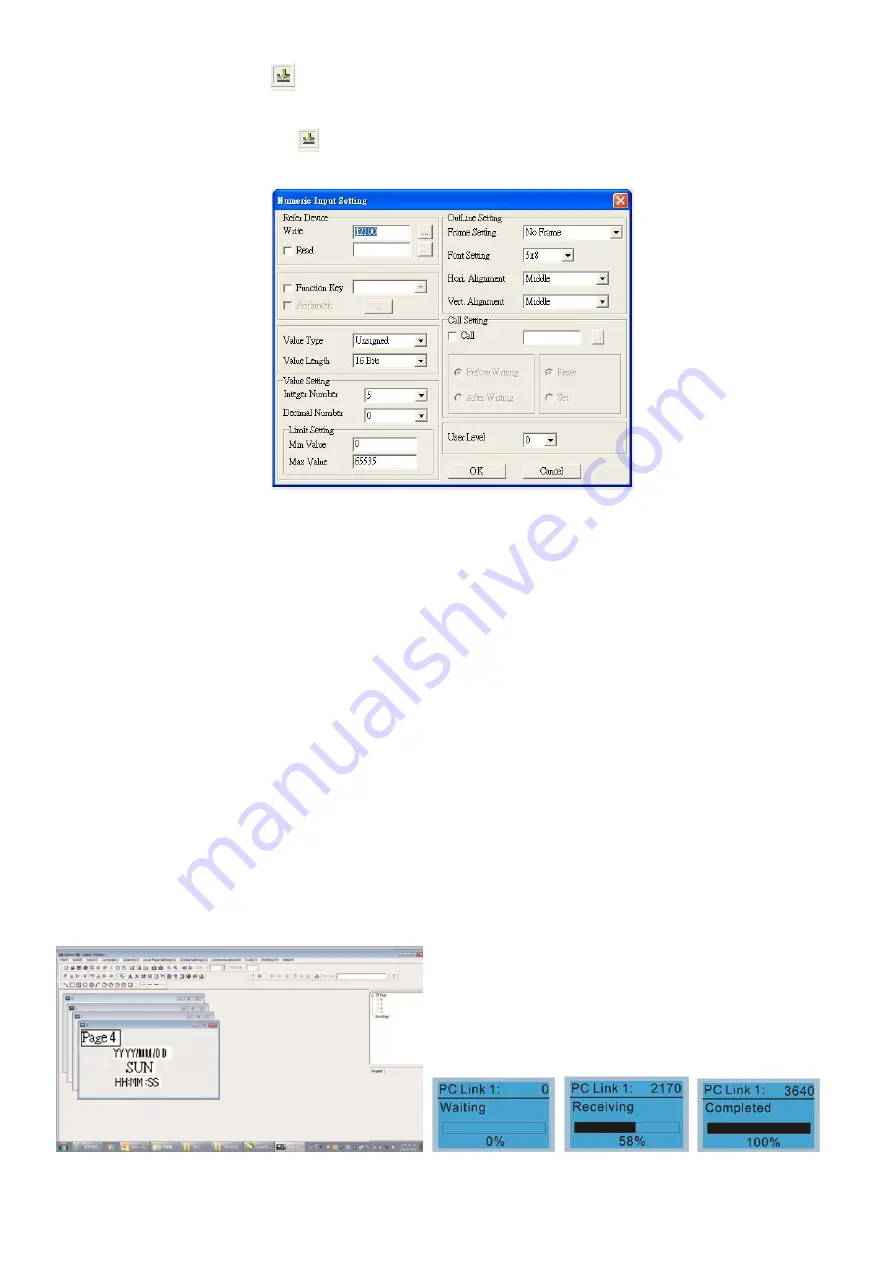
10. Numeric Input Setting
:
This menu allows you to provide parameters or communication ports and to input numbers.
Click once on this button
.
Open a new file and double click on that window, you will see the following:
a.
Related Device: There are two blank spaces to fill in, one is <Write> and another one is <Read>.
Input the numbers that you want to display and the corresponding numbers of a parameter and that
of a communication port. For example, input 012C to Read and Write Parameter Pr.01-44.
b.
Outline Setting: The Frame setting, Font setting, Vertical Alignment and Horizontal Alignment are
the same as mentioned before. Click on the drop down menu and choose the setting that you need.
c.
Function key: The setting here allows you to program keys on the keypad. Press the key on the
menu then the corresponding key on the keypad will start to blink, then press Enter to confirm the
setting.
d.
Value Type & Value Length: These two factors influence the range of the Minimum and Maximum
Value of the Limit Setting. Please note that the corresponding supporting values for CP2000 have
to be 16bits. The 32bits values are not supported.
e.
Value Setting: This part is set automatically by the keypad itself.
f.
Limit Setting: Input the range the security setting here.
For example, if you set Function Key as F1, Minimum Value as 0 and Maximum Value as 4, then
press F1 on Keypad. Then you can press Up and Down key on the keypad to increase or decrease
the value. Press Enter Key on the keypad to confirm your setting. You can also go to parameter
table 01-44 to verify if your input value is correct.
11. Download TP Page: Press Up or Down key on the keypad until you reach #13 PC Link.
Then press Enter on the keypad and you will see the word “Waiting” on keypad’s screen. Now choose a
page that you have created then go to Communication (M)
Write to TP (W) to start downloading the
page to the keypad.
When you see the word Completed on the keypad’s screen, that means the download is done.
Then you can press ESC on the keypad to go back to the menu of the keypad.
Summary of Contents for CP2000 Series
Page 3: ......
Page 12: ...Chapter 1 Introduction CP2000 1 3 1 2 Model Name 1 3 Serial Number...
Page 35: ...Chapter 1 Introduction CP2000 1 26 Digital Keypad KPC CC01 Figure 1 32...
Page 42: ...Chapter 3 Unpacking CP2000 3 1 Chapter 3 Unpacking 3 1 Unpacking 3 2 The Lifting Hook...
Page 72: ...Chapter 4 Wiring CP2000 4 1 Chapter 4 Wiring 4 1 System Wiring Diagram 4 2 Wiring...
Page 77: ...Chapter 4 Wiring CP2000 4 6 Figure 4 5...
Page 79: ...Chapter 4 Wiring CP2000 4 8 This page intentionally left bank...
Page 109: ...Chapter 6 Control Terminals CP2000 6 12 This page intentionally left blank...
Page 172: ...Chapter 7 Optional Accessories CP2000 7 63 EMC filter model name EMF018A43A Figure 7 46...
Page 174: ...Chapter 7 Optional Accessories CP2000 7 65 EMC filter model name KMF370A KMF3100A Figure 7 48...
Page 175: ...Chapter 7 Optional Accessories CP2000 7 66 EMC filter model name B84143D0150R127 Figure 7 49...
Page 176: ...Chapter 7 Optional Accessories CP2000 7 67 EMC filter model name B84143D0200R127 Figure 7 50...
Page 182: ...Chapter 7 Optional Accessories CP2000 7 73 Wall Mounting Embedded Mounting...
Page 197: ...Chapter 7 Optional Accessories CP2000 7 88 6 Installation complete...
Page 237: ...Chapter 7 Optional Accessories CP2000 7 128 This page intentionally left blank...
Page 265: ...Chapter 8 Option Cards CP2000 8 28 This page intentionally left blank...
Page 277: ...Chapter 09 Specifications CP2000 9 12 575V 690V Figure 9 3 Altitude Derating Curve Figure 9 4...
Page 281: ...Chapter 09 Specifications CP2000 9 16 9 8 Efficiency Curve Figure 9 11 Figure 9 12...
Page 317: ...Chapter 10 Digital Keypad CP2000 10 36 This page intentionally left blank...
Page 361: ...Chapter 11 Summary of Parameter Settings CP2000 11 44 This page intentionally left blank...
Page 416: ...Chapter 12 Description of Parameter Settings CP2000 12 1 03 3 3 4 5...
Page 417: ...Chapter 12 Description of Parameter Settings CP2000 12 1 03 4 6 7 8...
Page 418: ...Chapter 12 Description of Parameter Settings CP2000 12 1 03 5 9 10 11...
Page 419: ...Chapter 12 Description of Parameter Settings CP2000 12 1 03 6 12 13 14...
Page 420: ...Chapter 12 Description of Parameter Settings CP2000 12 1 03 7 15 16 17...
Page 421: ...Chapter 12 Description of Parameter Settings CP2000 12 1 03 8 18 19 20...
Page 422: ...Chapter 12 Description of Parameter Settings CP2000 12 1 03 9 21 22 23...
Page 423: ...Chapter 12 Description of Parameter Settings CP2000 12 1 03 10 24 25 26...
Page 424: ...Chapter 12 Description of Parameter Settings CP2000 12 1 03 11 27 28 29...
Page 425: ...Chapter 12 Description of Parameter Settings CP2000 12 1 03 12 30 31 32...
Page 426: ...Chapter 12 Description of Parameter Settings CP2000 12 1 03 13 33 34 35...
Page 427: ...Chapter 12 Description of Parameter Settings CP2000 12 1 03 14 36 37 38...
Page 836: ...Chapter 16 PLC Function Applications CP2000 16 153...
Page 838: ...Chapter 16 PLC Function Applications CP2000 16 155...
Page 841: ...Chapter 16 PLC Function Applications CP2000 16 158 This page intentionally left blank...
Page 857: ...Chapter 17 Introduction to BACnet CP2000 17 16 This page intentionally left blank...


