


Procedure
1. If installing an unpopulated spare blade, acclimatize the blade to the computer room before removing it from
the shipping case. Then reinstall the daughter cards, voltage modules, DIMMs, etc.
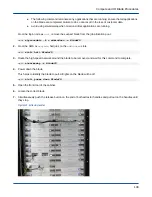
2. If a filler blade assembly is in the empty slot, remove the filler blade assembly.
3. Grasp the front of the blade with one hand and the bottom of the blade near the center with the other hand.
4. Align the left and right guide rails on the blade with the guide slots in the sides of the chassis.
5. Slide the blade straight into the cage until it stops. Push the center of the face plate to avoid pinching fingers
under the extractor handles.
6. Engage the tabs on the extractor handles with the extractor flanges on the sides of the cage.
7. Simultaneously push in on both extractor handles until they lock in place.
8. Close the front door of the cabinet.
9. From the SMW as
root
, power up the blade slot.
smw#
xtcli power up_slot
blade_id
10. Check the status of the slot to ensure that it powered up properly.
smw#
xtcli status
blade_id
11. Check for a response from the blade slot.
smw#
xtalive
12. Power up the components of the blade slot.
smw#
xtbounce
blade_id
13. Check the status of the slot to ensure it powered up properly.
smw#
xtcli status
cabinet_id
5.5
Blade Memory DIMM Replacement
5.5.1
Remove a Blade Memory DIMM
Prerequisites
Tools Required:
Adjustable torque driver, 5–40 in-lbs
Compute and IO Blade Procedures
135