44
CHAPTER TEN: TROUBLESHOOTING
020-300020-03 Rev. 1 (03-2013)
VEINVIEWER FLEX USER GUIDE
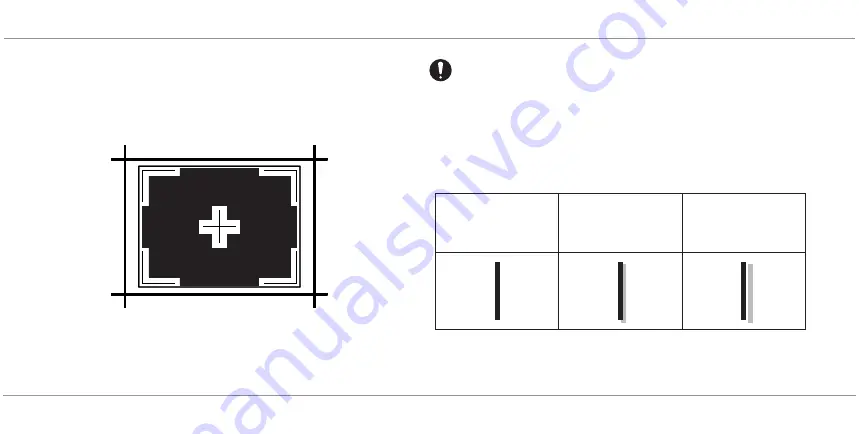
5. Mount the device 12 in. (30 cm) away from Test Pattern Image to check the
image alignment. Ensure VeinViewer Flex is perpendicular to the Alignment
Test Pattern located on the inside back cover of this manual. Adjust the
distance of the target in order that the border of the projected image is
aligned to the largest rectangle of the target.
6. Evaluate alignment by looking for separation (white space) between
projected line and printed line.
SAMPLE
ONLY
If the Image is in proper alignment, you can reset the Drop Event notification by
pressing and holding the f2 button. The Drop Event notification may also be reset
by connecting VeinViewer Flex to the VeinViewer Flex Connect software. A pop-
up window will prompt you to ‘Reset: Yes or No’.
If there is any separation between the printed line and the projected line
in ANY of the 5 horizontal and/or vertical positions, VeinViewer Flex is
not within alignment specifications. Please contact Christie Technical
Support.
PERFECT ALIGNMENT
Projected Line Exactly
Matches Printed Line
GOOD ALIGNMENT
Projected Line
Overlaps Printed Line
BAD ALIGNMENT
White Space
Between Projected
and Printed Lines
Summary of Contents for VeinViewer Flex
Page 1: ...020 300020 03 Rev 1 02 2013 USER GUIDE VeinViewer Flex ...
Page 2: ......
Page 71: ...NOTES 65 VEINVIEWER FLEX USER GUIDE 020 300020 03 Rev 1 03 2013 NOTES ...
Page 72: ...66 NOTES 020 300020 03 Rev 1 03 2013 VEINVIEWER FLEX USER GUIDE ...
Page 73: ...NOTES 67 VEINVIEWER FLEX USER GUIDE 020 300020 03 Rev 1 03 2013 ...
Page 74: ...68 NOTES 020 300020 03 Rev 1 03 2013 VEINVIEWER FLEX USER GUIDE ...
Page 75: ......


