background image

33672AB 
 

71 

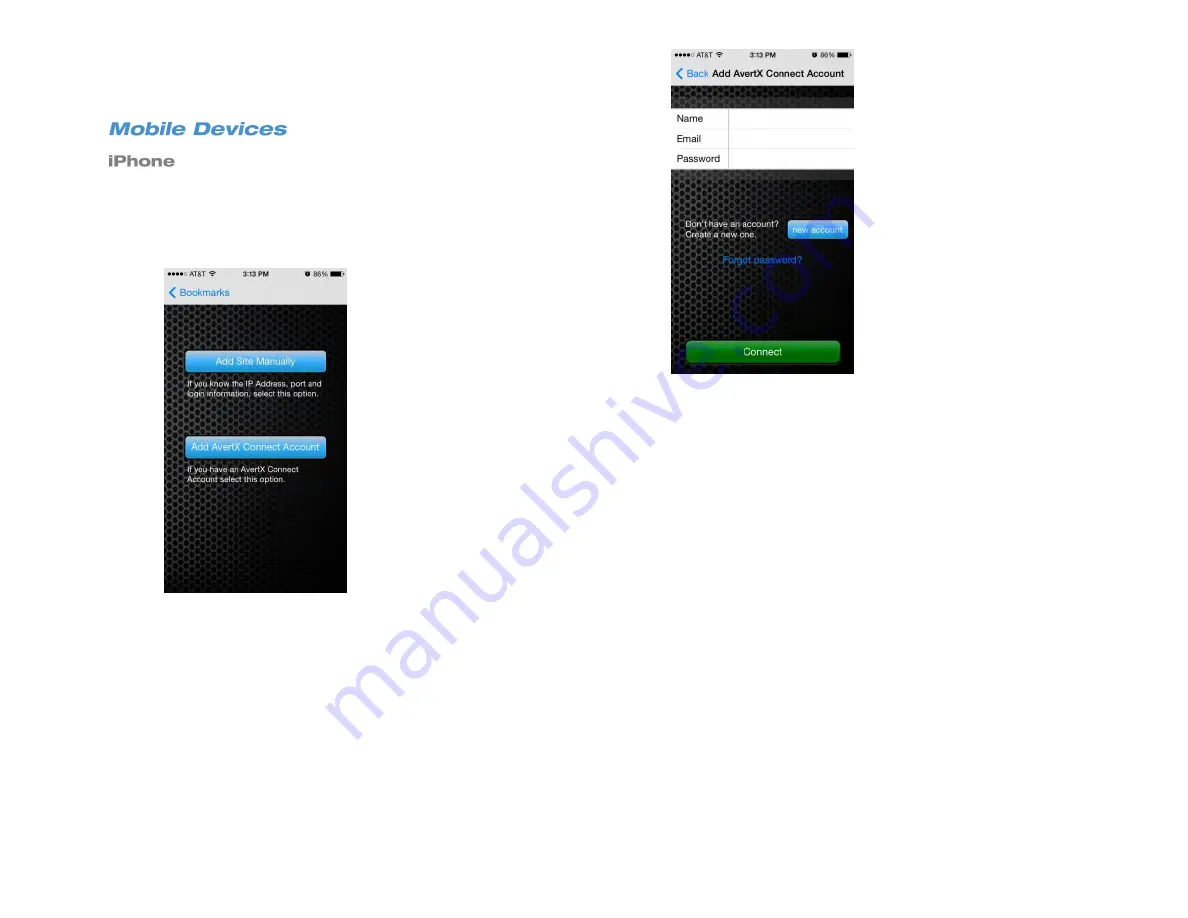
Using an AvertX Connect account is a quick way to view your NVRs 

streamed images with the AvertX GO! App. When configured correctly, 

the App can also connect to the NVR using the local IP address or 

DDNS hostname.  
1.  Open the 

AvertX GO!

 App. 

2.  Tap 

and then tap 

Add AvertX Connect Account. 


3.  If your account already exists, enter the appropriate 

login 

information,

 and then tap 

Connect

--OR— 

4.  Tap 

New Account 

to create an AvertX Connect account.  

5.  Enter 

First

 and 

Last name

email address, password

 and 

confirmation

, and 

the caption verification.  

6.  Agree to the 

Terms of Use

, and then tap 

Create Account

7.  You will receive an email from AvertX Connect, tap the link in the 

email to 

Activate

 your account. 

8.  Follow steps 1-3 to add your new account and connect to your 

recorder. 


Summary of Contents for NV160 Series

Page 1: ...High Definition Network Video Recorder PRO Series User Manual ...

Page 2: ...ng without limitation damages for loss of business profits business interruption or loss of business information even if AVERTX has been advised of the possibility of such damages or whether in an action contract or tort including negligence This software and documentation are copyrighted All other rights including ownership of the software are reserved to AvertX AVERTX and AvertX are registered t...

Page 3: ...vertX as they may touch dangerous voltage points or short out parts that could result in a fire or electrical shock Never spill liquid of any kind on the product 11 Accessories Do not place this product on an unstable cart stand tripod bracket or table The product may fall causing serious personal injury and serious damage to the product 12 Burden Do not place a heavy object on or step on the prod...

Page 4: ...that product s instructions MAINTENANCE This recorder is designed to last for long periods of time To keep the recorder always operational we recommend regular inspection maintenance cleaning parts or replacement For details contact the nearest dealer MOISTURE CONDENSATION Moisture condensation damages the recorder Read the following information carefully Moisture condensation occurs during the fo...

Page 5: ...nsideration should be given to the connection of the equipment to the supply circuit and the effect that overloading of the circuits might have on over current protection and supply wiring Appropriate consideration of equipment nameplate ratings should be used when addressing this concern Grounding Grounding of rack mounted equipment should be maintained Particular attention should be given to sup...

Page 6: ...WHICH THE RECEIVER IS CONNECTED CONSULT THE DEALER OR AN EXPERIENCED RADIO TV TECHNICIAN FOR HELP CAUTION CHANGES OR MODIFICATIONS NOT EXPRESSLY APPROVED BY THE PARTY RESPONSIBLE FOR COMPLIANCE COULD VOID THE USER S AUTHORITY TO OPERATE THE EQUIPMENT THIS CLASS A DIGITAL APPARATUS COMPLIES WITH CANADIAN ICES 003 CET APPAREIL NUMÉRIQUE DE LA CLASSE B EST CONFORME À LA NORME NMB 003 DU CANADA OPERAT...

Page 7: ...on 18 TWO CONNECTIONS 19 Front Panel 20 Front Panel 20 16 CH 20 Rear Panel 21 Rear Panel 16 channel model shown 21 Remote Control 22 USB Mouse 22 Onscreen Menu Bar 22 THREE INSTALLATION 23 Connection Guide 24 Power Setup 24 Monitor Setup 24 Connecting an IP Camera 25 Connecting to a Network 25 Connecting an Alarm Sensor Input 25 Connecting a Relay Output 25 ...

Page 8: ...a Name 29 Display 29 Monitor Resolution 29 HDMI Auto Resolution Detection 29 Monitor Image Controls 29 Sequence Setup 29 Monitor Dwell 30 Date Time 30 Network Time Protocol Setup 30 Daylight Saving Time Setup 31 Network Setup 32 Network Setup 32 General Settings 32 DHCP 32 Web Port 32 Network Restart 32 DDNS Setup 32 AvertX Connect 33 Camera Info 33 PoE Status 33 Camera Setup 34 Device Search 34 ...

Page 9: ... 39 General Settings 39 Per Channel Configuration 39 Channel Select 39 Video Loss Detection 39 Motion Detection 39 Alarm In 40 Alarm Out 41 Event Trigger Preset 41 Copy Event Settings 41 Motion Detection Setup 41 Enable Motion Detection 41 Creating a Detection Area 41 E Mail Management 42 Hard Drive Setup 43 Internal And External Disks 43 Data Protection 43 Configuration 44 General Settings 44 Loa...

Page 10: ...PRO Series Recorder 47 Maintenance 48 Auto Logout 48 Password Protection 48 Account Permission Reset 48 Audio Output 48 Audio Output Gain 48 Key Beep 48 Auto Restart 48 PoE Power Limitation 49 Info 49 FIVE OPERATION 50 Login 51 Logging In To the Recorder 51 Changing the Admin Password 51 Adjust Permission Level Requirement for Menu Access 51 display 52 Channel Details 52 Connection Icons 52 Notifi...

Page 11: ...ant playback 56 Search 56 Calendar Search 56 Preview Search 57 Panorama Search 57 Review Calendar to Select Date and Time to Play 57 Event Search 58 Preview 58 Filter 58 Backup Export VIDEO 59 Terms 59 USB Export Drives 59 Export Formats 59 Backup a Selection of Video during Playback 59 Backup Video from Calendar Search 59 Backup Video from Event Search 60 Export Menu 60 Instant Export 60 Export 6...

Page 12: ...up 66 LAN Setup 66 Static IP Address 66 DDNS Setup 67 Port Forwarding 67 Configure Your Router 67 Establishing a Connection with a Windows Computer 68 Connecting to the Recorder on a Local Area Network 68 Connecting to the Recorder from a Remote Location 69 Accessing your AvertX IP Camera 69 Connecting to the Camera via a Recorder on a Local Area Network 69 Connecting to the Recorder from a Remote...

Page 13: ...vent in Playback 80 Download an Event to your Computer 80 Snapshot 80 4 3 81 Health 81 PTZ 81 AvertX Remote for Mac 82 Product Description 82 Features 82 System Requirement 82 Downloading AvertX Remote 82 Using AvertX Remote 82 Connect to Your Recorder Using AvertX Connect 82 Connect to Your Recorder Using DDNS 82 Editing a Recorder 83 Deleting a Recorder 83 Viewing Multiple Recorders 83 Viewing L...

Page 14: ...g In to the Mobile Application 90 User Management 90 Adding Users to your AvertX Connect Account 90 Removing Users from your AvertX Connect Account 91 Edit User Permissions 91 Edit User Recorder Permissions 91 APPENDIX A ADDITIONAL CAMERA CONFIGURATION 93 Plug N Play and Power over Ethernet 94 Using an External PoE Switch 94 Connect Your Camera and PoE Switch to Your Local Network 94 Connect Your ...

Page 15: ...are to be used only for reference and minor repairs Due to the complexity of the device no end user should attempt to make component repairs or modifications to any printed wiring board Improper repairs can create a safety hazard Any indications of component replacement or printed wiring board modifications may void any warranty Warning To reduce the risk of electrical shock or damage to the equip...

Page 16: ...16 Product Description Features Basic Setup Password Protection ...

Page 17: ...gh the internet for live viewing digital search and even camera control With the latest advancements included in the PRO Series software searching your video archive is easier than ever The AvertX PRO Series network video recorder includes the following features 16 network channels available on the NV160 models 8 network channels available on the NV80 models Supports cameras up to 4K resolution Mu...

Page 18: ... 6 Click Network Setup 7 Click General Settings 8 DHCP is enabled On by default if no changes are needed simply make a note of the IP address 9 If the IP address needs to be static set DHCP to Off and then enter the IP Address Netmask Gateway and DNS for the network Note If you plan to access the NVR remotely using a computer smart phone or tablet Set DHCP to Off after you complete your port forwa...

Page 19: ...33672AB 19 Front Panel Rear Panel Remote Control ...

Page 20: ...20 USB 2 0 Network LED Record LED Power Button Power LED Indicator IR Remote Port Alarm LED ...

Page 21: ...ders which can be differentiated by their part numbers To find the part number of your recorder locate the product sticker either on the side of your recorder or on the bottom Network Camera Ports Power Vent USB 3 0 LAN Network Port Alarm I O HDMI Port VGA Port ...

Page 22: ... mouse pointer to select and click menu items instead of using the remote control Using a USB mouse also allows access to the onscreen menu bar The Onscreen Menu Bar will display when the mouse pointer hovers over the top of the screen The Menu Bar will display the following options DVR select Direction arrows Channel selection Exit Escape Pause Export Play Search Enter Sequence Reverse Fast Forwa...

Page 23: ...33672AB 23 Connection Guide Turning On the Recorder Turning Off the Recorder ...

Page 24: ...mes Disconnect the power from the recorder by unplugging the power cord either from the electrical outlet or the recorder The recorder has the following connections available to attach a monitor An attached monitor is required for the initial configuration of the NVR HDMI Output To TV Digital Display VGA Connect to an analog VGA Monitor Connect the monitor to the rear of the recorder using the cab...

Page 25: ...meras from another manufacturer you may need a separate power supply if it is not a PoE camera Note The AvertX PRO Series supports ONVIF Profile S compliant IP cameras However cameras will require manual set up refer to page 95 3rd party ONVIF compliant PTZ cameras will have limited functionality when viewed through the NVR Please consult with the 3rd party camera manufacturer to confirm the level...

Page 26: ...Press the button on the front panel to turn on the recorder Note Connect cameras after you power on the NVR for the first time Press the power button on the front panel 1 Mouse over the top of the screen 2 Click Exit on the dropdown menu 3 Click Shutdown 4 Click Confirm Note You can also shutdown the system by holding down the power button on the front of the NVR for 8 seconds ...

Page 27: ...33672AB 27 Main Menu System Setup Camera Setup Schedule Setup Alarms Setup Hard Drive Setup Configuration Management Info ...

Page 28: ...n Shutdown Account Setup LAN Setup AvertX Connect Setup DDNS Setup Camera Setup Schedule Setup Event Duration VGA Resolution Date Time Display Software Upgrade System Log Use this menu to configure all of the recorder settings schedule recording configure the alarms set up user access networking display and system options To access the menu mouse over the top portion of your display and select Set...

Page 29: ...n for your monitor Caution Do not choose a resolution that his higher than that of your monitor Doing so will result in an out of range or no signal message For details on the available resolution options for your monitor refer to the user manual of your monitor If using the HDMI video port the NVR can detect the preferred resolution of the monitor This feature can be turned on or off You can adju...

Page 30: ... Time Time Zone Date Time Display Date Display Mode and Time Display Mode click Date Time and use your mouse to adjust the values Note Changing the date or time after initial configuration requires formatting the hard drive s to avoid data mismatch Note In the United States the Pacific Time Zone is 8 00 the Mountain Time Zone is 7 00 the Central Time Zone is 6 00 and the Eastern Time Zone is 5 00 ...

Page 31: ...ould be applied 1 In the Date Time menu click Daylight Saving Time Setup 2 Click Daylight Saving Time and select On 3 Adjust the DST Start settings to the appropriate date and time to start Daylight Savings Time 4 Adjust the DST End settings to the appropriate date and time to end Daylight Savings Time 5 Adjust DST Bias to the appropriate time adjustment for Daylight Savings Time 6 Close Daylight ...

Page 32: ...r your recorder Netmask Specify a subnet mask of the network you are connecting to the recorder Gateway Specify the default gateway of the network you are connecting to the recorder DNS Specify the DNS of the network you are connecting to the recorder To access your recorder from outside your local network your router will use the web port of your recorder The default port is 80 If you change the ...

Page 33: ...me AvertX Connect gives you free easy access to your video whether you re on the go or at home using Internet Explorer on your Windows based computer AvertX Remote for Mac or the AvertX Go apps on mobile devices iOS and Android For more information refer to the AvertX Connect chapter This option allows you to view the format resolution frame rate and bandwidth of each camera on your system Click P...

Page 34: ... begin recording video immediately without manually entering an IP address for each camera If PnP is On the cameras are reset to their default settings If you have custom camera settings set Enable PnP to Off Note Enable PnP will only function with AvertX cameras You can use the Connection setup to control what functions of your camera your PRO Series unit has access to as well as set up the kind ...

Page 35: ...e of the streamed and recorded video on Stream 1 stream viewed when in full view Video2 Resolution Adjust the quality and size of the streamed and recorded video on Stream 2 stream viewed by mobile devices and in multi camera display modes Video Rotation Rotate or flip the image if the camera is placed on a table wall or ceiling Bit Rate Set the data transmission speed for your camera A lower bit ...

Page 36: ...o blue Use the White Balance Settings to adjust the color temperature of your camera 1 Click White Balance and select Auto Auto Tracking White Balance ATW or Manual 2 If you select Manual adjust your Red Rgain and Blue Bgain levels IR Function is enabled when using a camera equipped with IR Illuminators IR Illuminators enable the camera to see in very low light situations and are set to Smart by d...

Page 37: ...al life of the data This is only necessary if you are restricted by law to retain video data for a maximum number of days 1 Select the number of days you would like to keep using the onscreen keyboard mouse scroll wheel or arrows Data Purge is used to manage stored data Recorded data can be purged as ALL or ALL EVENT and a date can be designated as a restriction to the data purge to preserve desir...

Page 38: ...to the presets Custom Profiles allow you to set the specific frame rate and image quality for each camera for normal recording and during an alarm event Frame rate given in Frames Per Second FPS dictates how smooth video will look on your screen A high frame rate 30 FPS captures motion very smoothly but uses more system resources A low frame rate produces choppier video but uses less recording spa...

Page 39: ...he video feed from the camera sensing the alarm event to full screen on the live view Per Channel Configuration allows you to configure alarm events for video loss and alarm inputs and outputs For each item in this section select a specific camera channel to configure Set this option to On to trigger an alarm when the video feed from a camera is lost This can occur if the camera loses power breaks...

Page 40: ...more details about setting up your door contacts please refer to documentation from your alarm manufacturer Door sensor hardware can be purchased at many home improvement stores 1 Follow the manufacturer instructions to attach your sensor hardware to the door There should be two parts for each door sensor contact one attached to the door itself and the other attached to the door frame 2 Connect th...

Page 41: ...rea detection level and sensitivity level for each camera 1 On the Hover menu click Setup 2 Click Schedule Setup and then click General Settings 3 Set Global Configuration to Motion Event 4 Click Alarms Setup and then click Per Channel Config 5 Ensure that Motion Detect is set to On 1 On the Hover menu click Setup 2 Click Alarms Setup and then click Motion Detection 3 Click a Camera Channel 4 Clic...

Page 42: ...finished making your changes set E mail Activate to On 3 Using the on screen keyboard or a USB keyboard type the E mail Address you want to receive alert messages 4 To include a video file with the alert message click E Mail Video Attachment and select On 5 Click Event Alarm Selection 6 Choose what kinds of alarm events to be notified about by clicking on them and selecting Yes or No Motion Detect...

Page 43: ...t use the rear USB ports if you wish to use a USB 3 0 external hard drive for stoage 1 Click Internal Disks or External Disks 2 To view the information for your hard drives click the Detail column for the drive you want to view 3 To format or repair your drive click Action and select your desired action Add Remove This action will activate and deactivate the drive The status of the drive is displa...

Page 44: ...urations from your PRO Series recorder to backup settings or for use in another PRO Series recorder using a USB drive 1 Plug a USB drive into the USB port and then click Export Configuration 2 Click Configuration Name 3 Use the on screen keyboard to type a name for the file and then click OK 4 Click the Agree check box 5 Click OK 6 Press any key or click Close to continue 7 Close the Export Config...

Page 45: ... field and use the on screen keyboard to type the new password Note The default password for a user account is 4321 Note Passwords require a minimum of four characters maximum of eight characters 4 Click Privilege and select the privilege level for this user Level 1 Level 8 Level 1 has the lowest authority and Level 8 has full administrative authority 5 Click Save 6 Repeat as necessary selecting u...

Page 46: ...tains firmware for several PRO Series recorder models Your recorder will select the appropriate version 4 Connect a USB drive to your computer copy both firmware folders to your USB drive and then remove the drive from your computer 5 Insert your USB drive into any of the USB ports on your recorder 6 On the Hover menu click Setup 7 Click Management and then click Software Upgrade 8 A message will ...

Page 47: ... NV160 P2B upd_snseries NV160 PS16 NV80 PS8 Note The firmware file contains firmware for several PRO Series recorder models You must select the appropriate version to install based on the model of your recorder The model number of your recorder is indicated in Menu System Version Information 4 Type the IP address or DDNS address of the recorder in the address bar to open the AvertX Remote Viewer 5...

Page 48: ...t and cannot be recovered unless you have a saved configuration with those settings Note This reset only affects options customized within the Account Setup and Permissions Setup menus CAUTION There is no confirmation message selecting Yes will instantly reset Account Setup and Permissions Setup menu settings Audio Output will enable or disable the sound from cameras equipped with microphones Note...

Page 49: ...creen keyboard and enter a value 4 Click Close to continue Use the INFO menu to view system information such as camera PoE switch hard drive and remote status hardware and software version and network address information Model Name Displays the model identifier of the recorder MAC Address Displays the MAC Media Access Control of the recorder Network Address Displays the IP Address of the recorder ...

Page 50: ...50 Login Live Display Call Monitor Display PTZ Search Export Backup Viewer Save and Load Settings ...

Page 51: ...word 1 On the Hover menu click Setup 2 Log in and an administrator 3 Click Management 4 Click Account Setup 5 Click the Password field and then use the on screen keyboard to type a new password Note Passwords require a minimum of four characters maximum of eight characters 6 Click Confirm By default the PRO Series system is set to allow only the Administrator to access the menu To change this perm...

Page 52: ...icable Note Mouse over or double click the Connection or Notification bar to get more detailed connection information Connection Failed The camera failed to connect and does not display live video Connection Successful The camera connected successfully and will display live video Connecting The camera is attempting to connect CH1 Live Video Details Channel Details ...

Page 53: ...the current user indicated by a user level Live Display is the default mode of the recorder After startup the recorder will load to the Live Display After being left idle on any menu the recorder will return to the Live Display For a full screen display of an individual camera channel double click on the channel in the multiplex view or hold the pointer over the menu bar click Channel and then cli...

Page 54: ... be customized using the Main Monitor Schedule option in the Display menu see the Display section in the Setup chapter of this manual 4 Channel 2x2 The recorder will sequence through channels 1 4 in the first view then channels 5 8 then 9 12 then 13 16 This sequence mode is only available on the 8 and 16 channels models and the 8 channel will only sequence through channels 1 4 and 5 8 9 Channel 3x...

Page 55: ...through Tours are configured in the camera not the recorder For information on setting tours refer to the user manual of your PTZ camera 1 Click the channel of the camera you want to work with 2 Click PTZ in the hover menu bar 3 Click Preset 4 Enter the number of the tour you want to call 5 Click Run Tour Note Some camera models do not support tours and some only support a single tour Most cameras...

Page 56: ...normal Search controls Instant playback provides options for playback from 30 minutes 1 hour 3 hours or 1 day ago This will begin a playback immediately starting at the selected interval and playing forward To view an Instant Playback 1 On the Hover menu click Playback 2 Select Instant PB 3 Choose a time interval to begin playing recorded video 4 Use the on screen controls to manipulate the playba...

Page 57: ...he selected channel at the selected interval This allows you to skip forward or backward from the selected time 1 Select a starting date and time 2 Select the Channel to view 3 Select the interval Panorama Search will use to display the still images 1 second 10 seconds 1 minute 10 minutes 30 minutes or 1 hour 4 Click Start to show the first set of images 5 Click the arrows on the Left or Right of ...

Page 58: ...e event 5 During the playback use the search control bar to pause rewind or fast forward the recorded video 6 Click Search in the hover menu to return to the Search screen or click Live to return to the Live screen 1 Select an event from the Event List 2 Click Start to preview 1 Select a Start and End time 2 Select the event type 3 Select the channel s 4 Click Apply to filter ...

Page 59: ...e available on the drive To save more than 8GB AvertX recommends saving your video in multiple exports If the space required for your video export is greater than the available space a message will recommend an export timeframe If you are unable to back up multiple cameras using your required timeframe reduce the number of cameras or select a single camera The PRO Series NVR can export video in se...

Page 60: ...oose a time interval to begin exporting recorded video Export displays the Video Export tab with detailed options for exporting video This window displays the recorded video for all camera channels by date 1 Connect a USB thumb drive or external hard drive to the front or rear panel of the recorder 2 On the Hover menu click Export 3 In the Video Export tab select a date from the calendar Note Date...

Page 61: ...lick Backup_Viewer 4 If prompted click Yes 5 Click Search to locate your video file 6 Select the file you want to view and then click Playback 7 Select the camera you want to view or click All 8 Click Play Your video will begin playing automatically 9 Use the Playback controls to pause fast forward or rewind your video 10 You can change which cameras you are viewing and the screen mode using the C...

Page 62: ...e camera will find the correct focus length b Manual Focus Use the MF and MF buttons to manually adjust the focus length 6 Adjust the Iris Control 7 Adjust the PTZ speed using the speed percentage bar 8 When you are satisfied with the PTZ controls click Exit to return to the Live view If your PTZ camera can support preset positions you can use the Preset button in the PTZ controls to manage those ...

Page 63: ...es recorder using a USB drive 1 Plug the drive into the USB port 2 Right click in the Live screen and click Menu 3 Click System 4 Click Export Configuration 5 Click Destination 6 Choose the USB drive you want to export your configuration to and select Yes 7 Click File Name 8 Use the on screen keyboard to type a name for the file and then click OK 9 Click Export 10 Click Confirm 11 Press any key or...

Page 64: ...64 Introduction to Remote Connection Remote Connection Setup Using the Remote Software AvertX Remote for Mac ...

Page 65: ...ertX Remote for Mac chapter For most users AvertX recommends AvertX Connect to simplify configuring Remote Access For more information refer to the AvertX Connect chapter Your router directs information from the Internet based on the port and internal IP address of your equipment such as your recorder personal computer or printer To access your recorder from the internet you will need to be sure y...

Page 66: ...munication Protocol DHCP address space 6 The following information will appear Write it down on a piece of paper IP Address Netmask Gateway DNS 7 Click Close If you are using a DDNS account to access your recorder remotely or have an IP address Netmask Gateway and DNS you want to use other than that assigned by DHCP follow these instructions If you are unsure contact your system administrator 1 Be...

Page 67: ...ect to your recorder Note Port forwarding must be configured on both your recorder and your router to allow remote access to the recorder from an offsite location The IP address of your recorder is identifiable within your network In order to be able to access your recorder from a remote location through the internet you will need to configure your router to forward the information from the intern...

Page 68: ...order within your building you must use the local IP address of the recorder found on the recorder under LAN setup If you are connecting to your recorder from another building you will connect over the Internet using the wide angle network WAN IP address or DDNS address To connect from a remote location you must use your DDNS address or the public IP address of your recorder To find the public IP ...

Page 69: ...order If there is an instance in which you need to configure your camera directly you can do so from a computer over the web Your camera uses an address based on the IP address of the PRO Series recorder starting with port 81 If you want to access the camera that is on channel 3 of your recorder you would use the IP address of the recorder then add 83 http XXX XXX XXX XXX 83 Note Use this method t...

Page 70: ...se the local IP address of the recorder When connecting from outside your local network use DDNS To install AvertX GO on your device you will need to have a valid account with either the Google Play Store for Android devices or iTunes for Apple devices 1 On your device tap either the iTunes or Play Store icon 2 Tap Search and type AvertX GO 3 Follow the instructions to download and install the app...

Page 71: ...t Account 3 If your account already exists enter the appropriate login information and then tap Connect OR 4 Tap New Account to create an AvertX Connect account 5 Enter First and Last name email address password and confirmation and the caption verification 6 Agree to the Terms of Use and then tap Create Account 7 You will receive an email from AvertX Connect tap the link in the email to Activate ...

Page 72: ...count 3 If your account already exists enter the appropriate login information and then tap Connect OR 4 Click New Account to create an AvertX Connect account 5 Enter First and Last name email address password and confirmation and the caption verification 6 Agree to the Terms of Use and then tap Create Account 7 You will receive an email from AvertX Connect tap the link in the email to Activate yo...

Page 73: ...t already exists enter the appropriate login information and then tap Save 4 Tap the name from the site list and then tap Connect OR 5 Click New Account to create an AvertX Connect account 6 Enter First and Last name email address password and confirmation and the caption verification 7 Agree to the Terms of Use and then tap Create Account 8 You will receive an email from AvertX Connect tap the li...

Page 74: ...s password and confirmation and the caption verification 7 Agree to the Terms of Use and then tap Create Account 8 You will receive an email from AvertX Connect tap the link in the email to Activate your account 9 Follow steps 1 3 to add your new account and connect to your recorder Using an AvertX Connect account is the best way to view and manage your NVRs with the AvertX Remote app 1 Open the A...

Page 75: ... an email from AvertX Connect click the link in the email to Activate your account 8 Follow steps 1 3 to add your new account and connect to your recorder Sites can be added manually for use with the AvertX GO apps if you don t have the recommended AvertX Connect account 1 Tap 2 Tap Add Site Manually 3 Enter the NVR Name IP address Port number Username and Password 4 Click Connect ...

Page 76: ...tX GO Mobile application give you convenient NVR viewing options including search alarm list snapshots PTZ control if available and quick access to NVR information 1 Tap a User 2 Tap the recorder you wish to view ...

Page 77: ...Viewer software to download the Backup Viewer software click the Backup Viewer link in the live view Use the Record button to save video you are currently viewing live or to save playback video while searching To save a segment of video while watching live video or playback video 1 Click Record to start the video segment 2 In the Save As window select a location and file name and then click Save 3...

Page 78: ...78 Audio Controls Channel Selection Camera Display Smooth Record Live Screen Playback Configuration Menu Event Search Snapshot Ratio Disk information Logout Bandwidth Backup Viewer Link ...

Page 79: ...eft hand Start slider in the yellow bar 3 Click OK a Playback of all channels at the selected time will begin b Use the playback navigation buttons in the lower right to rewind pause or fast forward 4 Click Live when you are done with Playback and want to return to Live 1 Click Search 2 Select Save Select AVI to download an AVI file that can be played with any media player select DRV to save the f...

Page 80: ...uble click the desired event a Playback of all channels at the selected time will begin b Use the playback navigation buttons in the lower right to rewind pause or fast forward 3 Click Live when you are done with Playback and want to return to Live 1 Click Event 2 Select the desired event and click Download 3 In the Save As window select a location and file name and then click Save Note In order t...

Page 81: ... storage devices connected to the recorder internal or external Use the channel select buttons to view a single PTZ camera to enable the onscreen pan tilt zoom controller Please reference the PTZ section in the Operation chapter earlier in this manual for details on each of these functions Note The PRO Series recorder is only compatible with IP PTZ cameras Because of this the ID button on this con...

Page 82: ...ovided Once it is downloaded locate the program in Launchpad and click to start the program 1 In the Device Manager section click and then tap Add AvertX Connect Account 2 If your account already exists enter the appropriate login information and then click Connect OR 3 Click New Account to create an AvertX Connect account 4 Enter First and Last name email address password and confirmation and the...

Page 83: ...r select the recorder in the list and then click the Trash icon You can connect to up to 9 PRO Series recorders simultaneously using AvertX Remote for Mac 1 Double click the recorders in your list to connect 2 To view the recorders simultaneously click 1x1 2x2 or 3x3 3 When changing viewing configurations or searching a specific recorder select the recorder in the live screen before using the butt...

Page 84: ...u want for this application Selecting High bandwidth will result in smoother video but will use more resources on your Mac Dual Stream Click Dual Stream to retrieve video from your recorder via dual stream Info Click the Information icon to view camera information for each camera channel Snapshot Save a snapshot of the currently displaying camera This function is only available when viewing a sing...

Page 85: ...viously pre set position select the number from the list and then click Goto 1 To playback recorded video click Playback 2 Set the Start Time and End Time of the video you want to view be sure you set your desired date as well as the time 3 Click OK to begin playback 4 While playing back recorded video use the Playback Control buttons to play fast forward backward or pause video 5 To return to the...

Page 86: ...86 Introduction Create an AvertX Connect account User Management Add a NVR to AvertX Connect View the NVR Remotely User Management ...

Page 87: ... your ISP Note Port forwarding may be necessary for some advanced network configurations Creating an AvertX Connect account is free To create an AvertX Connect account 1 Go to connect AvertX com 2 Fill in the information boxes appropriately including a valid email address and password with confirmation 3 Identify and enter the text in the Captcha Verification box Note If you are having difficultie...

Page 88: ...n access account functions After you create an AvertX Connect account you will need to add your NVRs to that account To do this you will need to access the NVR configuration menu To add a NVR to your AvertX Connect account 1 On the hover menu click Setup 2 Under System Setup click Network Setup 3 Click AvertX Connect 4 Change the System Name if desired The default System Name is NVR 5 Enter the Co...

Page 89: ...e To identify the NVR Web Port see the Web Port section of this manual The default Web Port is 80 1 Identify your NVR IP address DDNS location and web port 2 Click Recorder List 3 Click Edit next to the desired recorder 4 Enter the IP address or DDNS address 5 Enter the Web Port 6 Click Save After you add the NVR to your AvertX Connect account you can access the NVR from a remote location using th...

Page 90: ...ter First and Last name email address password and confirmation and the caption verification 6 Agree to the Terms of Use and then tap Create Account AvertX Connect allows you to manage users with your account This way you can manage your NVRs and multiple users under one account as the original user account will be established as the Account Owner The Account Owner has control over the subsequent ...

Page 91: ...er Management tab 2 In the user table click Edit next to the user whose permissions you with to edit 3 On the left navigation column click Web Services Permissions 4 Check the boxes next to the AvertX Connect Account Permissions that this user can have access to 5 Click Save To establish the recorders that specific users have access to 1 Click the User Management tab 2 In the user table click Edit...

Page 92: ...lick the User Management tab 2 In the user table click Edit next to the user whose permissions you with to edit 3 Click the Recorders tab 4 Click Remove next to the recorder you wish to deny a user access to The user is no longer able to access this recorder ...

Page 93: ...33672AB 93 Using Cameras from Other Manufacturers Using an External PoE Switch ...

Page 94: ...ns 2 Connect your camera to the external PoE switch 3 Follow the instructions in your camera user manual to view and change the camera IP address using a PC on the same network Write down the IP address of your camera for future use 1 Ensure that your PRO Series recorder is connected to your network If the connection is working the green lights on your LAN port will turn on 2 On the hover menu cli...

Page 95: ...evices the brand model and IP address of each camera on your system will appear 10 Click the camera you want to assign to this channel Note You can also manually enter the IP address of the camera To do so click Hostname IP and type the IP Address of your camera 11 Click Model and select ONVIF 12 Click Connection Setup 13 Click Account and type in the username for the camera the default user name ...

Page 96: ...rmission from AvertX The information in this publication is believed to be accurate in all respects However AvertX cannot assume responsibility for any consequences resulting from the use thereof The information contained herein is subject to change without notice Revisions or new editions to this publication may be issued to incorporate such changes IRREL ...

Reviews: