background image

Setting Up the System

  Configuring System Setup Parameters

Octel 50 Installation Guide

8-79


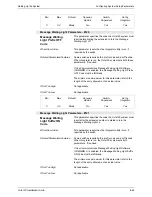
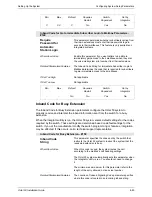
If Set Too Low


Not applicable.


Min


1


Max


99


Default


1


Requires

Restart


No


Switch-

Dependent


No


Set by

Integrator


No


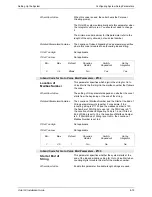
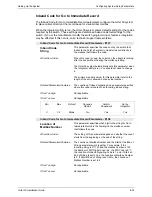
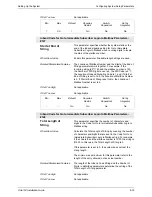
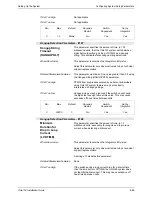
 Inband Code for Go to Immediate Subscriber Login to Mailbox Parameters -
#147


Start at End of
String


This parameter specifies whether the system starts at the
end of the inband signaling string for Go to Immediate
Subscriber Login to Mailbox when counting digits to locate
the start of the mailbox number.


When/How to Use


Enable this parameter if variable-length strings are used.


Related Parameters/Features


The Location of Mailbox Number and the Start at the End of
String parameters work together. For example, if the
incoming string is 9*1123 and the mailbox number is 123,
the Number of DID Digits to use is 6, the DID Code is 9*1,
the Location of Inband Signaling Code is 1, and, if Start at
End of String is set to Yes, the Location of Mailbox Number
is 3. If Start at End of String is set to No, the Location of
Mailbox Number is set to 4.


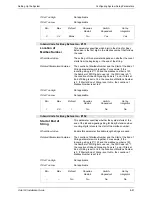
If Set Too High


Not applicable.


If Set Too Low


Not applicable.


Min


Max


Default


No


Requires

Restart


No


Switch-

Dependent


No


Set by

Integrator


No


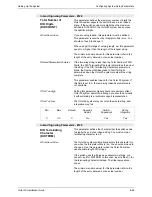
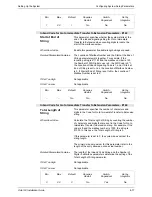
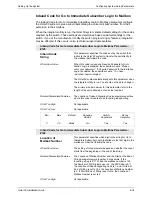
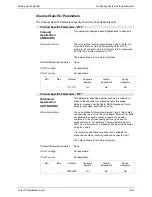
 Inband Code for Go to Immediate Subscriber Login to Mailbox Parameters -
#148


Total Length of
String


This parameter specifies the number of characters and
digits in the Code for Go to Immediate Subscriber Login to
Mailbox string.


When/How to Use


Calculate the Total Length of String by counting the number
of characters and digits that are sent in the Code for Go to
Immediate Subscriber Login to Mailbox string. For example,
if the code is $ and the mailbox number is 1000, the string is
$1000. In this case, the Total Length of String is 5.


If this parameter is set to 0, the system does not test the
string length.


The minimum and maximum for this parameter refer to the
length of the entry allowed, not an actual number.


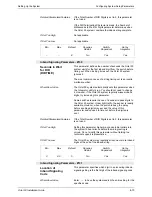
Related Parameters/Features


The length of the Inband Code String and the Number of
Digits in a Mailbox parameters determine the setting of the
Total Length of String parameter.


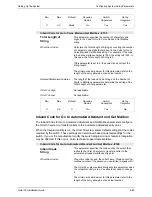
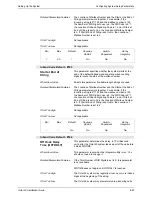
If Set Too High


Not applicable.


If Set Too Low


Not applicable.

Summary of Contents for Octel 50

Page 1: ...585 313 134 Comcode 108503004 101 1840 000 Issue 1 June 1999 Octel 50 Installation Guide Octel Messaging ...

Page 2: ......

Page 3: ...Octel 50 Installation Guide 585 313 134 Comcode 108503004 101 1840 000 Issue 1 June 1999 ...

Page 4: ...ecurity of your system such as programming and configuring your equipment to prevent unauthorized use The system manager is also responsible for reading all installation instruction and system administration documents provided with this product in order to fully understand the features that can introduce risk of toll fraud and the steps that can be taken to reduce that risk The manufacturer does n...

Page 5: ...es Provide the telephone company with the FCC registration and Ringer Equivalence Numbers The sum of the RENs from all equipment on one phone line must be less than 5 Note that the Octel 50 ringer equivalence is approximately 0 5 The REN is used to determine the number of devices you can connect to the telephone line and still be assured that all of those devices ring properly when the number is c...

Page 6: ...00 457 1764 International Voice 1 317 322 6791 International Fax 1 317 322 6849 Write Lucent Technologies BCS Publications Center 2855 North Franklin Road Indianapolis IN 46219 Order Document No 585 313 134 Comcode 108503004 Issue 1 0 June 1999 How to Comment on This Manual Use the feedback form located after this section to send your comments and recommendations for changes ...

Page 7: ...omers Would you please take a few minutes and complete the following questionnaire and fax it to 303 538 1741 Please rate the effectiveness of this Implementation and Service Manual in the following areas Area Excellent Good Fair Poor 1 Organization 2 Clarity 3 Completeness 4 Accuracy 5 Illustrations 6 Overall satisfaction Please provide any other comments Document Products Service ...

Page 8: ......

Page 9: ...ials 3 2 Materials Checklist 3 2 Step 2 Verifying Phone System Readiness 3 3 Confirming Dial Tone 3 3 Verifying the Phone System Configuration 3 3 Compiling Phone System Configuration Information 3 3 Step 3 Configuring the Voice Boards 3 3 Configuring Dialogic Boards 3 4 Configuring Rhetorex Boards 3 6 Step 4 Configuring the Fax Boards 3 7 Configuring Brooktrout TR112 Boards 3 8 Setting the TR112 ...

Page 10: ... SMDI as a Standalone Utility 5 3 Chapter 6 Configuring Dial Plan 6 1 Identifying Local Area Code and Prefixes 6 2 Running Dial Plan After Installation 6 2 Deleting a Prefix 6 3 Activating Dial Plan 6 3 Understanding How Dial Plan Works 6 4 Chapter 7 Integrating with the Phone System 7 1 Running the Switch Integrator Utility 7 2 Running the Switch Integrator After Installation 7 3 Chapter 8 Settin...

Page 11: ...ified Message Desk Interface Parameters 8 99 Low Level Voice Board Parameters 8 100 Chapter 9 Defining Phone System Signals 9 1 Running Call Analysis 9 2 Determining If You Should Run Call Analysis 9 2 Meeting the Requirements to Run Call Analysis 9 2 Using CCA for Rhetorex and Dialogic Boards 9 3 Running CCA After Installation 9 6 Running AccuCall Call Analysis for Rhetorex 9 6 Common AccuCall Pr...

Page 12: ...ystem Troubleshooting Table 13 16 Understanding Call Flow for Specific Call Handling Conditions 13 40 Determining a Switch s Disconnect Signal 13 40 Displaying Features Enabled on the Sentinel 13 41 Interpreting the View Sentinel Information 13 41 Using the Command Line Interface 13 42 Opening and Closing the Command Line Interface 13 42 Closing Business Hours 13 42 Opening Business Hours 13 42 Cl...

Page 13: ...nt of a Phrase 14 30 Copying a Segment of a Phrase into a File 14 31 Inserting a Phrase into the Current File 14 31 Trimming an Existing Phrase 14 32 Deleting a Phrase 14 32 Writing a Phrase to a File 14 33 Reading a Phrase into a File 14 34 Adding Text Records to a Phrase File 14 34 Creating or Editing a Text Record 14 34 Converting an ASCII Based Text Record for Use with V Edit 14 35 Deleting Te...

Page 14: ... Display Scale 14 45 Saving and Assigning Display Settings 14 46 Deleting Phrases or Segments of Phrases 14 46 Copying Phrases or Segments of Phrases 14 47 Pasting into Phrases 14 47 Exiting V Edit 14 48 Preparing the Phrases for Use with Octel 50 14 49 Index I 1 ...

Page 15: ...50 system Configure Octel 50 Maintain the Octel 50 system Troubleshoot the Octel 50 system This manual provides information on using all available Octel 50 features and options Note however that all features and options are not available with all Octel 50 systems Tabs for this Installation Guide are provided in separate wrapping Insert the tabs before their corresponding sections Use the Additiona...

Page 16: ...ions that they create The AMIS Interface Module AIM allows subscribers to send and receive messages to and from other voice mail systems that support the AMIS analog protocol Octel 50 is a voice prompted menu driven system Through voice prompts the system conveys information that includes the options subscribers can choose from to proceed As subscribers become familiar with the voice prompts for t...

Page 17: ...ing System Needs This section discusses items you should consider before you set up the Octel 50 system hardware and install the system software The steps in this section help you Determine system application and requirements Determine hardware requirements ...

Page 18: ... the system Attendant Menu What morning afternoon evening office closed or holiday prompts does the customer want System prompts What kind of information or background music does the customer want callers to hear while they are on hold Call Queuing phrases How many languages are supported on the system Have the appropriate voice files been ordered Multiple languages Does the customer want differen...

Page 19: ...pts 20 and up to 1000 subscribers j Megabytes needed for each additional 1000 subscribers _____ 5 for each additional 1000 k Estimated number of pages needed for fax applications _____ l Megabytes needed for fax applications k 15 _____ Total Megabytes Needed h i j l _____ If you are installing optional software such as remote maintenance software make sure you allow sufficent hard drive space See ...

Page 20: ...irements represent the minimum to effectively run Octel 50 Some additional hardware such as a printer modem for remote maintenance and tape backup unit can optionally be used with the Octel 50 system This optional hardware is not supplied and the optional hardware is not supported by technical support Monitor An VGA or better monitor should be used 3 inch Floppy Drive One 1 44 megabyte 3 inch driv...

Page 21: ... can be used to archive the entire Octel 50 system or a portion of it for example phrase files Make sure a DOS compatible tape backup unit is used Voice Boards Dialogic and Rhetorex voice boards are supported for the Octel 50 system Octel 50 only recognizes a voice board if the EPROM has been programmed to contain the proper signature If a nonsignatured board is detected during initialization its ...

Page 22: ...Determining System Needs Step 3 Consider Additional Hardware Needs OCTEL 50 INSTALLATION GUIDE 2 6 Notes ...

Page 23: ...mation for configuring and installing the hardware required to run Octel 50 The steps in this section help you Assemble the required materials Preparing the phone system Configure and install the voice boards Configure and install the fax boards Connect phone and fax lines Install peripheral hardware ...

Page 24: ...round strap Modular RJ 14 cables 4 connector Power strip 2500 set at least one Phone system documentation Octel 50 Configuration Note for the customer s switch Line simulator DOS installation disks and manual Octel 50 software Octel 50 manuals Hard disk utility software and manual One or two boxes of high density disks for system backup Mouse software and manual Optional Modem software and manual ...

Page 25: ...nfiguration Note when programming the phone system If a Configuration Note is not available for the customer s switch contact a technical support representative for information on the codes required Compiling Phone System Configuration Information Obtain the following phone system configuration information List of hunt groups configured for the phone system if there are any List of active phone sy...

Page 26: ...s and electrostatic dissipative mats while handling a board Configuring Dialogic Boards Octel 50 supports the DIALOG 4 and D 42D SX boards for new Octel 50 systems In addition the Dialogic D 4xD board is supported for existing systems in which it is already installed The following figure illustrates the DIALOG 4 board The following diagram illustrates the D 4xD board The location of the relevant j...

Page 27: ...n address in the D segment which is the default If you cannot use the D segment due to a conflict or for some other reason a technical support representative can advise you to use an address in segment A or C To use an alternate segment you must install one of two jumpers on the Dialogic board Install the JP5 jumper if you assign the voice board an address using the A segment such as A0000 Install...

Page 28: ...ed Configuring Rhetorex Boards Rhetorex 432 4132 and 4108 boards are supported for existing systems in which they are already installed All Rhetorex boards are configured the same way for Octel 50 All Rhetorex boards are factory set to a default address of 300 hex If you are only installing one voice board leave the port address at the factory default unless it conflicts with the address of anothe...

Page 29: ...second column lists the port address that should be assigned to each board and the third column represents the jumper settings that correspond to the port address Step 4 Configuring the Fax Boards Fax boards allow the Octel 50 system to use the Fax Solution features You must configure the fax boards for use with the Octel 50 system before you install them Fax boards contain ports which are the int...

Page 30: ...efore installing the TR112 board you must Set the board s port address Set the interrupt level Set the DMA channel Setting the TR112 Port Address The PC and the Brooktrout boards communicate with each other through a shared memory block that resides within the memory address space of the PC You can modify the physical address offset where this memory block is located by changing the dip switches o...

Page 31: ...Board s in the PC Use caution when handling voice and fax boards as they are electrostatic sensitive Make sure you ground the PC the work area and the ground end of the antistatic wrist strap prior to handling a board and always use antistatic wrist straps and electrostatic dissipative mats while handling a board To install the voice and fax boards 1 Turn off the power to the PC and any peripheral...

Page 32: ...rmination use an adapter or connector that starts with an RJ 14 connection and ends with the required termination To connect the Dialogic and Rhetorex voice boards to the phone system 1 With the gold contacts on the RJ 14 end of the modular phone cable facing the gold contacts of one of the connectors insert the RJ 14 end of the modular telephone cable into one of the phone connectors on the brack...

Page 33: ... if the Octel 50 system has four voice ports and two fax ports you must use the Transfer method With the Transfer method you must use a separate telephone extension for each voice and fax channel For example on an Octel 50 system with four voice ports and two fax ports you must have a total of six telephone extensions Non Transfer Method The Non Transfer method denotes a situation where voice and ...

Page 34: ... for the Non Transfer method Each voice channel must be assigned the same extension as the corresponding fax channel For example if you assign extension 2100 to voice channel 1 fax channel 1 must also be assigned extension 2100 You must have the same number of voice channels as fax channels Depending on the type of termination from the switch and the type of boards used splitters may be required T...

Page 35: ...our system the peripherals should be installed and tested using the instructions in their respective manuals Step 10 Installing the Sentinel The sentinel shipped with the Octel 50 system controls Maximum number of ports available on the system Octel 50 software version access Access to Octel 50 system optional utilities such as AMIS Fax Solution and SMDI integration Octel 50 system copy protection...

Page 36: ...Installing the Hardware Step 10 Installing the Sentinel Octel 50 Installation Guide 3 14 Notes ...

Page 37: ... the Octel 50 software Install the Octel 50 program files Confirm the contents of the AUTOEXEC BAT CONFIG SYS and RUNSMO3 BAT files Define an alternate keypad format This chapter also provides a list of important Octel 50 system files Procedures in this section assume that the hard drive on which the Octel 50 system is installed is drive C and the disk drive is A and B if there is a second disk dr...

Page 38: ... press ENTER to display the memory status Verify the amount of memory is sufficient Octel 50 requires at least 450 KB of RAM 7 From the C prompt type DATE then press ENTER If the current date displayed is correct press ENTER If the current date displayed is not correct enter the current date as prompted then press ENTER 8 From the C prompt type TIME then press ENTER If the current time displayed i...

Page 39: ...C drive UPS Integration enables the Octel 50 system to monitor the UPS s status and recognize a potential interruption in operation before it occurs For additional information on integrating the Octel 50 system with a UPS see Chapter 10 Integrating with an Uninterupptible Power Supply To install the Octel 50 software 1 Turn on the Octel 50 PC if it is not already running 2 Insert Octel 50 disk 1 i...

Page 40: ...n you installed the boards Select the interrupt and press ENTER 13 If you selected Y in step 6 the system prompts you to select the hardware interrupt level of the fax boards You set the hardware interrupt for the fax boards when you installed the boards Select the interrupt and press ENTER 14 The system prompts Do you want to install the 4 0 program files Press Y 15 A dialog box displays describi...

Page 41: ...ion on running Integrator see Chapter 7 Integrating with the Phone System 30 When you exit Integrator the Configuration Utility dialog box displays Press TAB to select Setup from the Configuration Utility menu and press ENTER The System Setup dialog box displays For information on running System Setup see Chapter 8 Setting Up the System 31 When you exit Setup the Configuration Utility dialog box d...

Page 42: ...ER The Shutdown System dialog box displays d Select Shutdown and press ENTER The system shutdown completes and the CVR prompt displays 37 Press CTRL ALT DEL to reboot the PC Once the system reboots a menu with options to run Octel 50 run Setup or return to DOS displays 38 Press 1 to run Octel 50 The Octel 50 launches and the Octel 50 main screen displays Confirming Files During Octel 50 installati...

Page 43: ...ERRORLEVEL 2 GOTO SETUP IF NOT EXIST RECOVER FLG CALL CVR RECOVER BAT QASSIST B1 D LOGUTIL LOGUTIL A RHETDRV for Rhetorex installations CALL D40 for Dialogic installations CALL LOAD integration_name for SMDI installations IF EXIST CVR FIRST CCA CALL CVR RUNCCA BAT BTKERNEL BTKERNEL CFG for Brooktrout fax boards IF EXIST CVR1 FXDRIVER DAT DEL CVR1 FXDRIVER DAT for Brooktrout fax boards FD S CVR1 FX...

Page 44: ...PY C CVR SO3 ALL VOX D for Rhetorex with RAMDrive COPY C CVR SO3 ALL VAP D for Dialogic with RAMDrive SMOOTHX OPERATOR H5 R8 for Dialogic with 8KHz phrases SMOOTHX OPERATOR H5 R8 SX for D 42 SX board with 8KHz phrases IF ERRORLEVEL 50 DOW IF ERRORLEVEL 20 GO TO QBOOT IF ERRORLEVEL 15 UPS GO TO END QBOOT CLS QUERY A CQUERY1 CTL IF ERRORLEVEL 2 GOTO END C_BOOT END CLS There are several command line ...

Page 45: ...ame format as that in the United States where the 2 key is labeled ABC the 3 key is labeled DEF etc you must define the foreign keypad in a file named DTMF DEF for use in proper directory searches There is a file named DTMF ALT in the CVR directory that includes alternate keypad assignments where the letters A through D are assigned to the 1 key the letters E through H are assigned to the 2 key co...

Page 46: ...ated activity BTKERNEL CFG The configuration file for the BTKERNEL EXE driver BTKERNEL EXE The Brooktrout driver Octel 50 uses to communicate with the RD driver COMPASS TON A tone table file shipped with the Rhetorex version only to handle tone for immediate fax receive CONTROL DAT CONTROL KEY Files that control the system s access to other system files DIALPLAN An executable file that starts the ...

Page 47: ...ontaining message confirmation information OPERATOR CKP A file containing statistical information used by the system OPERATOR LOG An output error log file OPERATOR P A system control file OPERATOR SYS A file containing System Setup parameters such as OUTBOUND and INBOUND PORTS DAT A greeting by port configuration file QASSIST EXE An executable file that starts the Octel 50 file maintenance utility...

Page 48: ...ed with Dialogic voice boards SO3 ALL VOX SO3 D1 VOX SO3 D2 VOX Octel 50 voice files used with Rhetorex voice boards SUBSCRIB DAT A file containing mailbox information SWDATA TXT A data file used in the Integrator utility VBOX DAT A file containing volatile mailbox information VFTREE DAT A file containing voice and fax tree information ...

Page 49: ... 5 Running the SMDI Utility SMDI integration is an option available with Octel 50 that allows you to configure the system for a serial integration The steps in this section help you Install the SMDI utility Run the SMDI utility in standalone mode ...

Page 50: ...x displays The information you enter on the Integration Configuration dialog box depends on the phone system configuration and is strictly defined if the system connects directly to a central office CO or switch See the switch documentation or Configuration Note for more information Use the TAB key to move around the dialog box 5 Under Baud select the speed at which the data is transferred 6 Under...

Page 51: ... the following parameters in the CFG file are overwritten MWLPRFX MWLTIMEOUT DATAWAIT DTR TRS CTS and DISPLAY Consequently you must manually edit the CFG file each time after you run ICONFIG to restore these parameters previous settings It is therefore strongly recommended that you record the SI CFG file settings for future reference The name of the CFG file depends on the type of SMDI integration...

Page 52: ...Running the SMDI Utility Running SMDI as a Standalone Utility Octel 50 Installation Guide 5 4 Notes ...

Page 53: ...t For an outbound dialing operation to an outside number to be successful the Octel 50 system must have the correct outdial string which consists of the applicable access codes and prefixes followed by the destination telephone number For the following outbound dialing operations the entire outdial string may not be supplied by the application and must be determined by the Octel 50 system Replying...

Page 54: ... 4 digits to represent a 1 plus a 3 digit prefix or 6 digits to represent an area code plus a 3 digit prefix If the first 3 digits in a 6 digit string are the same as the specified local area code Dial Plan prompts you whether you want to convert the data to a 3 digit prefix 5 Repeat step 4 until you identify all prefixes for the local area code If you are entering a list of sequential prefixes on...

Page 55: ...ow or TAB keys to highlight the Remove button then press ENTER 5 To save the configuration and exit the Dial Plan utility select Done Activating Dial Plan Use the following procedure to activate the Dial Plan utility To activate Dial Plan 1 If the Octel 50 system is currently running make sure you are logged in as a level 3 supervisor then select System Setup from the Options menu If the Octel 50 ...

Page 56: ...ch is not found the Octel 50 system assumes the number is long distance and dials 1aaapppnnnn where 1 represents the Long Distance Access Code you defined on the Networking tab in System Setup 2 If the destination number s area code matches the defined Local Area Code Dial Plan conducts the following additional searches a Searches for an aaappp match If a match is found the Octel 50 system dials a...

Page 57: ... by setting many of the software s parameters to values appropriate for the switch This allows you to move through the System Setup utility much faster and reduces the possibility of making invalid entries in some of the more advanced setup fields The steps in this section help you Run the Switch Integrator utility Run the Switch Integration utility after installation ...

Page 58: ...iguration Utility main menu displays 2 Select Integrator from the Configuration Utility main menu An initial information dialog box displays To continue select OK The Select dialog box displays 3 Use the mouse or up and down arrow keys to highlight the name of the switch then select Select SW A dialog box displays the name of the selected switch If you are using a switch with the Simplified Messag...

Page 59: ...all if the selected switch is already installed the system displays a dialog box asking if you want to terminate the integration If you select No to continue the system reinstalls the switch and overwrites any customized switch settings 8 Once the switch information is installed a dialog box displays a list of integration requirements and switch programming notes 9 Select OK when you are done read...

Page 60: ...Integrating with the Phone System Running the Switch Integrator After Installation Octel 50 Installation Guide 7 4 Notes ...

Page 61: ... for a particular group of mailboxes in the class of service assigned to those mailboxes Note however that you cannot activate options in an individual class of service unless they are permitted on a system wide basis in System Setup Some of the System Setup parameters are preset for you by the Integrator utility It is strongly recommended that you run the Integrator utility before running the Sys...

Page 62: ...u or from the CVR prompt 3 Press any key to continue The System Setup dialog box displays 4 Select Change System Setup The first page of System Setup parameters displays Individual parameter descriptions are provided on the pages that follow 5 Use the up and down arrow keys to highlight individual parameters To activate a highlighted parameter with a checkbox press SPACEBAR to place a check in the...

Page 63: ... System Setup settings after you install the Octel 50 system by running the System Setup utility as a standalone utility To run System Setup type SETUP from the CVR prompt then press ENTER If you are logged into the Octel 50 PC as a level 3 supervisor you can also access System Setup screens by selecting System Setup from the Options pull down menu Configuring System Setup Parameters Unless otherw...

Page 64: ... applicable If Set Too Low Not applicable Min Max Default Yes Requires Restart No Switch Dependent No Set by Integrator No General Parameters 2 Number of Digits in a Mailbox This parameter determines the length and available range of Octel 50 system subscriber mailboxes For example if you set this parameter to 5 the range of available mailboxes is 10000 to 99999 When How to Use Set this parameter ...

Page 65: ...ith the system If you are using multiple languages on the system you must load the appropriate voice files onto the system Related Parameters Features You must define the multilingual prompts on the System Prompts dialog box and or select an alternative language in each mailbox s class of service If Set Too High Not applicable If Set Too Low Not applicable Min 1 Max 5 Default 1 Requires Restart No...

Page 66: ...keypresses to access their mailboxes If Set Too Low Setting this parameter low increases the chance that a caller could guess a password and gain unauthorized access to the Octel 50 system If this parameter is set to 0 a password is not required to access system mailboxes However subscribers can assign passwords to their mailboxes Min 0 Max 9 Default 4 Requires Restart No Switch Dependent No Set b...

Page 67: ...to a low traffic time as the Octel 50 system will be unable to accept calls until it restarts When this parameter is enabled the OFFHDIS parameter determines whether callers hear a busy or no answer while the Octel 50 system is shut down Note that if OFFHDIS is enabled some phone switches may see the off hook as a line problem and disable the ports If Set Too High Not applicable If Set Too Low Not...

Page 68: ...or example on a Octel 50 system with 3 digit mailboxes the default for this parameter is 100 If Set Too High Not applicable If Set Too Low Not applicable Min 1000 Max 9999 Default 1000 Requires Restart No Switch Dependent No Set by Integrator No Receptionist Parameters 9 After Hours Receptionist Mailbox Number This parameter defines the mailbox where the Octel 50 system routes callers after busine...

Page 69: ...ndent No Set by Integrator No Receptionist Parameters 11 Disconnect All Rotary Callers This parameter determines whether the Octel 50 system disconnects all callers dialing from a rotary phone The Octel 50 system considers a rotary call to be any call from which it does not detect touch tone digits at the initial greeting or at the main greeting for a V Tree When you enable this parameter and the ...

Page 70: ...not available if Enable Automated Attendant is disabled If Set Too High The higher you set this parameter the longer the port holding the rotary caller is tied up If Set Too Low If this parameter is set to 0 the Octel 50 system attempts to transfer rotary callers once before they are transferred to voice mail to leave a message Min 0 Max 9 Default 3 Requires Restart No Switch Dependent No Set by I...

Page 71: ... does not affect Octel 50 system performance but callers could perceive the system as intolerant if they are disconnected or transferred after one error Min 0 Max 9 Default 3 Requires Restart No Switch Dependent No Set by Integrator No Receptionist Parameters 15 Maximum Number of No Entries This parameter specifies the number of times the Octel 50 system prompts callers for an entry before assumin...

Page 72: ...valid mailboxes are transferred to the switch General Transfer Parameters 17 Transfer Invalid Mailboxes During Business Hours This parameter determines whether calls to an invalid mailbox during business hours are transferred to the switch An invalid mailbox is an extension that is not assigned a Octel 50 system mailbox number If this parameter is enabled calls during business hours to numbers tha...

Page 73: ...would like to speak with When How to Use Disable this parameter unless you have extensions that callers should be allowed to directly dial Be aware that enabling this parameter can pose a security concern in that depending on the configuration of the switch callers transferred to the switch may use this capability to attempt to access an outside line Related Parameters Features If you turn off Ena...

Page 74: ...g until 8 00 AM If Set Too High Not applicable If Set Too Low Not applicable Min 0000 12 00 AM Max 2359 11 59 PM Default 600 6 00 AM Requires Restart No Switch Dependent No Set by Integrator No Time Date Parameters 20 Start of Afternoon Hours This parameter defines when during open hours the Octel 50 system begins voicing the Afternoon greeting identified on the System Prompts dialog box If you do...

Page 75: ...rameter determines when the evening hours end The Start of Evening Hours parameter must be set later than the Start of Afternoon Hours parameter The Evening greeting is only voiced during the Open hours set on the Business Hours dialog box For example if you set the Start of Evening Hours to 5 00 PM and set the Closed time on the Business Hours dialog box to 9 00 PM the Evening greeting voices fro...

Page 76: ...er defines the number of seconds a message pauses when a subscriber uses the Pause keypress when reviewing messages When How to Use For most Octel 50 systems the default value should be sufficient Subscribers may use the Pause keypress while the message is paused to resume the playback of the message When you set this parameter to 0 the message continues playback without pausing when subscribers u...

Page 77: ... to record mailbox prompts and folder labels When How to Use For most Octel 50 systems the default setting should be sufficient Some applications may require longer prompts For example using V Trees you may want to raise this parameter value Set this value lower if you need to limit the amount of disk space to store prompts on small Octel 50 systems to conserve disk space Related Parameters Featur...

Page 78: ...ures for subscriber mailboxes Subscriber Parameters 28 Enable Extended Password Security This parameter determines whether the Octel 50 system requires subscribers to press after they enter their passwords to gain immediate access to their mailboxes If you enable this parameter and a subscriber enters the correct password but does not press the Octel 50 system pauses after the last digit before pe...

Page 79: ... of service If Set Too High Not applicable If Set Too Low Not applicable Min Max Default Yes Requires Restart No Switch Dependent No Set by Integrator No Subscriber Parameters 30 Permit Listen Only Messages to be Reviewed This parameter determines whether the Octel 50 system allows subscribers to review listen only messages before deleting them Messages marked as listen only cannot be saved or cop...

Page 80: ...ble this parameter when you want the Octel 50 system to inform subscribers that messages have been deleted from their mailboxes because the messages exceeded the Number of Days to Save New and Saved messages It is recommended you enable this parameter if Days to Save messages is set low This should prevent subscribers from thinking they have lost messages when they have in fact expired Related Par...

Page 81: ... a supervised transfer if the Maximum Rings setting in the mailbox s class of service is 1 or above A call is a blind transfer if the Maximum Rings setting is 0 If the mailboxes are not using supervised transfers the system cannot track the forwarding which prevents the system from voicing the greeting of the original called party should the maximum be reached For most Octel 50 systems the default...

Page 82: ...11 regardless of this parameter Related Parameters Features If Minimum Length of Password is greater than 4 subscribers are prompted to enter a new password that complies with the minimum If Set Too High Not applicable If Set Too Low Not applicable Min Max Default Yes Requires Restart No Switch Dependent No Set by Integrator No Caller Parameters The Caller parameters control whether outside caller...

Page 83: ...ory Services This parameter determines whether outside callers can access subscriber directories If you enable this parameter callers can press to access a directory they can use to dial the names of the subscribers they want to reach If you disable this parameter callers must know the number of the subscribers they wish to speak to or they can transfer to the default operator When How to Use If t...

Page 84: ...When defining the System Telephone Access Number you must include the area code and 7 digit phone number such as 9415551234 Only digits can be entered for this parameter If you do not enter the System Telephone Access Number remote systems will be unable to reply directly to messages dispatched from the Octel 50 system Related Parameters Features The Country Code is placed in front of the System T...

Page 85: ...eatures The Prefix Code field on the AMIS Node Entry dialog box overrides the AMIS Prefix on a per node basis The Octel 50 system uses the Code for Accessing an Outside Line when no AMIS Prefix or Prefix Code is defined If you do not want to use a prefix or the Code for Accessing an Outside Line insert a comma in this field If Set Too High Not applicable If Set Too Low Not applicable Min 0 Max 3 D...

Page 86: ...es Dial Plan determines whether the Long Distance Access Code is required for network replies If the prefix of the remote system is not found in Dial Plan the Octel 50 system assumes it is a long distance number and inserts the Long Distance Access Code in the dialing string When How to Use Enter the Long Distance Access Code for the Octel 50 system location The Long Distance Access Code for the U...

Page 87: ...network replies If Set Too High Not applicable If Set Too Low Not applicable Min 0 Max 32 Default Blank Requires Restart No Switch Dependent No Set by Integrator No AMIS Parameters 43 Permit Inbound AMIS Dispatch This parameter determines whether the Octel 50 system is permitted to receive AMIS messages When How to Use When you enable this parameter all subscribers on the Octel 50 system able to r...

Page 88: ...me The same economy time is used for each weekday you cannot specify different economy times for different weekdays When defining economy hours use the off peak rate period defined by the phone carrier It is recommended that you start the economy hours a few minutes after the start of the lower rate period to allow for discrepancies between the Octel 50 system clock and the carrier s clocks Relate...

Page 89: ... applicable If Set Too Low Not applicable Min 0000 12 00 AM Max 2359 11 59 PM Default Blank Requires Restart No Switch Dependent No Set by Integrator No AMIS Parameters 47 Start of Weekend Economy Hours This parameter defines the system wide start of economy dispatch hours for the weekend During economy hours the Octel 50 system sends any casual or administered network messages marked for economy ...

Page 90: ...w minutes before the end of the lower rate period to allow for discrepancies between the Octel 50 system clock and the carrier s clocks The economy time frame can overlap into the next day For example Sunday s time may extend into Monday morning In this case the hours that extend into Monday are still considered part of the weekend economy time Related Parameters Features You can use the Economy D...

Page 91: ... node Related Parameters Features Each time the Number of Retries for No Answer is reached for a message the Octel 50 system returns the message to the subscriber s mailbox and an attempt is counted towards Maximum Number of Attempts Before Failure Each time the Number of Retries for Busy is reached for a message the Octel 50 system returns the message to the subscriber s mailbox and an attempt is...

Page 92: ...alog box is reached first the Octel 50 system dispatches all of the messages in the queue before the maximum delay is reached The Octel 50 system creates queues for standard dispatch based on the System Telephone Access Number not the node number If Set Too High Some messages may be held in the queue for quite a while before they are dispatched If Set Too Low The Octel 50 system will make more out...

Page 93: ...o Set by Integrator No AMIS Parameters 52 Delay for Busy In Minutes This parameter defines the number of minutes the Octel 50 system waits between retries when dispatching to a remote access phone number that is busy This parameter applies to all outbound network messaging Administered AMIS Casual AMIS network replies When How to Use The default for this parameter should be sufficient on most Octe...

Page 94: ...r No AMIS Parameters 54 Delay for No Answer In Minutes This parameter defines the number of minutes the Octel 50 system waits between retries when dispatching to a remote access phone number that does not answer This parameter applies to all outbound network messaging Administered AMIS Casual AMIS network replies When How to Use The default for this parameter should be sufficient for most Octel 50...

Page 95: ...essage in the sender s mailbox after the first attempt resulting in a no answer Min 0 Max 99 Default 5 Requires Restart No Switch Dependent No Set by Integrator No Fax Parameters The Fax parameters determine where and how callers retrieve faxes from the Octel 50 system Fax Parameters 56 Local Fax Machine Telephone Number This parameter defines the fax machine phone number where Octel 50 system sub...

Page 96: ... Code and a Custom Message Delivery code are undefined the Octel 50 system dials the fax number as it displays in the field If Set Too High Not applicable If Set Too Low Not applicable Min 0 Max 32 Default Blank Requires Restart No Switch Dependent No Set by Integrator No The following fax parameters are only available on Octel 50 systems with sentinels that support the Fax Solution module Fax Par...

Page 97: ...Not applicable Min Max Default No Requires Restart No Switch Dependent No Set by Integrator No Fax Parameters 59 Use Immediate Fax Delivery Mode in V Trees This parameter determines whether the Octel 50 system delivers a fax during the phone call the caller requested it or schedules the fax for later delivery If this parameter is enabled callers must be calling from a fax machine to receive the fa...

Page 98: ...et in the system Related Parameters Features A Fax cover sheet is not sent from a V Tree when Use Immediate Fax Delivery Mode in V Trees is enabled If Set Too High Not applicable If Set Too Low Not applicable Min Max Default No Requires Restart No Switch Dependent No Set by Integrator No Fax Parameters 62 Number of Attempts when Sending a Fax This parameter specifies the number of times the Octel ...

Page 99: ...arameter the longer callers have to wait for fax delivery If Set Too Low Ports may not have enough time to reset between delivery attempts Also the number of attempts could be exhausted before the fax can be delivered Min 1 Max 60 Default 2 Requires Restart No Switch Dependent No Set by Integrator No Fax Parameters 64 Fax Prefix Code This parameter specifies the prefix the Octel 50 system dials wh...

Page 100: ...the Extension Connected to Fax Channel n parameters The Fax Extensions parameters are not available when the Fax Board Type parameter is set to 0 If Set Too High Not applicable If Set Too Low Not applicable Min Max Default No Requires Restart Yes Switch Dependent No Set by Integrator No Fax Extensions Parameters 66 77 Extension Connected to Fax Channel 0 11 These parameters define the phone system...

Page 101: ...led on the Octel 50 system Related Parameters Features The number of ports enabled for inbound calls determines the maximum number of callers allowed in the Octel 50 system If Set Too High All inbound ports on the Octel 50 system are tied up by callers on hold If this occurs the Octel 50 system will be unable to receive inbound calls If Set Too Low Callers will not be able to wait in queues Set th...

Page 102: ...subscriber at the busy extension Disable this parameter if you do not want the Octel 50 system to inform callers of their positions in the queue Related Parameters Features When the caller is first transferred to the second position queue position or higher the Octel 50 system voices Please hold while your call is being transferred and I m sorry but that extension is busy followed by You are numbe...

Page 103: ...ress To try another extension press 1 To leave a voice or fax mail message press 2 To be transferred to a live operator press 0 Or to disconnect press This prompt is voiced after Please hold while your call is being transferred and I m sorry but that extension is busy if each of these phrases is enabled If the caller is holding in the second queue position or higher this prompt is voiced after the...

Page 104: ...ll Queuing Parameters 84 Require Caller to Press Star to Stay in Queue This parameter determines whether the Octel 50 system prompts all callers to press to remain holding in a call queue When this parameter is enabled the Octel 50 system voices To continue holding press To try another extension press 1 To leave a voice or fax mail message press 2 To be transferred to a live operator press 0 Or to...

Page 105: ...ters define the codes the Octel 50 system dials to activate the Intercom Paging feature They also determine how many times and how often the Octel 50 system pages a subscriber Intercom Paging Parameters 86 Intercom Paging Code This parameter specifies the dialing string the Octel 50 system must send to the switch to activate Intercom Paging When the Octel 50 system initiates a page it puts the cal...

Page 106: ...w to Use When this parameter is enabled and a subscriber does not respond to the paging announcement within the time specified in Paging Wait Time Intercom Redirect the Octel 50 system repeats the announcement Related Parameters Features If the subscriber s mailbox is configured for Automatic paging on the Subscriber Settings dialog box the Octel 50 system automatically pages the subscriber when t...

Page 107: ...his parameter consider the following If Repeat Intercom Paging Phrase is enabled the Octel 50 system voices the paging announcement twice for each paging attempt before prompting the caller to try another extension leave a message retry the page or disconnect Note that the Octel 50 system prompts callers to try the page again only if Max Number of Retries in Paging Intercom Redirect is set greater...

Page 108: ...if Max Number of Retries in Paging Intercom Redirect is set greater than 0 or disconnect If Set Too Low Subscribers do not have adequate time to respond to a page Min 10 Max 99 Default 30 Requires Restart No Switch Dependent No Set by Integrator No Call Transfer Parameters The Call Transfer parameters define the general transfer and release code sequences and dialing standards that enable the voic...

Page 109: ...ended that you do not change this parameter without speaking to a technical support representative If you do choose to modify this parameter write down the original code should you need to reenter it The minimum and maximum for this parameter refer to the length of the entry allowed not an actual value Custom Transfer Codes can include the following commands and codes which signal the switch to pe...

Page 110: ...e If neither is defined the Octel 50 system uses a default that performs a hook flash pauses dials the extension number with call progress and then looks for the appropriate release code If the Custom Transfer Code includes an R the switch looks for the appropriate release code Release codes allow the Octel 50 system to pull calls back from the switch for routing There are basic release codes for ...

Page 111: ... the Integrator utility is run if required by the switch This code is either hard coded or programmable depending on the switch It is recommended that you do not change this parameter without speaking to a technical support representative If you do modify this parameter write down the original code should you need to reenter it The minimum and maximum for this parameter refer to the length of the ...

Page 112: ...nanswered If you disable this parameter callers are only able to try another extension or transfer to the operator when an extension is busy or unanswered The Octel 50 will not voice the option to leave a voice mail message When How to Use If you have a live operator but use the automated attendant for overflow disabling this parameter forces callers who came in through the automated attendant to ...

Page 113: ...k as a hangup If Set Too Low The phone system may not recognize the flash hook Min 0 Max 30000 Default 50 Requires Restart Yes Switch Dependent Yes Set by Integrator Yes Call Transfer Parameters 99 Pause Interval for Comma in Dial String PAINTVL This parameter defines the duration of the pause in 10 milliseconds units represented by a comma in a dialing string When a comma displays in a dialing st...

Page 114: ...quired for the switch is automatically entered when the Integrator utility is run Related Parameters Features Not applicable If Set Too High Setting this parameter higher should not adversely affect Octel 50 system operation If Set Too Low The switch may not recognize the digits Min 0 Max 30000 Default 10 Requires Restart Yes Switch Dependent Yes Set by Integrator Yes Call Transfer Parameters 102 ...

Page 115: ...ither pull the call back from the switch after a no answer a busy or a reject or to release the call to the switch on an accept for call screening If the switch uses call screening release codes they are automatically entered for you when the Integrator utility is run for the switch Do not modify the release codes unless instructed to do so by a technical support representative If the release code...

Page 116: ...r Yes Call Screening Parameters 105 Release Code When No Answer This parameter defines the release code required to pull the call back from the switch when no answer is received at the subscriber s extension for a call screening attempt Once the Octel 50 system retrieves the call it informs the caller that there was no answer and voices the available options When How to Use This parameter is set w...

Page 117: ...the entry allowed not an actual value Related Parameters Features None If Set Too High Not applicable If Set Too Low Not applicable Min 0 Max 32 Default Blank Requires Restart No Switch Dependent Yes Set by Integrator Yes Call Screening Parameters 107 Release Code When Transfer This parameter defines the code required to release the call to the switch when a subscriber redirects a call screening r...

Page 118: ... If the extension is busy the Octel 50 system places the call on hold then dials the Call Waiting Code to activate the call waiting feature If Set Too High Not applicable If Set Too Low Not applicable Min 0 Max 32 Default Blank Requires Restart No Switch Dependent Yes Set by Integrator No Call Waiting Parameters 109 Number of Attempts for Call Waiting This parameter specifies the number of times t...

Page 119: ...ermine the correct dialing sequence for the following outcall operations Administered AMIS Network replies Delivery of Fax Retrieval requests When How to Use Dial Plan compares destination phone numbers to the Dial Plan database to determine whether the numbers are local If a match is found the last seven digits but not the area code are dialed If the numbers do not match identified local prefixes...

Page 120: ...ally press to dial an outside line on the phone system usually followed by a comma to instruct the switch to wait momentarily before dialing the number For most phone systems the default 9 is used The minimum and maximum for this parameter refer to the length of the entry allowed not an actual number Related Parameters Features If the Code for Accessing an Outside Line is not properly defined the ...

Page 121: ...l listen to before assuming a no answer This parameter is only used for outdial operations When How to Use The default should be adequate for most Octel 50 systems However if you find that the switch is routinely pulling calls back try lowering this parameter Related Parameters Features This parameter is only used if the Octel 50 system is supervising calls The Maximum Rings field on the Class of ...

Page 122: ...s in Local Phone Number the Code for Accessing an Outside Line is used instead of the Custom Message Delivery Code If the destination fax phone number is equal to or greater than the Number of Digits in Local Phone Number the Fax Prefix Code is used instead of the Custom Message Delivery Code If Set Too High Not applicable If Set Too Low Not applicable Min 0 Max 32 Default Blank Requires Restart N...

Page 123: ... system assumes the port is receiving an incoming call and attempts to answer When How to Use This parameter is set when the Integrator utility is run For most Octel 50 systems the default value should be sufficient to allow the switch to reset the port after a call before the next event If you modify this parameter make sure that it is less than the value of DTONDET Related Parameters Features DT...

Page 124: ...munications Message Waiting Light Software COMMMWL is enabled the Permit Message Waiting Lights parameter must be on If Set Too High Not applicable If Set Too Low Not applicable Min Max Default No Requires Restart No Switch Dependent Yes Set by Integrator Yes Message Waiting Light Parameters 119 Message Waiting Light Prefix ON Code This parameter specifies the code the Octel 50 system must insert ...

Page 125: ...ximum for this parameter refer to the length of the entry allowed not an actual value If Set Too High Not applicable If Set Too Low Not applicable Min 0 Max 32 Default Blank Requires Restart No Switch Dependent Yes Set by Integrator Yes Message Waiting Light Parameters 121 Message Waiting Light Suffix ON Code This parameter specifies the code the Octel 50 system must insert after the extension num...

Page 126: ...nimum and maximum for this parameter refer to the length of the entry allowed not an actual value If Set Too High Not applicable If Set Too Low Not applicable Min 0 Max 15 Default Blank Requires Restart No Switch Dependent Yes Set by Integrator Yes Message Waiting Light Parameters 123 Message Waiting Light Supervised This parameter determines whether the Octel 50 system performs call progress for ...

Page 127: ...code When this occurs the remaining message waiting light stay active even though there are no more new messages until the port is manually reset Some switches limit the number of message indications per phone In this case do not enable this parameter Related Parameters Features If this parameter is enabled outbound ports that activate and deactivate message waiting lights are tied up until the po...

Page 128: ...Default No Requires Restart No Switch Dependent No Set by Integrator No Uninterruptable Power Supply Parameters 127 UPS COM Port This parameter specifies the COM port to which the UPS is connected When How to Use Use this parameter when the Enable UPS Integration parameter is enabled Leave this parameter at the default 0 if UPS integration is not supported Related Parameters Features The Enable UP...

Page 129: ... the Octel 50 system considers the string complete This parameter enables Inband for the Octel 50 system If this field is set to 0 the remaining Inband parameters are not available If Set Too High Setting this parameter higher should not adversely affect Octel 50 system operation although you should not modify it without talking to a technical support representative If Set Too Low The Octel 50 sys...

Page 130: ...r if the Octel 50 system regularly misses inband digits try increasing this parameter Some switches require the use of a sender to pass digits to the Octel 50 system Under light traffic the sender is readily available However when the switch is busy the delay before sending digits may exceed the value of this parameter and cause it to time out before the digits are sent Related Parameters Features...

Page 131: ... determines when the Octel 50 system considers the string to be complete If Set Too High Setting this parameter higher may cause initial callers into the system to hear silence before the main greeting is voiced Do not modify this parameter without talking to a technical support representative If Set Too Low The Octel 50 system may not receive the entire string Min 0 Max 9999 Default 0 Requires Re...

Page 132: ... number that follows the code When How to Use The setting of this parameter depends on whether the count starts from the beginning or the end of the string Related Parameters Features The Location of Mailbox Number and the Start at the End of String parameters work together For example if the incoming string is 9 1123 and the mailbox number is 123 the Number of DID Digits to use is 6 the DID Code ...

Page 133: ...ail Parameters 136 Total Length of String This parameter specifies the number of characters and digits in the Code for Go to Voice Mail string When How to Use Calculate the Total Length of String by counting the number of characters and digits that are sent in the Code for Go to Voice Mail string For example if the code is and the mailbox number is 1000 the string is 1000 In this case the Total Le...

Page 134: ...t need to change it The minimum and maximum for this parameter refer to the length of the entry allowed not an actual number Related Parameters Features The Location of Inband Signaling Code parameter specifies where this code is located in an incoming inband string If Set Too High Not applicable If Set Too Low Not applicable Min 0 Max 32 Default Blank Requires Restart No Switch Dependent Yes Set ...

Page 135: ...of Mailbox Number is set to 4 If Set Too High Not applicable If Set Too Low Not applicable Min Max Default No Requires Restart No Switch Dependent No Set by Integrator No Inband Code for Go to Immediate Record Parameters 140 Total Length of String This parameter specifies the number of characters and digits in the Code for Go to Immediate Record string When How to Use Calculate the Total Length of...

Page 136: ... Related Parameters Features The Location of Inband Signaling Code parameter specifies where this code is located in an incoming inband string The minimum and maximum for this parameter refer to the length of the entry allowed not an actual number If Set Too High Not applicable If Set Too Low Not applicable Min 0 Max 32 Default Blank Requires Restart No Switch Dependent Yes Set by Integrator Yes I...

Page 137: ...ox Number is set to 4 If Set Too High Not applicable If Set Too Low Not applicable Min Max Default No Requires Restart No Switch Dependent No Set by Integrator No Inband Code for Go to Immediate Transfer to Extension Parameters 144 Total Length of String This parameter specifies the number of characters and digits in the Code for Go to Immediate Transfer to Extension string When How to Use Calcula...

Page 138: ...Octel 50 system automatically sets this parameter when the Integrator utility is run You should not need to change it The minimum and maximum for this parameter refer to the length of the entry allowed not an actual number Related Parameters Features The Location of Inband Signaling Code parameter specifies where this code is located in an incoming inband string If Set Too High Not applicable If S...

Page 139: ...art at End of String is set to No the Location of Mailbox Number is set to 4 If Set Too High Not applicable If Set Too Low Not applicable Min Max Default No Requires Restart No Switch Dependent No Set by Integrator No Inband Code for Go to Immediate Subscriber Login to Mailbox Parameters 148 Total Length of String This parameter specifies the number of characters and digits in the Code for Go to I...

Page 140: ...e for Busy Extension The Inband Code for Busy Extension parameters configure the Octel 50 system to properly receive and interpret the inband information sent from the switch for a busy extension When the Integrator utility is run the Octel 50 system enters default settings for the codes required by the switch These settings are determined based on default settings for the switch If you or the man...

Page 141: ...s 3 If Start at End of String is set to No the Location of Mailbox Number is set to 4 If Set Too High Not applicable If Set Too Low Not applicable Min 1 Max 99 Default 1 Requires Restart No Switch Dependent No Set by Integrator No Inband Code for Busy Extension 152 Start at End of String This parameter specifies whether the system starts at the end of the inband signaling string for Busy Extension...

Page 142: ...e Inband Code for No Answer Extension parameters configure the Octel 50 system to properly receive and interpret the inband information sent from the switch for extensions that are not answered When the Integrator utility is run the Octel 50 system enters default settings for the codes required by the switch These settings are determined based on default settings for the switch If you or the manuf...

Page 143: ... End of String is set to No the Location of Mailbox Number is set to 4 If Set Too High Not applicable If Set Too Low Not applicable Min 1 Max 99 Default 1 Requires Restart No Switch Dependent No Set by Integrator No Inband Code for No Answer Extension 156 Start at End of String This parameter specifies whether the system starts at the end of the inband signaling string for No Answer Extension when...

Page 144: ...l and Get Mailbox The Inband Code for Go to Voice Mail and Get Mailbox parameters configure the Octel 50 system to transfer callers to voice mail to request the mailbox number When the Integrator utility is run the Octel 50 system enters default settings for the codes required by the switch These settings are determined based on default settings for the switch If you or the manufacturer modify the...

Page 145: ...Too Low Not applicable Min 0 Max 99 Default 0 Requires Restart No Switch Dependent Yes Set by Integrator No Inband Code for Go to Automated Attendant and Get Mailbox The Inband Code for Go to Automated Attendant and Get Mailbox parameters configure the Octel 50 system to transfer callers to the Automated Attendant entry point When the Integrator utility is run the Octel 50 system enters default se...

Page 146: ...ameter refer to the length of the entry allowed not an actual number Related Parameters Features The length of the Inband Code String and the Number of Digits in a Mailbox parameters determine the setting of the Total Length of String parameter If Set Too High Not applicable If Set Too Low Not applicable Min 0 Max 99 Default 0 Requires Restart No Switch Dependent Yes Set by Integrator No Inband Co...

Page 147: ...ures The Location of Mailbox Number and the Start at the End of String parameters work together For example if the incoming string is 9 1123 and the mailbox number is 123 the Number of DID Digits to use is 6 the DID Code is 9 1 the Location of Inband Signaling Code is 1 and if Start at End of String is set to Yes the Location of Mailbox Number is 3 If Start at End of String is set to No the Locati...

Page 148: ... support representative Related Parameters Features You must set DTONDET at least 4 seconds higher than DTONWAIT For example if you set DTONWAIT to 300 DTONDET must be set to at least 700 If Set Too High A high setting causes excessive off hook time between calls If Set Too Low Setting this parameter to 0 disables it and the Octel 50 system does not detect dial tones The result is excessive off ho...

Page 149: ...resses entered by callers or subscribers using Octel 50 system features may be incorrectly interpreted as hangup strings If Set Too Low Hangup strings may be ignored if the switch cannot send the digits fast enough to meet this value This may cause excessive off hook times between calls Min 0 Max 30000 Default 0 Requires Restart No Switch Dependent Yes Set by Integrator Yes Hangup Detection Parame...

Page 150: ...ence when a caller has hung up during a record session When How to Use This parameter is used for switches that do not use positive disconnects or dial tones to indicate disconnects For most Octel 50 systems the default value should be sufficient Related Parameters Features Set this parameter to a value less than 1000 if using AMIS messaging Set this parameter to a value greater than 0 if using HA...

Page 151: ... Channel Specific Parameters 171 Outbound Application OUTBOUND This parameter specifies whether each port is allowed to make outbound calls for outbound events message delivery message waiting lights AMIS messages future delivery messages and wake up calls When How to Use The valid entries for this parameter are 0 and 2 Each digit corresponds to a port on the voice board Enter a 0 for ports not al...

Page 152: ...ated Parameters Features None If Set Too High Not applicable If Set Too Low Not applicable Min Max Default NNNNNNNN Requires Restart No Switch Dependent Yes Set by Integrator No Channel Specific Parameters 173 Number of Incoming Rings INRINGS This parameter specifies the number of rings each port must hear before it answers an incoming call Each character represents the number of rings for each co...

Page 153: ...ntegration you should disable OFFHDIS See the Configuration Note for your switch for information on setting this parameter Related Parameters Features None If Set Too High Not applicable If Set Too Low Not applicable Min Max Default Yes Requires Restart Yes Switch Dependent Yes Set by Integrator No Channel Specific Parameters 175 Maximum Call Duration PROGTIME This parameter specifies the maximum ...

Page 154: ...receive to interrupt a prompt voiced by the Octel 50 system When How to Use For most Octel 50 systems the default value is sufficient If the Octel 50 system misinterprets voice data as DTMF tones during prompts try increasing this setting Related Parameters Features When RECDTMF is set to a higher value than PLAYDTMF the RECDTMF value is used for both If Set Too High The Octel 50 system may not re...

Page 155: ... TIMEOUT This parameter specifies the number of seconds the Octel 50 system waits for the caller to respond with a keypress after voicing a prompt before voicing Please make your selection now and repeating the prompt When How to Use For most Octel 50 systems the default allows sufficient time for most callers to respond to prompts Related Parameters Features Maximum Number of No Entries specifies...

Page 156: ... default is sufficient If your phone system uses European style rings you may need to adjust this setting Call a technical support representative for information on setting this parameter for European style rings Related Parameters Features None If Set Too High The Octel 50 system cannot detect rings and does not answer incoming calls If Set Too Low The Octel 50 system could misinterpret short ins...

Page 157: ...e If Set Too Low Not applicable Min Max Default C Requires Restart No Switch Dependent No Set by Integrator No PC Configuration Parameters 184 Sound Tone on Answer ANSTONE This parameter determines whether the Octel 50 system sounds an audible tone when it answers an incoming call When How to Use For most Octel 50 systems leave this parameter disabled Enable this parameter when recommended by a te...

Page 158: ... on high call volume systems Do not set this parameter to 0 as this disables it Related Parameters Features None If Set Too High The higher you set this parameter the longer between file saves and the greater the chance of data loss should there be a power outage If Set Too Low A low setting for this parameter does not affect system performance However setting it to 0 which disables the parameter ...

Page 159: ...e When How to Use This parameter is enabled if required when the Integrator utility is run for the switch This parameter is not available when you run System Setup from the Options menu and does not reset when you select the Set to Defaults option from the System Setup File menu Do not enable this parameter unless the Octel 50 system sentinel supports Serial integration and you installed the suppo...

Page 160: ...ameters must be blank and disabled If Set Too High Not applicable If Set Too Low Not applicable Min Max Default No Requires Restart Yes Switch Dependent Yes Set by Integrator Yes Simplified Message Desk Interface Parameters 190 Strobe Interval in Seconds STROBE This parameter specifies the number of 10 millisecond intervals that a signal is sent to the switch configured with SMDI to notify the swi...

Page 161: ...he CCA utility for both Dialogic and Rhetorex voice boards the AccuCall utility for Rhetorex boards and the CPC utility for Dialogic boards The AccuCall and CPC utilities are provided as additional tools and usually do not need to be run The steps in this section help you Run the call analysis utility CCA Run the AccuCall call analysis utility for Rhetorex boards Run CPC call analysis utility for ...

Page 162: ...tem The fax tone table that ships with the Octel 50 system is the industry standard tone for a fax machine If you find that the fax machine uses tones that do not fall within an acceptable variance for the fax tone standard contact a technical support representative to help you increase the fax tone variance You do not need to run Call Analysis if You are installing a new voice board in an existin...

Page 163: ...can be classified by comparing the periods of silence and nonsilence to established parameters Frequency detection Used to identify single frequency tones such as Special Information Tone SIT sequences It can detect single frequency tones below 2100 Hz Loop current detection Used to return a connect signal when a drop in loop current is detected CCA is designed to operate in either Auto or Advance...

Page 164: ... an extension is plugged into the port you specified in the Channel In field 8 In the Phone Number field enter the number of the extension connected to the Channel In For example if you entered channel 3 in the Channel 3 field and extension 5500 is plugged into channel 3 enter 5500 in this field 9 To begin CCA use the TAB or arrow keys to highlight the Start option then press ENTER Once you select...

Page 165: ...p and Down buttons to view graphs for the other tests 12 Select Exit to close the graph The Call Analysis Summary dialog box displays 13 To close the Call Analysis Summary dialog box select OK The Call Analysis Auto Mode dialog box displays To adjust CCA parameters you can use the TAB or arrow keys to highlight Advanced and press ENTER For more information on using the Advanced CCA parameters cont...

Page 166: ... again To clear CCA settings type CLEARCCA then press ENTER from the CVR prompt When you exit CCA from standalone mode you return to the CVR prompt You must then reboot the PC Running AccuCall Call Analysis for Rhetorex Rhetorex s AccuCall program is provided to handle situations that CCA may not be able to handle Normally AccuCall does not need to be run For additional information contact a techn...

Page 167: ...m number of call progression cadence cycles that Auto Run should analyze during each call 7 In the Auto Run Align Frequencies field verify the field is set to YES Press the SPACEBAR if necessary to change the selection 8 In the Auto Run Quick Frequency Scan field press the SPACEBAR to change the selection to YES if the signal of the destination phone has no cadence or a cadence that changes after ...

Page 168: ... change or time out on the line 15 To start AccuCall analysis press F9 A graphic representation of the busy signal displays in the Cadence Detected box 16 When prompted to add tones press F8 The Edit Tones dialog box displays 17 In the Name field enter a name for the tone The name should be descriptive such as the name of the switch followed by Busy Once you name the tone it appears on the Main Me...

Page 169: ... of each other change the lower frequency value of the two to equal the higher frequency value 22 In the PCPMCODE field enter a numeric identifier to the tone Specify identifier 7 for all busy tones If the tone is undefined the device driver returns PCPMCODE 9 if an answer is detected the driver returns PCPMCODE 10 If an incorrect PCPMCODE is returned AccuCall is not differentiating between the to...

Page 170: ... as little as possible to achieve the spread If the two tones in question are within 10 Hz of each other change the lower frequency value of the two to equal the higher frequency value Write down the values of the FREQUENCY 1 and FREQUENCY 2 fields You will be required to enter these values later 33 In the PCPMCODE field enter a numeric identifier to the tone Specify identifier 8 for all ring tone...

Page 171: ...the ring signal 41 Verify that the test returns a PCPMCODE value of 8 42 After the ring test verify that the extension you entered in the step 11 is busy by creating a talk path to another phone Dialing another number ensures that there is not a tone change or time out on the line Once the extension is busy press F9 to test the busy signal 43 Verify the test returns a PCPMCODE value of 7 44 Set up...

Page 172: ...s F8 twice to add the tone j Press F10 to return to the Main Menu k Press F3 The Filters dialog box displays l In the Filters box enter a frequency of 1075 for the tone Overwrite a filter you entered in step 38 if necessary m Press TAB to move to the Filter Characteristics box and change the Inband Ratio field in the Filter Characteristics box to 6 46 Press F10 to return to the Main Menu 47 From t...

Page 173: ...save the changes and return to the Main Menu 57 Under VP Driver verify that Hook is set to OFF This indicates that callers hear a busy signal if the system is down If it is not set to OFF press F5 to display the VP Driver Parameters screen change the default phone line HOOK state to OFFHOOK then press F10 to save the changes and return to the Main Menu 58 When you finish making necessary modificat...

Page 174: ... or reboot To eliminate delayed call transfers 1 If the highest frequency scanned is 650 or lower add values 700 750 800 850 and so on through 1050 to the F3 Filter Table in AccuCall 2 Set OUTDIAL to Voice VOXLIMIT to 2 SPIKES to 3 and DROPOUTS to 3 on the Configure Main Menu dialog box To make these changes use the up and down arrow keys to highlight the parameter you want to change edit the fiel...

Page 175: ... the voice board 4 When prompted enter the available extension number CPC dials the extension 10 times as it identifies the ring signal The phone must be on hook at the extension When the process is complete the CVR prompt displays If the phone continues to ring lift the receiver and hang it up again 5 To test busy verify that the extension is busy by creating a talk path to another phone Dialing ...

Page 176: ...Defining Phone System Signals Running Call Progress Characterization CPC Call Analysis for Dialogic Octel 50 Installation Guide 9 16 Notes ...

Page 177: ... UPS s battery the Octel 50 PC can lose power and the Octel 50 system and PC can be damaged UPS Integration enables the Octel 50 system to monitor the UPS s status and recognize a potential interruption in operation before it occurs The UPS Integrator can shut down the Octel 50 system to maintain system integrity and then restart the Octel 50 system when power returns The steps in this section hel...

Page 178: ...diately This procedure prevents a shutdown with open files which can cause data corruption Because the UPS monitor still runs after Octel 50 is shut down UPS EXE also monitors for the restoration of power Once power returns to the Octel 50 PC and the UPS recognizes a normal operating state UPS EXE signals the RUNSMO3 BAT file to restart the Octel 50 system This minimizes Octel 50 system downtime T...

Page 179: ...py it to UPS CFG For example to use the APC CFG file type COPY APC CFG UPS CFG then press ENTER 3 Open System Setup by selecting System Setup from the Options menu on the Octel 50 main window The System Setup dialog box displays 4 Under General Parameters select Shutdown System After Daily Maintenance Parameter 7 5 Under Uninterruptible Power Supply Parameters select Enable UPS Integration Paramet...

Page 180: ...Integrating with an Uninterruptible Power Supply Running UPS Integration Octel 50 Installation Guide 10 4 Notes ...

Page 181: ...lity This section describes how to set up Octel 50 s fax retrieval feature which allows the Octel 50 system to automatically fax information to callers Steps in this section help you Understand fax retrieval Load documents onto the system Set up fax cover pages Activate fax retrieval ...

Page 182: ...val options For additional information on enabling fax retrieval for the system see Chapter 8 Setting Up the System Install and set up the fax mail feature to use fax retrieval to fax into the system Fax Retrieval capabilities are provided to callers through Octel 50 s V Tree feature For more information on creating a V Tree that includes fax retrieval see Chapter 11 V Trees in the Supervisor s Gu...

Page 183: ...h the catalog numbers of products enabling customers to receive a fax on a product by entering the product s catalog number while using a V Tree To change a fax document number 1 Identify the directory where the fax document file is stored on the system by recording the last digit of the fax document number This number indicates the last number of the fax directories on the system For example if t...

Page 184: ... document to HEADER TIF and save it in the CVR1 directory Regardless of the size and contents of the header and footer files the system always prints the information bar immediately after the header 3 If you want to add a footer or logo to the bottom of the cover page fax the logo or footer into the system change the name of the fax document to FOOTER TIF and save it in the CVR1 directory Activati...

Page 185: ...r what conditions you should use each utility contact a technical support representative The steps in this section help you Shut down and start the Octel 50 system Add additional boards to the system Use the Quick Assist utility Use the Log File utility Understand the Automatic Data Recovery utility Procedures in this section assume that the hard drive on which the Octel 50 system is installed is ...

Page 186: ...he CVR directory prompt type RUNSMO3 and press ENTER The Octel 50 main window displays Shutting Down Octel 50 To shut down Octel 50 1 From the Octel 50 main screen select Exit from the File menu A dialog box prompts you to confirm you want to shut down the Octel 50 system 2 To proceed with the shutdown press Y The Octel 50 system shuts down and the DOS prompt displays Adding Additional Boards to t...

Page 187: ...he DOS editor Using Quick Assist The Octel 50 system includes a file maintenance program called Quick Assist that enables you to verify system file integrity and recover files in the CVR1 directory the REC00 through REC09 directories and the FAX00 through FAX09 directories Using Quick Assist you can Verify and recover Octel 50 system files Run Quick Assist as part of routine Octel 50 system mainte...

Page 188: ...When you select Verify the CVR1 directory is first copied into a directory named REPAIR Although the files in this directory are not necessary for Octel 50 execution they should not be deleted until you are confident that any corruption errors have been corrected Once the Verify procedure is completed review the report named QASSIST RPT in the CVR1 directory If errors or warnings were detected dur...

Page 189: ... is complete select View Report to display the report If the system detected errors or warnings during verification the appropriate corrective action is suggested in the report 10 To close the report window select continue The Recover Status dialog box displays 11 To close the Recover Status dialog box select OK The Recover Options dialog box displays 12 To close the Recover Options dialog box sel...

Page 190: ...e Drive field enter the drive on the Octel 50 PC where the CVR1 directory is located 6 Under Options Information in the Default Box field enter the mailbox in which you want the system to place messages with invalid header information Unattached messages with valid header information are placed in the new message queue of the receiving mailbox 7 Under Options Information select the Verify Before C...

Page 191: ... Edit dialog box displays 13 On the Mailbox Edit dialog box you can enter the extension number mailbox owner s name company department and Personal Operator Use the Next and Previous buttons to view a dialog box and enter information for each recovered mailbox Use the Tab and up and down arrow keys to move about each dialog box 14 Select OK to close the Mailbox Edit dialog box The Recover Status d...

Page 192: ...and press ENTER The Quick Assist dialog box displays 3 Select Recover Files The Recover Options dialog box displays 4 Under Options Select select the Update all boxes option 5 Under Options Information in the Drive field enter the drive on the Octel 50 PC where the CVR1 directory is located 6 Under Options Information in the Default Box field enter the mailbox in which you want the system to place...

Page 193: ...system has corrected any file damage The Searching Directory and Processing Mailbox fields display the directory and mailbox currently being verified The Errors and Warnings fields reflect the respective number of errors and warnings the system encounters during verification 13 When the update is complete you can update specific information for each mailbox To do this select Mailboxes from the Rec...

Page 194: ...t optional prompts personal greeting Mailbox information First and last name extension company division class of service number or custom class of service personal operator Mailbox settings Active call handling options message delivery entries V Tree folders If the system cannot restore this information it returns the mailboxes to the defaults and you must manually edit the mailboxes to reenter th...

Page 195: ...creates mailboxes The system creates mailboxes when it finds messages or greetings that are linked to a mailbox number that does not exist If you deselect this option the system automatically creates the mailboxes indicated by the message or greeting links 8 Under Options Information select the Delete Unattached Msg option if you want the system to automatically delete unattached messages If you d...

Page 196: ... To close the report window select Continue The Recover Status dialog box displays 18 To close the Recover Status dialog box select OK The Recover Options dialog box displays 19 To close the Recover Options dialog box select Cancel 20 To close Quick Assist select Quit from the Quick Assist dialog box Running Quick Assist as Part of Routine Octel 50 Maintenance Quick Assist has been placed in the A...

Page 197: ...ult 1 D Instructs Octel 50 to delete OPERATOR LOG instead of compressing and archiving the log Un Where n is the extension of the archived compressed log file to uncompress Valid range 1 to 5 Fn Where n is the filename given to the uncompressed archive log file Default ARCHIVE TXT A Instructs the log file utility to automatically compress and archive the AUDIT LOG file which logs AMIS related acti...

Page 198: ...ng to extensions not assigned system mailboxes Impede callers from gaining access to the Quick Assist maintenance mailbox Require passwords at least one digit longer than mailbox numbers Require subscribers to regularly change their passwords Use extended password security Have subscribers record their Name prompts Delete unused mailboxes immediately Secure the system PC Utilize phone system secur...

Page 199: ... dialog box to specify a mailbox in which to place messages with invalid header information For additional information on using Quick Assist see the topic Using Quick Assist earlier in this chapter Requiring Passwords at Least One Digit Longer than Mailbox Numbers The longer the passwords assigned to system mailboxes the harder it is for a caller to guess them The Minimum Length of Password parame...

Page 200: ...n deleting system mailboxes see the topic Delete a Mailbox in Chapter 3 The Mailbox Menu in the Supervisor s Guide Securing the System PC It is very important the system PC be protected from unauthorized system management access Unauthorized access to the system PC could result in system setup changes loss of mailboxes and messages and database corruption The best way to prevent unauthorized syste...

Page 201: ...in mind that the more people who have a password the greater the possibility for problems to occur There should be more than one individual who knows the passwords for the system however so when one system manager is away from the office another is available to maintain the system For additional information on supervisor passwords see Chapter 2 The File Menu in the Supervisor s Guide Logging Off f...

Page 202: ...__7 Required Use at least 6 digit level 2 and level 3 supervisor passwords to prevent unauthorized system manager access _____8 Recommended Write down level 2 and level 3 passwords and keep them in a secure place _____9 Recommended Notify the local service provider of any changes to level 2 or level 3 supervisor passwords in case remote maintenance is required _____10 Required Contact the system r...

Page 203: ...y installed and configured Troubleshoot possible program problems you may encounter Understand call flow conditions Determine a switch s disconnect signal Display the features enabled on the system s sentinel Use the command line interface Some information provided in this section is highly technical Your level of knowledge on general telephony and the switch being used and your access to tools su...

Page 204: ...eps outlined in this test plan you encounter unexpected results see the troubleshooting table later in this chapter for information that may help you resolve the issue The troubleshooting table is organized alphabetically by problem area in a format that describes possible problems and potential resolutions This section also includes troubleshooting procedures to help you to confirm Octel 50 is co...

Page 205: ...he following status for each port as it goes off hook For SMDI integration Querying Integration Server For Inband integration Answering For DID integration Answering If this test fails see the appropriate integration section of the Octel 50 Troubleshooting Table for possible resolutions Pilot Number Hunt Group This section tests the pilot number to verify the ports answer as expected when the pilo...

Page 206: ...ing In a test mailbox set the No Answer Call Blocking feature to Default on the Subscriber Settings dialog box In the same test mailbox set the Maximum Rings on the Class of Service dialog box to 3 or greater Call into the Octel 50 system and dial the mailbox number Do not answer the phone Expected Outcome Verify the system voices I m sorry there is no answer at that extension Verify the Channel S...

Page 207: ...e Channel Status display should show the following messages Transfer mailbox number Dialing extension number Waiting for Ring or Data or DID depending on integration Note that if station set forwarding is on the call will be returned to the Octel 50 system in a busy or no answer situation If this test fails see the SMDI integration does not work section of the Octel 50 Troubleshooting Table for po...

Page 208: ...ner s name prompt or default mailbox number prompt followed by Please enter your password Note that this feature is switch dependent If this test fails see the SMDI integration does not work section of the Octel 50 Troubleshooting Table for possible resolutions Message Waiting Lights This section tests the message waiting light feature to verify message waiting lights turn on to signal new message...

Page 209: ... of the following status messages For SMDI integration Waiting for Data For Inband integration Waiting for Ring For DID integration Waiting for DID If this test fails see the Disconnects are not recognized properly section of the Octel 50 Troubleshooting Table for possible resolutions Greetings This section tests the greetings to verify Octel 50 voices the appropriate greetings at various times No...

Page 210: ...ce hours Holiday Greetings Test From a non integrated station set dial into the Octel 50 system during a holiday date Expected Outcome Verify the holiday greeting is voiced Messaging This section tests the messaging feature to verify messages can be sent and reviewed as expected See the Special Features section in this table to test the destinations for messages sent using the auto forwarding AMIS...

Page 211: ...fy all the mailboxes with the same company and or division as the sending mailbox receive the messages If this test fails see the Distribution lists do not work section of the Octel 50 Troubleshooting Table for possible resolutions Group Distribution Lists Test Using the supervisor menu functions over the phone interface create a global distribution list Log into a mailbox and send messages to the...

Page 212: ...ueue positions as appropriate Verify custom call queuing prompts are voiced if they are recorded If this test fails see the Call queuing does not work section of the Octel 50 Troubleshooting Table for possible resolutions Call Screening This section tests the call screening feature to verify subscribers can accept reject and reroute callers Call Screening Accept Test In a test mailbox activate the...

Page 213: ... Octel 50 system and dial the mailbox number Answer the mailbox s extension when it rings and press at the call screening prompt to transfer the call then enter the new destination mailbox number Expected Outcome Verify the system voices to the caller Please speak your name at the tone so I may say who is calling Verify the caller is connected to the new destination mailbox If this test fails see ...

Page 214: ...ault Make the extension associated with the test mailbox busy From a non integrated station set call into the Octel 50 system and dial the extension associated with the mailbox Expected Outcome Verify the system voices to the caller I m sorry but that extension is busy right now If this test fails see the Call handling does not work section of the Octel 50 Troubleshooting Table for possible resolu...

Page 215: ... pilot number of the Octel 50 system and dial the extension for the mailbox Do not answer the phone 2 Make the extension associated with the test mailbox busy From an integrated station set dial the pilot number of the Octel 50 system and dial the extension for the mailbox Expected Outcome Verify under both busy and no answer conditions the call is transferred to the V Tree and that the options pe...

Page 216: ...r possible resolutions Message Delivery to a Beeper Test In a test mailbox set up the message delivery feature to call a beeper number Delete any messages from the test mailbox From another extension call the Octel 50 system during the day of week and time of day window specified for message delivery and leave a message for the test mailbox Expected Outcome Verify the system calls the specified be...

Page 217: ... language selection feature to verify callers can select a preferred language Note that the availability of the language selection feature is controlled by the sentinel Test From a non integrated station set call the Octel 50 system Expected Outcome Verify the expected language selection prompt is voiced Verify the prompts are voiced in the expected language for each language option If this test f...

Page 218: ...RAB and DEBUG features are enabled from the Command Line interface These parameters instruct the Octel 50 system to log errors and digit strings in the system log files This information helps authorized representatives solve the problems you encounter Octel 50 System Troubleshooting Table Auto forwarding does not work Resolution Possibilities Mailbox Entry dialog box Verify the Auto forwarding act...

Page 219: ...isconnected Verify call analysis was run and Octel 50 correctly interprets signals from the switch If call analysis was run and Octel 50 still cannot correctly interpret signals from the switch contact a technical support representative for information on using Advanced Call Analysis System Setup parameters Turn off all System Setup parameters that cause disconnects to help determine if the proble...

Page 220: ...ify the Transfer Release Code for Busy under Call Transfer is entered correctly Verify the Transfer Release Code for No Answer under Call Transfer is entered correctly Verify the FLINTVL parameter under Call Transfer matches the hook flash time of the switch Verify the TONEDLY parameter under Call Transfer is set high enough for the system to distinguish the time between DTMFs If this parameter is...

Page 221: ...arameter under Subscriber is not being exceeded Class of Service dialog box Verify the Call Handling option is enabled Mailbox Entry dialog box Verify call forwarding is activated for the mailbox by either the subscriber over the phone or the system manager through the Subscriber Settings dialog box Verify a valid mailbox number is entered in the Forward To field on the Subscriber Settings dialog ...

Page 222: ...stem Prompts dialog box Verify that If using supervisor prompts confirm that the 10 call queuing phrases are specified on the System Prompts dialog box and that the prompts have been recorded Call screening does not work Resolution Possibilities Disconnect a line from the Octel 50 system and attach a single line phone Attempt to use call screening manually to verify the switch supports call screen...

Page 223: ...s is available If the field is grayed out it cannot be accessed Log out of supervisor access then log back in If a mouse is connected to the Octel 50 system use the mouse to place the cursor in a field button or checkbox then click the left mouse button to select the option Use TAB and Shift Tab to move the cursor through the options Press Alt plus the first highlighted character of the button or ...

Page 224: ... For Hangup String detection Resolution Possibilities System Setup parameters Verify the correct string is entered in the HANGUPSTR parameter under Hangup Detection in System Setup It should be blank if the switch does not use a hangup string Verify the HANGUPDLY parameter under Hangup Detection in System Setup is correct for the switch To calculate this value 1 Multiply the number of digits in th...

Page 225: ...respectively which are automatically created by the system Note that system distribution lists 10 19 can only be created using the supervisor s main menu available through the phone interface Note that there must be more than one mailbox with entries in the Company and Division fields on the Mailbox Entry dialog box to create company wide and division wide distribution lists 98 and 99 Verify a sys...

Page 226: ...inel see the topic Displaying Features Enabled on the Sentinel later in this chapter Class of Service dialog box Verify the Fax V Trees option is enabled System Setup parameters Verify the entries under Fax Extensions are configured properly if using the transfer method Verify that at least one port is enabled for outbound under Channel Specific Folders do not work Resolution Possibilities Verify ...

Page 227: ... use in the current year Multilingual greetings do not voice Resolution Possibilities Verify the sentinel supports multiple languages For information on verifying the features enabled on a sentinel see the topic Displaying Features Enabled on the Sentinel later in this chapter Verify a Language Select prompt is recorded and specified on the System Prompts dialog box accessible from the Attendant m...

Page 228: ...T is set equal to or higher than the total number of digits in the inband signaling string The Number of Milliseconds to Wait for Inband Signaling DID is set to 1000 If the switch requires a or to signify the end of an inband code verify it is entered in the DID Terminating Character DIDTERM parameter No spacer characters are entered in the DID Terminating Character DIDTERM parameter Seconds to Wa...

Page 229: ...lbox Resolution Possibilities You must be logged in as a level 2 or 3 supervisor to access most features on screen Make sure that the correct level of security access is entered To access the functions under all menus but the Options menu with the exception of the AMIS Maintenance option enter the level 2 security password Default 12345 To access all system functions including those on the Options...

Page 230: ...ish entering the password before accessing the mailbox Verify the password contains the minimum number of digits specified in Minimum Length of Password under General in System Setup Note that a guest mailbox is deleted with its sponsor mailbox Note that the system manager can assign a new password either through the Edit Mailbox dialog box or over the phone if the subscriber cannot remember the p...

Page 231: ...PC clock Mailbox Entry dialog box If Auto Forwarding is active on the Auto Forwarding dialog box confirm that the option to delete the message after forwarding is disabled Note that the number of days to save messages can be set to 99 allowing saved messages to remain on the Octel 50 system indefinitely Class of Service dialog box Note that a message will be removed from the saved message queue wh...

Page 232: ...ents under Channel Specific Verify that the Code for Accessing an Outside Line for example 9 is specified If message delivery is to an internal extension less than the Number of Digits in Local Telephone Number the switch may require a Custom Message Delivery code Verify the value entered for DTONDET under Hangup Detection is at least 400 units higher than the value entered for DTONWAIT under Mess...

Page 233: ...ger company s phone number Insert a comma for every two seconds of time it took to connect that you found in step 1 and then enter the call back number For a company that took 10 seconds to connect a phone number would look like N 1 Area Code Pager Company s Callback 4 Verify the entire callback number is displayed on the pager If not adjust the number of commas in the Phone field System Setup Par...

Page 234: ...is enabled Verify the Message Waiting Light Prefix ON Code Message Waiting Light Prefix OFF Code Message Waiting Light Suffix ON Code and the Message Waiting Light Suffix OFF Code are entered in the fields under Message Waiting Light If using the Dialogic SX or SL integration see the appropriate Configuration Note for the correct codes to enter in these fields Some PBXs require Octel 50 to wait fo...

Page 235: ...ing Light and that the correct prefix and suffix codes are entered Class of Service dialog box Verify the Message Waiting Light option is enabled Network messages are returned to mailboxes Resolution Possibilities Verify AMIS is enabled on the sentinel For information on verifying the features enabled on a sentinel see the topic Displaying Features Enabled on the Sentinel later in this chapter Ver...

Page 236: ...Timing to 2 seconds does not correct the problem set the parameter to 4 seconds and set the Maximum Silence parameter under Hangup Detection to 350 PC continually reboots after Octel 50 installation Resolution Possibilities Make sure that the sentinel is installed If it is a Rhetorex system from the CVR directory prompt type CONFIGUR then press ENTER Change the entry point from 6D Hex to 61H PC is...

Page 237: ...PNA do not work Resolution Possibilities Be sure that Distribution Lists which control PNAs are permitted for the mailbox in the class of service Confirm that the PNA is defined with the remote phone number and mailbox When sending a message to a Personal Network Address be sure to enter followed by the PNA number Personal Network Addresses are numbered 20 39 Propeller stops spinning Resolution Po...

Page 238: ...is at least 400 units higher than the value entered for DTONWAIT under Message Delivery Receiving error message Voice board not found Resolution Possibilities If you have a Rhetorex board and you encounter this problem you must run the Configure utility From the CVR prompt type CONFIGUR then press ENTER On the Configure dialog box use the up and down arrow keys to add the hex address for each inst...

Page 239: ...the interrupt level and the signal levels Phone Diagnostics Verifies the board s analog hardware by placing a call between two channels and transmitting data across both channels To copy the contents of the RDSPTEST diskette into the CVR directory 1 Insert the RDSPTEST diskette in the PC s diskette drive 2 Access the command line interface under the Display menu 3 Type COPY A C CVR where A is the ...

Page 240: ...nu for mailbox functions and select 4 to reset a mailbox Note that when you select the Statistics option on the Clear Mailbox dialog box the statistics are deleted permanently Some mailboxes are not included in reports Resolution Possibilities The entry in the mailbox s Company or Division field is incorrect or missing Check the field for spelling errors or extra spaces Note that these fields are ...

Page 241: ...r Verify this number with the central office Verify the port numbers are entered on the ICONFIG Port ID dialog box Supervised transfers do not work Resolution Possibilities Clear the previous CCA results and run Call Analysis again For more information on running Call Analysis see Chapter 9 Defining Phone System Signals Voice system has an echo Resolution Possibilities Check the interrupts on the ...

Page 242: ... as defined in the Subscriber Settings On systems using inband signaling when Call Blocking is active the No Answer Call Blocking call handling option is set to Default and call paging is set to Automatic call paging takes priority over call handling Determining a Switch s Disconnect Signal When you are troubleshooting certain integration issues you are instructed to confirm that Octel 50 is confi...

Page 243: ...ER 3 The sentinel information displays Interpreting the View Sentinel Information The following information displays when you run the View Sentinel program Serial Number Identifies the sentinel unit s serial number You may be asked to provide this number when you contact a technical support representative Product Code Indicates the product the sentinel is programmed to run Max Ports Indicates the ...

Page 244: ...bar 2 Select Command Line from the Display menu To close the Command Line interface 1 Press ESC to close the active display and active the menu bar 2 Reselect Command Line from the Display menu Closing Business Hours Use the following procedure to immediately terminate any active business hours To close business hours 1 Press ESC to close the active display and active the menu bar 2 Select Command...

Page 245: ...lay area To clear the Command Line display area 1 Press ESC to close the active display and active the menu bar 2 Select Command Line from the Display menu 3 From the Command Line type CLS then press ENTER Copying Files Use the following procedure to copy a file from the Command Line interface To copy a file 1 Press ESC to close the active display and active the menu bar 2 Select Command Line from...

Page 246: ...stem on the PC To set the system date 1 Press ESC to close the active display and active the menu bar 2 Select Command Line from the Display menu 3 From the Command Line type TIME hhmm then press ENTER where hhmm denotes the hour and minute in military format For example to set the time to 1 05 PM from the Command Line type TIME 1305 then press ENTER Activating Debug Mode Use the following procedu...

Page 247: ...le system ports When you use the disable command the port is disabled at the completion of the current call and no further calls are accepted To disable a port 1 Press ESC to close the active display and active the menu bar 2 Select Command Line from the Display menu 3 From the Command Line type DIS n then press ENTER where n is the number of the port you want to disable For example to disable the...

Page 248: ... affect the board To restart the system 1 Press ESC to close the active display and active the menu bar 2 Select Command Line from the Display menu 3 From the Command Line type RESTART then press ENTER Shutting Down the System Use the following procedures to shut down the Octel 50 system This command shuts down system operations and returns to the operating system Unoccupied ports are disabled to ...

Page 249: ...playing the Status of System Setup Parameters Use the following procedure to display the current status of certain system parameters in rings active event rate serial count blanking rate checkpoint rate last message and message count To display the parameters status 1 Press ESC to close the active display and active the menu bar 2 Select Command Line from the Display menu 3 From the Command Line t...

Page 250: ...w the value of the INBOUND setting from the Command Line type SYSLOOK INBOUND then press ENTER Displaying the System Version Number Use the following procedure to display the version number of the system software To display the software version number 1 Press ESC to close the active display and active the menu bar 2 Select Command Line from the Display menu 3 From the Command Line type VERSION or ...

Page 251: ...les and Using V Edit This section lists Octel 50 s phrase files along with each phrase s corresponding phrase number helps you use the system s multilingual capabilities and helps you use Dialogic V Edit and Rhetorex V Edit to record and modify phrases for use with Octel 50 ...

Page 252: ...torage of custom phrases recorded on site Following the phrase file listings is information on how you can prepare professionally recorded phrases for use on Octel 50 If you are using the system s multilingual capabilities see the topic Using the Multilingual Capabilities later in this chapter for information on recording and storing phrases in more than one language SO3 ALL VAP and SO3 ALL VOX Ph...

Page 253: ...28 hundred 29 thousand 30 million 31 dollars 32 cents 33 and 34 oh 35 AM 36 PM 37 January 38 February 39 March 40 April 41 May 42 June 43 July 44 August 45 September 46 October 47 November 48 December 49 on 50 at 51 zero 52 25 second silence 53 50 second silence 54 75 second silence 55 1 0 second silence 56 month 57 day 58 hour 59 minute ...

Page 254: ...our message 78 If you are satisfied with your message press 1 to send 79 To review your message press 4 80 is not an available selection 81 To mark this as a regular message press 7 To mark this as an urgent message press 8 82 To rerecord your message press 2 83 Message sent 86 The password you have entered is not valid 87 When you are finished recording you can press the pound key for special sen...

Page 255: ...y services 206 mailbox is an invalid extension number 207 Please hold while your call is being transferred 208 I m sorry but that extension is busy right now 209 To try another extension press 1 210 I m sorry but there is no answer at that extension 211 To be transferred to our receptionist press 3 212 Please speak your name at the tone so that I may say who is calling 213 You have a call from nam...

Page 256: ... your message press 3 304 At the tone please leave a voice message 305 Please leave a voice message for 306 Six 307 Thank you good bye SO3 D1 VAP and SO3 D1 VOX Phrase Files Some phrases reference a Subsriber s Guide In these cases users should see the Quick Reference Guide 1 You have entered an invalid class of service number 2 This message has been deleted by the sender 3 In class of service num...

Page 257: ...lowed by the pound sign or press the pound sign followed by the mailbox number 19 To return to the Main menu press star 20 To delete a mailbox from the distribution list press 2 21 To verify your new password please re enter it now 22 The passwords entered do not match 23 Password accepted Your new password will be in effect the next time you call 24 At the tone record system prompt number 25 has ...

Page 258: ...eturn to the previous menu press 5 48 Enter the mailbox number 49 Returning to level 50 Advancing to level 53 For record and go to next level press 7 For transfer to mailbox entry press 8 For transfer caller to voice mail press 9 54 For transfer caller to directory services press 6 55 To select Intercom paging options 56 automatic 57 For automatic call paging 58 For review the last recorded messag...

Page 259: ...ty one followed by the pound sign 86 Enter the hour you want your message delivered Enter the hour between zero and twenty three followed by the pound sign 87 Enter the minute you want your message delivered Enter the minute between zero and fifty nine followed by the pound sign 88 This message will be delivered on date 89 If this is correct press 1 If this is not correct press 2 90 This message w...

Page 260: ...recipient s mailbox to check for message confirmations or press pound to check all message confirmations 110 I m sorry but there are no message confirmations for 111 To repeat press 2 112 To continue press 2 113 The message confirmation for mailbox number 114 no longer exists on the system 115 To delete this message confirmation press 1 116 Message waiting available 117 Saving of messages 118 Dist...

Page 261: ... Wake up call 143 Enter the folder number 1 through 9 or press zero to listen to all saved messages For a listing of current folders press star 144 Your wake up call has been activated for 145 To turn 146 cannot receive messages 147 Company list 148 Division list 149 To create a guest mailbox press 8 150 Enter the mailbox number to use for the guest mailbox 151 mailbox number has been created as a...

Page 262: ...el press 2 179 Enter the number of the document to send followed by the pound sign 180 Enter the area code and phone number of your fax machine followed by the pound sign 181 To help identify the fax enter your extension number followed by the pound sign 182 attempts will be made to send the requested fax 183 does not exist 184 Your fax is number 186 You have requested a fax be sent to 188 I m sor...

Page 263: ...cord and go to next level using mailbox number 215 is transfer to automated attendant 216 is transfer to voice mail 217 is advance to next level after sending a user specified fax 218 is advance to next level after faxing document number number 219 is to review the last recorded message and go to next level 220 Please hold while I page 221 Delete option 222 Enter the number of the option to delete...

Page 264: ...e hold prompt 255 At the tone record your mailbox owner s name prompt 256 At the tone record your directory prompt 257 At the tone record your personal greeting prompt 258 Please enter your mailbox number 259 no 260 Please enter your password 261 You have 262 new message 263 saved message 264 new messages 265 saved messages 266 Warning Your remaining message recording time is now under 2 minutes 2...

Page 265: ...l queuing 294 To turn call screening 295 To update call distribution lists press 6 296 To turn call paging 297 To update your V Tree press 8 298 Or to retrieve the fax now press pound 299 Or press pound to return to the Options menu 301 is now off 302 Call paging 303 Message delivery 304 To be notified of urgent messages only press 1 To be notified of all messages press 2 305 To turn message deliv...

Page 266: ...tion list 326 is full 327 All list numbers must begin with a star 328 Current list numbers are 329 To review all current list numbers press 4 330 I m sorry but you have no lists on the system 331 already exists in the distribution list 332 Message recovered 334 Enter the number of the mailbox to which calls will be forwarded 335 Optional prompt number 336 has been activated 337 Calls will be forwa...

Page 267: ... 5 366 For message delivery information press 6 2 367 Message saved 368 To delete press 1 369 To accept this message press 1 To continue press 2 Or to return to the previous menu press pound 370 To delete press 1 To rerecord press 2 371 Enter the number of the mailbox containing the message to be changed 372 First deleted message 373 End of deleted messages 374 today 375 Or 376 To review press 4 3...

Page 268: ...irmation is on 396 To send the message without comments press 1 To add comments to the message press 2 397 Record your comments at the tone When you are finished recording press pound 398 To send your comments and the message press 1 To review your comments press 2 To rerecord your comments press 3 399 To send the message with the same comments press 1 To record new comments or to send the message...

Page 269: ...update an option 429 Enter the number of the option to create or update 430 Hello This is your new voice processing system Since this is your first time calling we need to take a few minutes to familiarize you with the system and customize your mailbox While we recommend that you continue you may exit the tutorial and set up your mailbox manually by pressing the star button at any time First let s...

Page 270: ...ou have decided not to personalize your mailbox at this time you will need to refer to the Options menu section of the Subscriber s Guide for assistance in changing any or all of your personal prompts 439 In addition to your personal greeting prompt an optional prompt is available for special call handling functions To activate your optional prompt refer to the Call Handling section of your Subscr...

Page 271: ...to the fax system 471 If you wish to cancel the fax operation press the pound key now 472 The fax system is currently busy Please hold for the next available fax line 473 To save press 2 474 To continue holding press star To try another extension press 1 To leave a voice or fax mail message press 2 475 To access the Supervisor On Line Voice Editor 476 You may then hang up at anytime 477 Enter the ...

Page 272: ...special sending options 506 special sending and fax options 507 I m sorry your number has been dialed in error 508 Please select the method by which you wish to dispatch your message 509 For standard dispatch press 2 510 For priority dispatch press 3 511 For economy dispatch press 1 512 exists as both a mailbox number and network address 513 To send to the local mailbox press 1 To dispatch to the ...

Page 273: ...precede the prompt number you enter in the dialog box field with the letter D Using the Multilingual Capabilities Octel 50 has the ability to support up to five languages English plus four others To activate the multilingual capability specify the number of languages supported on the system in the Number of Languages parameter in the System Setup If the system is English only set the Number of Lan...

Page 274: ...guage selection Remember to specify the prompt numbers for these phrases on the System Prompt dialog box If you are using custom phrases be sure to precede the prompt number in the field with the letter D During business hours the caller will hear the appropriate time of day greeting followed by the Language Select prompt and the Attendant menu if used During non business hours a caller will hear ...

Page 275: ... running a If the Mailbox Status screen is open and the Exit button is highlighted press ENTER The Mailbox Status screen closes and the menu bar is activated with the File menu highlighted b Press ALT F to view the File menu options c From the File menu use the down arrow key to select Exit then press ENTER The Shutdown System dialog box displays d Select Shutdown then press ENTER The system shutd...

Page 276: ...gic boards 4 At the Enter File Name prompt enter the name of the new phrase file you want to create or the existing phrase file you want to open then press ENTER If you create a new file it is automatically assigned a VAP extension 5 At the prompt to enter the maximum number of prompts enter the number of phrases for that file from 1 to 3000 then press ENTER Allow for any phrases you may want to a...

Page 277: ...g New Phrases Before you begin recording in V Edit make sure you set any necessary equipment as specified by the equipment manufacturer Attempt to eliminate any background noise and do not record over a speakerphone If you reach the maximum number of phrases you specified when you opened the file but want to record more phrases you can use the Compress option to add additional blank phrases See th...

Page 278: ...isten to a selected portion of the phrase To listen to an existing phrase in its entirety 1 Open the phrase file in which you want to review phrases if it is not already open 2 From the Main menu press E to access the Edit menu The first phrase in the file is graphically displayed 3 To select a phrase press N 4 At the phrase prompt enter the number of the phrase you want to review then press ENTER...

Page 279: ...y displayed 5 To review the last 3 seconds of the phrase press ALT P or the PAGEDOWN key The last 3 seconds of the phrase voice 6 To review the last 3 seconds of the previous phrase in the file press then repeat step 5 To review the last 3 seconds of the next phrase in the file press then repeat step 5 To select and review other phrases in the same file repeat steps 3 through 5 Rerecording a Phras...

Page 280: ...Ends mode 1 Open the phrase file that contains the phrase you want to select a section of 2 From the Main menu press E to access the Edit menu The first phrase in the file is graphically displayed The default edit mode is Edit Ends 3 To select a phrase press N 4 At the phrase prompt enter the number of the phrase you want to view then press ENTER The selected phrase is graphically displayed with t...

Page 281: ...number of the phrase you want to view then press ENTER The selected phrase is graphically displayed with the left cursor blinking 5 Follow the procedure Selecting a Portion of a Phrase to select the phrase segment to be copied 6 Press C 7 When prompted specify the name of the file to which you want to copy the affected phrase segment then press ENTER The default filename is INSERT PHR 8 If the fil...

Page 282: ...graphically displayed 3 To select a phrase press N 4 At the phrase prompt enter the number of the phrase you want to trim then press ENTER The selected phrase is graphically displayed with the left cursor blinking 5 Follow the procedure Selecting a Portion of a Phrase to select the phrase segment to be trimmed 6 Press T If the current editing mode is Edit Ends the areas outside the selected segmen...

Page 283: ...le are overwritten by the single phrase To write a single phrase or group of phrases to an indexed phrase file 1 From the Main menu press M 2 At the prompt to enter the name of the source file enter the name of the file from which you want the phrases moved then press ENTER Include the complete file path if the file is not located in the VEDIT directory 3 At the prompt to enter the starting phrase...

Page 284: ...dit can also convert a standard ASCII based file to a V Edit text record that you can view edit print or save to a file Creating or Editing a Text Record You use the same procedure to create a new text record or edit an existing text record To create or edit a text record 1 Open the phrase file for which you want to create or edit text records if it is not already open 2 From the Main menu press T...

Page 285: ...ase file in which you want to insert the converted text record file 2 From the Main menu press T to access the Text menu 3 Press C 4 At the prompt to enter the ASCII file name to convert enter the path and filename of the ASCII based text file that contains the text records then press ENTER Deleting Text Records You can delete an individual text record or delete all of the text records in a phrase...

Page 286: ...t records for a phrase file 1 Open the phrase file for which you want to print the text records if it is not already open 2 From the Main menu press T to access the Text menu 3 Press P 4 When prompted whether you want to print to a printer or disk press P Saving Text Records to a File You can save text records to a file for future reference To save text records to a file 1 Open the phrase file for...

Page 287: ...o adjust the amount of silence to leave at the start and end of each phrase in the open file 1 Open the phrase file from which you want to remove leading and trailing silence if it is not already open 2 From the Main menu press S The Setup menu displays 3 To adjust the auto edit parameters press 2 4 When prompted to enter the number of milliseconds to leave on the front of phrases either press ENT...

Page 288: ... menu highlighted b Press ALT F to view the File menu options c From the File menu use the down arrow key to select Exit then press ENTER The Shutdown System dialog box displays d Select Shutdown then press ENTER The system shutdown completes and the CVR prompt displays 2 Copy the phrase file you modified from the VEDIT directory to the CVR directory For example to copy the SO3 D2 VAP file from th...

Page 289: ...attempting to install V Edit make sure that you have completed the steps to install the Rhetorex voice boards and the Octel 50 software To install Rhetorex V Edit 1 Shut down the Octel 50 system if it is currently running a If the Mailbox Status screen is open and the Exit button is highlighted press ENTER The Mailbox Status screen closes and the menu bar is activated with the File menu highlighte...

Page 290: ...tes and the CVR prompt displays 2 Back up the existing language file you want to modify For example to back up the SO3 D2 VOX file to another filename on the same hard drive from the CVR directory prompt type COPY SO3 D2 VOX SO3 D2 BAK then press ENTER 3 Copy the phrase file to the VEDIT directory For example to copy the backup created in the example in step 2 from the CVR directory prompt type CO...

Page 291: ...tivated with the File menu highlighted b Press ALT F to view the File menu options c From the File menu use the down arrow key to select Exit then press ENTER The Shutdown System dialog box displays d Select Shutdown then press ENTER The system shutdown completes and the CVR prompt displays 2 From the CVR directory prompt type CD VEDIT then press ENTER The VEDIT directory prompt displays 3 From th...

Page 292: ... the phrases to a subdirectory on the specified drive press 7 When prompted enter the path to which you want to save the phrases then press ENTER If the directory to which you want to save the phrases is not at the root of the specified drive make sure you enter the entire directory path For example if you want to save the phrases to a directory named PHRASES in the CVR directory type CVR PHRASES ...

Page 293: ... Menu displays the Main phrase window which is empty If you want to open a phrase in the Main window proceed to step 3 2 If you want to open a phrase in the Other window press O to move the Other phrase window to the foreground 3 Press G 4 When prompted enter the complete name of the phrase you want to review then press ENTER For example to review phrase D2001 LIN type D2001 LIN then press ENTER A...

Page 294: ...6 If you are satisfied with the recording proceed with step 8 If you want to rerecord press C to clear the recording then repeat steps 2 through 5 7 Repeat step 6 until you are satisfied with the recorded phrase 8 Complete one of the following steps to save the phrase If you want to save the phrase manually press W When prompted enter the name of the LIN file to which you want to save the recordin...

Page 295: ...lways the active cursor 4 To move the active cursor to the left To move the active cursor to the left in small increments press the left arrow key To move the cursor to the left in medium increments press the key To move the cursor to the left in large increments hold down Ctrl while pressing the left arrow key To move the active cursor to the left edge of the phrase window press Home 5 Once the s...

Page 296: ... tag for the group of display settings from A D you want to assign to the phrase in the foreground The display of the active phrase changes to reflect the selected tag Deleting Phrases or Segments of Phrases Use the following procedures to delete entire phrases or segments of phrases The deleted phrase or segment is placed in the buffer which provides temporary storage for phrases or segments of p...

Page 297: ...s copied to the buffer Pasting into Phrases Use the following procedures to paste the contents of the buffer into a new or existing phrase For more information on cutting and pasting to the buffer see the topics Deleting Phrases or Segments of Phrases and Copying Phrases or Segments of Phrases earlier in this chapter To paste the buffer contents into a new phrase 1 Complete the steps to copy or de...

Page 298: ...on top of each other at the location you want to paste the buffer contents For more information on positioning the cursors see the topic Selecting a Segment of a Phrase earlier in this chapter 6 Once the cursors are positioned correctly press ESC to return to the Main menu 7 From the Main menu press B 8 When prompted to enter a filename press ENTER The contents of the buffer is written to the fore...

Page 299: ...e used is d2999 and that the report will be written to the file phrase map If they are correct press Y If they are not correct press N and repeat steps 4 through 6 After a few moments the VOX files are joined to make the phrase SO3 D2 VOX and a phrase file listing is written to the file PHRASE MAP 4 From the VEDIT prompt type COPY SO3 D2 VOX C CVR then press ENTER This replaces the existing SO3 D2...

Page 300: ...he example in step 2 of the procedure Preparing an Existing Phrase for Use with V Edit to create a backup in the CVR directory named SO3 D2 BAK from the CVR prompt type DEL SO3 D2 BAK then press ENTER If you need to restore the original phrase file copy or rename the backup file as necessary to overwrite the current phrase file For example if you followed the example in step 2 of the procedure Pre...

Page 301: ...tch Integrator utility 7 2 System Setup utility 8 2 voice boards 3 3 Connecting telephone and fax lines to the phone system 3 10 CONTROL DAT 4 11 CONTROL KEY 4 11 CPC 9 14 D Date Time parameters 8 13 Dialing Setup parameters 8 59 Dialogic boards configuring 3 4 connecting to the phone system 3 10 Dialogic adding additional boards to the system 12 3 CCA Call Analysis 9 3 CPC Call Analysis 9 14 V Ed...

Page 302: ...em 12 1 MESSAGE DAT 4 11 Message Message Delivery Setup parameters 8 62 Message Timing parameters 8 15 Message Waiting Light Setup parameters 8 64 MSGCONF DAT 4 11 Multilingual capabilities 14 23 N Non Transfer method fax 3 11 O Octel 50 configuring the system 10 1 determining system needs 2 1 documentation 1 2 hardware requirements 2 3 installing the hardware 3 1 maintaining the system 12 1 mater...

Page 303: ...8 35 General parameters 8 3 General Transfer parameters 8 12 Hangup Detection parameters 8 88 Inband Signaling parameters 8 68 Intercom Paging parameters 8 45 Low level Voice Board parameters 8 100 Message Delivery parameters 8 62 Message Timing parameters 8 15 Message Waiting Light parameters 8 64 PC Configuration parameters 8 97 Receptionist parameters 8 7 SMDI parameters 8 99 Subscriber paramet...

Page 304: ... 50 Installation Guide I IV Visual Voice Editor using 14 39 Voice Board parameters 8 100 Voice boards adding additional boards to the system 12 2 configuring 3 3 connecting to the phone system 3 10 installing 3 9 ...

Reviews: