background image

Vehicle Tracking

130

© 2005 ... Directions Ltd

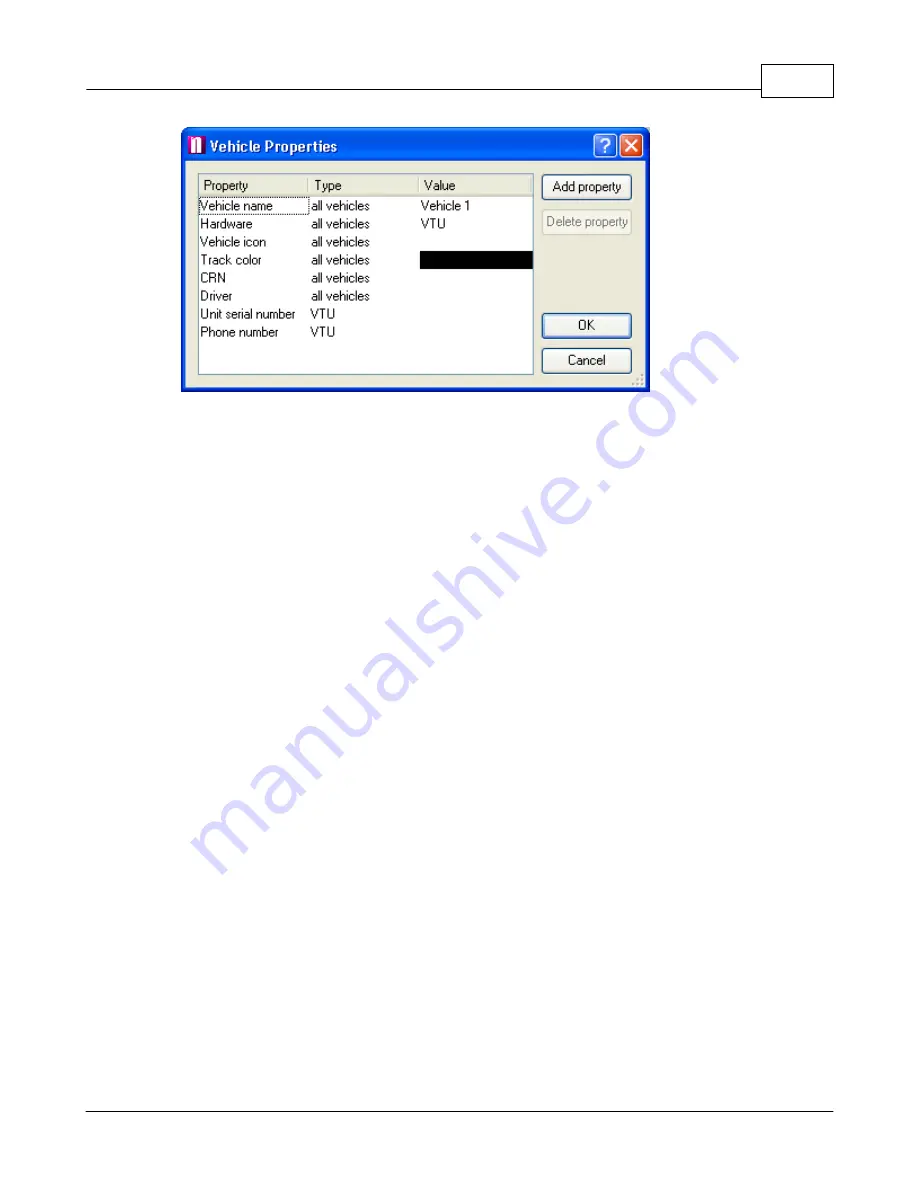
Make sure that you enter the correct parameters here.

Name

 - a label under which the vehicle will be shown on screen.

Hardware

 - Select which hardware unit you are using, for VTU007 or VTU008 select VTU.

Icon

 - You must enter a valid icon which will be used to represent the vehicle on the map. Some

icons a available in the application folder (usually c:\Program files\Navigator\picts2\car_icons)

Track color

 - the colour that the vehicle journeys will be represented in on the map. To make

different easily distinguishable you can select different track colours for different vehicles.

CRN

 - Vehicle registration number

Driver

 - name of the driver.

Unit serial number

 - the serial number of the vehicle tracking unit. This part must be entered

correctly for GPRS communication.

Phone number

 - Enter the phone number of the unit. Please remember that your SIM card must

be data enabled and the PIN removed or set to 0000. This number is the data number for the SIM
card not the voice number. If the unit came with a SIM card the number will be included for you.

When you enter a second vehicle some of the fields will be automatically filled in for you to save
time.

You can always edit 

Vehicle Properties

 by highlighting a vehicle from the list and selecting

Tracking / Edit

 from the menu or clicking the 

Edit

 button underneath.

Next to each vehicle in the list is a check box. If you have enabled 

zoom to selected vehicles

 at

the top of the vehicle list then Navigator will automatically zoom the map to fit all vehicles that
you have checked.

9.2

Setting up a tracking unit

Caution! Setting up a tracking unit incorrectly can substantially change its behaviour.
We recommend that you download the original settings using the 

Fetch unit settings

 command

from the context menu (which can be brought up by a right click on a vehicle in the list).

Now select 

Send unit settings

 from the context menu.

Summary of Contents for NAVIGATOR 4.3

Page 1: ... 2005 Directions Ltd Navigator Manual version 4 ...

Page 2: ...ne 16 Overview 18 Search 21 Postcode 22 Routing 25 Customise 31 4 The Output Pane 31 Search Results 34 Route Results 36 Highlights 37 5 GPS 37 GPS tracking 38 Replay 39 6 Navigation 39 Navigation 41 7 Exporting to PDA 41 Exporting from Navigator 46 Installing on PDA 47 8 Toolbar 47 Toolbar buttons 48 Customising the toolbar 50 9 Pushpins 50 Adding a pushpin 53 User Object List 56 Removing a pushpi...

Page 3: ... Controlling the map 96 3 Linking with a GPS 99 4 Navigation 101 5 Navigator CE settings Part VI Navigator CE Professional 105 105 1 Starting up and opening a map 107 2 Controlling the map 108 3 Linking with a GPS 112 4 Searching 114 5 Navigation 117 6 Navigator CE settings Part VII CarPC interface 122 Part VIII TCP IP communication 127 Part IX Vehicle Tracking 129 129 1 Adding a new Vehicle or Gr...

Page 4: ...urney 142 6 History Table 142 7 Configuring Vehicle Tracking 145 8 Scheduling 148 9 Geofencing 149 Setting up a geofence 151 Setting up a local geofence Part X FAQ s 154 Index 155 Navigator 4 4 Help III 2005 Directions Ltd ...

Page 5: ...Part I ...

Page 6: ...tings Currently available languages are English Czech German and Italian Available Maps The following countries are covered Country Size MB Coverage Supplier Notes Andorra 2 100 Tele Atlas Austria 192 100 Tele Atlas Belgium 132 100 Tele Atlas Czech Republic 109 72 9 Tele Atlas Denmark 109 100 Tele Atlas Finland 127 100 Tele Atlas France 1259 100 Tele Atlas Germany 1334 100 Tele Atlas Great Britain...

Page 7: ...r window with a tool bar in the top part will appear as shown below If you leave the mouse pointer over a toolbar button for more than 1 second a help bubble will pop up with a brief description of what the button does Note that if a button is greyed out it cannot be used 1 3 Opening a map To display a new map click the button on the left of the toolbar This brings up the Select Map dialog box ...

Page 8: ...ow containing the map you selected To see it across the whole screen click the maximize button in the top right corner of the map window If you have previously saved any Position Marks then can select to open a map at the saved position Notice that once a map is opened all the buttons on the toolbar become active 1 4 Exiting Navigator From the menu select File Exit to quit Navigator If Open last a...

Page 9: ...Part II ...

Page 10: ...the right The input pane is where you can search for locations postcodes routes as well as navigate and customise the map A third pane the results or output pane is not visible initially and will only appear after some search route or GPS connection is initiated Before we examine the input pane lets first see what we can do with the map view 2 2 The Map View 2 2 1 The map menu Right click on the m...

Page 11: ...p operation zoom move rotate etc Open another view Open another view of the current map Fullscreen Show the map across the whole screen To get out of full screen mode right click on the map and select this item again Show map highlights Show hide any existing map highlights This option only appears after you have selected to show route or search results on the map Centralise position Centre the ma...

Page 12: ...ngle Elliptic Change the cursor to elliptic search mode Use to search the map for objects within a user defined circle ellipse Free shape Change the cursor to free shape search mode Use to search the map for objects within a user defined region Routing Moving the cursor over this item will show the following submenu Set departure Make the point on the map where you clicked the start of your route ...

Page 13: ... and select Delete Calculate route Calculate a route based on the currently selected route points If the destination or departure has not been selected then routing will begin end the route at the home point Navigate route This will start voice driven step by step navigation Note that you must have a GPS device connected and configured for this feature to work Also it is not necessary to select a ...

Page 14: ... and to the right to zoom out The scale bar will automatically adjust to give a correct reading This method zooms in out of the centre point of the map view Toolbar zoom buttons Clicking the first two of the above buttons in the toolbar will zoom out increasing area shown on the map by one third or zoom in decreasing the area shown by one third Click the third button to zoom to maximum detail the ...

Page 15: ...area will shift to the left To move the map further you can click the square and slide it as far as necessary Panning If you move the mouse pointer near the edge of the map you will notice it change to a chevron symbol Now click the left mouse button to move the map in the direction of the chevrons This way you can move in eight directions move the mouse pointer near the corners of the map to move...

Page 16: ...ctangle to move the map to a new position Goto to coordinates If you know the coordinates of the location you want see on the map then you go there directly From the menu select Search Go to coordinates to bring up the Go to position dialog The dialog already contains a set of coordinates These signify the position at the centre of current map view Use the Coordinate system drop down menu to selec...

Page 17: ...ere are four as can be seen at the top of the bubble entity 1 of 4 To see the other information on the other layers click the small arrows in the top right corner of the bubble To exit the bubble click the cross in the top right corner Click menu to see the map menu 2 3 The Input Pane See Settings Application to find out how to enable disable components on the input pane 2 3 1 Overview The overvie...

Page 18: ...s display the whole map If not selected you can choose the scale of the overview in relation to the current map view On the bottom right of the tab you can the current overview scale Show all views If you have more than one map view open you can check this option to display the bounding boxes of all of them Note that the View Overview will be in relation to the map view with the highest zoom Selec...

Page 19: ...de tab By initial Search tab looks like this This allows you to search all databases for name of the location you are looking for To find Abbey Road type Abbey Road and click the Search button You do not have to type the full name For example typing just Abbey will find Abbey Road but it will also find Abbey Street Abbey Lane and so on The more you type the more precise the result will be Show cat...

Page 20: ...nterest and Roads and Streets To exclude an entire category from the search make sure to uncheck it To speed up the search for Abbey Road uncheck Geographical features and Points of Interest in the list Now Navigator will only look up the streets databases Notice that the amount of fields you can search has increased You can now specify even the town in which the street is located If instead you w...

Page 21: ... mode Tick this check box if you want to limit the search by area Now select the in area along route radio button If you have previously planned a route it will be shown in the list below Check it to search for locations along it To set the width of the search corridor see Settings Search The list will also show a search area if you created one on the map To create a search area click the button a...

Page 22: ... want to search for text that may not be at the beginning of the name you are looking then enable this mode It will pattern search all databases For example the only way to find New Abbey Road from Abbey is by Checking this option 2 3 3 Postcode Click on the postcode tab if you want to search the postcode database ...

Page 23: ...d button You can use the other search fields also To find all postcodes in Sevenoaks type Sevenoaks in the Post Town field Notice that as you type the nearest match is automatically found So for Sevenoaks it is only necessary to type Sev 2 3 4 Routing The route tab is where you set out your journey To add points to your route you can select them directly from the map Simply right click on the map ...

Page 24: ...m a search and add them from the output pane Simply select the entry you want to route to and right click on it From the menu go to routing and select a waypoint type Once a route point has been selected it will appear in the list as well as on the map ...

Page 25: ...oints click Select all and the Delete Note that deleting a route point will also remove it from the map If you have selected more than one waypoint you can get Navigator to automatically sort them to make your route faster To do this click the Optimise button If you have not yet selected all your route points you can do so now From the Select route points drop down menu choose which type of point ...

Page 26: ...o work Also it is not necessary to select a Departure for your journey as the route is calculated from your current GPS position Routing in restricted access roads If you select a routing point in a pedestrian street you will be warned with a message to let you know that the street may be inaccessible to vehicles Routing points in private and restricted roads will not give a warning message but wi...

Page 27: ...lways and so on Each of these categories has several layers As you can see above the Streets category contains many different types of street If you expand a layer by clicking the next to it you will see one or more drawers There are four basic types of drawer line LINE area AREA icon PICT and text TEXT As you can see the local road shown above has three drawers one line and two texts The line rep...

Page 28: ...daries defined above BLINKING shown as a highlight or HIDDEN not shown Line and Area attributes fill colour the colour of the line Click the value and a browse button will appear Click this to open the Select colour dialog fill style the way in which the line styled Click the value and a browse button will appear Click this to open the Fill Style dialog Here you can set different transparency leve...

Page 29: ...Using Navigator 28 2005 Directions Ltd Line only attributes end type defines the look of the end of a line square round trapezium ...

Page 30: ...Navigator 4 4 Help 29 2005 Directions Ltd flat join type when a road link is made of several points this setting affects the way the middle points are represented miter ...

Page 31: ...resenting a street gets thinner Use this value to stop the line from shrinking beyond a certain pixel width size shrinking the rate at which the line shrinks with each zoom The larger the number the faster the line shrinks Text attributes font sets the font effects and size of text Click the value and a browse button will appear Click this to open the Fill Style dialog ...

Page 32: ...ou zoom out Width height ratio affects the spacing between letters In most cases you want to keep this set to proportional The lower the value the closer characters will be Pict attributes icon file Click the value and a browse button will appear Click this to open the Choose a file dialog Here you can select an alternate icon to represent the layer Note that most icon layers have two PICT drawers...

Page 33: ... into two lists On the left is a category list This list shows all the databases had records beginning with Abbey The number in brackets after shows the number of records found in that category If there is a symbol before the number then this indicates that not all records are listed In the interests of speed Navigator only searches for a limited number of records in a databases To increase or dec...

Page 34: ... record they will all be highlighted on the screen and the map will automatically adjust to show them all Note that this performs the same function as clicking the following button in the top right corner of the Output pane Copy to clipboard If you want to past the selected record in to another application the use this to copy it to clipboard first Set as search area This option will be greyed out...

Page 35: ...his point will automatically add as the opposite end of the journey So if you have selected a departure then the home point will be added as a destination and vice versa Once you have selected your routing points the you can use this menu to calculate the route or initiate navigation 2 4 2 Route Results When a route is calculated it is highlighted on the map and the itinerary displayed in the outp...

Page 36: ...mary major minor and unclassified See Routing settings for a further explanation of these types Comment other information about the maneuver e g roundabout slip road Length the distance you will travel before the next manoeuvre Distance the total distance traveled on the journey so far Time the length in time before the next manoeuvre Total time the total time traveled on the journey so far Instru...

Page 37: ...he list will enable them in routing again The top right corner of the output pane shows several buttons highlights the current route on the map clears the current route from the map copy itinerary to clipboard send itinerary to printer close the current route itinerary A summary is also added to the Route summary tab This shows you the total distance time consumption and cost of the journey To cal...

Page 38: ... to it Right click an item to bring up the following menu Zoom in show the selected item on the map and zoom in on it Change colour This option is only available if the Colour Icon column is not an icon It will bring up the Select color dialog which lets you choose a different highlight colour Delete deletes the highlight permanently so it cannot be show again without re initiating the search or r...

Page 39: ... makes the map easier to read To enable disable this feature select Tools GPS Rotate map from the menu To reset the map to north up select Tools Reset map rotation to north up from the menu If you have selected to display GPS information and snail trail on the map see Settings GPS you will also see a history of your most recent positions as well as your speed direction altitude etc 2 5 2 Replay To...

Page 40: ...u have selected to display the Navigation tab in the Input pane Settings Application Input Dialogs Navigation only works if a GPS device is plugged in and receiving data Now you must set the navigation destination To select a destination from the map click the Set destination button Otherwise you can set any found record as a destination by right clicking it in the search result list and selecting...

Page 41: ...to Navigation mode giving you a better overview of the map and the next maneuver There are two forms of guidance voice and visual Voice you will be verbally instructed ahead of your manoeuvre Remember to turn up the volume on your computer Visual in the Input pane instructions are shown in large bold text as well as large graphical indicators representing a magnified view of your next manoeuvre ...

Page 42: ...igator has is the ability to rotate the map as you drive This way your driving direction is always towards the top of the screen which makes the map easier to read To enable disable this feature select Tools GPS Rotate map from the menu This is selected by default To reset the map to north up select Tools Reset map rotation to north up from the menu 2 7 Exporting to PDA 2 7 1 Exporting from Naviga...

Page 43: ...ion let you export a map section only The last two options let you export a route Exporting a map Select the type of region you want to cut out and export There are three choices rectangular cut out a rectangular square region of the map elliptic cut out an oval circular region of the map polygonal cut out in irregular user defined region Click Next to continue ...

Page 44: ...nt the data to be exported to and what you want the map to be called Map name To select an already existing folder click Browse Click Next to continue Navigator will now display the progress of the export You can cancel the process at any time by clicking Cancel ...

Page 45: ...nd route and its route corridor exports the route points for the route selected below and a user defined map area either side of the route found route only exports the only the route points for the route selected below Because this only exports route points start destination etc the route on the PDA may be slightly different This is because on the PDA you cannot modify routing preferences Select o...

Page 46: ...e and a name for the navigation data Navigation name To select an already existing folder click Browse Please note that if you have selected to export a route only then the Map name will not be shown Click Next to continue Navigator will now display the progress of the export You can cancel the process at any time by clicking Cancel ...

Page 47: ...r PDA should have been provided by the PDA manufacturer 2 7 2 Installing on PDA End the end of the Navigator installation you should have been offered the chance to install the Pocket PC program files If you chose not to do so at the time or have acquired a device since then you can run the setup again from the Navigator program group on the start menu During the installation you can select a lang...

Page 48: ...ayer to the selected point on the map Goto coordinates Measure distance on the map Measure area on the map Measure bearing Display pointer co ordinates in status bar Pushpins Add a new pushpin on the map Delete a pushpin from the map Display Hide pushpins on the map Show pushpin list GPS Start Stop GPS tracking Replay a GPS journey from file Centre map on GPS position Automatically rotate map with...

Page 49: ... Redo last Undo 2 8 2 Customising the toolbar Right click on the toolbar and the following menu will appear The top two entries toggle the visibility of the input and output windows The next set of entries show the defined tool groups Each group is a collection of buttons on the toolbar whose visibility can be toggled using the check box on the left of it To edit the groups and the buttons they co...

Page 50: ...it You can add remove groups and tools using the buttons in the centre of the dialog If a group contains many buttons you can additional subdivide them using separators These are thin vertical lines between buttons Lets try to make a new group Click the Add Toolbar button This will add a new entry in the list Simply type in a new name My tools for example and hit enter Now from the list on the lef...

Page 51: ... double lines to the left of the group If the buttons in your toolbar are not neatly arranged you can click Line up and Navigator will stack them together 2 9 Pushpins 2 9 1 Adding a pushpin There are two ways to add a pushpin on the map From the map The first thing you must do before you add a pushpin is to move the map to the correct position As an example lets say that we want to add a pushpin ...

Page 52: ...the add pushpin button in the toolbar right click on the map and select Add Pushpin from the menu When you move your mouse pointer over the map it will change to a target symbol Centre the target on where you want to position your pushpin and click the left mouse button From the route point list In the routing tab you can right click on any point in the list and select Copy as ...

Page 53: ...ere The pushpin name is the name that will appear in the list of user object and as label on the map You can also add a short Description with further details about the pushpin Although an icon is automatically suggested you can select a different one by clicking the button Now click OK and the pushpin will appear on the map ...

Page 54: ...bjects categories Categories are only visible if there are user objects defined in them For example if you have yet not defined any route points then the Routing points category will not be shown Possible categories are pushpins routing points closed roads and search areas Pushpins Select Pushpins from the left hand column and all your pushpins will be shown on the right Right click on the name of...

Page 55: ...he pushpin simply click the entry in the Icon file path column This will bring the standard Windows Open dialog where you can select an alternative icon The last three columns let you toggle visibility on the map Only two settings are possible here yes and no Icon visibility show hide the pushpin and label from the map Label contains name show hide the name in a text label under the pushpin Label ...

Page 56: ...he pushpin Label contains description show hide the description in a text label under the pushpin Type the route point type departure destination waypoint home point Closed roads If you have prohibited any roads from being route on then they will appear in the list here Right clicking on a road reveals the following options Click Highlight to zoom in on the route point and highlight it Click Zoom ...

Page 57: ...set the current area as a point in a route or a home point The route point will be added to the street nearest the centre of the area The list has the following columns Name Name of the search area which is also used in Search Search in area Description If you want to add a short note to a search area click the description column and modify it Visible show hide the area on the map 2 9 3 Removing a...

Page 58: ...l Move the target over the pushpin you want to remove and click the left mouse button 2 10 Position marks Position marks are a tool to save your favorite views so that you can return to them quickly at a later date Position marks store the current position and zoom level of a map window If you open a position mark Navigator will restore the map window to that position Position marks also appear in...

Page 59: ...n dialog In the textbox enter the name for the position mark and click OK It will now appear in the File menu under Position marks To go to the saved position simply click on it in the list To amend your position marks click Edit The following dialog will appear If you want to save the current view click Save current position To edit a current position mark select ...

Page 60: ...saved position for the current map view Delete position delete the position mark from the list 2 11 Points of Interest Airline Access Airport Amusement Park Important Tourist Attraction Beach Cash Dispenser Company Frontier Crossing Camping Ground Park and Recreation Area Car Dealer Rent a Car Facility Casino Cinema Convention Centre Cultural Centre Theatre Courthouse Government Office ...

Page 61: ...spital Polyclinic Pharmacy Hotel or Motel Rest Area Tourist Information Office Music Centre Nightlife Parking Area Parking Garage Rent a Car Parking Mountain Pass Mountain Peak Concert Hall Opera Police Station Post Office Public Phone Swimming Pool Water Sport Restaurant Area Restaurant Ice Skating Rink Library College University ...

Page 62: ...tor 4 4 Help 61 2005 Directions Ltd Car Repair Facility Shopping Centre Shop Sports Centre Stadium Tennis Court Railway Station Toll Veterinarian Scenic Panoramic View Winery Place of Worship Yacht Basin Zoo ...

Page 63: ...Part III ...

Page 64: ...port wizard from the Navigator menu The first import wizard screen will now appear Select import You have two choices Create a new import select this option if you have never imported this database before Select existing imported lets you amend the settings of an existing import If you are creating a new import you must give it a name under import name If you are amending an existing import please...

Page 65: ...ng Microsoft Access and Excel Once you have selected a driver click the New Driver button to select a database or ODBC Driver to connect to Once you have selected a database the lower part of this dialog will give you details about the connection status including the database table name driver type and if a Navigator has successfully connected to it Click the Properties button to select a differen...

Page 66: ...select the type you are using If you have address data from the United Kingdom you can choose to geocode data by postcode In this case your data must contain the full postcode Once you have selected a coordinate system you must specify which column field in the database contains this information In some instances like British National Grid or Latitude Longitude two fields must be selected In other...

Page 67: ...or all records Now select an icon by clicking the Browse icon button Many icons can be found in the Navigator installation folder typically C Program Files InfoMap picts 24x24 If you want to break down records into several icon groups then select a column field from Source Data Column which indicates which group each record belongs to Once you have done this the dialog will change Navigator will a...

Page 68: ...roup should be represented be a different icon Whether you are importing one icon or many you can limit their visibility Select the zoom levels between which you want your icons to be visible by setting minimal zoom and maximal zoom Note that if you are importing many records then it is important to limit the Maximal Zoom to prevent Navigator from slowing down when displaying the whole map Click N...

Page 69: ...e to amend data in Navigator select the edit check box for the field in question If you do not select the edit check box then the column field will be read only Columns will appear in the user object list in the order shown here If you want to change the order of a column highlight it and use the Move Up Move Down buttons Click Next to continue Schedule import updates ...

Page 70: ... start Navigator will update from the source database every time it starts Every Navigator will update from the source database at user defined intervals Do not schedule Navigator will not automatically update Update can still be performed manually Click Next to continue Import summary ...

Page 71: ...g outlines the import settings you have just selected If you are not happy with any of the values click Back and ammend them Select the Import database now checkbox to import you data immediately or deselect it to import at a later date Click Finish ...

Page 72: ...he import click the Run import button Any unplaced records will be listed To terminate the import process click Cancel import 3 2 Updating your database If you have not set to update your database automatically and want to update it manually then select Tools Import points from the Navigator menu ...

Page 73: ...menu select which database you want to update and click Run import 3 3 Deleting your database There are two ways to remove imported data from Navigator To delete all data but leave the import settings intact select Tools Import points from the Navigator menu ...

Page 74: ...or 4 4 Help 73 2005 Directions Ltd Now select a database from the drop down menu and click Delete all imported data To delete all data and the import profile select Tools Import wizard from the Navigator menu ...

Page 75: ...Importing Data 74 2005 Directions Ltd Now select Edit existing import and highlight the database you want to delete Click Delete ...

Page 76: ...Part IV ...

Page 77: ...here you can select which part of Navigator you want to customise Use the scroll bar to display other options On the right side of the dialog you can see the settings for that section 4 1 Application Here you can configure general application behaviour Language If you had chosen to install several languages you can switch between here Startup and exit Open last active map on startup select this op...

Page 78: ...g Local Time time shift from GMT GPS devices usually communicate Greenwich Mean Time GMT If you are in a different time zone or in the UK when clocks have changed to British Summer Time BST then you can adjust the time displayed and recorded with the Time offset spinner As an indication BST is set as 1 hour ahead of GMT In most cases it is enough to select system default and let Navigator adjust i...

Page 79: ...you leave the mouse pointer over a map object for more than 1 second left click bubble appears if you left click over a map object 4 3 GPS There are three tabs available here one for setting up communication with a GPS device and one for setting up replay of previously recorded journeys ...

Page 80: ... LPT to find out which port your device is using Set the speed etc at which your GPS unit communicates Make sure that Baud rate Byte size Parity and Stop bits match the settings of your COM Port TCP IP Settings In the Professional version Navigator can receive data over a TCP IP network Disconnecting this is the timeout after which Navigator should stop waiting for GPS data from a COM port if ther...

Page 81: ...te replay select this option to replay a file at a higher speed than that at which it was recorded Use the spinner on the right to set the replay acceleration Skip time gaps larger than this is a useful feature which lets you skip parts of the file where the position is stationary Use the spinner on the right to select what sized gaps to skip Visualisation ...

Page 82: ... any option then no label will be shown GPS Trail If you want to see a snail trail of where you have been then select how long it will be The number represents historical positions if your GPS updates every second then the number of seconds The higher the number the longer the trail If you want to see a trail over the last 2 minutes then enter 120 If you select 0 then no trail will be shown 4 4 Ma...

Page 83: ...ber of screen pixels that will represent one metre on the map Mouse sensitivity This feature to remove annoying mouse over sensitivity when operating on the map view For example if you find that clicking on the map results in unwanted selection or zoom boxes appearing then increase the number in the spinner Scale adjuster In order for Navigator to be able to work out map scale accurately it must k...

Page 84: ... map will change its shape on screen Type of co ordinates shown in status bar Change the coordinates displayed in the status bar as you move the mouse pointer over the map 4 5 Navigation Here you can change the behaviour of the navigation voice guidance feature of Navigator General ...

Page 85: ...ay you are in time hours minutes and seconds Maneuvre map view This section sets the look of the enlarged view of the next maneuvre Arrow width in pixels your direction of travel through the next junction is represented by a large transparent arrow This setting adjust the width of that arrow Arrow transparency sets how transparent the arrow should be Move the slider towards the min side to make it...

Page 86: ...iour when navigating enable rotate map when navigating to always drive up the screen This section lest you choose which layers to display in the maneuvre view Selecting fewer layers can have a beneficial effect by making the map look less cluttered You can choose which layers to display by ticking the check boxes next to them All layers with a next to them have sublayers which can also be selected...

Page 87: ...eters for your car If you have set Navigator to imperial measurements then consumption is displayed in miles per gallon otherwise when set to metric units it is shown in litres per kilometre Fuel cost Enter the average price per litre of petrol in your car Runtime This is the maximum amount of memory available to the routing module In most cases it is best to leave this value untouched Map depende...

Page 88: ...he right to increase preference and make Navigator favour that type of road in your route calculations You can also set the average speeds in and out of urban areas 4 7 Scout Scout is a feature which allows you to set up audible warning in navigation mode when you get near an object in a specified layer Scout can use both built in and user layers One the most common uses for Scout is warning for s...

Page 89: ...irections Ltd To use scout first you must tick the Use the feature checkbox Now you need to select at least one layer Built in or User under Layers to watch If you approach any object in this layer Scout will play an audible warning ...

Page 90: ...ult wav To change it to a different sound click on the default wav name and selected another Warnings are triggered by your distance from an object If Use the feature is enabled then the first warning will always be given You can select second and third warnings at the bottom of the dialogue ...

Page 91: ...ng the record you are looking for Maximum nearest objects to find per category This sets how many records will be returned for each searchable map layer when you perform the find nearest Maximum distance from a street when searching along route If you want to look for objects along a route you can set the size of the search corridor In the above example Navigator will look for objects up to 999 me...

Page 92: ...ight you wish to amend Number of colours Set the maximum number of colours for the selected highlight type If you display more highlighted objects than the number of colours selected the first colour will be used again Click the Colour column in the list to change to another colour ...

Page 93: ...Part V ...

Page 94: ... Navigator CE standard Navigator Standard contains Navigator CE for Pocket PC 2003 an later 5 1 Starting up and opening a map After installation you can run Navigator CE from the Start menu on your device Navigator will now appear on your screen ...

Page 95: ...st task is to open a map You should have already exported a map out of Navigator and copied the data to your device From the Tools menu select Open The following dialog will appear All your exported maps should appear in the list Select the one you want ...

Page 96: ...e then it will look something like this 5 2 Controlling the map Once a map has been opened move around in the same way as you would with Navigator on a PC In the toolbar you will see a magnifying glass symbol This signifies that you are in zoom mode To zoom in and out of the map simply drag your stylus diagonally across the map to draw out a ...

Page 97: ...y using the scroll bars You can also use the View menu to quickly zoom the map to overview or maximum detail If the use of hardware buttons is enabled in Settings then you can zoom using hardware buttons 1 and 2 5 3 Linking with a GPS If you have a GPS device that connects to your PDA then you can use it to display your position on the map Before you start make sure that the device is connected Yo...

Page 98: ...entre toggle between keeping your position always visible on the screen and free movement around the map Save Position Save your journey to file You can record your journey and replay it at a later date GPS info Display additional GPS information beneath the map speed number of satellites in view and your latitude and longitude Odo before you start using the odometer make sure that you have enable...

Page 99: ... Business counter Start accumulating private mileage When you select this item mileage will begin to be added to the business counter Note that you can only enable one counter at a time Enabling the business counter will stop the private counter Reset private reset the private counter to 0 Reset business reset the business counter to 0 Reset total the total is the sum of both private and business ...

Page 100: ...route you want to take and click OK If your GPS device is connected then voice instructions will start guiding you when you start driving Navigation instructions are always given at predefined distances away from the next maneuver You can adjust at which distances instructions are given in settings can be If you would like to see the next maneuver on screen select Nav bar from the Nav menu ...

Page 101: ...of Navigator CE you will be warned when you deviate from your route but a new route will not be recalculated You can choose to display the itinerary showing you several maneuvers ahead by selecting Nav Itinerary from the menu To switch back to a map view select Nav Itinerary again ...

Page 102: ...is means NMEA Port Select which COM port your device is attached to If you want to replay a file select file You will now be prompted to select a prerecorded NMEA file to replay Set the speed etc at which your GPS unit communicates Baud rate Byte size Parity and Stop bits In most cases you want to keep it as default 4800 8 none 1 5 Check for position every Select how often you want your position t...

Page 103: ... tracking This is useful for mileage allowances etc Hardware buttons select the use hardware buttons to enable control using the PDA buttons When this is enabled the buttons on you PDA will no longer start Contacts Calendar Tasks etc but will be used to control Navigator CE The controls are as follows Hardware button 1 Zoom in Hardware button 2 Zoom out Hardware button 3 Switch between itinerary a...

Page 104: ...ttings You are lost when you are X meters away from route after you stray more than the set distance in meters you will get a You are lost warning Voice Navigation set at which distances before the next maneuver you want the voice prompts to be played Click OK to exit settings ...

Page 105: ...Part VI ...

Page 106: ...will automatically recalculate a new one Navigator CE Professional can work with maps up to about 100MB in size 6 1 Starting up and opening a map After installation you can run Navigator CE from the Start menu on your device The Navigator Open Map dialog will now appear on your screen The first task is to open a map You should have already exported a map out of Navigator and copied the data to you...

Page 107: ...Navigator CE Professional 106 2005 Directions Ltd Note opening a large map may take time ...

Page 108: ...om rectangle to zoom in and outside it to zoom out To cancel the zoom rectangle click on the toolbar You can fast zoom to preset zoom levels Detail 75 50 25 and Overview by using the Map menu You can zoom using hardware buttons 1 and 2 if you have enable their use in Settings Moving the map To move the map click the magnifying glass on the toolbar It should now change to a grabber hand symbol Now ...

Page 109: ...ou have a GPS device that connects to your PDA then you can use it to display your position on the map Before you start make sure that the device is connected You must first set it up Navigator CE correctly in settings To start displaying your position on the map select Tools GPS Tracking from the menu ...

Page 110: ...ways visible on the screen and free movement around the map Replay Replay a previously recorded journey Save Position Save your journey to file You can record your journey and replay it at a later date Odo before you start using the odometer make sure that you have enabled it in settings The odometer is particularly useful if you want to keep a track of business and or private mileages There are s...

Page 111: ...from Tools Odometer There are several options Private counter Start accumulating private mileage When you select this item mileage will begin to be added to the private counter Business counter Start accumulating private mileage When you select this item mileage will begin to be added to the business counter Note that you can only enable one counter at a time Enabling ...

Page 112: ...ve options So selecting one will automatically stop adding mileage to the other Off the journey is not added to either business or private mileages Summary displays a table with the totals for private and business mileages and gives you an option to reset them To display odometer information on screen select View In Map Odo Details ...

Page 113: ...egory to search Address search for streets and roads Postcode search for a postcode POI search for a Point of Interest hotels cinemas etc type the name of the object you are looking for and click Find Once the search is finished results will be displayed underneath Results are separated into categories which can be switched using the drop down menu in the middle of the screen ...

Page 114: ... your stylus over a result for a short while a context menu will appear with the following options Details displays detailed information about the object Show on map displays the object on the map Navigate to selects the object as the navigation destination ...

Page 115: ...er objects If you had highlighted an object on the map you can dehighlight it by deleting it from this list 6 5 Navigation Selecting a navigation destination from the map Change the multifunction icon in the toolbar to Now click on the map to place your destination It will be represented by a checkered flag icon ...

Page 116: ...ur GPS is connected you can start navigating by selecting Tools Routing Navigation If the GPS has signal you will hear voice instructions as soon as you start driving In settings you can set at which distances from a manoeuvre you want to hear the voice prompts In the bottom part of the map you can see an arrow representing the direction of the next ...

Page 117: ...d you distance from it If you depart from the planned route then Navigator CE Professional will automatically recalculate a new one To see your itinerary select Tools Routing Itinerary from the menu It lists several upcoming manoeuvres and your distance from them ...

Page 118: ... Directions Ltd To go back to the map click the Close button 6 6 Navigator CE settings To access the settings dialog select Navigator Settings from the menu GPS This tab is where you set up Navigator CE to work with a GPS device ...

Page 119: ...cted via a cable send data through COM1 GPS HI 203 Compact Flash is virtually mapped the a higher port the number varies from PDA to PDA For example on iPAQ 36xx it tends to be COM4 iPAQ 38xx COM5 and on 39xx COM6 Set the speed etc at which your GPS unit communicates Baud rate Byte size Parity and Stop bits In most cases you want to keep it as default 4800 8 none 1 5 Check for position every Selec...

Page 120: ...h speed but may not return all available results Hardware buttons select the use hardware buttons to enable control using the PDA buttons When this is enabled the buttons on you PDA will no longer start Contacts Calendar Tasks etc but will be used to control Navigator CE The controls are as follows Hardware button 1 Zoom in Hardware button 2 Zoom out Hardware button 3 Switch between itinerary and ...

Page 121: ... set distance in meters you will get a You are lost warning and the route will recalculate Detailed navigation in this setting you will hear more instructions even when you are carrying on straight ahead Voice Navigation set at which distances before the next maneuver you want the voice prompts to be played Click OK to exit settings ...

Page 122: ...Part VII ...

Page 123: ...ch through user objects like pushpins or imported databases Object search through the internal Navigator databases Cinemas Museum Streets etc Address search for a postcode or street name Home navigate to your Home point if you have already set one up Last destination Navigate to the last selected destination If you select Home or Last destination then navigator will automatically initiate the navi...

Page 124: ...ory them select one or both from the drop down menus below To find the object tap the right arrow in the top right corner of the screen to go back to the main menu tap the left arrow A progress bar will display the status of the search When the search is complete you will see a list of matches Pick the one you want to go to from the list and tap the right arrow Tap the left arrow to go back to the...

Page 125: ...e or address Type a postcode or part of a postcode into the postcode textbox If you don t know the postcode you can type in any part of the address using the other fields Tap the right arrow to continue A list of all matching addresses will appear Select one and click the right arrow to navigate to it ...

Page 126: ...e From the command line type navigator carpc This command will run Navigator in CarPC mode From the command line type navigator dest dd dd dd dd This command will run Navigator in navigation mode with destination in coordinates dd dd dd dd Coordinates are in WGS84 decimal degrees ...

Page 127: ...Part VIII ...

Page 128: ... If no port or ip address is specified navigator selects some address and port on its own It is possible to check that the server is running by using the netstat a n command It should display an ip address with apropriate port and status LISTENING The TCP command is destination lat lon i e destination 15 123 42 123 As a simple test it is possible to use Internet Explorer and insert this into the a...

Page 129: ...Part IX ...

Page 130: ...ack in real time on street level maps of Europe and download history Vehicle Tracking is designed for WIN 98 ME NT 2000 and XP 9 1 Adding a new Vehicle or Group From the menu select Tracking Add vehicle or Add group Alternatively you can right click on a group in the list and select Vehicles Edit Add vehicle to add a vehicle into that group You can also manage your vehicles using the buttons locat...

Page 131: ...e remember that your SIM card must be data enabled and the PIN removed or set to 0000 This number is the data number for the SIM card not the voice number If the unit came with a SIM card the number will be included for you When you enter a second vehicle some of the fields will be automatically filled in for you to save time You can always edit Vehicle Properties by highlighting a vehicle from th...

Page 132: ...Navigator 4 4 Help 131 2005 Directions Ltd General ...

Page 133: ...S km h if the vehicle if moving at less than this amount of km h do not save positions Geofence also see the chapter on Geofencing Active enable the geofence Latitude the latitude of the centre point of the geofence in milliseconds Longitude the latitude of the centre point of the geofence in milliseconds Radius radius of the geofence in meters Alarm when leaving the area will trigger an alarm whe...

Page 134: ...ne number when the alarm is triggered This phone with this number can also be used to activate deactivate the alarm 4 rings indicates activation 1 ring deactivation Alarm geofence text set your own custom SMS alert message in the text box Please note that coordinates are automatically sent with the message Alarms the unit can also send alarm SMS messages to the Alarm SMS Alert phone number on the ...

Page 135: ...s when GPRS connection was not available Access point the APN for the network provider e g pp vodafone co uk for Vodafone internet for O2 orangeinternet for Orange User name user name for access to the network APN wap for Vodafone username for O2 leave blank for Orange Password password for access to the network APN wap for Vodafone password for O2 leave blank for Orange Host server IP the server ...

Page 136: ...ll be sent Minimal speed to send data packets if the vehicle if moving at less than this amount of km h do not send positions but send at least one position each send a position every X seconds even if the above conditions are not met Time to wait for valid GPS data if the VTU is in sleep mode and wakes to send a position as set in but send at least one position each then it should go back to slee...

Page 137: ...leep mode if the GPS reports above this speed even if the vibration sensor is below Level for Sleep Wake up sensitivity level 0 255 indicates the vibration sensor level below which the vehicle is considered stationary Sensor filter settings This feature is designed to stop GPS drifting when the vehicle is parked for several hours Keep a note of the original settings before modifying these values T...

Page 138: ...ill not answer calls from any other numbers than the three listed here This security feature is useful if you want to make sure that nobody can dial into your unit from another location But be careful to set the right numbers otherwise you will not be able to dial in yourself Answer all calls data and voice this turns the number filtering off completely It is only necessary if you want to dial the...

Page 139: ...le For online download select Connect using modem The unit will communicate through its GSM modem For Internet download select Connect using GPRS The unit will communicate through a GPRS connection You can also switch communication type from the main program menu Tracking Communication device Now right click a vehicle in the list and from the context menu select History Download ...

Page 140: ...oad is finished Navigator will disconnect automatically When you download history Navigator will only download new data that has not been downloaded before This enables you to track vehicles from several computers 9 4 Tracking your vehicles You can track your vehicles using a GSM or GPRS connection From the toolbar select how you want to communicate with the vehicle ...

Page 141: ...o this from the menu Tracking Communication device Disconnect 9 5 Replaying a journey Showing a journey on the map Select a vehicle from the list and then switch to the History tab at the bottom of the screen If the History tab is not visible then you can opened it from the main menu Tracking Show vehicle history Here you can see the date and time at which the vehicle was moving You can select one...

Page 142: ...ays begins with a header that contains the name of the vehicle driver and CRN All journeys within the selected period are summarised in 4 lines Journey start date time and street Journey end date time and street Summary distance travelled and time taken Pause time the vehicle was stationary before the next journey The total time and length of all journeys in the report is shown at the end The CSV ...

Page 143: ...Input state only valid for VTU The coloured arrows in the date column mean A green arrow indicates a journey start A red arrow indicates a journey end To show a single position on the map highlight in the list and click the Show button Alternatively you can double click the record 9 7 Configuring Vehicle Tracking From the main menu select Tools Settings Tracking to modify Navigator tracking settin...

Page 144: ... and Stop bits unchanged at 8 No parity 1 stop bit Modem From the drop down menu select which dial up modem you want to use and the type of dialing generally tone You can also set to Disconnect automatically after a set time in case Navigator and the VTU connect but fail to communicate and Automatic redial attempts to retry dialing in if connection was unsuccessful TCP IP Here you must enter the a...

Page 145: ...Vehicle Tracking 144 2005 Directions Ltd In the Map tab you can set which information to display in the map label when replaying or showing vehicle journeys History tab ...

Page 146: ... street will be displayed for each record in the table or only the start and end points Accelerate history replay the journey is replayed a number of times faster than the recorded speed If you leave it unchecked Navigator will replay at the recorded speed Skip lags greater than skips time gaps in history greater than the given time 9 8 Scheduling If you want to look are where your vehicles are or...

Page 147: ...lick on it in the list and from the context menu select Scheduling Alternatively from the main menu select Tracking Scheduling Make sure that Vehicle scheduling enabled is checked To set up a new schedule click the Add new button This will bring the Scheduled Task dialog ...

Page 148: ...ial cable GSM or GPRS Now you must select connection interval on application startup only connect when you start Navigator every connect ever X minutes once on connect only once on a certain date at a defined time once a day at connect every day at a given time You can also set up exceptions to the schedule if you want to avoid connecting during certain periods This is especially useful if you are...

Page 149: ...chedule by clicking the Edit button You also have the option to disable some schedules while leaving others running To disable a schedule select it from the list and click the Disable button Conversely use the Enable button to start it up again You can also do this by checking and un checking the check box next it in the list To remove a schedule permanently click Delete 9 9 Geofencing If you want...

Page 150: ...ine units 9 9 1 Setting up a geofence Set up the geofence Right click on a vehicle in the list and from the context menu select Geofencing Draw Now right click on the map where you want the centre point of the geofence to be Keep your mouse button pressed and move the mouse to change the perimeter of the geofence Once you are happy with the size of the geofence release the mouse button ...

Page 151: ...ameters as you want then click the Send settings button to transfer them to the unit Note that once a geofence has bee triggered and an SMS sent the geofence will be deactivated To reactivate the geofence you must set it again To deactivate a geofence uncheck the Active check box and click the Send settings button Example use You want to make sure that a vehicle operates only within the limits of ...

Page 152: ...of the geofence is set by default to 500 metres A vehicle can be locked in two ways 1 Right click on a vehicle in the list and from the context menu select Send unit settings This will bring up the VTU settings dialog From the General tab check the Local geofence section See the Setting up a tracking unit chapter on setting up a Local geofence Once you have set the parameters as you want then clic...

Page 153: ...t again To deactivate a geofence uncheck the Active check box in the VTU settings dialog and click the Send settings button You can also unlock the local geofence by calling the unit from the designated mobile phone This time no rings should be heard NOTE Activating Deactivating the local geofence from a mobile phone does not incur any call costs Example use A driver parks the car and alarms it wi...

Page 154: ...Part X ...

Page 155: ... system Expand the Mice and other pointing devices item You should see at least two devices listed here one being Microsoft Serial Ballpoint Right click on it and select Disable This should prevent another occurrence of this problem Q When I start GPS tracking I get a message GPS data out of map boundaries What is wrong A There is nothing wrong in this instance In fact if you see this message it m...

Page 156: ...ion 78 E Edit existing import 72 Elliptic 9 Exit 7 Export to PDA 41 Exporting a map 41 Exporting route 41 F Find nearest 9 Find Route 22 Free shape 9 Fuel consumption 85 Fuel cost 85 Fullscreen 9 G Geocoding 63 Goto to coordinates 14 GPS 78 GPS tracking 37 Grabber hand 9 14 H Highlights 36 Home Point 9 Choose route optimisation type 22 I import 63 Import summary 63 Import update 71 Import wizard 6...

Page 157: ...map 37 39 route itinerary 39 Route optimisation 83 Route Results 34 Route summary 34 Routing 9 22 Runtime 85 S Scale adjuster 81 Scroll bars 14 Search 18 Search Results 31 Select Map 6 Selection set 90 Selections 90 Set as search area 31 Set departure 9 Set destination 9 Show all views 16 Show categories 18 Show entire map 16 Show legend 9 25 Show map highlights 9 Show on map 31 Show search mode 1...

Page 158: ...Voice navigation 83 W Waypoint 22 Z Zoom bar 13 Zoom in out 9 Zooming 13 Navigator 4 4 Help 157 2005 Directions Ltd ...

Reviews: