


SmartPad LCD
™
Page:
75
© 2008 Xantech Corporation
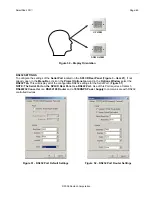
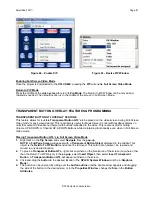
1.
Within the appropriate
MRC88 Project
, in the
System Window
, select the
Zone
the
SPLCD
will be
connected to from the
pull-down
. (Zone 1)
2.
In the
System Window
click the
RC68 Tab
.
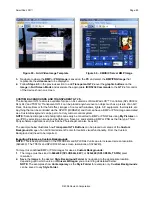
3.
In the
Palette Editor Window
, click the
Internal Commands Tab
.
4.
In the
Internal Commands Block
, select
Set Volume
from the
pull-down
.
5.
Select the
Zone Number.
( Zone 1)
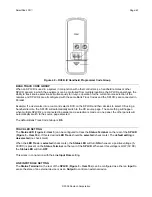
6.
Select the
[80] Button
on the
Virtual RC68
(or any other free RC68 Trigger Button).
7.
Select a discrete
Volume
Level
for the
Low
setting (i.e.
20
) and click
Accept
.
8.
Repeat for two other
RC68 Trigger Buttons
for a
Mid
Volume level and a
Hi
Volume Level (i.e. place the
discrete
Set Volume Level 40 Command
under the
[48] Button
and the discrete
Set Volume Level 50
Command
under the
[10] Button
on the
Virtual RC68
.
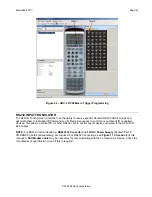
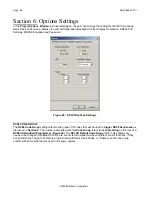
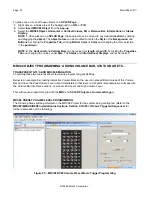
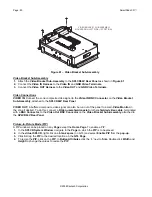
SPLCD / MRC88 PRESET VOLUME LEVEL PROGRAMMING
The following Steps will be performed in the SPLCD Project for the system being configured.
Figure 56 – Configuring MRC88 Volume Preset Triggers
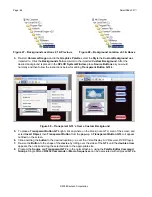
Placing the Volume Bar
1.
Right click on a
blank
area of the
Background
(no
GTL
or
PiP
) and select
Insert MRC88 Object
, then
select a
Horizonta
l or
Vertical Volume Bar
from the
pop-up
options.
2.
Place and resize to the desired position.
Creating Transparent GTL’s over a Volume Bar
1.
Right click on a blank area of the background (no
GTL
or
PiP
) and select
Insert Objects
then
Transparent
Button
from the
pop-up
.
2.
Resize the
Transparent GTL
to cover 1/3 of the
Volume Bar
and place over the
lower
1/3 of the
Volume
Bar
.
NOTE:
Use the
Size
values in the
Properties/Button Attributes
for reference and quick adjustments.


