SmartPad LCD
™
Page:
29
© 2008 Xantech Corporation
STARTING A NEW SPLCD PROJECT
For example, in this section, a Blank SPLCD 64v Project will be used. With the Universal Dragon software open
and Com Port communication verified, proceed as follows:
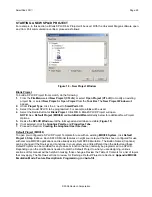
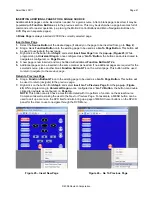
Figure 18 – New Project Window
Blank Project
To build a SPLCD Project from scratch, do the following:
1.
From the
File Menu
select
New Project (CTL+N)
or select
Open Project (CTL+O)
to modify an existing
project file, or select
New Project
or
Open Project
from the
Tool Bar
. The
New Project Window
will
appear.
2.
Under
Project Type
, click the ‘
+
’ next to
SmartPad LCD
.
3.
Select the model SPLCD to be programmed. For example, a
64v
will be used.
4.
Select the Radio Button for
Blank Project
. Click
OK
. A Blank SPLCD Project will open.
NOTE:
See:
Default Project (MRC88)
and
AutoBuild Wizard
directly below for additional New Project
Options.
5.
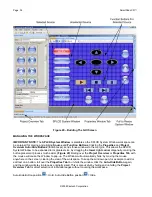
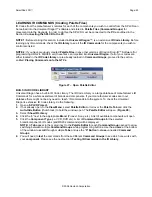
Resize the
SPLCD Window
until the full keypad and all tabs are visible (
Figure 19
).
6.
If not selected, click the
Graphics Palette
and
Properties Tabs
.
7.
Proceed to Section:
Creating the Graphical User Interface.
Default Project (MRC88)
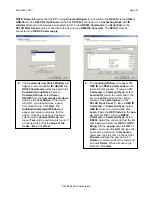
To open pre-configured a SPLCD Project Template for use with an existing
MRC88 System
, click
Default
Project
in
Step 4
above. Each SPLCD Model features an eight source layout that has been configured for use
with common MRC88 applications and is already setup for MRC88 Emulation. The Button Names (Captions)
can be changed if the Sources and Functions in your system are a little different than the default and these
Default Projects can be modified for any feature or function that can normally be programmed to a SPLCD.
Depending upon the modifications needed to match a Default Project to what you are designing, various
sections of this manual will be helpful in making those changes. Review the Table of Contents for a list of topics
that may apply. The first two sections to review for finishing a Default Project are Sections:
Appendix: MRC88
Emulation Mode: Feature Description & Programming
and
Auto-fill
.

