1143100
SmartPAC PRO User Manual
60
Chapter 2 – Installing SmartPAC PRO
Adding or Upgrading DiProPAC or ProCamPAC Option
ELECTRIC SHOCK HAZARD
Turn off and disconnect power from SmartPAC PRO and from the machinery it is connected to
before making any wiring connections. This includes power to the machine control and motor. Do
not connect the AC power source until you are done with all other installation procedures.
Failure to comply with these instructions could result in death or serious injury.
CAUTION
DAMAGE TO BOARD FROM STATIC DISCHARGE
Ground yourself before touching circuit boards or chips by touching a large metal object such as
the press. Static electricity can destroy electronic components.
Failure to comply with these instructions could result in property damage.
NOTICE
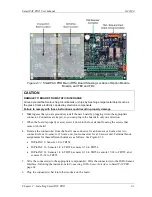
INSTALL DIPROPAC AND/OR PROCAMPAC BOARD IN CORRECT LOCATIONS
Install these boards in the locations shown in Figure 2-11, below. If you install a board in the wrong
location, SmartPAC PRO will not recognize that the option is installed.
Eight-, 16-, and 32-channel configurations of the same option are interchangeable. When a board
is installed in the correct location, SmartPAC PRO recognizes whether it is an 8-, 16-, or 32-
channel version of DiProPAC or an 8- or 16-channel version of ProCamPAC.
NOTICE
For information about using the DiProPAC or ProCamPAC options, see:
•
(Optional), page 159
•
– Using ProCamPAC Programmable
The following instructions describe how to add die protection capabilities to a basic SmartPAC PRO.
If you ordered either of these options with your new SmartPAC PRO, the boards will have been
installed at the factory, and you can skip to the wiring sections for these modules. DiProPAC is
available as an 8-sensor, 16-sensor, or 32-sensor board. You can obtain the ProCamPAC board in 8-
cam or 16-cam versions.
Wiring instructions for the DiProPAC board are provided below. Wiring for the ProCamPAC board is
documented starting on page 66.
To install a new DiProPAC or ProCamPAC board, do the following:
1.
On the SmartPAC PRO board, locate the connector in which the new board should be installed
(see Figure 2-11).
Содержание SmartPAC PRO
Страница 1: ......
Страница 2: ......
Страница 4: ......
Страница 6: ......
Страница 20: ......
Страница 22: ......
Страница 24: ......
Страница 42: ...1143100 SmartPAC PRO User Manual 42 Chapter 1 Introduction to SmartPAC PRO ...
Страница 142: ...1143100 SmartPAC PRO User Manual 142 Chapter 4 SmartPAC PRO Program Mode ...
Страница 200: ...1143100 SmartPAC PRO User Manual 200 Chapter 6 Using DiProPAC Die Protection Optional ...
Страница 222: ...1143100 SmartPAC PRO User Manual 222 Chapter 7 ProCamPAC Instructions ...
Страница 250: ...SmartPAC PRO User Manual 1143100 250 Appendix A SmartPAC PRO Preventive Maintenance PM Monitor Optional ...
Страница 254: ...1143100 SmartPAC PRO User Manual Appendix C SmartView Remote Viewing and E mail Setup 254 ...
Страница 280: ...SmartPAC PRO User Manual 1143100 280 Appendix C Reporting Downtime and Scrap to SFC ...
Страница 290: ...SmartPAC PRO User Manual 1143100 290 Index Y yellow fault 232 yellow sensor 169 ...
Страница 292: ......
Страница 294: ......
Страница 296: ......
Страница 298: ......
Страница 300: ......
Страница 301: ......
Страница 302: ......
Страница 303: ......
Страница 304: ......
Страница 305: ......
Страница 306: ......
Страница 307: ......
Страница 308: ......
Страница 309: ......
Страница 310: ......
Страница 311: ......
Страница 312: ......
Страница 313: ......
Страница 314: ......
Страница 315: ......
Страница 316: ......
Страница 317: ......
Страница 318: ......


