1143100
SmartPAC PRO User Manual
48
Chapter 2 – Installing SmartPAC PRO
1.
Determine a convenient location for the enclosure. Ideally, the enclosure should be mounted
where operators and setup personnel can easily see the readouts and reach the display. Make sure
that all cables can reach the enclosure. Leave enough room to open the door at least 120
. The
enclosure can be mounted on a pedestal, pendant, or the press itself.
2.
Drill and tap (if necessary) mounting holes, using a No. 7 drill and 1/4–20 tap, then mount the
enclosure, using the enclosed shock mounts. Shock mount studs are 1/4–20.
Installing SmartPAC PRO as a Panel Mount
Follow the steps below to install the panel mount version of the SmartPAC PRO in your enclosure.
Be sure to allow at least 6 in. (152 mm) of clearance behind the panel mounting plane to leave enough
room for the electronics.
1.
Determine a convenient location within your enclosure or console for mounting SmartPAC PRO.
Ideally, SmartPAC PRO should be mounted where operators and setup personnel can easily see
the readouts and reach the display.
2.
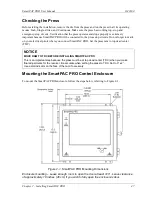
Cut out a hole in your enclosure, and drill and tap twelve holes for #10-32 screws, referring to
Figure 2-2, page 49, and Figure 2-3, page 50, for mounting and “cutout” dimensions.
3.
Prop the panel mount near the cutout location. You can do this by connecting ty wraps from two
of the left holes on the panel to the corresponding holes on the enclosure or console, creating
hinges.
4.
Perform wiring connections as shown in the following sections. Make sure all cables will reach
the connectors on the back of the panel mount.
5.
When final checkout procedures have been completed (see pages 82 - 83), install the panel mount
in your enclosure or console, using twelve #10-32 screws.
Содержание SmartPAC PRO
Страница 1: ......
Страница 2: ......
Страница 4: ......
Страница 6: ......
Страница 20: ......
Страница 22: ......
Страница 24: ......
Страница 42: ...1143100 SmartPAC PRO User Manual 42 Chapter 1 Introduction to SmartPAC PRO ...
Страница 142: ...1143100 SmartPAC PRO User Manual 142 Chapter 4 SmartPAC PRO Program Mode ...
Страница 200: ...1143100 SmartPAC PRO User Manual 200 Chapter 6 Using DiProPAC Die Protection Optional ...
Страница 222: ...1143100 SmartPAC PRO User Manual 222 Chapter 7 ProCamPAC Instructions ...
Страница 250: ...SmartPAC PRO User Manual 1143100 250 Appendix A SmartPAC PRO Preventive Maintenance PM Monitor Optional ...
Страница 254: ...1143100 SmartPAC PRO User Manual Appendix C SmartView Remote Viewing and E mail Setup 254 ...
Страница 280: ...SmartPAC PRO User Manual 1143100 280 Appendix C Reporting Downtime and Scrap to SFC ...
Страница 290: ...SmartPAC PRO User Manual 1143100 290 Index Y yellow fault 232 yellow sensor 169 ...
Страница 292: ......
Страница 294: ......
Страница 296: ......
Страница 298: ......
Страница 300: ......
Страница 301: ......
Страница 302: ......
Страница 303: ......
Страница 304: ......
Страница 305: ......
Страница 306: ......
Страница 307: ......
Страница 308: ......
Страница 309: ......
Страница 310: ......
Страница 311: ......
Страница 312: ......
Страница 313: ......
Страница 314: ......
Страница 315: ......
Страница 316: ......
Страница 317: ......
Страница 318: ......

