background image

Industrial Clean instruction manual

26

15/02/12   Rev:1.0.0 

Pr

ese aspiranti

Kw

 5.5

Kw

 4

Kw

 2.2

Ar

t. 3500.1M

Ar

t. 3500.3M

Ar

t. 3500.5M

12

3

4

R3

R4

R2

R1

3301.4

SISTEM AIR

Ar

t. 3301.4

Pa

rtit

or

e

Quadr

o elettric

o

Ar

t. 3301.10

Co

ntr

ol panel

RS

E

P

2
1

400 V ac

12

T

Micr

o 2

Micr

o 2

Micr

o 2

Micr

o 2

PE PE

L (marrone)

L (m

arro

ne)

N (blu)

N (b

lu)

230 V ac

230

 V a

c

Industrial

Industrial Ind

us

tri

al 

Ar

t. 3400.1

Ar

t. 3

40

0.1

230 V ac

8
7

5
4

N
L9

10

Mo

to

re

 1

Mo

to

re

 3

T

400 V ac

P

E

S
R

Pa

rtit

or

e

Ar

t. 3301.4

Verso altri par

tit

ori

SISTEM AIR

3301.4

R1R1

R2R2

R4R4

R3R3

4

3

2

1

Pr

ese aspiranti

LINE IN

LINE OUT

LINE IN

Micr

o 1

Micr

o 1

Micr

o 1

Micr

o 1

11

2
11

2
11

2
11

2
11

2
11

2
11

Kw

 5.5

Kw

 4

Kw

 2.2

Ar

t. 3500.1M

Ar

t. 3500.3M

Ar

t. 3500.5M

Mo

to

r

Industrial

Mo

to

r

CleanCl

ea

n

11

12

13

14

Mo

to

re

 5

T

400 V ac

P

E

S
R

Kw

 5.5

Kw

 4

Kw

 2.2

Ar

t. 3500.1M

Ar

t. 3500.3M

Ar

t. 3500.5M

Industrial

Mo

to

r

15

16

Mo

to

re

 7

T

400 V ac

P

E

S
R

Kw

 5.5

Kw

 4

Kw

 2.2

Ar

t. 3500.1M

Ar

t. 3500.3M

Ar

t. 3500.5M

Industrial

Mo

to

r

Kw

 5.5

Kw

 4

Kw

 2.2

Ar

t. 3500.1M

Ar

t. 3500.3M

Ar

t. 3500.5M

RS

E

P

400 V ac

T

Industrial

Mo

to

re

 2

Mo

to

re

 4

T

400 V ac

P

E

S
R

11

2
11

2

11

2
11

2

11

2
11

2

11

2
11

2

Kw

 5.5

Kw

 4

Kw

 2.2

Ar

t. 3500.1M

Ar

t. 3500.3M

Ar

t. 3500.5M

Mo

to

r

Industrial

Mo

to

r

Mo

to

re

 6

T

400 V ac

P

E

S
R

Kw

 5.5

Kw

 4

Kw

 2.2

Ar

t. 3500.1M

Ar

t. 3500.3M

Ar

t. 3500.5M

Industrial

Mo

to

r

Mo

to

re

 8

T

400 V ac

P

E

S
R

Kw

 5.5

Kw

 4

Kw

 2.2

Ar

t. 3500.1M

Ar

t. 3500.3M

Ar

t. 3500.5M

Industrial

Mo

to

r

17

18

19

20

21

22

42

43

44

45

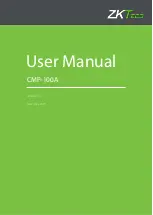
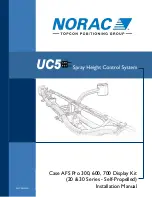
4) Connection layout of nr. 1 dust separator to nr. 8 electric motors.

Содержание Industrial Clean Basic

Страница 1: ...hnique Manual t cnico Technisches Handbuch w w w s i s t e m a i r c o m 27020 Gravellona Lomellina PV ITALIA Via Cilavegna 53 GPS N 45 19 28 E 8 45 32 Tel 39 0381 650082 Fax 39 0381 650120 info siste...

Страница 2: ......

Страница 3: ...5 6 Targhetta di identificazione 11 6 USO PREVISTO DELLA MACCHINA 12 7 USO NON PREVISTO DELLA MACCHINA 12 8 CORREDO E ACCESSORI 13 9 INSTALLAZIONE 14 9 1 Installazione consigliata 14 9 2 Trasporto e d...

Страница 4: ...allarmi 39 11 3 3 3 Men impostazione data e ora 43 11 3 3 4 Men set blocco macchina 43 Allarme polveri 44 Allarme manutenzioni 45 Allarme filtro 46 Allarme Autocleaner 47 11 3 3 5 Men parametri insta...

Страница 5: ...ell operatore per il corretto funzionamento e conseguentemente per la lunga durata della macchina La preghiamo pertanto di leggere attentamente e per intero il presente manuale di attenersi scrupolosa...

Страница 6: ...a costante ricerca applicata ai sistemi centralizzati di aspirazione coadiuvata dall alta tecnologia elettronica ha permesso alla TECNOPLUS S r l di realizzare il nuovo separatore di polvere Industria...

Страница 7: ...a polveri epossidiche e con secchio polveri di grande capacit l 62 106 dotato di rotelle Possibilit di abbinare anche in tempi successivi il sistema di autopulizia Autocleaner vedi pag 75 Un innovati...

Страница 8: ...o Industrial Motor Raccordo impianto di aspirazione Interruttore generale Cono convogliatore Basamento 1 2 3 4 5 6 7 Trasduttore di pressione Valvola rompivuoto Computer di bordo Protezione filtro Fil...

Страница 9: ...protezione IP 20 20 Alimentazione V ac 220 240 220 240 Frequenza Hz 50 60 50 60 Portata massima aria motore m3 h 700 1200 Superficie filtrante cm2 24000 43400 Capacit contenitore polveri l 62 106 Pes...

Страница 10: ...della centrale Scocca cilindrica in metallo verniciata a polvere epossidica Apertura del contenitore polveri con maniglia di apertura per facilitare le operazioni di svuotamento Contenitore di raccolt...

Страница 11: ...danneggiato Si sospetta che la centrale aspirante abbia bisogno di manutenzione o di riparazione Indossare guanti di protezione e mascherina per eseguire lavori di manutenzione svuotamento del conteni...

Страница 12: ...t Die Firma TECNOPLUS S r l erkl rt dass ihre Produkte und Ger te mit Materialien hergestellt wur den die den festgelegten Grenzwerten der geltenden Vorschriften in Bezug auf Gesundheits und Umweltsch...

Страница 13: ...lung und montage verwendeten Schrauben durch solche mit anderen technischen Merkmalen zu ersetzen Sollte der Kunde irgendwelche nderungen vornehmen annulliert TECNOPLUS s r l sofort den Ga rantieanspr...

Страница 14: ...5 7 USO NON PREVISTO DELLA MACCHINA E molto importante NON utilizzare l apparecchio negli usi seguenti ritenuti scorretti e pericolosi Non deve essere usata per aspirare tessuti materiale pesante o i...

Страница 15: ...cotti in gomma per il collegamento alla rete tubiera di aspirazione 3 N 4 fascette metalliche per il fissaggio dei manicotti 4 N 1 manuale d installazione uso e manutenzione Verificare che la centrale...

Страница 16: ...sbalzi di temperatura temperatura ambiente lavoro 5 45 C umidit relativa 20 85 senza condensa o congela mento Occorre scegliere per l installazione luoghi lontani da fonti di calore come ad esempio st...

Страница 17: ...o 9 2 Trasporto e disimballo Trasportare la centrale ancora imballata in prossimit del luogo di installazione seguendo le indicazioni riportate sull imballo ed utilizzando un transpallet o un carrello...

Страница 18: ...on forche possibile togliere manual mente la centrale dal bancale vedi figura In questo caso sono necessarie alme no due persone robuste che faranno scivolare la centrale ed una terza che dovr estrarr...

Страница 19: ...17 1 15 02 12 Rev 1 0 0 LINGUA ORIGINALE Italiano Rimozione del maniglione Estrarre tutti gli accessori presenti e smaltire l imballo in conformit delle leggi vigenti in materia 7 6...

Страница 20: ...nistra Normalmente le centrali aspiranti sono fornite con attacco tubi aspirazione e scarico alla destra ver sione DX In caso di necessit possibile trasformarle portando entrambi gli attacchi a sinist...

Страница 21: ...e C e la lamiera di chiusura D svitan do le relative viti di fissaggio 3 Rimontare scambiandone di posto l imbocco del tubo di scarico C e la lamiera di chiusura D riavvitando le relative viti di fiss...

Страница 22: ...10 1 Postazione di comando Il Separatore di polvere Industrial Clean ha una postazione di comando dalla quale si pu configurare il funzionamento dell apparecchio tramite un semplice display interfacc...

Страница 23: ...e elettrico Nel caso in cui il numero dei motori elettrici sia pi di uno collegare il cavo al quadro elettrico sele zione chiamata Sistem Air Verificare che l impianto elettrico sia realizzato secondo...

Страница 24: ...rici Industrial Motor art 3500 1M 3500 3M 3500 5M Figura A collegamento separatore polveri con un motore elettrico Figura B collegamento separatore polveri con due o pi motori elettrici art 3500 1M 35...

Страница 25: ...rese aspiranti Kw 5 5 Kw 4 Kw 2 2 Art 3500 1M Art 3500 3M Art 3500 5M 1 2 3 4 R S E P 1 400 V ac 11 12 T Micro 2 Micro 2 PE L marrone N blu 230 V ac Industrial Art 3400 0 Industrial Art 3400 1 Motore...

Страница 26: ...cro 2 Micro 2 PE L marrone N blu 230 V ac Industrial Art 3400 0 Industrial Art 3400 1 230 V ac 8 7 5 4 N L 9 10 Motore 1 Motore 2 T 400 V ac P E S R Partitore Art 3301 4 Verso altri partitori LINE OUT...

Страница 27: ...dustrial Art 3400 0 Industrial Art 3400 1 230 V ac 8 7 5 4 N L 9 10 Motore 1 Motore 2 T 400 V ac P E S R Partitore Art 3301 4 Verso altri partitori SISTEM AIR 3301 4 R1 R2 R4 R3 4 3 2 1 Prese aspirant...

Страница 28: ...1 12 13 14 Motore 5 Motore 5 T 400 V ac 400 V ac P E S R Kw 5 5 Kw 5 5 Kw 4 Kw 4 Kw 2 2 Kw 2 2 Art 3500 1M Art 3500 1M Art 3500 3M Art 3500 3M Art 3500 5M Art 3500 5M Industrial Industrial Motor Motor...

Страница 29: ...12 13 14 Motore 5 T 400 V ac P E S R Kw 5 5 Kw 4 Kw 2 2 Art 3500 1M Art 3500 3M Art 3500 5M Industrial Motor 15 16 Motore 7 T 400 V ac P E S R Kw 5 5 Kw 4 Kw 2 2 Art 3500 1M Art 3500 3M Art 3500 5M I...

Страница 30: ...tori elettronici Industrial Motor Matic art 3500 2M 3500 4M 3500 6M 3500 7M Figura A collegamento separatore polveri con un motore elettronico Figura B collegamento separatore polveri con due o pi mot...

Страница 31: ...lveri con n 1 motore elettronico Prese aspiranti Kw 5 5 Kw 4 Kw 2 2 Art 3500 2M Art 3500 4M Art 3500 6M 1 2 3 4 R S E P 1 400 V ac 3 T Micro 2 Micro 2 PE L marrone N blu 230 V ac Industrial Art 3400 0...

Страница 32: ...cat 6 R S E P 400 V ac T Industrial Motore 2 Motor Resistenza 120ohm gi in dotazione al motore Cavo Patch cat 6 Kw 5 5 Kw 4 Kw 2 2 Art 3500 2M Art 3500 4M Art 3500 6M Kw 7 5 Art 3500 7M Kw 5 5 Kw 4 Kw...

Страница 33: ...r Cavo Patch cat 6 Kw 7 5 Art 3500 7M Art 3500 2M Art 3500 4M Art 3500 6M Art 3500 7M Kw 5 5 Kw 4 Kw 2 2 Kw 7 5 R S E P 400 V ac T Industrial Motore 3 Motor Resistenza 120ohm gi in dotazione al motore...

Страница 34: ...Art 3500 6M Art 3500 7M Kw 5 5 Kw 4 Kw 2 2 Kw 7 5 Cavo Patch cat 6 1 3 2 M O C 1 3 2 M O C R S E P 400 V ac T Industrial Motore 3 Motor Art 3500 2M Art 3500 4M Art 3500 6M Art 3500 7M Kw 5 5 Kw 4 Kw...

Страница 35: ...2 Kw 7 5 1 3 2 M O C 1 3 2 M O C 1 3 2 M O C 1 3 2 M O C Kw 5 5 Kw 4 Kw 2 2 Art 3500 2M Art 3500 4M Art 3500 6M R S E P 400 V ac T Industrial Motore 5 Motor R S E P 400 V ac T Industrial Motore 6 Moto...

Страница 36: ...nte 11 2 Utilizzo della centrale aspirante Ruotare l interruttore generale situato sulla spalla destra della centrale in posizione I ON Il Display si accender ad indicare che la centrale sotto tension...

Страница 37: ...iene nel seguente modo Premendo la freccia alto e basso si scorre all interno della videata del display Premendo enter si memorizza il dato inserito o la scelta effettuata Premendo la freccia dx e sx...

Страница 38: ...i Su Gi Dx e Sx Premendo Enter si passa alla videata successiva Questa videata e le successive permet tono di memorizzare i dati dell instal latore e del Servizio Assistenza Pre mendo i tasti freccia...

Страница 39: ...UTOCLEANER OPTION PRESS ENTER MOTORI ELETTRONICI 1 0 8 min max PREMERE ENTER MOTORI ELETTRICI 1 1 8 min max PREMERE ENTER Selezione del numero di motori Indu strialMotorMatic art 3500 2M 3500 4M 3500...

Страница 40: ...macchina SETUP non disponibile N B Se al termine di questa procedura dovesse apparire questa videata si prega di verificare il collegamento seriale tra i separatori di polvere ed il gruppo Motore Soff...

Страница 41: ...ideata successiva Premendo ESC si ritorna al men precedente DEPRESSIONE 120 60 200mbar min max PREMERE ENTER Premendo il tasto Enter si memorizza il parametro modificato Utilizzando le frecce basso e...

Страница 42: ...di aspi razione h ore di aspirazione attiva mbar valore della potenza aspirante presente nell impianto 5a 2 22 2 HZ 23 6 A 00000000h 42 mBAR ESC DATA PRODUZIONE 01 01 11 ORE MACCHINA 00000000h DATA I...

Страница 43: ...tempo di decelerazione AXX 02 Sottotensione Inverter Tensione limite basso di bus superata Verificare la tensione di alimentazione AXX 03 Temperatura Inverter Temperatura di limite alto di bus superat...

Страница 44: ...eriale 5 N ALLARMI AUTOCLEA 0 N ALLARMI POLVERI 0 ESC PER USCIRE Allarmi Autocleaner allarme non utilizzato Allarmi polveri indica quante volte stato richiesto lo svuotamento delle polveri dal secchio...

Страница 45: ...sul computer di controllo Per la codifica contattare il personale au torizzato Sistem Air 8 9 11 3 3 3 Men impostazione della data e ora SET POINT DEPRESS INFO ALLARMI IMPOSTAZ DATA ORA SET BLOCCO MA...

Страница 46: ...iesta della svuo tamento delle polveri raccolte nel sec chio 1 Timer polveri tempo in ore per la visua lizzazione del relativo allarme Premere Enter per memorizzare il dato impostato Premere le frecce...

Страница 47: ...UTENZIONE 2 150 1 200h min max PREMERE ENTER SEI SICURO SI NO PREMERE ENTER Allarme manutenzioni Timer manutenzione 2 tempo in ore per la visualizzazione del relativo allarme Premere Enter per memoriz...

Страница 48: ...ver solo dopo 15 minuti dalla visualizzazione dell allarme Nel caso in cui si scegliesse di arre stare la macchina dopo aver rimosso l allarme presente sul computer di con trollo si dovr estrarre e re...

Страница 49: ...installazione della macchina 2 TIMER AUTOCLEANER 4 1 40h min max PREMERE ENTER N CICLI AUTOCLEANER 6 1 10 min max PREMERE ENTER Timer Autocleaner tempo in ore di uti lizzo dell aspirazione trascorso...

Страница 50: ...leziono orario diurno si attiva la se guente videata tramite la quale possibile modificare l arco di tempo in cui il sistema Autocleaner pu funzionare 6 Utilizzare le frecce alto e basso per modi fica...

Страница 51: ...ando la freccia su e gi Premendo Enter si conferma la lingua e si p assa alla videata successiva WELCOME SELECT YOUR LANGUAGE ITALIANO PRESS ENTER Inserire nome installatore ROSSI _ABCDEFGHILMNOP CONF...

Страница 52: ...SPIRAZ TRASDUTTORE PARTITORI RESISTIVI PREMERE ENTER CARICAMENTO DATI ATTENDERE PREGO Selezione del numero di motori Indu strial Motor Matic art 3500 2M 3500 4M 3500 6M 3500 7M comandati elettroni cam...

Страница 53: ...R PARAM INSTALLAZIONE TRASMISSIONE DATI RESET PARAMETRI COLLAUDO E TEST PREMERE ENTER INSERIRE INDIRIZZO IP SCHEDA ETHERNET 192 168 000 080 PREMERE ENTER RIPRISTINARE TUTTI DATI DI DEFAULT SI NO PREME...

Страница 54: ...RI COLLAUDO E TEST PREMERE ENTER COLLAUDO IMPIANTO TEST PRESA ASPIRANTE TEST AUTOCLEANER TEST ELETTRONICA PREMERE ENTER COLLAUDO IMPIANTO TEST PRESA ASPIRANTE TEST AUTOCLEANER TEST ELETTRONICA PREMERE...

Страница 55: ...IONE PREMERE ENTER COLLAUDO IMPIANTO CORRENTE NOMINALE 12 0 A APRIRE VALVOLA ROMPIVUOTO COLLAUDO IMPIANTO CORRENTE NOMINALE 12 3 A CHIUDERE VALVOLA ROMPIVUOTO COLLAUDO IMPIANTO CORRENTE NOMINALE Segui...

Страница 56: ...OCEDURA SI NO PREMERE ENTER TEST PRESA ASPIRANTE TUBO DI ASPIRAZIONE INSERITO ESC PER USCIRE TEST PRESA ASPIRANTE TUBO DI ASPIRAZIONE DISINSERITO ESC PER USCIRE Premere Enter per accedere al sottome n...

Страница 57: ...itare il sistema Autocleaner vedi par 11 3 3 5 Premere ENTER per accedere al sotto men 2 1 Utilizzare le frecce dx e sx per effettare la selezione Premere Enter per avviare la procedura 3 Seguire le i...

Страница 58: ...ATO SI NO PREMERE ENTER TEST AUTOCLEANER PULIZIA FILTRO ESEGUITA SI NO PREMERE ENTER VERIFICA IL COMPRESSORE SI ATTIVATO SI NO PREMERE ENTER DIAGNOSI AUTOCLEANER CONCLUSA ESC PER USCIRE Seguire le ist...

Страница 59: ...ntistica elettronica presente all interno della macchina COLLAUDO IMPIANTO TEST PRESA ASPIRANTE TEST AUTOCLEANER TEST ELETTRONICA PREMERE ENTER Seguire le istruzioni a video 13 Seguire le istruzioni a...

Страница 60: ...viare la procedura 1 11 4 Videate con macchina in funzione In questo paragrafo sono riportate alcune videate esemplificative con il sistema di aspirazione attivo Si ricorda che in questo caso non poss...

Страница 61: ...non accessibile con aspirazione at tiva 7 Messaggio che informa l utente di arre stare l aspirazione per poter accedere al men selezionato 8 1 STOP 00000000h 122 mBAR ESC Aspirazione in arresto 5 SET...

Страница 62: ...INVERTER 1 A98 ESC PER USCIRE ALLARME INVERTER ROSSI 0000000000 ESC PER USCIRE 11 5 1 Allarmi inverter Vedi codifica a pag 41 tabella codifica allarmi 1 Vedi codifica a pag 41 tabella codifica al larm...

Страница 63: ...000000 ESC PER USCIRE 28 11 11 13 43 WARNING PRESSOSTATO Allarme relativo al funzionamento automati co del sistema Autocleaner Contattare il personale autorizzato Sistem Air 1 Allarme relativo al funz...

Страница 64: ...ER USCIRE Se al termine della procedura di messa in servizio appare il seguente messaggio di allarme vuol dire che alla macchina sta ta collegata la scheda ethernet opzionale e pertanto il sistema di...

Страница 65: ...NUTENZIONE 2 ROSSI 0000000000 ESC PER USCIRE 1 messaggio di avviso l aspirazione non si arresta 2 messaggio di avviso l aspirazione si fer ma nel caso in cui si sia scelto di bloccare la macchina Prem...

Страница 66: ...ezione del blocco macchina attivo l aspirazione si arrester dopo 15 minuti dall attivazione del messaggio di warning 28 11 11 13 42 WARNING SVUOTARE CONTENITORE POLVERI 1 messaggio di avviso l aspiraz...

Страница 67: ...re in caso di assistenza tecnica L utilizzatore pu decidere inoltre in caso di allarme derivante da una richiesta di manutenzione ordinaria filtro sporco contenitore polveri pieno se arrestare immedia...

Страница 68: ...nte l involucro esterno della centrale utilizzando un panno morbido inumidito con acqua e sapone neutro Attenzione pulire la centrale solo con acqua o acqua e sapone neutro L uso di altri solventi o a...

Страница 69: ...aliano Legare il sacco raccoglipolvere e rimuo verlo dal contenitore 4 Inserire un nuovo sacco ed il tendisacco 5 Inserire il cono convogliatore 6 Utilizzando due mani abbassare la mani glia di agganc...

Страница 70: ...1 0 0 LINGUA ORIGINALE 12 5 Sostituzione cartuccia filtro Utilizzando due mani sollevare la maniglia di sgancio Svitare il pomello di bloccaggio Avvitare il pomello di bloccaggio 1 3 5 Estarre il con...

Страница 71: ...69 1 15 02 12 Rev 1 0 0 LINGUA ORIGINALE Italiano Riposizionare il contenitore polveri 6 Utilizzando due mani abbassare la mani glia di aggancio 7...

Страница 72: ...per guasto o malfunzionamento devono essere eseguiti da personale qualificato del Servizio Assistenza In caso di interventi da parte di personale non autorizzato l eventuale garanzia sul prodotto dec...

Страница 73: ...ualora si decidesse di mettere fuori servizio la centrale aspirante necessario eseguirlo nel rispetto della nostra salute e dell ambiente in cui viviamo Informarsi se vi siano luoghi e o persone autor...

Страница 74: ...rere ad utili suggerimenti ed accorgimenti quali Eventualmente ricorrere a materiali fonoassorbente sulle due pareti laterali se queste sono molto vicine tra loro in modo da spezzare l onda sonora ed...

Страница 75: ...asto Chiamare il Servizio Assistenza L aspirazione d aria scarsa Utilizzo di pi prese contemporaneamente Ridurre il numero delle prese utilizzate contemporaneamente Tubo flessibile o accessori di puli...

Страница 76: ...Manuale istruzioni Industrial Clean 74 15 02 12 Rev 1 0 0 LINGUA ORIGINALE...

Страница 77: ...upporto in dota zione all Autocleaner Rimuovere la copertura in termofor mato agendo sulle viti Torsen Agganciare il telaio dell au topulizia alla staffa di sup porto infilando le lamelle di centraggi...

Страница 78: ...overe il tappo del connettore presente sull unit aspirante 2 A 2 Collegamento pneumatico Avvicinare il raccordo del tubo dell aria compressa all imbocco posto sulla parte posteriore della cen trale N...

Страница 79: ...RECT USE OF THE APPLIANCE 12 8 EQUIPMENT AND ACCESSORIES 13 9 INSTALLATION 14 9 1 Recommended Installation 14 9 2 Transport and unpacking 15 9 3 Positioning of the appliance 18 9 4 Transforming DX ver...

Страница 80: ...3 4 Menu for setting machine block 43 Dust alarm 44 Maintenance alarm 45 Filter alarm 46 Autocleaner alarm 47 11 3 3 5 Installation parameters menu 48 11 3 3 6 Data transmission menu 51 11 3 3 7 Param...

Страница 81: ...the system which are crucial to ensure the user s safety the correct functioning and the long working life of the vacuum cleaning unit Read the entire manual carefully follow the instructions precisel...

Страница 82: ...eate the new dust separator Industrial Clean The central vacuum cleaner suitable for any type of residential building private houses offices hotels service sector consists of a network of PVC trace pi...

Страница 83: ...106 Possibility to combine the Autocleaner filter self cleaning system even afterwards see page 75 The machine adopts an innovative control and routine maintenance system based on an electronic contr...

Страница 84: ...r connection Connection to the vacuuming installation Main switch Conveyor cone Base 1 2 3 4 5 6 7 Pressure transducer Vacuum breaker valve Board computer Filter protection Filter Dust container relea...

Страница 85: ...tection degree IP 20 20 Supply V ac 220 240 220 240 Frequency Hz 50 60 50 60 Max air flow motor m3 h 700 1200 Filtering surface cm2 24000 43400 Dust container capacity l 62 106 Weight kg 53 67 Size A...

Страница 86: ...l characteristics are the following Base coated with shockproof material to protect the unit Epoxy powder coated cylindrical body made of metal Dust container opening with handle to make emptying oper...

Страница 87: ...n in any way damaged you think the system requires maintenance or repair Wear protective gloves and mask to carry out maintenance to empty the dust bin or replace and clean the filter Only use origina...

Страница 88: ...of dangerous substances TECNOPLUS S r l declares that its products and appliances have been manufactured with materials which comply with the restrictions established by the health and environment pro...

Страница 89: ...d to design and manufacture the appliances with screws that feature different characteristics TECNOPLUS s r l will immediately suspend the product guarantee in case of machine tampering car ried out b...

Страница 90: ...ortant NOT to use the appliance in the following circumstances which are con sidered to be inappropriate and dangerous The system must not be used to vacuum clean fabrics heavy or hot burning material...

Страница 91: ...s for the connection to the suction piping network 3 N 4 metal clamps to fix the sleeves 4 N 1 installation use and maintenance manual Check that the system the accessories and the kit correspond to t...

Страница 92: ...perature 5 45 C relative humidity 20 85 without moisture or freezing Install the unit in a place far from heat sources such as stoves and radiators N B the unit features IP 20 protection degree During...

Страница 93: ...h 9 2 Transport and unpacking Use a transpallet or a fork lift truck for transport and handling always maintain the system inside its own packaging until it reaches the place of installation Remove th...

Страница 94: ...o suitable fork lifts are available remove manually the unit from the pallet see picture In this case at least two strong per sons are needed to slide the unit whi le a third person removes the pallet...

Страница 95: ...17 2 15 02 12 Rev 1 0 0 English Remove the handle Remove all the accessories and dispose the cardboard box according to the regulations in force 7 6...

Страница 96: ...et pipes fitted on the left The units are generally supplied with suction and exhaust pipes on the right side RIGHT version If needed the system can be transformed so to have both suction and exhaust...

Страница 97: ...ction pipe and the D closing plate by removing the screws 3 After exchanging their housings reassemble the intake of the C suction pipe and the D closing plate by fastening the screws Now rotate by 18...

Страница 98: ...ARTING THE MACHINE 10 1 Control board The Industrial Clean dust separator features a control board from which the appliance functions can be programmed by means of a simple operator s interface displa...

Страница 99: ...ICRO LINE 2 to the electric motor Should the motors be more than one connect the cable to the Sistem Air s electrical panel Check that the electric installation is made according to the electric regul...

Страница 100: ...6 3301 10 item 3301 4 art 3301 4 R S T 1 1112 2 10 2 1 Electric and piping network connection for the electric motors Industrial Motor item 3500 1M 3500 3M 3500 5M Picture A dust separator connection...

Страница 101: ...aspiranti Kw 5 5 Kw 4 Kw 2 2 Art 3500 1M Art 3500 3M Art 3500 5M 1 2 3 4 R S E P 1 400 V ac 11 12 T Micro 2 Micro 2 PE L marrone N blu 230 V ac Industrial Art 3400 0 Industrial Art 3400 1 Motore 1 Mic...

Страница 102: ...Micro 2 PE L marrone N blu 230 V ac Industrial Art 3400 0 Industrial Art 3400 1 230 V ac 8 7 5 4 N L 9 10 Motore 1 Motore 2 T 400 V ac P E S R Partitore Art 3301 4 Verso altri partitori LINE OUT SISTE...

Страница 103: ...al Art 3400 0 Industrial Art 3400 1 230 V ac 8 7 5 4 N L 9 10 Motore 1 Motore 2 T 400 V ac P E S R Partitore Art 3301 4 Verso altri partitori SISTEM AIR 3301 4 R1 R2 R4 R3 4 3 2 1 Prese aspiranti LINE...

Страница 104: ...12 11 Kw 5 5 Kw 4 Kw 2 2 Art 3500 1M Art 3500 3M Art 3500 5M Motor Industrial Motor Clean Clean 11 12 13 14 Motore 5 T 400 V ac P E S R Kw 5 5 Kw 4 Kw 2 2 Art 3500 1M Art 3500 3M Art 3500 5M Industri...

Страница 105: ...14 Motore 5 T 400 V ac P E S R Kw 5 5 Kw 4 Kw 2 2 Art 3500 1M Art 3500 3M Art 3500 5M Industrial Motor 15 16 Motore 7 T 400 V ac P E S R Kw 5 5 Kw 4 Kw 2 2 Art 3500 1M Art 3500 3M Art 3500 5M Industri...

Страница 106: ...electronic motors Industrial Motor Matic item 3500 2M 3500 4M 3500 6M 3500 7M Picture A Dust separator connection to an electronic motor Picture B dust separator connection to two or more electronic m...

Страница 107: ...r 1 electronic motor Prese aspiranti Kw 5 5 Kw 4 Kw 2 2 Art 3500 2M Art 3500 4M Art 3500 6M 1 2 3 4 R S E P 1 400 V ac 3 T Micro 2 Micro 2 PE L marrone N blu 230 V ac Industrial Art 3400 0 Industrial...

Страница 108: ...P 400 V ac T Industrial Motore 2 Motor Resistenza 120ohm gi in dotazione al motore Cavo Patch cat 6 Kw 5 5 Kw 4 Kw 2 2 Art 3500 2M Art 3500 4M Art 3500 6M Kw 7 5 Art 3500 7M Kw 5 5 Kw 4 Kw 2 2 Art 350...

Страница 109: ...cat 6 Kw 7 5 Art 3500 7M Art 3500 2M Art 3500 4M Art 3500 6M Art 3500 7M Kw 5 5 Kw 4 Kw 2 2 Kw 7 5 R S E P 400 V ac T Industrial Motore 3 Motor Resistenza 120ohm gi in dotazione al motore Cavo Patch...

Страница 110: ...Art 3500 7M Kw 5 5 Kw 4 Kw 2 2 Kw 7 5 Cavo Patch cat 6 1 3 2 M O C 1 3 2 M O C R S E P 400 V ac T Industrial Motore 3 Motor Art 3500 2M Art 3500 4M Art 3500 6M Art 3500 7M Kw 5 5 Kw 4 Kw 2 2 Kw 7 5 R...

Страница 111: ...2 M O C 1 3 2 M O C 1 3 2 M O C 1 3 2 M O C Kw 5 5 Kw 4 Kw 2 2 Art 3500 2M Art 3500 4M Art 3500 6M R S E P 400 V ac T Industrial Motore 5 Motor R S E P 400 V ac T Industrial Motore 6 Motor Cavo Patch...

Страница 112: ...start suction again 11 1 Switching the machine on 11 2 Using the machine Position the main switch assembled on the right side on the appliance on I ON posi tion The display will switch on to indicate...

Страница 113: ...The data uploading is carried out as follows Press the upper and lower arrow to scroll the display screen Press ENTER to save data or confirm the selection Press the Right dx and Left sx arrows to cha...

Страница 114: ...eft sx keys Press ENTER to move onto the next screen display This and the successive screen di splays allow saving the data of the Installer and of the Technical Service Press Right and Left arrows to...

Страница 115: ...TRONIC MOTORS 1 0 8 min max PRESS ENTER ELECTRIC MOTORS 1 1 8 min max PRESS ENTER Select the number of motors Industrial Motor Matic item 3500 2M 3500 4M 3500 6M 3500 7M controlled electro nically by...

Страница 116: ...s been reached SETUP not available N B Should this screen display be shown at the end of this procedure please check the serial connection between the dust separators and the blowing motor group LOADI...

Страница 117: ...he next screen display Press ESC to go back to the previous menu DEPRESSION 120 60 200mbar min max PRESS ENTER Press Enter to save the modified para meter Use the up and down to change the data Press...

Страница 118: ...bsorbed by the vacuum sy stem h hours of active suction mbar installation suction power value 5a 2 22 2 HZ 23 6 A 00000000h 42 mBAR ESC PRODUCTION DATE 01 01 11 MACHINE HOURS 00000000h INSTALLATION DA...

Страница 119: ...deceleration time AXX 02 Under power Inverter bus lower tension limit exceeded Check supply tension AXX 03 Temperature Inverter bus temperature limit exceeded Check inverter ventilation AXX 04 Overcha...

Страница 120: ...ed 5 N AUTOCL ALARMS 0 N DUST ALARMS 0 ESC TO EXIT Autocleaner alarms alarm not used Dust alarms it indicates how many times the dust container emptying was required 3 N TRANSDUCER ALARMS 0 N PRESSURE...

Страница 121: ...they were displayed on the control computer on For coding contact Sistem Air s qualified personnel 8 9 11 3 3 3 Menu for date and time setting DEPRESS SET POINT INFO ALARM SET DATE TIME SET MACHINE ST...

Страница 122: ...larm which refers to the emptying request of the dust container 1 Dust timer time in hours for the relative alarm display Press Enter to save the selected data Press the up and down arrows to change d...

Страница 123: ...MAINTENANCE TIMER 2 150 1 200h min max PRESS ENTER ARE YOU SURE YES NO PRESS ENTER Maintenance alarm Maintenance timer 2 time in hours for the relative alarm display Press Enter to save the data Pres...

Страница 124: ...e machine stop will occur only 15 minutes after alarm display In case the stop option is chosen after cancelling the alarm on the control computer it will be necessary to remove and plug in the flexib...

Страница 125: ...case the Autocleaner was connected after the ma chine start up 2 AUTOCLEANER TIMER 4 1 40h min max PRESS ENTER N AUTOCL CYCLES 6 1 10 min max PRESS ENTER Autocleaner Timer time in hours for the sucti...

Страница 126: ...the following screen display is activated Through this it is pos sible to change the Autocleaner system s functioning time period 6 Use the up and down arrows to change the data Use the right and left...

Страница 127: ...display by using the up and down ar rows Press Enter to confirm language and move onto the next screen display WELCOME SELECT YOUR LANGUAGE ENGLISH PRESS ENTER Enter name installer ROSSI _ABCDEFGHILMN...

Страница 128: ...TRANSDUCER RESISTIVE DIVIDERS PRESS ENTER DATA LOADING PLEASE WAIT Select the number of motors Industrial Motor Matic item 3500 2M 3500 4M 3500 6M 3500 7M controlled electroni cally by the electronic...

Страница 129: ...ENTER INSTALLATION PARAM DATA TRANSMISSION RESET PARAMETERS TRIAL AND TEST PRESS ENTER ENTER IP ADDRESS ETHERNET CARD 192 168 000 080 PRESS ENTER RESET DEFAULT DATA YES NO PRESS ENTER Through this scr...

Страница 130: ...PARAMETERS TRIAL AND TEST PRESS ENTER INSTALLATION TRIAL SUCTION INLET TEST AUTOCLEANER TEST ELECTRONICS TEST PRESS ENTER INSTALLATION TRIAL SUCTION INLET TEST AUTOCLEANER TEST ELECTRONICS TEST PRESS...

Страница 131: ...OMINAL CURRENT 12 0 A OPEN VACUUM BREAKER VALVE INSTALLATION TRIAL NOMINAL CURRENT 12 3 A CLOSE VACUUM BREAKER VALVE INSTALLATION TRIAL NOMINAL CURRENT Follow the instructions on the display 3 Follow...

Страница 132: ...CEDURE YES NO PRESS ENTER SUCTION INLET TEST SUCTION HOSE PLUGGED IN ESC TO EXIT SUCTION INLET TEST SUCTION HOSE UNPLUGGED ESC TO EXIT Press Enter to access the submenu 1 Use the right and left arrows...

Страница 133: ...the Autocleaner system see paragraph 11 3 3 5 Press Enter to access the submenu 2 1 Use the right and left arrows to make the selection Press Enter to start the procedure 3 Follow the instructions on...

Страница 134: ...S ENTER AUTOCLEANER TEST FILTER CLEANING DONE YES NO PRESS ENTER CHECK COMPRESSOR WAS ACTIVATED YES NO PRESS ENTER AUTOCLEANER ANALYSIS COMPLETED ESC TO EXIT Follow the instructions on the display 7 F...

Страница 135: ...ctronic parts inside the machine INSTALLATION TRIAL SUCTION INLET TEST AUTOCLEANER TEST ELECTRONICS TEST PRESS ENTER Follow the instructions on the display 13 Follow the instructions on the display Pr...

Страница 136: ...cedure 1 11 4 Screen displays during machine functioning In this paragraph you will find some illustrative screens while the vacuum system is active Remember that in this case it is not possible to ac...

Страница 137: ...t accessible while suction is active 7 This notice informs the user to stop suction in order to access the selected menu 8 1 STOP 00000000h 122 mBAR ESC Suction to end 5 DEPRESS SET POINT INFO ALARM S...

Страница 138: ...2 ESC TO EXIT ALARM INVERTER 1 A98 ESC TO EXIT ALARM INVERTER ROSSI 0000000000 ESC TO EXIT 11 5 1 Inverter alarms See coding on page 41 alarm coding ta ble 1 See coding on page 41 alarm coding ta ble...

Страница 139: ...EXIT 28 11 11 13 43 WARNING PRESSURE SWITCH Alarm relative to the automatic functioning of the Autocleaner system Contact the Sistem Air s authorised personnel 1 Alarm relative to the automatic funct...

Страница 140: ...ARTRIDGE ESC TO EXIT If at the end of the start up procedure the following alarm notice appears it means that the machine has been connected to the optional Ethernet board and therefore the management...

Страница 141: ...CE 2 ALARM MAINTENANCE 2 ROSSI 0000000000 ESC TO EXIT First warning notice suction does not stop Second warning notice suction stops if the machine block was activated press ESC to cancel the alarm To...

Страница 142: ...ctive machine block was selected suction will stop 15 minutes after that the warning notice has been displayed 28 11 11 13 42 WARNING EMPTY DUST CONTAINER First warning notice suction does not stop Se...

Страница 143: ...needed Furthermore when the alarm signals the need for routine maintenance dirty filter full dust bag and full dust bin the operator can decide whether to switch off the system immediately and satisf...

Страница 144: ...iodically clean the outside casing of the appliance using a soft damp cloth with water and neutral soap Important only use water or neutral soap and water to clean the appliance The use of other sol v...

Страница 145: ...glish Tie up the dust bag and remove it from the container 4 Introduce a new dust bag and the bag stretcher 5 Assemble the conveyor cone 6 Use both hands to lower the clip handle 8 Put the dust contai...

Страница 146: ...ion manual 68 15 02 12 Rev 1 0 0 12 5 Replacing the filter cartridge Lift the release handle using both hands Unscrew the blocking knob Screw the blocking knob 1 3 5 Remove the dust container 2 Replac...

Страница 147: ...69 2 15 02 12 Rev 1 0 0 English Reassemble the dust container in its position 6 Use both hands to lower the clip handle 7...

Страница 148: ...repair for breakage or malfunctioning must be carried out by qualified Technical Assistance personnel Any intervention of non authorized personnel will result in the invalidation of any guarantee of t...

Страница 149: ...rules Should you decide to put the suction system out of service this should be done with the utmost attention to everyone s health and environment You can get information about spaces and or persons...

Страница 150: ...and measures will help reducing the sound emissions of the vacuum cleaner You can use sound absorbing materials on the two side walls if these are very close to each other this will interrupt the sou...

Страница 151: ...of suction socket is out of order Call Technical Service The air suction is weak More than one socket is being used at the same time Reduce the number of sockets used at the same time The flexible ho...

Страница 152: ...Industrial Clean instruction manual 74 15 02 12 Rev 1 0 0...

Страница 153: ...e Autocleaner sy stem Loosen the Torsen screws to remo ve the cover made of thermoformed material Hook the autocleaner frame to the anchoring bracket and slide the centering strips in the slotted hole...

Страница 154: ...em Disassemble the connec tor cover on the vacuum cleaner appliance 2 A 2 Pneumatic connection Approach the pipe connection of the vacuum system to the inlet on the rear side of the appliance N B chec...

Страница 155: ...ue 11 6 UTILISATION PR VUE DE L APPAREIL 12 7 UTILISATION NON PR VUE DE L APPAREIL 12 8 QUIPEMENT FOURNI ET ACCESSOIRES 13 9 INSTALLATION 14 9 1 Installation conseill e 14 9 2 Transport et d ballage 1...

Страница 156: ...t de l heure 43 11 3 3 4 Menu Set blocage de l appareil 43 Alerte poussi res 44 Alerte entretien 45 Alerte filtre 46 Alerte Autocleaner 47 11 3 3 5 Menu param tres d installation 48 11 3 3 6 Menu tran...

Страница 157: ...nt de la machine et par voie de cons quence pour une longue dur e d utilisation de celle ci Nous vous prions donc de lire attentivement et enti rement ce manuel de suivre scrupuleuse ment les instruct...

Страница 158: ...e appliqu e aux syst mes d aspiration centralis e ainsi que la haute techno logie lectronique qui ont permis TECNOPLUS S r l de r aliser le nouveau s parateur poussi res Industrial Clean Le syst me d...

Страница 159: ...poudre poxy et bac poussi res grande capacit l 62 106 mont sur roulettes Possibilit d installer ventuellement m me dans un deuxi me temps le syst me d auto nettoyage du filtre Autocleaner voir page 7...

Страница 160: ...rial Motor Raccord aspiration Interrupteur g n ral Convoyeur conique Base 1 2 3 4 5 6 7 Transducteur de pression Soupape casse vide Ordinateur de bord Protection filtre Filtre Poign e d verrouilla ge...

Страница 161: ...ction IP 20 20 Alimentation V ac 220 240 220 240 Fr quence Hz 50 60 50 60 D bit max air moteur m3 h 700 1200 Surface filtrante cm2 24000 43400 Capacit bac poussi res l 62 106 Poids kg 53 67 Mesure A m...

Страница 162: ...ncipales caract ristiques techniques sont les suivantes Base rev tue de mat riel anti choc pour la protection de la centrale Corps cylindrique en m tal verni poudre poxy D verrouillage du bac avec poi...

Страница 163: ...i un choc ou si l ext rieur est endommag Vous soup onnez que la centrale d aspiration a besoin d entretien ou de r paration Utiliser des gants et un masque de protection pour effectuer les travaux d e...

Страница 164: ...ppareils sont r alis s avec des mat riaux qui respectent les limites tablies par les normes actuellement en vigueur en mati re de sauvegarde de la sant et de l environnement et qu ils ne contiennent p...

Страница 165: ...lors de la conception et de la construction de l appareil par d autres ayant des caract ri stiques diff rentes TECNOPLUS s r l suspendra imm diatement la garantie du produit en cas de manipulation de...

Страница 166: ...LISATION NON PR VUE DE L APPAREIL Il est tr s important de NE PAS utiliser l appareil pour les usages suivants qui sont incorrects et dangereux Il ne doit pas tre utilis pour aspirer des tissus ou du...

Страница 167: ...uc pour le raccord au r seau de tubes d aspiration 3 N 4 colliers m talliques pour le fixage des manchons 4 N 1 manuel d installation d usage et d entretien V rifier que la centrale ses accessoires et...

Страница 168: ...eu de travail 5 45 C humidit relative 20 85 sans condensation ou gel Choisir pour l installation un endroit loign des sources de chaleur telles que chaudi res ou radiateurs N B degr de protection des...

Страница 169: ...port et d ballage 1 Transporter la centrale encore emball e proximit du lieu d installation en suivant les instructions imprim es sur l emballage et en se servant d un transpalette ou d un chariot l v...

Страница 170: ...effec tuer l op ration manuellement voir dessin condition de disposer de l aide d au moins deux autres person nes ayant une force suffisante pour faire glisser la centrale de la palette pendant qu une...

Страница 171: ...17 3 15 02 12 Rev 1 0 0 Fran ais Retirer la poign e Extraire tous les accessoires contenus et mettre l emballage au rebut conform ment aux lois en vigueur 7 6...

Страница 172: ...e Normalement les centrales d aspiration sont livr es avec sortie des tubes d aspiration et de rejet droite version DX En cas de n cessit il est possible de les transformer en positionnant la sortie d...

Страница 173: ...t le panneau de ferme ture D d visser les vis 3 Remonter en intervertissant leurs positions re spectives le tube d aspiration C et le panneau de fermeture D en revissant les vis Durant l op ration fai...

Страница 174: ...e Le s parateur poussi res Industrial Clean a un panneau de commande qui permet de programmer le fonctionnement de l appareil travers un simple cran d interface op rateur et six touches de fonction De...

Страница 175: ...ufflant Dans le cas o les moteurs soient plusieurs brancher le c ble au tableau lectrique Sistem Air V rifier que le r seau lectrique soit r alis selon les normes techniques lectriques en vigueur Il e...

Страница 176: ...s Industrial Motor art 3500 1M 3500 3M 3500 5M Dessin A branchement du s parateur poussi res au moteur lectrique Dessin B branchement du s parateur poussi res deux ou plus moteurs lectriques art 3500...

Страница 177: ...aspiranti Kw 5 5 Kw 4 Kw 2 2 Art 3500 1M Art 3500 3M Art 3500 5M 1 2 3 4 R S E P 1 400 V ac 11 12 T Micro 2 Micro 2 PE L marrone N blu 230 V ac Industrial Art 3400 0 Industrial Art 3400 1 Motore 1 Mic...

Страница 178: ...ro 2 PE L marrone N blu 230 V ac Industrial Art 3400 0 Industrial Art 3400 1 230 V ac 8 7 5 4 N L 9 10 Motore 1 Motore 2 T 400 V ac P E S R Partitore Art 3301 4 Verso altri partitori LINE OUT SISTEM A...

Страница 179: ...rt 3400 0 Industrial Art 3400 1 230 V ac 8 7 5 4 N L 9 10 Motore 1 Motore 2 T 400 V ac P E S R Partitore Art 3301 4 Verso altri partitori SISTEM AIR 3301 4 R1 R2 R4 R3 4 3 2 1 Prese aspiranti LINE IN...

Страница 180: ...11 Kw 5 5 Kw 4 Kw 2 2 Art 3500 1M Art 3500 3M Art 3500 5M Motor Industrial Motor Clean Clean 11 12 13 14 Motore 5 T 400 V ac P E S R Kw 5 5 Kw 4 Kw 2 2 Art 3500 1M Art 3500 3M Art 3500 5M Industrial M...

Страница 181: ...otore 5 T 400 V ac P E S R Kw 5 5 Kw 4 Kw 2 2 Art 3500 1M Art 3500 3M Art 3500 5M Industrial Motor 15 16 Motore 7 T 400 V ac P E S R Kw 5 5 Kw 4 Kw 2 2 Art 3500 1M Art 3500 3M Art 3500 5M Industrial M...

Страница 182: ...lectro niques Industrial Motor Matic art 3500 2M 3500 4M 3500 6M 3500 7M Dessin A branchement du s parateur poussi res un moteur lectronique Dessin B branchement du s parateur poussi res deux ou plus...

Страница 183: ...i res n 1 moteur lectronique Prese aspiranti Kw 5 5 Kw 4 Kw 2 2 Art 3500 2M Art 3500 4M Art 3500 6M 1 2 3 4 R S E P 1 400 V ac 3 T Micro 2 Micro 2 PE L marrone N blu 230 V ac Industrial Art 3400 0 Ind...

Страница 184: ...R S E P 400 V ac T Industrial Motore 2 Motor Resistenza 120ohm gi in dotazione al motore Cavo Patch cat 6 Kw 5 5 Kw 4 Kw 2 2 Art 3500 2M Art 3500 4M Art 3500 6M Kw 7 5 Art 3500 7M Kw 5 5 Kw 4 Kw 2 2 A...

Страница 185: ...Patch cat 6 Kw 7 5 Art 3500 7M Art 3500 2M Art 3500 4M Art 3500 6M Art 3500 7M Kw 5 5 Kw 4 Kw 2 2 Kw 7 5 R S E P 400 V ac T Industrial Motore 3 Motor Resistenza 120ohm gi in dotazione al motore Cavo P...

Страница 186: ...500 6M Art 3500 7M Kw 5 5 Kw 4 Kw 2 2 Kw 7 5 Cavo Patch cat 6 1 3 2 M O C 1 3 2 M O C R S E P 400 V ac T Industrial Motore 3 Motor Art 3500 2M Art 3500 4M Art 3500 6M Art 3500 7M Kw 5 5 Kw 4 Kw 2 2 Kw...

Страница 187: ...5 1 3 2 M O C 1 3 2 M O C 1 3 2 M O C 1 3 2 M O C Kw 5 5 Kw 4 Kw 2 2 Art 3500 2M Art 3500 4M Art 3500 6M R S E P 400 V ac T Industrial Motore 5 Motor R S E P 400 V ac T Industrial Motore 6 Motor Cavo...

Страница 188: ...l appareil 11 2 Utilisation de l appareil Tourner l interrupteur g n ral situ sur le c t droit de la centrale sur I ON L cran s allumera pour signaler que la centrale est sous tension Monter sur la po...

Страница 189: ...mani re suivante Appuyer sur les fl ches haut et bas pour faire d filer le menu sur l cran Appuyer sur entr e pour m moriser la donn e saisie ou le choix effectu Appuyer sur les fl ches dx et sx pour...

Страница 190: ...as Dx et Sx Appuyer sur Entr e pour passer la page cran suivante Cette page cran et les suivantes per mettent de m moriser les donn es du technicien installateur et du service apr s vente Appuyer sur...

Страница 191: ...RESSER ENTR E MOTEURS LECTRONIQUES 1 0 8 min max PRESSER ENTR E MOTEURS LECTRIQUES 1 1 8 min max PRESSER ENTR E S lection du nombre de moteurs Industrial Motor Matic art 3500 2M 3500 4M 3500 6M 3500 7...

Страница 192: ...disponible N B Si la fin de la proc dure cette page cran appara t v rifier le branche ment en s rie entre le s parateurs poussi res et le groupe moteur soufflant DONN ES DE DEFAULT ATTENDRE S V P 11 3...

Страница 193: ...puyer sur ESC pour revenir au menu pr c dent D PRESSION 120 60 200mbar min max PRESSER ENTR E Appuyer sur la touche Entr e pour pas ser au sous menu s lectionn Appuyer sur les fl ches bas et haut pour...

Страница 194: ...ures d aspiration activ e mbar valeur de la puissance d aspiration pr sente dans le syst me 5a 2 22 2 HZ 23 6 A 00000000h 42 mBAR ESC DATE PRODUCTION 01 01 11 HEURES MACHINE 00000000h DATE INSTALLATIO...

Страница 195: ...e Augmenter le temps de d c l ration AXX 02 Sous tension Onduleur Tension limite basse de bus d pass e V rifier la tension d alimentation AXX 03 Temp rature Onduleur Temp rature de limite haute de bus...

Страница 196: ...RTIR Alertes Autocleaner alerte non inter venue Alertes poussi res nombre d alertes sollicitant le vidage du bac poussi res 3 N ALERTES TRANSDUCT 0 N ALERTES PRESSOST 0 ESC POUR SORTIR N ALERTES COMMU...

Страница 197: ...s sur l ordinateur de contr le Pour la codification contacter le person nel autoris Sistem Air 8 9 11 3 3 3 Menu r glage de la date et de l heure SET POINT D PRESS INFO ALERTES CONFIG DATE HEURE CONFI...

Страница 198: ...vidage des poussi res r colt es dans le bac 1 Timer poussi res temps en heures pour l affichage de l alerte poussi res Appuyer sur Entr e pour m moriser la donn e pr tablie Appuyer sur les fl ches hau...

Страница 199: ...1 200h min max PRESSER ENTR E TU ES S R OUI NON PRESSER ENTR E Alerte entretiens Timer entretien 2 temps en heures pour l affichage de l alerte entretien 2 Appuyer sur Entr e pour m moriser la donn e...

Страница 200: ...roduira seu lement 15 minutes apr s l affichage de l alerte Si vous choisissez d arr ter la machi ne apr s avoir limin l alerte pr sen te sur l ordinateur de contr le il faudra extraire et r ins rer l...

Страница 201: ...nstallation de la machi ne 2 TIMER AUTOCLEANER 4 1 40h min max PRESSER ENTR E NO CYCLES AUTOCLEANER 6 1 10 min max PRESSER ENTR E Timer Autocleaner temps en heures d a spiration au del duquel le syst...

Страница 202: ...re diurne la page cran suivante s affiche et il est alors possible de modifier le laps de temps dans lequel le syst me Autocleaner peut fonctionner 6 Utiliser les fl ches haut et bas pour modi fier la...

Страница 203: ...angue qui appara tra sur l cran Appuyer sur Entr e pour confirmer la lan gue et passer la page cran suivante WELCOME SELECT YOUR LANGUAGE FRANCAIS PRESSER ENTR E INS RER NOM INSTALLATEUR ROSSI _ABCDEF...

Страница 204: ...LE ASPIRAT TRANSDUCTEUR DIVISEURS RESISTIFS PRESSER ENTR E DONN ES DE DEFAULT ATTENDRE S V P S lection du nombre de moteurs Indu strialMotorMatic art 3500 2M 3500 4M 3500 6M 3500 7M command s lec tro...

Страница 205: ...TRAnSMISS DONN ES R INIT PARAM TRES ESSAI ET TEST PRESSER ENTR E INS RER ADRESSE IP FICHE ETHERNET 192 168 000 080 PRESSER ENTR E R TABLIR LES DONN E DE D FAULT OUI NON PRESSER ENTR E Utiliser les fl...

Страница 206: ...AI INSTALLATION TEST PRISE D ASPIR TEST AUTOCLEANER TEST ELECTRONIQUE PRESSER ENTR E ESSAI INSTALLATION TEST PRISE D ASPIR TEST AUTOCLEANER TEST ELECTRONIQUE PRESSER ENTR E ESSAI INSTALLATION ACTIVER...

Страница 207: ...ON COURANTE NOMINALE 12 0 A OUVRIR LA SOUPAPE CASSE VIDE ESSAI INSTALLATION COURANTE NOMINALE 12 3 A FERMER LA SOUPAPE CASSE VIDE ESSAI INSTALLATION COURANTE NOMINALE Suivre les instructions affich es...

Страница 208: ...A PROC DURE OUI NON PRESSER ENTR E TEST PRISE D ASPIR TUYAU D ASPIRATION INS R ESC POUR SORTIR TEST PRISE D ASPIR TUYAU D ASPIRATION D BRANCH ESC POUR SORTIR Appuyer sur Entr e pour acc der au sous me...

Страница 209: ...iliter le syst me Autocleaner voir par 11 3 3 5 Appuyer sur ENTR E pour acc der au sous menu 2 1 Utiliser les fl ches dx et sx pour effec tuer la s lection Appuyer sur Entr e pour commencer la proc du...

Страница 210: ...LEANER NETTOYAGE FILTRE EFFECTU OUI NON PRESSER ENTR E V RIFICATION LE COMPRESSEUR A T ACTIV OUI NON PRESSER ENTR E DIAGNOSTIC AUTOCL COMPL T ESC POUR SORTIR Suivre les instructions affich es l cran 7...

Страница 211: ...ur de la machine ESSAI INSTALLATION TEST PRISE D ASPIR TEST AUTOCLEANER TEST ELECTRONIQUE PRESSER ENTR E Suivre les instructions affich es l cran 13 Suivre les instructions affich es l cran Appuyer su...

Страница 212: ...ant lors du fonctionnement de la machine Dans ce paragraphe sont fournis quelques exemples de pages crans s affichant quand le syst me d aspiration est en marche Nous vous rappelons que dans ce cas l...

Страница 213: ...essible avec aspiration ac tiv e 7 Message informant l usager d arr ter l a spiration pour acc der au menu s lec tionn 8 1 STOP 00000000h 122 mBAR ESC Aspiration l arr t 5 SET POINT D PRESS INFO ALLAR...

Страница 214: ...TIR ALERTE ONDULEUR 1 A98 ESC POUR SORTIR ALERTE ONDULEUR ROSSI 0000000000 ESC POUR SORTIR 11 5 1 Alertes onduleur Voir codes la page 41 tableau des codes d alertes 1 Voir codes la page 41 tableau des...

Страница 215: ...SC POUR SORTIR 28 11 11 13 43 ALERTE PRESSOSTAT Alerte concernant le fonctionnement auto matique du syst me Autocleaner Contacter le personnel autoris Sistem Air 1 Alerte concernant le fonctionnement...

Страница 216: ...oc dure de mise en servi ce termin e le message d alerte suivant appara t cela signifie que la fiche Ethernet optionnelle a t connect e la machine et que par cons quent le syst me de gestion requiert...

Страница 217: ...TIR 1er message d avertissement l aspiration ne s arr te pas 2 me message d avertissement l aspiration s arr te si vous avez choisi de bloquer la machine Appuyer sur ESC pour annuler l alerte pour fai...

Страница 218: ...de la machine l a spiration s arr tera 15 minutes apr s l apparition du message d alerte 28 11 11 13 42 ALERTE VIDER BAC POUSSI RES 1er message d avertissement l aspiration ne s arr te pas 2 me messa...

Страница 219: ...nce technique peuvent tre saisis L utilisateur peut aussi d cider en cas d alerte r sultant d une demande d entretien ordinaire filtre encras s bac poussi res plein soit d arr ter imm diatement la cen...

Страница 220: ...xt rieur de la centrale en utilisant un chiffon doux imbib d eau et de savon neutre Attention nettoyer la centrale exclusivement avec de l eau avec ou sans savon neutre L utilisa tion d autres solvant...

Страница 221: ...0 Fran ais Fermer le sac poussi res et l enlever du bac 4 Placer un nouveau sac et le ten deur de sac 5 Placer le convoyeur conique 6 Baisser la poign e de verrouillage des deux mains 8 Repositionner...

Страница 222: ...2 12 Rev 1 0 0 12 5 Remplacement de la cartouche filtre Soulever la poign e de d ver rouillage des deux mains D visser le bouton de verrouillage Revisser le bouton de verrouillage 1 3 5 Retirer le bac...

Страница 223: ...69 3 15 02 12 Rev 1 0 0 Fran ais Replacer le bac poussi res 6 Baisser la poign e de verrouillage des deux mains 7...

Страница 224: ...ar ce manuel Toute intervention de r paration pour dommage ou dysfonctionnement doit tre effectu e par un techni cien qualifi et autoris par le service apr s vente Toute intervention de personnel non...

Страница 225: ...iration r gles g n rales Si vous d cidez de mettre hors service la centrale d aspiration il est n cessaire d effectuer l op ration dans le respect de notre sant et de l environnement o nous vivons Inf...

Страница 226: ...ous vous sugg rons de Utiliser ventuellement des mat riaux phono absorbants sur les deux parois lat rales si celles ci sont tr s proches l une de l autre afin de briser l onde sonore et d viter que de...

Страница 227: ...ppeler le service apr s vente L aspiration de l air est faible Utilisation de plusieurs prises en m me temps R duire le nombre de prises utilis es en m me temps Tube flexible ou accessoires de nettoya...

Страница 228: ...Manuel d utilisation Industrial Clean 74 15 02 12 Rev 1 0 0...

Страница 229: ...ourni avec l Autocleaner Retirer le couvercle thermoform en d vissant les vis Torsen Accrocher le cadre de l au to nettoyage au support en faisant glisser les lamelles de centrage dans les illets pr s...

Страница 230: ...rendre solidaires Retirer le bouchon du connecteur situ sur l unit d aspiration 2 A 2 Raccordement pneumatique Approcher le raccord du tube de l air comprim l embout situ sur la partie post rieure de...

Страница 231: ...HENE VERWENDUNG DES GER TS 12 7 NICHT VORGESEHENE VERWENDUNG DES GER TS 12 8 AUSSTATTUNG UND ZUBEH R 13 9 INSTALLATION 14 9 1 Empfehlungen f r die Installation 14 9 2 Transport und Auspacken 15 9 3 Au...

Страница 232: ...ation 39 11 3 3 3 Men Uhrzeit und Datumseinstellung 43 11 3 3 4 Men Set Ger teblockierung 43 Staubalarm 44 Wartungsalarm 45 Filteralarm 46 Autocleaner Alarm 47 11 3 3 5 Men Installationsparameter 48 1...

Страница 233: ...en korrekten Betrieb und folglich f r eine lange Lebensdauer des Ger tes unabdingbar sind Wir bitten Sie deshalb die Bedienungsanleitung aufmerksam in all ihren Punkten zu lesen sich strikt an die dar...

Страница 234: ...eine kontinuierliche Forschung im Bereich zentraler Saugsysteme und mit Hilfe einer hochentwi ckelten Elektrotechnologie gelang der Firma TECNOPLUS S r l die Entwicklung vom neuen Stau babscheider In...

Страница 235: ...mit gro em rollbarem Staubbeh lter 62 106 Lt M gliche Nachr stung mit dem Autocleaner System siehe Seite 75 Ein innovatives Steuer und Wartungssystem das mit einer Steuerplatine mit Mikroprozessor ver...

Страница 236: ...chluss zum Industrial Motor Anschluss zum Absaugsystem Hauptschalter Zyklonabscheider Grundgestell 1 2 3 4 5 6 7 Druckwandler Vakuumbrechventil Bordcomputer Filterschutz Filter Ausl sgriff am Staubbeh...

Страница 237: ...Schutzgrad IP 20 20 Versorgungsspannung V ac 220 240 220 240 Frequenz Hz 50 60 50 60 Motor Luftumw lzung m3 h 700 1200 Filtering surface cm2 24000 43400 Dust container capacity l 62 106 Gewicht kg 53...

Страница 238: ...rzichten Zusammenfassung der wichtigsten technischen Eigenschaften Mit sto festem Material verkleidetes Grundgestell zum Schutz der Saugzentrale Zylinderf rmiges Ger tegeh use aus Epoxid lackiertem Me...

Страница 239: ...igt sein sollte der Verdacht bestehen dass das Ger t Wartungs oder Reparatureingriffe ben tigt Bei der Durchf hrung von Wartungseingriffen beim Entleeren des Staubbeh lters oder bei Auswe chseln des F...

Страница 240: ...zur Schadstofffreiheit Die Firma TECNOPLUS S r l erkl rt dass ihre Produkte und Ger te mit Materialien hergestellt wur den die den festgelegten Grenzwerten der geltenden Vorschriften in Bezug auf Gesu...

Страница 241: ...ng und montage verwendeten Schrauben durch solche mit anderen technischen Merkmalen zu ersetzen Sollte der Kunde irgendwelche nderungen vornehmen annulliert TECNOPLUS s r l sofort den Ga rantieanspruc...

Страница 242: ...olgenden aufgef hrt zu verwenden da es sich hierbei um unkorrekten und gef hrlichen Gebrauch handelt Es darf nicht zum Aufsaugen von Textilien schweren Gegenst nden oder gl hendem Material verwen det...

Страница 243: ...chluss an das Rohrleitungsnetz 3 N 4 Rohrschellen aus Metall f r die Befestigung der Muffen 4 N 1 Installations Bedienungs und Wartungsanleitung Bitte berpr fen Sie bei Warenannahme dass das Saugger t...

Страница 244: ...ative Feuchtigkeit 20 85 ohne Kondenswasser oder Gefrieren Es empfiehlt sich das Ger t fern vor W rmequellen wie z B fen oder Heizk rpern aufzustellen Merke Die Saugzentrale verf gt ber Schutzart IP20...

Страница 245: ...sport und Auspacken Das Ger t sollte in der Verpackung zum Installationsort bef rdert werden wobei die Hinweise auf der Verpackung befolgt werden und ein Palettenhubwagen oder ein Gabelstapler benutzt...

Страница 246: ...nken verf gbar sein kann das Ger t auch manuell von der Palet te genommen werden siehe Ab bildung In diesem Fall sind mindestens zwei starke Personen n tig die das Ger t hinab gleiten lassen und eine...

Страница 247: ...17 4 15 02 12 Rev 1 0 0 Deutsch Griff wegnehmen Alle Zubeh rteile entnehmen und die Verpackung vorschriftgem entsorgen 7 6...

Страница 248: ...tungsausgang rechts nach Links Rohrleitungsausgang links Normalerweise werden die Saugzentralen mit den Absaug und Abluftstutzen auf der rechten Seite ge liefert Rechts Version Bei Bedarf k nnen aber...

Страница 249: ...h Den Absaugstutzen C und die Abdeckplatte D abschrauben 3 Nach dem Seitenwechsel des Absaugstutzens C diesen sowie die Abdeckplatte D erneut festschrauben In dieser Phase den Absaugstutzen wie abgebi...

Страница 250: ...l Der Staubabscheider Industrial Clean verf gt ber eine Schalttafel ber welche die Betriebsfunktionen des Ger ts eingestellt werden k nnen und zwar mithilfe eines einfachen Displays und sechs Funktion...

Страница 251: ...an den elektrischen Motor an schlie en Falls mehr als ein Motor vorhanden ist das Kabel an das Sistem Airs Schalttafel an schlie en Sicher gehen dass die elektrische Anlage des Geb udes gem den gelte...

Страница 252: ...r Art 3500 1M 3500 3M 3500 5M Bild A Anschluss von einem Staubabscheider an einen elektrischen Motor Bild B Anschluss von einem Staubabscheider an zwei oder mehrere elektrische Motoren Art 3500 1M 350...

Страница 253: ...aspiranti Kw 5 5 Kw 4 Kw 2 2 Art 3500 1M Art 3500 3M Art 3500 5M 1 2 3 4 R S E P 1 400 V ac 11 12 T Micro 2 Micro 2 PE L marrone N blu 230 V ac Industrial Art 3400 0 Industrial Art 3400 1 Motore 1 Mi...

Страница 254: ...icro 2 PE L marrone N blu 230 V ac Industrial Art 3400 0 Industrial Art 3400 1 230 V ac 8 7 5 4 N L 9 10 Motore 1 Motore 2 T 400 V ac P E S R Partitore Art 3301 4 Verso altri partitori LINE OUT SISTEM...

Страница 255: ...Art 3400 0 Industrial Art 3400 1 230 V ac 8 7 5 4 N L 9 10 Motore 1 Motore 2 T 400 V ac P E S R Partitore Art 3301 4 Verso altri partitori SISTEM AIR 3301 4 R1 R2 R4 R3 4 3 2 1 Prese aspiranti LINE I...

Страница 256: ...2 11 Kw 5 5 Kw 4 Kw 2 2 Art 3500 1M Art 3500 3M Art 3500 5M Motor Industrial Motor Clean Clean 11 12 13 14 Motore 5 T 400 V ac P E S R Kw 5 5 Kw 4 Kw 2 2 Art 3500 1M Art 3500 3M Art 3500 5M Industrial...

Страница 257: ...Motore 5 T 400 V ac P E S R Kw 5 5 Kw 4 Kw 2 2 Art 3500 1M Art 3500 3M Art 3500 5M Industrial Motor 15 16 Motore 7 T 400 V ac P E S R Kw 5 5 Kw 4 Kw 2 2 Art 3500 1M Art 3500 3M Art 3500 5M Industrial...

Страница 258: ...strial Motor Matic Art 3500 2M 3500 4M 3500 6M 3500 7M Bild A Anschluss von einem Staubabscheider an einen elektronischen Motor Bild B Anschluss von einem Staubabscheider an zwei oder mehrere elektron...

Страница 259: ...Nr 1 elektronischen Motor Prese aspiranti Kw 5 5 Kw 4 Kw 2 2 Art 3500 2M Art 3500 4M Art 3500 6M 1 2 3 4 R S E P 1 400 V ac 3 T Micro 2 Micro 2 PE L marrone N blu 230 V ac Industrial Art 3400 0 Indust...

Страница 260: ...E P 400 V ac T Industrial Motore 2 Motor Resistenza 120ohm gi in dotazione al motore Cavo Patch cat 6 Kw 5 5 Kw 4 Kw 2 2 Art 3500 2M Art 3500 4M Art 3500 6M Kw 7 5 Art 3500 7M Kw 5 5 Kw 4 Kw 2 2 Art...

Страница 261: ...tch cat 6 Kw 7 5 Art 3500 7M Art 3500 2M Art 3500 4M Art 3500 6M Art 3500 7M Kw 5 5 Kw 4 Kw 2 2 Kw 7 5 R S E P 400 V ac T Industrial Motore 3 Motor Resistenza 120ohm gi in dotazione al motore Cavo Pat...

Страница 262: ...6M Art 3500 7M Kw 5 5 Kw 4 Kw 2 2 Kw 7 5 Cavo Patch cat 6 1 3 2 M O C 1 3 2 M O C R S E P 400 V ac T Industrial Motore 3 Motor Art 3500 2M Art 3500 4M Art 3500 6M Art 3500 7M Kw 5 5 Kw 4 Kw 2 2 Kw 7...

Страница 263: ...1 3 2 M O C 1 3 2 M O C 1 3 2 M O C 1 3 2 M O C Kw 5 5 Kw 4 Kw 2 2 Art 3500 2M Art 3500 4M Art 3500 6M R S E P 400 V ac T Industrial Motore 5 Motor R S E P 400 V ac T Industrial Motore 6 Motor Cavo Pa...

Страница 264: ...einzustecken um die Absaugung wieder anfangen zu lassen 11 1 Einschalten der Saugzentrale 11 2 Benutzung der Saugzentrale Den sich rechts oben an der Saugzentrale befindenden Hauptschalter auf Positi...

Страница 265: ...ende Weise Durch Dr cken des Pfeils nach oben und nach unten kann man die verschiedenen Themen auf der Seite abrufen Mit Enter speichert man die eingegebenen Daten oder die getroffene Wahl Durch Dr ck...

Страница 266: ...nstellen Dr ckt man Enter wechselt man zur n chsten Seite Diese Seite und die folgenden erlau ben die Daten des Installateurs und des Betreuungsdienstes zu speichern Dr ckt man die Pfeilen nach rechts...

Страница 267: ...KTRONISCHE MOTOREN 1 0 8 min max ENTER DR CKEN ELEKTRISCHE MOTOREN 1 1 8 min max ENTER DR CKEN W hlen die Anzahl der vom Fernschal ter elektronisch angetriebenen Mo toren Industrial Motor Matic Art 35...

Страница 268: ...SETUP nicht verf gbar N B Falls diese Bildschirmseite am Ende dieser Prozedur gezeigt werden sollte bitte den Reihenanschluss zwischen den Staubabscheidern und der Gebl se pr fen DATEN WERDEN GELADEN...

Страница 269: ...an ESC kehrt man zum vorheri gen Men zur ck UNTERDRUCK 120 60 200mbar min max ENTER DR CKEN Dr ckt man Enter tritt man in das Unter men Durch die Pfeile nach unten und oben durchl uft man das Men Dr c...

Страница 270: ...ver Absaugung mbar Saugleistungswert innerhalb der Anlage 5a 2 22 2 HZ 23 6 A 00000000h 42 mBAR ESC HERSTELLUNGSDATUM 01 01 11 BETRIEB STANDBY 00000000h INSTALLATIONSDATUM 28 11 11 10 43 VERSIONE FW T...

Страница 271: ...n Verlangsamungszeit verl ngern AXX 02 Unterspannung Inverter Niedrigstgrenze Busspannung ist berschritten worden Versorgungsspannung berpr fen AXX 03 Temperatur Inverter H chstgrenze Bustemperatur is...

Страница 272: ...ALARME AUTOCL 0 ANZ ALARME STAUB 0 ESC ZU BEENDEN Autocleaner Alarme dieser Alarm wird nicht benutzt Staubalarme es zeigt wie viel Mal die Alarmmeldung betreffend des Staub beh lterentleerens gezeigt...

Страница 273: ...ng nehmen Sie Kontakte zum Fachpersonal auf 8 9 11 3 3 3 Men Uhrzeit und Datumseinstellung SET POINT UNTERDRUCK INFO ALARME DATUM UHRZEIT SET MASCHINENSPERRE ENTER DR CKEN DATUM UND UHRZEIT 28 11 11 1...

Страница 274: ...aubbeh lters 1 Staubtimer gebrauchte Zeit in Stunden f r das Erscheinen der entsprechenden Alarmmeldung Dr ckt man Enter speichert man die gew hlten Daten Mit den Pfeilen nach oben und unten modifizie...

Страница 275: ...CKEN BIST DU SICHER JA NEIN ENTER DR CKEN Wartungsalarm Wartung 2 Timer gebrauchte Zeit in Stunden f r das Erscheinen der entspre chenden Alarmmeldung Dr ckt man Enter speichert man die Da ten Durch...

Страница 276: ...still stehen erst 15 Mi nuten nachdem die entsprechende Alarmmeldung vorkommt Falls die Ger teblockierung gew hlt werden sollte ist es notwendig den Schlauch von der Saugsteckdose wegzunehmen und wie...

Страница 277: ...r sten Inbetriebnahme des Ger ts angesch lossen wird 2 TIMER AUTOCLEANER 4 1 40h min max ENTER DR CKEN ANZ AUTOCL ZYKLEN 6 1 10 min max ENTER DR CKEN Autocleaner Timer Absaugungszeit in Stunden nach d...

Страница 278: ...urch ist es m glich die Betriebszeitspanne des Autocleaner Systems zu modifizieren 6 Mit den Pfeilen nach oben und unten k n nen die Daten abge ndert werden Durch die Pfeilen nach rechts und lin ks is...

Страница 279: ...w hlen die gew nschte Sprache auf dem Display Dr ckt man Enter best tigt man die Sprachwahl und wechselt man zur folgenden Seite WILLKOMMEN SPRACHE W HLEN DEUTSCH ENTER DR CKEN Namen eingeben Installa...

Страница 280: ...WERDEN GELADEN BITTE WARTEN Anzahl der vom elektronischen Umfor mer Inverter elektronisch angetriebenen Motoren Industrial Motor Matic Art 3500 2M 3500 4M 3500 6M 3500 7M die an Staubabscheider Indust...

Страница 281: ...METER PR FUNG UND TEST ENTER DR CKEN IP ADRESSE VON ETHERNET KARTE 192 168 000 080 ENTER DR CKEN ALLE DEFAULT WERTEN WIEDERHERSTELLEN JA NEIN ENTER DR CKEN Mit den Pfeilen nach oben unten rechts und l...

Страница 282: ...ANLAGE TESTEN SAUGDOSE TESTEN AUTOCLEANER TESTEN ELEKTRONIK TESTEN ENTER DR CKEN ANLAGE TESTEN SAUGDOSE TESTEN AUTOCLEANER TESTEN ELEKTRONIK TESTEN ENTER DR CKEN ANLAGE TESTEN VORGANG AKTIVIEREN JA NE...

Страница 283: ...N NOMINALSTROM 12 0 A FFNEN VAKUUMBRECHVENTIL ANLAGE TESTEN NOMINALSTROM 12 3 A VAKUUMBRECHVENTIL SCHLIESSEN ANLAGE TESTEN NOMINALSTROM Die Anweisungen auf dem Display befolgen 3 4 5 6 7 Die Anweisung...

Страница 284: ...DOSE TESTEN SAUGSCHLAUCH EINGESTECKT ESC ZU BEENDEN SAUGDOSE TESTEN SAUGSCHLAUCH NICHT EINGESTECKT ESC ZU BEENDEN Durch Dr cken der Entertaste gelingt man zum Untermen 1 Durch die Pfeile nach rechts u...

Страница 285: ...cken der Entertaste gelingt man zum Untermen 2 1 Durch die Pfeile nach rechts und lin ks kann man die gew nschte Position ausw hlen Entertaste dr cken um die Prozedur zu starten 3 Die Anweisungen auf...

Страница 286: ...OCLEANER TESTEN FILTERREINIGUNG AUSGEF HRT JA NEIN ENTER DR CKEN PR FUNG DER KOMPRESSOR WURDE AKTIVIERT JA NEIN ENTER DR CKEN AUTOCLEANERDIAGNOSE ZU ENDE ESC ZU BEENDEN 7 8 Die Anweisungen auf dem Dis...

Страница 287: ...s Ger tes zu machen ANLAGE TESTEN SAUGDOSE TESTEN AUTOCLEANER TESTEN ELEKTRONIK TESTEN ENTER DR CKEN 13 14 PR FUNG DER KOMPRESSOR WURDE AKTIVIERT JA NEIN ENTER DR CKEN AUTOCLEANER TESTEN PR FEN KOMPRE...

Страница 288: ...aste dr cken um die Prozedur zu starten 1 11 4 Bildschirme bei betreibendem Ger t In diesem Kapitel findet man einige Beispielbildschirmseiten bei betreibendem Absaugungssystem In diesem Fall ist es n...

Страница 289: ...nn Absaugung aktiv ist 7 Diese Anzeige informiert den Benutzer dass Absaugung stillstehen muss um ins gew hl te Men eintreten zu k nnen 8 1 STOP 00000000h 122 mBAR ESC Absaugung stillstehend 5 SET POI...

Страница 290: ...ALARM INVERTER 1 A98 ESC ZU BEENDEN ALARM INVERTER ROSSI 0000000000 ESC ZU BEENDEN 11 5 1 Inverter Alarme Siehe Kodierung auf Seite 41 Tabelle zur Alarmkodierung 1 Siehe Kodierung auf Seite 41 Tabelle...

Страница 291: ...ZU BEENDEN 28 11 11 13 43 ALARM DRUCKW CHTER Dieser Alarm bezieht sich auf den automa tischen Betrieb des Autocleaner Systems Sistem Airs Fachpersonal kontaktieren 1 Dieser Alarm bezieht sich auf den...

Страница 292: ...hmeprozedur die folgende Alarmanzeige erscheint weist sie darauf hin dass die Zentrale zur Ether net Platine verbunden ist und deswegen for dert das System die IP Adresse hinzuf gen 1 Um diese Operati...

Страница 293: ...I 0000000000 ESC PER USCIRE Erste Alarmmeldung die Absaugung steht nicht still Zweite Alarmmeldung falls die Ger teblo ckierung gew hlt wurde steht die Absau gung still dr ckt man ESC l scht man den A...

Страница 294: ...kierung gew hlt ha ben wird das Ger t erst 15 Minuten nach Alarmmeldung still stehen 28 11 11 13 42 ALARM STAUBEH LTER ENTLEEREN Erste Alarmmeldung die Absaugung steht nicht still Zweite Alarmmeldung...

Страница 295: ...scheiden ob bei einer Meldung bez glich eines ordentlichen War tungseingriffs Filterverschmutzung voller Staubbeh lter die Saugzentrale sofort gestoppt und der War tungseingriff durchgef hrt werden so...

Страница 296: ...ugzentrale sollte au en regelm ig mit einem feuchten Tuch und Neutralseifenrei niger gereinigt werden Achtung die Zentrale nur mit Wasser und Neutralseife reinigen Die Verwendung sonstiger Reini gungs...

Страница 297: ...aubbeutel zubinden und aus dem Beh lter nehmen 4 Einen neuen Beutel in die Spann vorrichtung einspannen 5 Den Zyklonabscheider wieder einsetzen 6 Mit beiden H nden den Verschlusshebel hinunterklappen...

Страница 298: ...Clean 68 15 02 12 Rev 1 0 0 12 5 Wechseln der Filterpatrone Mit beiden H nden den Ver schlusshebel hochklappen Den Verschlussgriff drehen Verschlussgriff festdrehen 1 3 5 Den Staubbeh lter herausnehme...

Страница 299: ...69 4 15 02 12 Rev 1 0 0 Deutsch Staubbeh lter wieder einsetzen 6 Mit beiden H nden den Verschlusshebel herunterdr cken 7...

Страница 300: ...unktionen n tigen Reparaturarbeiten m ssen von qualifiziertem Fachpersonal des Kundendienstes durchgef hrt werden Sollten Eingriffe von nicht autorisiertem Personal vorgenommen werden verf llt die eve...

Страница 301: ...ne Regeln Wenn man die Anlage au er Betrieb nehmen m chte muss dies in bereinstimmung mit den Gesun dheits und Umweltschutzvorschriften geschehen Bevor die Anlage entsorgt wird muss man sich informier...

Страница 302: ...Ma nahmen befolgen Wie beispielsweise Eventuell schalld mmende Wandverkleidungen an den beiden Seitenw nden anbringen sollten diese nah zueinander stehen um die Schallwelle zu brechen und zu vermeiden...

Страница 303: ...e Kontakte sind unterbrochen oder der Mikroschalter des Sauganschlusses ist Service anrufen Die Saugleistung ist nicht ausreichend Benutzung mehrer Saugsteckdosen gleichzeitig Die Anzahl der gleichzei...

Страница 304: ...Bedienungsanleitung Industrial Clean 74 15 02 12 Rev 1 0 0...

Страница 305: ...wenden Durch Abschrauben der Torx Schrauben die thermogeformte Ab deckung abnehmen Den Rahmen des Selbstrei nigungssystems an dem Halteb gel befestigen in dem die F hrungslamellen in die ffnungen auf...

Страница 306: ...det wird Die Steckerschutzkappe der Saugzentrale ab nehmen 2 A 2 Pneumatikanschluss Das Rohrendst ck der Druckluft der Rohreinlassbu chse auf der Hinterseite der Saugzentrale n hern Merke sicher gehen...

Страница 307: ...erre 11 5 6 Tarjeta de identificaci n 11 6 USO PREVISTO DE LA M QUINA 12 7 USO NO PREVISTO DE LA M QUINA 12 8 DOTACI N Y ACCESORIOS 13 9 INSTALACI N 14 9 1 Instalaci n aconsejada 14 9 2 Transporte y d...

Страница 308: ...s 39 11 3 3 3 Men fecha y hora 43 11 3 3 4 Men bloque m quina 43 Alarma polvos 44 Alarma mantenimiento 45 Alarma filtro 46 Alarma Autocleaner 47 11 3 3 5 Men par metros de instalaci n 48 11 3 3 6 Men...

Страница 309: ...consecuencia para la larga duraci n de la m quina Por lo tanto le rogamos que lea con atenci n todo el presente manual que se atenga escrupulo samente a las instrucciones y sobre todo por motivos de...

Страница 310: ...DESCRIPCI N DE LA CENTRAL ASPIRADORA La constante b squeda aplicada a los sistemas de aspiraci n centralizada coadyuvada por la alta tecnolog a electr nica ha permitido a TECNOPLUS S r l realizar el...

Страница 311: ...izado con polvo epiox dico y con contenedor de polvo de gran capacidad l 62 106 dotado de ruedas para el movimiento Posibilidad de combinar el sistema de limpieza autom tica Autocleaner tambi n en otr...

Страница 312: ...otor Conector sistema de aspiraci n Interruptor general Cono separador Bancada 1 2 3 4 5 6 7 Transductor de presi n V lvula rompevac o Computadora de borde Protecci n filtro Filtro Manija desenganche...

Страница 313: ...ci n IP 20 20 Alimentaci n V ac 220 240 220 240 Frecuencia Hz 50 60 50 60 Caudal m xima aire motor m3 h 700 1200 Superficie filtrante cm2 24000 43400 Capacidad contenedor polvo l 62 106 Peso kg 53 67...

Страница 314: ...de la central Bastidor cil ndrico barnizado con polvo epox dico Abertura del contenedor de polvo con manija de abertura para facilitar las operaciones de vaciado Contenedor recogida polvo en metal con...

Страница 315: ...er manera el envase est da ado Se sospecha que la central aspiradora necesite mantenimiento o reparaci n Ponerse guantes de protecci n y m scara para hacer el mantenimiento vaciar el contenedor de pol...

Страница 316: ...s est n realizados con materiales que respetan los l mites fijados por las normas vigentes en materia de salvaguardia de la salud y del ambiente y no contienen sustancias clasificadas como SVHC Substa...

Страница 317: ...stituir los tornillos utilizados en el proyecto y construcci n de las m quinas con otras con caracter sticas diferentes TECNOPLUS s r l suspender inmediatamente la garant a del producto en caso de vio...

Страница 318: ...O NO PREVISTO DE LA CENTRAL ASPIRADORA Es muy importante NO utilizar el equipo para los siguientes usos que son incorrectos y peligrosos No debe usarse para aspirar tejidos material pesado o incandesc...

Страница 319: ...conexi n a la red de tubos de aspiraci n 3 n 4 abrazaderas met licas para la fijaci n de los manguitos 4 n 1 manual de instalaci n uso y mantenimiento Verificar que la central los accesorios y el kit...

Страница 320: ...ciones de temperatura temperatura ambiente de trabajo 5 45 C humedad relativa 20 85 sin condensaci n o congelaci n Es necesario escoger para la instalaci n lugares que est n lejos de fuentes de calor...

Страница 321: ...porte y desembalaje Transportar la central embalada en su caja hasta el lugar donde se va a instalar siguiendo las indicaciones impresas en el embalaje y utilizando un transpallet o una carretilla ele...

Страница 322: ...os con horcas es posible quitar ma nualmente la central del pal v ase figura En este caso son necesarias por lo menos dos personas robustas que har n deslizar la central y una tercera que deber quitar...

Страница 323: ...17 5 15 02 12 Rev 1 0 0 Espa ol Remoci n de la manija Sacar todos los accesorios presentes y eliminar el embalaje conformemente a las leyes en vigor 7 6...

Страница 324: ...ente las centrales aspiradoras est n equipadas con una conexi n tubos aspiraci n y descarga en el lado derecho versi n derecha En caso de necesidad es posible transformarla poniendo la conexi n tubos...

Страница 325: ...chapa de cierre D volviendo a armar los tornillos de fijaci n 3 Volver a montar cambi ndolas de lugar la boca del tubo de descarga C y la chapa de cierre D volviendo a armar los tornillos de fijaci n...

Страница 326: ...LA M QUINA 10 1 Panel de control El separador de polvo Industrial Clean tiene un panel de control desde el cual se puede configurar el funcionamiento del aparato tr mite un simple display interface u...

Страница 327: ...otor el ctrico En caso el n mero de los motores el ctricos sea mas de uno conectar el cable al cuadro el ctrico selecci n llamada Sistem Air Averiguar que la instalaci n el ctrica se haya realizado se...

Страница 328: ...os Industrial Motor art 3500 1M 3500 3M 3500 5M Figura A conexi n separador de polvo con un motor el ctrico Figura B conexi n separador de polvo con dos o mas motores el ctricos art 3500 1M 3500 3M 35...

Страница 329: ...piranti Kw 5 5 Kw 4 Kw 2 2 Art 3500 1M Art 3500 3M Art 3500 5M 1 2 3 4 R S E P 1 400 V ac 11 12 T Micro 2 Micro 2 PE L marrone N blu 230 V ac Industrial Art 3400 0 Industrial Art 3400 1 Motore 1 Micro...

Страница 330: ...Micro 2 PE L marrone N blu 230 V ac Industrial Art 3400 0 Industrial Art 3400 1 230 V ac 8 7 5 4 N L 9 10 Motore 1 Motore 2 T 400 V ac P E S R Partitore Art 3301 4 Verso altri partitori LINE OUT SISTE...

Страница 331: ...Art 3400 0 Industrial Art 3400 1 230 V ac 8 7 5 4 N L 9 10 Motore 1 Motore 2 T 400 V ac P E S R Partitore Art 3301 4 Verso altri partitori SISTEM AIR 3301 4 R1 R2 R4 R3 4 3 2 1 Prese aspiranti LINE IN...

Страница 332: ...12 11 Kw 5 5 Kw 4 Kw 2 2 Art 3500 1M Art 3500 3M Art 3500 5M Motor Industrial Motor Clean Clean 11 12 13 14 Motore 5 T 400 V ac P E S R Kw 5 5 Kw 4 Kw 2 2 Art 3500 1M Art 3500 3M Art 3500 5M Industria...

Страница 333: ...Motore 5 T 400 V ac P E S R Kw 5 5 Kw 4 Kw 2 2 Art 3500 1M Art 3500 3M Art 3500 5M Industrial Motor 15 16 Motore 7 T 400 V ac P E S R Kw 5 5 Kw 4 Kw 2 2 Art 3500 1M Art 3500 3M Art 3500 5M Industrial...

Страница 334: ...s electr nicos Industrial Motor Matic art 3500 2M 3500 4M 3500 6M 3500 7M Figura A conexi n separador de polvo con un motor electr nico Figura B conexi n separador de polvo con dos o m s motores elect...

Страница 335: ...n n 1 motor electr nico Prese aspiranti Kw 5 5 Kw 4 Kw 2 2 Art 3500 2M Art 3500 4M Art 3500 6M 1 2 3 4 R S E P 1 400 V ac 3 T Micro 2 Micro 2 PE L marrone N blu 230 V ac Industrial Art 3400 0 Industri...

Страница 336: ...R S E P 400 V ac T Industrial Motore 2 Motor Resistenza 120ohm gi in dotazione al motore Cavo Patch cat 6 Kw 5 5 Kw 4 Kw 2 2 Art 3500 2M Art 3500 4M Art 3500 6M Kw 7 5 Art 3500 7M Kw 5 5 Kw 4 Kw 2 2 A...

Страница 337: ...tch cat 6 Kw 7 5 Art 3500 7M Art 3500 2M Art 3500 4M Art 3500 6M Art 3500 7M Kw 5 5 Kw 4 Kw 2 2 Kw 7 5 R S E P 400 V ac T Industrial Motore 3 Motor Resistenza 120ohm gi in dotazione al motore Cavo Pat...

Страница 338: ...500 6M Art 3500 7M Kw 5 5 Kw 4 Kw 2 2 Kw 7 5 Cavo Patch cat 6 1 3 2 M O C 1 3 2 M O C R S E P 400 V ac T Industrial Motore 3 Motor Art 3500 2M Art 3500 4M Art 3500 6M Art 3500 7M Kw 5 5 Kw 4 Kw 2 2 Kw...

Страница 339: ...1 3 2 M O C 1 3 2 M O C 1 3 2 M O C 1 3 2 M O C Kw 5 5 Kw 4 Kw 2 2 Art 3500 2M Art 3500 4M Art 3500 6M R S E P 400 V ac T Industrial Motore 5 Motor R S E P 400 V ac T Industrial Motore 6 Motor Cavo Pa...

Страница 340: ...ir 11 1 Encendido de la central aspiradora 11 2 Utilizo de la central aspiradora Levantar el interruptor general coloca do en la parte derecha de la central en posici n I ON El display prender para in...

Страница 341: ...iza como sigue Presionando la flecha hacia arriba y abajo se desfila en la pantalla del display Presionando enter se memoriza el dato introducido o la elecci n efectuada Presionando la flecha derecha...

Страница 342: ...clas Arriba Abajo Derecha e Izquierda Al apretar Enter aparecer la siguiente pantalla Esta pantalla y las siguientes permiten memorizar los datos del instalador y del Servicio de Asistencia Al apretar...

Страница 343: ...CIONAL APRETAR ENTER MOTORES ELECTR NICOS 1 0 8 min max APRETAR ENTER MOTORES ELECTR NICOS 1 1 8 min max APRETAR ENTER Elegir el n mero de motores Industrial Motor Matic art 3500 2M 3500 4M 3500 6M 35...

Страница 344: ...a SETUP no disponible N B Si al terminar este procedimiento apareciera esta pantalla se ruega verificar la conexi n serial entre los separadores de polvo y el grupo motor soplante CARGANDO DATOS ESPER...

Страница 345: ...e pantalla Al apretar ESC se regresa al men precedente DEPRESI N 120 60 200mbar min max APRETAR ENTER Al apretar la tecla Enter se memoriza el par metro modificado Utilizando las flechas abajo y arrib...

Страница 346: ...as de aspiraci n activa mbar valor de la potencia aspirante presente en la instalaci n 5a 2 22 2 HZ 23 6 A 00000000h 42 mBAR ESC FECHA PRODUCCI N 01 01 11 HORAS M QUINA 00000000h FECHA INSTALACI N 28...

Страница 347: ...e bus superada Aumentar el tiempo de deceleraci n AXX 02 Subtensi n Inverter Tensi n l mite bajo de bus superada Verificar la tensi n de alimentaci n AXX 03 Temperatura Inverter Temperatura de l mite...

Страница 348: ...n de tipo serial 5 N ALARMAS AUTOCLEANER 0 N ALARMAS POLVOS 0 ESC PARA SALIR Alarmas Autocleaner alarma no utilizada Alarmas polvo indica cuantas veces fue pedido el vaciado del polvo del contenedor...

Страница 349: ...ual estas aparecieron en la computadora de control Para los c digos contactar con el personal autorizado 8 9 11 3 3 3 Men fecha y hora SET POINT DEPRESS INFO ALARMAS FECHA HORA SET BLOQUE M QUINA APRE...

Страница 350: ...tici n de vaciado del polvo en el contenedor 1 Timer polvo iempo en horas para la vi sualizaci n de la relativa alarma Apretar Enter para memorizar el dato programado Apretar las flechas arriba y abaj...

Страница 351: ...ENTO 2 150 1 200h min max APRETAR ENTER ESTAS SEGURO SI NO APRETAR ENTER Alarmas mantenimientos Timer mantenimiento 2 tiempo en horas para la visualizaci n de la alarma relativa Apretar Enter para gra...

Страница 352: ...de 15 minutos desde la visualizaci n de la alarma En caso se escogiera no apagar la m quina despu s de haber quitado la alarma presente en la computadora de control se tendr que quitar la manguera de...

Страница 353: ...e la m quina 2 TIMER AUTOCLEANER 4 1 40h min max APRETAR ENTER N CICLOS AUTOCLEANER 6 1 10 min max APRETAR ENTER Timer Autocleaner tiempo en horas de utilizaci n de la aspiraci n despu s del cual el s...

Страница 354: ...rno se activa la si guiente pantalla tr mite la cual es posible modificar el periodo de tiempo en el cual el sistema Autocleaner puede funcionar 6 Utilizar las flechas arriba y abajo para mo dificar e...

Страница 355: ...abajo Al apretar Enter se confirma el idioma y se pasa a la siguiente pantalla WELCOME SELECT YOUR LANGUAGE ITALIANO APRETAR ENTER Introducir nombre instalador ROSSI _ABCDEFGHILMNOP CONFIRMAR Introduc...

Страница 356: ...1 0 8 min max APRETAR ENTER Escoger el n mero de motores Industrial Motor Martic art 3500 2M 3500 4M 3 5 0 0 6 M 3 5 0 0 7 M c o m a n d a d o s electr nicamente por el convertidor electr nico inverte...

Страница 357: ...RASMISI N DATOS RESET PAR METROS PRUEBA Y TEST APRETAR ENTER INTRODUCIR DIRECCI N IP FICHA ETHERNET 192 168 000 080 APRETAR ENTER CARGAR TODOS LOS DATO DE DEFAULT SI NO APRETAR ENTER En esta pantalla...

Страница 358: ...TAR ENTER PRUEBA INSTALACI N TEST TOMA ASPIRACI N TEST AUTOCLEANER TEST ELECTR NICA APRETAR ENTER PRUEBA INSTALACI N TEST TOMA ASPIRACI N TEST AUTOCLEANER TEST ELECTR NICA APRETAR ENTER PRUEBA INSTALA...

Страница 359: ...ALACI N CORRIENTE NOMINAL 12 0 A ABRIR V LVULA ROMPEVAC O PRUEBA INSTALACI N CORRIENTE NOMINAL 12 3 A CERRAR V LVULA ROMPEVAC O PRUEBA INSTALACI N CORRIENTE NOMINAL Seguir las instrucciones en la pant...

Страница 360: ...SI NO APRETAR ENTER TEST TOMA DE ASPIRACI N MANGUERA DE ASPIRACI N CONECTADA ESC PARA SALIR TEST TOMA DE ASPIRACI N MANGUERA DE ASPIRACI N DESCONECTADA ESC PARA SALIR Apretar Enter para entrar al sub...

Страница 361: ...v ase p r 11 3 3 5 Apretar ENTER para entrar al submen 2 1 Utilizar las flechas derecha e izquierda para efectuar la elecci n Apretar Enter para empezar el procedimiento 3 Seguir las instrucciones en...

Страница 362: ...R TEST AUTOCLEANER LIMPIEZA FILTRO TERMINADA SI NO APRETAR ENTER CONTROL EL COMPRESOR SE HA ACTIVADO SI NO APRETAR ENTER DIAGNOSIS AUTOCLEANER TERMINADA ESC PARA SALIR Seguir las instrucciones en la p...

Страница 363: ...en el interior de la m quina COLLAUDO IMPIANTO TEST PRESA ASPIRANTE TEST AUTOCLEANER TEST ELETTRONICA APRETAR ENTER Seguir las instrucciones en la pantalla 13 Seguir las instrucciones en la pantalla A...

Страница 364: ...ar Enter para empezar el procedimiento 1 11 4 Pantallas con central en uso En este p rrafo se encuentran unas pantallas de ejemplo con el sistema de aspiraci n activo Se recuerda que en este caso no e...

Страница 365: ...e con aspiraci n activa 7 Mensaje que informa el usuario que tiene que apagar la aspiraci n para poder en trar al men seleccionado 8 1 STOP 00000000h 122 mBAR ESC Aspiraci n apagada 5 SET POINT DEPRES...

Страница 366: ...98 ESC PARA SALIR ALARMA INVERTER ROSSI 0000000000 ESC PARA SALIR 11 5 1 Alarmas inverter V ase codificaci n p g 41 tabla codificaci n alarmas 1 V ase codificaci n p g 41 tabla codificaci n alarmas 2...

Страница 367: ...SC PARA SALIR 28 11 11 13 43 WARNING PRES STATO Alarma relativa al funcionamiento autom ti co del sistema Autocleaner Contactar con personal autorizado Sistem Air 1 Alarma relativa al funcionamiento a...

Страница 368: ...terminar el procedimiento de puesta en marcha aparece el siguiente mensaje de alarma quiere decir que a la m quina fue conectada la ficha ethernet opcional y por lo tanto el sistema de gesti n requie...

Страница 369: ...2 ROSSI 0000000000 ESC PARA SALIR 1 mensaje de aviso la aspiraci n no se apaga 2 mensaje de aviso la aspiraci n se apa ga en caso se escogi bloquear la m quina apretando ESC se anula la alarma y para...

Страница 370: ...m quina activo la aspiraci n se apagar despu s de 15 minutos desde la activaci n del mensaje de warning 28 11 11 13 42 WARNING VACIAR CONTENEDOR POLVOS 1 mensaje de aviso la aspiraci n no se apaga 2 m...

Страница 371: ...no que se pueden contactar en caso de asistencia t cnica El usuario puede decidir en caso de alarma para un mantenimiento ordinario filtro sucio contenedor polvo lleno si detener inmediatamente la cen...

Страница 372: ...ularmente el envoltorio exterior de la central utilizando un pa o blando mojado con agua y jab n neutro Atenci n limpiar la central s lo con agua o agua y jab n neutro El uso de otros solventes o alco...

Страница 373: ...Atar la bolsa de polvo y quitarla del contenedor 4 Colocar una bolsa de repuesto y el tiende bolsa 5 Colocar otra vez el cono separador 6 Utilizando las dos manos bajar la manija de enganche 8 Volver...

Страница 374: ...15 02 12 Rev 1 0 0 12 5 Sustituci n cartucho filtro Utilizando las dos manos levantar la manija de desenganche Destornillar el tirador de bloque Atornillar el tirador de bloque 1 3 5 Sacar el contened...

Страница 375: ...69 5 15 02 12 Rev 1 0 0 Espa ol Volver a meter el contenedor de polvo 6 Utilizando las dos manos bajar la manija de enganche 7...

Страница 376: ...r realizadas por personal cualificado del Servicio Asistencia En caso de intervenciones por parte de personal no autorizado la eventual garant a del producto se ven ce y el constructor declina cualqui...

Страница 377: ...l aspiradora reglas generales Si se decidiera poner fuera de servicio la central aspiradora es necesario realizarlo respetando nuestra salud y del ambiente en el que vivimos Informarse acerca de lugar...

Страница 378: ...seguir sugerencias y consejos tiles como Eventualmente utilizar material fono absorbente en las paredes laterales si las mismas est n muy cer cas para romper la onda sonora y evitar que haya fen menos...

Страница 379: ...n da ado Llamar el Servicio Asistencia La aspiraci n de aire es insuficiente Utilizaci n de varias tomas contempor neamente Reducir el n mero de las tomas utilizadas al mismo tiempo Manguera flexible...

Страница 380: ...Manual de instrucciones Industrial Clean 74 15 02 12 Rev 1 0 0...

Страница 381: ...taci n con el Autocleaner Quitar la cubertura en termoformado destornillando los tornillos Torsen Enganchar el bastidor del autolimpieza a la placa de soporte poniendo las l minas de equilibrado en la...

Страница 382: ...Quitar el tap n del conector presente en la unidad aspirante 2 A 2 Conexi n neum tica Acercar la conexi n del tubo del aire comprimido a la boca colocada en la parte posterior de la central N B asegur...

Страница 383: ......

Страница 384: ...hnique Manual t cnico Technisches Handbuch w w w s i s t e m a i r c o m 27020 Gravellona Lomellina PV ITALIA Via Cilavegna 53 GPS N 45 19 28 E 8 45 32 Tel 39 0381 650082 Fax 39 0381 650120 info siste...

Отзывы: