


Parker Hannifin Corporation
Parflex Division
Ravenna, Ohio
Bulletin No. 4660-PGP2T
0
Parflex
®
Flexible Gas Piping System
Design and Installation Guide
Section 4.0 Installation Practices
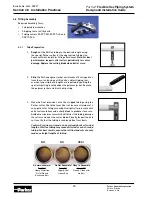
Do Not Assemble!
Bad Cut
Heavy Distortion
Out of Round
Excessive Burr
NO
NO
YES!
Do Not Assemble!
Bad Cut
Slightly Oval
Heavy Burr
Okay to Assemble
Good Cut
Round, Clean with
No Burr
4.2 Fitting Assembly
Required Assembly Tools:
• 2 adjustable wrenches
• Stripping tool or utility knife
• Tubing cutters, PGPCT-SM, PGPCT-LG and
PGPCT-XLG
4.2.1
Tube Preparation
1.
Rough cut
the Parflex tubing to the desired length using
the special Parker cutter for the appropriate tubing size.
Leave sufficient length for fitting attachment.
Note: For best
performance, inspect cutter rollers periodically for cuts or
damage. Replace the cutting blade when dull or worn.
2.
Strip
the Parflex polymer jacket a minimum of 8 corrugations
from the cut end using a utility knife, cable stripping tool,
or when long strip-back lengths are required, by pulling the
special zip string located under the polymer jacket. Remove
the polymer jacket and trim the zip string.
3. Make the final precision cut on the stripped tubing using the
Parker cutter. Check that your final cut leaves a minimum of 6
corrugations for fitting assembly. Use light roller pressure with
extra tool revolutions and a sharp blade to produce clean cuts.
Avoid excessive pressure which will distort the tubing, damage
the rollers and wear the cutter blade. Visually inspect the end
cut to verify that the tubing is round and free from burrs.
Caution: Precision cuts made on a previously bent or twisted
length of Parflex tubing may cause distorted or out-of-round
tubing. For best results, ensure that all final end cuts are only
made on straight lengths of tubing.