4
harDWare overvIeW
Top view - controls
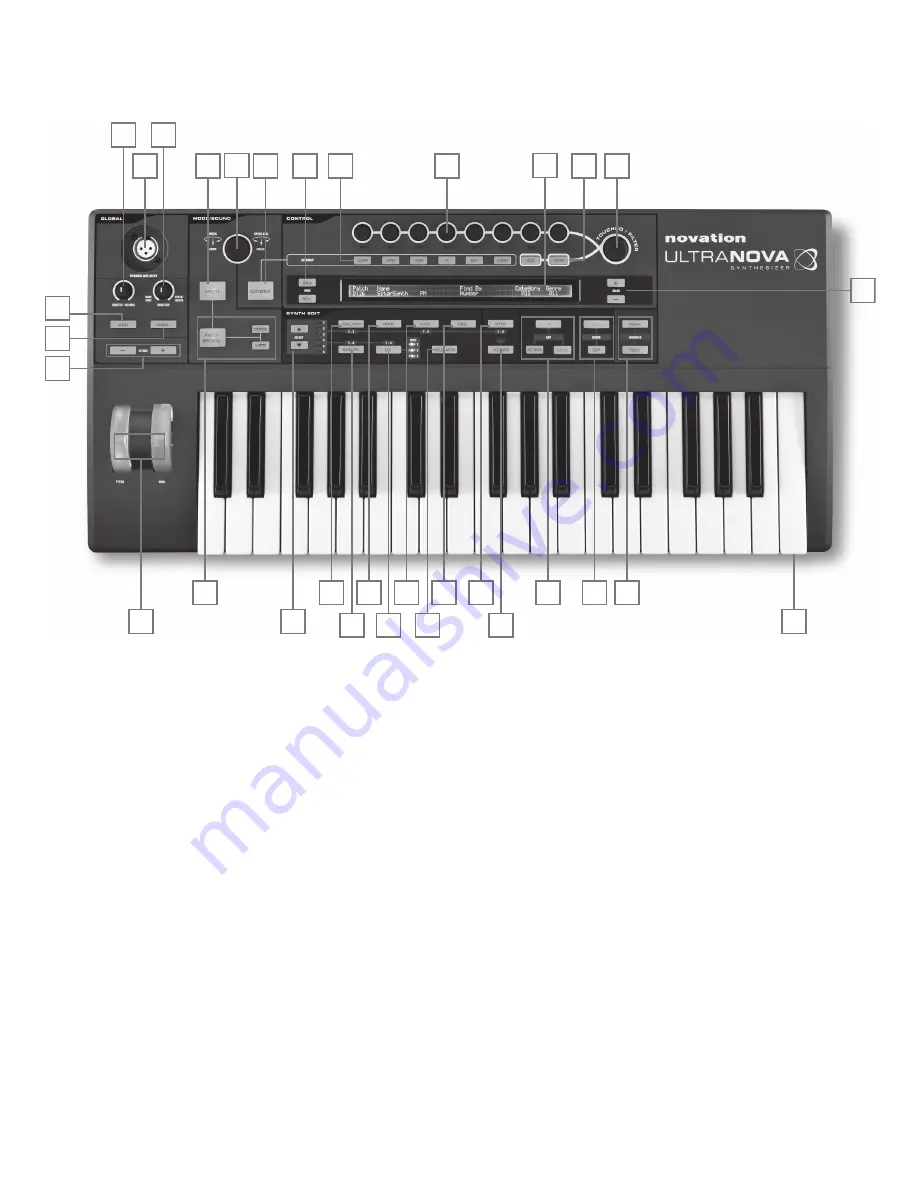
[1]
37-note (3 octaves) keyboard with velocity and aftertouch sensing.
[2]
PITCH
and
MOD
wheels. The
PITCH
wheel is mechanically biased to return to the
centre position when released.
[3]
2-row x 72-character LCD dot matrix display. For most menus, the display is divided
into eight zones from left to right, with each zone corresponding to one of the rotary
encoders [5].
CONTROL section
[4]
PAGE BACK
and
NEXT
buttons: these are used to step forwards and backwards
between menu pages. They illuminate to indicate that additional pages are available.
They have no function if the current menu only has one page.
[5]
Rotary encoders – 8 touch-sensitive, detented rotary controls for parameter
selection. Touching each control selects a parameter for adjustment, the parameters
being indicated in the upper row of the LCD display [3] immediately below it.
Multiple parameters may be be selected for simultaneous adjustment if wished. (Use
of a rotary encoder in the manual text is indicated by ‘
REn
’, where n is the number of
the encoder; e.g. ‘
RE1
’ refers to rotary encoder 1). The touch sensitivity of the
conductive knobs is also used to make them active touch controllers, and envelope
re-triggering and other effects can be performed by simply touching the knobs.
[6]
VALUE +
and
–
buttons: These adjust the value of the currently-selected parameter
– as indicated by the LED below the encoder in use – either up or down. The
parameter value is indicated in the lower row of the LCD display.
[7]
Automap controls: the
LEARN
,
VIEW
,
USER
,
FX
,
INST
and
MIXER
buttons are
used, in conjunction with the rotary encoders, with Novation’s Automap software
(see [26]).
[8]
LOCK
and
FILTER
buttons: these operate in conjunction with the
TOUCHED/FILTER
knob [9].
FILTER
assigns the knob to control the cut-off
frequency of Filter 1;
LOCK
ixes the function of the knob to the last touched
parameter.
[9]
TOUCHED/FILTER
: this is a large, touch-sensitive, “smooth-action” control
intended to aid more expressive performance when playing live. It either duplicates
the action of the last-touched rotary encoder, or, if the
FILTER
button [8] has been
pressed, Filter 1’s frequency.
SYNTH EDIT section
The buttons in the Synth Edit area of the control panel are laid out in logical order of sound
generation and treatment.
[10]
SELECT
K
and
J
buttons: several of the main synth blocks are duplicated: there
are 3 oscillators, 6 envelope generators, 5 FX blocks, 3 LFOs and 2 ilters. Each
block has its own menu, and the
SELECT
buttons let you select which block is to
be controlled. The
1
to
6
LEDs alongside indicate the block currently selected.
[11]
OSCILLATOR
button: opens an Oscillator Menu (two pages). The UltraNova has
3 oscillators, and the oscillator to be controlled can be chosen with the
SELECT
K
and
J
buttons.
[12]
MIXER
button: opens the Mixer Menu (two pages).
[13]
FILTER
button: opens a Filter Menu (two pages). The UltraNova has 2 ilters, each
with its own menu. The ilter to be controlled is selected with the
SELECT
K
and
J
buttons.
[14]
VOICE
button: opens the Voice Menu (one page).
[15]
ENVELOPE
button; opens an Envelope Menu (two pages). The UltraNova has 6
envelope generators, each with its own menu. The envelope generator to be
controlled is selected with the
SELECT
K
and
J
buttons.
[16]
LFO
button: opens an LFO Menu (two pages). The UltraNova has 3 LFOs (low
frequency oscillators), each with its own menu. The LFO to be controlled is selected
with the
SELECT
K
and
J
buttons. The set of 3 dedicated LEDs adjacent to the
LFO
button blink to indicate the current frequency of each LFO.
[17]
MODULATION
button: opens the Modulation Menu (one page).
[18]
EFFECT
button: opens an Effects (FX) Menu (four pages). The UltraNova has 5 FX
sections and the section to be controlled can be chosen with the Select K and J
buttons.
[19]
VOCODER
button: opens the Vocoder Menu (one page). An LED illuminates when
the Vocoder is active.
[20]
ARP
controls: the
ON
,
SETTINGS
and
LATCH
buttons control the UltraNova’s
Arpeggiator functions. The Arp Menu (one page) is displayed by pressing the
SETTINGS
button, the
ON
button enables/disables the arpeggiator and the
1
2
3
4
5
6
7
8
9
10
15
16
17
18
21
22
23
24
25
26
27
28
29
30
31
32
11
12
13
14
20
19


