


Release 6.0
76
User Guide
Chapter 3 Installing the Disk Array System
3.2.2 Mounting a Disk Enclosure on a Rack
When you have purchased a disk enclosure optionally, install the enclosure in the rack.
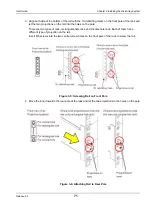
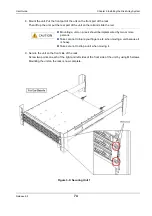
The installation procedure is the same as the procedure for mounting a disk array unit in a rack. See
Section 3.2.1: “Mounting a Disk Array Unit on a Rack”
for more details about the procedure.
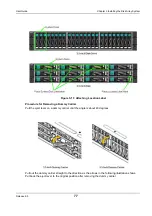
3.2.3 Installing Disk Drives
Follow the procedure below.
1. When a front bezel has been attached, detach it.
2. Remove dummy carriers from the slots where disk drives will be installed.
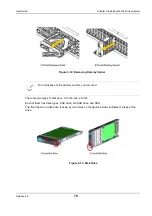
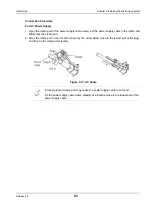
3. Mount disk drives. (For the detailed procedure, see the next page.)
4. Repeat steps (2) and (3) as many times as the number of disk drives you want to install.
Insert a disk drive slowly because it has a plug-in structure.
Mount disk drives carefully, one by one.
When the power is on, confirm that an inserted disk drive becomes
READY state before inserting the next disk drive.
Use a new disk drive you have purchased as a product.
The operation of a diverted or a reused disk drive is not guaranteed. Do
not use a disk drive that has been diverted from or used in other system.
For more information on how to attach/detach a front bezel, see
Disk drives are electrical parts. When handling them, take an anti-static
measure such as using a wrist strap.
Disk drives are precision machines. Protect them from any shock or
vibration.
When replacing a disk drive with a new drive, confirm that both of them
have the same model number.
Install dummy carriers for cooling the unit in the slots where disk drives
are not installed.
Three disk drives that will serve as system disks always need to be
installed on the slots 00, 01, and 02.
When 3.5 inch disk drives are used, place system disk labels that come
with the disk drives on the system disks to prevent operation errors. Also,
place location labels on disk drives to prevent a wrong disk drive from
being installed during drive replacement (when 3.5-inch hard disk drives
are installed).
Remove system disks from the unit one by one.
Содержание M100
Страница 25: ...Release 6 0 25 User Guide About Warning Labels Power Supply AC Power Supply ...
Страница 27: ...Release 6 0 27 User Guide About Warning Labels Battery ...
Страница 29: ...Release 6 0 29 User Guide About Warning Labels Power Cable AC Power Supply ...
Страница 40: ...Release 6 0 40 User Guide Chapter 1 Overview 1 2 1 4 Controller CONT ...
Страница 48: ...Release 6 0 48 User Guide Chapter 1 Overview 1 2 3 3 Controller CONT ...
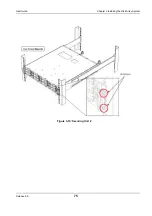
Страница 75: ...Release 6 0 75 User Guide Chapter 3 Installing the Disk Array System Figure 3 10 Securing Unit 2 ...
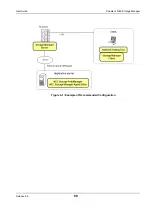
Страница 88: ...Release 6 0 88 User Guide Chapter 4 NEC Storage Manager Figure 4 1 Example of Recommended Configuration ...
Страница 125: ...Release 6 0 125 User Guide Chapter 4 NEC Storage Manager d Click Login to open the main screen Figure 4 26 Main Screen ...
Страница 194: ...Release 6 0 194 User Guide Chapter 6 Initializing a Disk Array iSCSI Figure 6 16 Hot Spare Bind View Display ...
Страница 260: ...Release 6 0 260 User Guide Chapter 8 Installing Optional Parts Figure 8 12 Removing the DIMMs ...
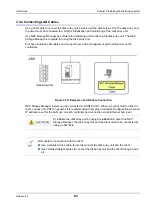
Страница 388: ...Release 6 0 388 User Guide Appendix F How to Set Check Application Server Linux iSCSI Figure F 3 Configuration Example ...
Страница 459: ...NEC Corporation 7 1 Shiba 5 chome Minato ku Tokyo 108 8001 Japan URL http www necstorage com ...