


Release 6.0
394
User Guide
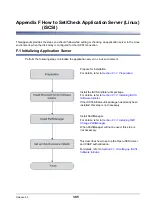
Appendix F How to Set/Check Application Server (Linux) (iSCSI)
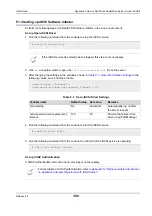
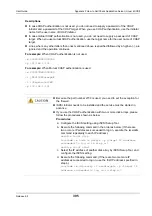
8. To confirm, enter the password of the CHAP target again.
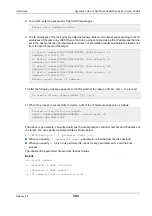
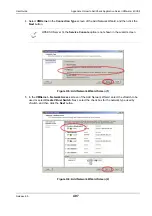
9. The IP addresses of the disk array are listed as follows. Enter a list number corresponding to the IP
addresses of the disk array. iSCSI Setup Tool runs a ping command using the IP addresses that are
set in the host connection port parameters. It does not show failed results and delete the failed ones
from the search result of the target.
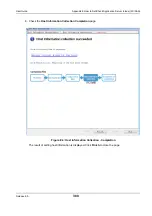
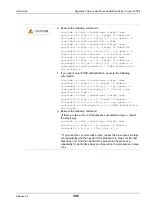
10.After the following message appears to confirm whether to create an LD set, enter
y
to proceed.
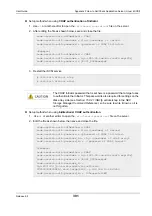
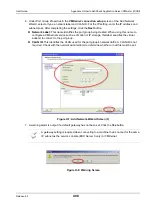
11.When the process is successfully complete, a list of the IP addresses appears as follows:
The above is an example. You will actually see the serial number, controller number and IP address of
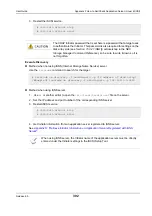
the target. You can specify a parameter file as shown below.
# iSMiSCSISetup.sh [–f <parameter name> [-n]]
When you specify
-f <parameter name>
, a parameter is loaded from the file specified.
When you specify
-n
, a dry run is performed to check for any parameter error, and does not
process
The details of the parameter file are described as follows.
Details
-m <Serial number>
-I <Password of CHAP initiator>
-t <Password of CHAP target>
-p <IP address of host connection port>
Please enter password again.
1) Serial number=0000000991000004, Controller=0, IP
address=172.168.1.101
2) Serial number=0000000991000004, Controller=0, IP
address=172.168.1.102
3) Serial number=0000000991000004, Controller=1, IP
address=172.168.2.101
4) Serial number=0000000991000004, Controller=1, IP
address=172.168.2.102
Please select target IP address.
To create LD set, please enter ‘y’. [y/n]
Succeed to log on to the target.
Serial number=XXXXXXXXXXXXXXXX, Controller=X, IP
address=XXX.XXX.X.XXX
Содержание M100
Страница 25: ...Release 6 0 25 User Guide About Warning Labels Power Supply AC Power Supply ...
Страница 27: ...Release 6 0 27 User Guide About Warning Labels Battery ...
Страница 29: ...Release 6 0 29 User Guide About Warning Labels Power Cable AC Power Supply ...
Страница 40: ...Release 6 0 40 User Guide Chapter 1 Overview 1 2 1 4 Controller CONT ...
Страница 48: ...Release 6 0 48 User Guide Chapter 1 Overview 1 2 3 3 Controller CONT ...
Страница 75: ...Release 6 0 75 User Guide Chapter 3 Installing the Disk Array System Figure 3 10 Securing Unit 2 ...
Страница 88: ...Release 6 0 88 User Guide Chapter 4 NEC Storage Manager Figure 4 1 Example of Recommended Configuration ...
Страница 125: ...Release 6 0 125 User Guide Chapter 4 NEC Storage Manager d Click Login to open the main screen Figure 4 26 Main Screen ...
Страница 194: ...Release 6 0 194 User Guide Chapter 6 Initializing a Disk Array iSCSI Figure 6 16 Hot Spare Bind View Display ...
Страница 260: ...Release 6 0 260 User Guide Chapter 8 Installing Optional Parts Figure 8 12 Removing the DIMMs ...
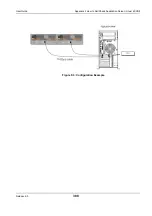
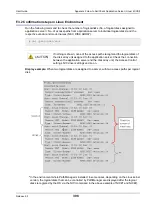
Страница 388: ...Release 6 0 388 User Guide Appendix F How to Set Check Application Server Linux iSCSI Figure F 3 Configuration Example ...
Страница 459: ...NEC Corporation 7 1 Shiba 5 chome Minato ku Tokyo 108 8001 Japan URL http www necstorage com ...