


Release 6.0
84
User Guide
Chapter 3 Installing the Disk Array System
3.3.5 Connecting Power Supply Cables
Preliminary Checking:
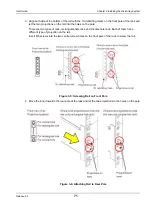
Press each of disk drives to make sure that they are not loose.
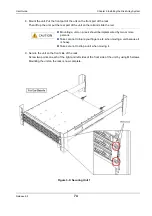
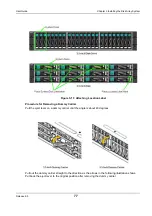
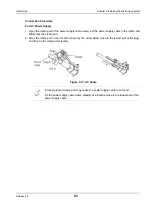
1. Connecting power supply cables of a disk enclosure
Confirm the AC switches are set to off and then connect the power supply cables of the disk
enclosures. (Only for AC power supply.)
Check the power-supply cable connections of all the installed disk enclosures.
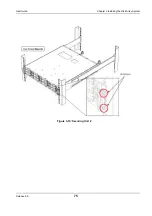
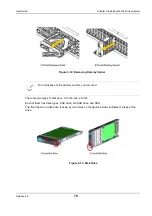
2. Connecting power supply cables of the disk array unit
Confirm the AC switches are set to off and then connect the power supply cables of the disk array
unit. (Only for AC power supply.)
The AC operating mode is enabled by default so when the power supply cables are connected
while power is being fed, the power supply is turned on. When power is not fed, connect the power
supply cables and then start feeding power.
Avoid overloading on an electrical circuit to prevent fire.
Do not plug in a power supply cable to an outlet and panel
board with a wet hand. Doing so may cause an electric shock.
Do not place a heavy item on a power supply cable. Doing so
may damage the shield of the cable, which may cause a fire or
an electric shock.
Connect the power supply cables of the disk array unit after all other processes are
finished.
Use the power supply cables that come with the disk array unit.
The disk array unit and a disk enclosure have a dual-power configuration to prevent
the unit or the enclosure from being stopped when one of the power supplies fails. To
use the disk array system, connect two power supply cables individually to the disk
array unit and the disk enclosure for ensuring two lines to receive power.
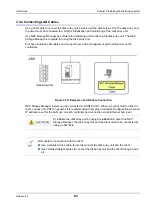
Make sure to connect the cables to both the power supply PS0 and PS1.
Содержание M100
Страница 25: ...Release 6 0 25 User Guide About Warning Labels Power Supply AC Power Supply ...
Страница 27: ...Release 6 0 27 User Guide About Warning Labels Battery ...
Страница 29: ...Release 6 0 29 User Guide About Warning Labels Power Cable AC Power Supply ...
Страница 40: ...Release 6 0 40 User Guide Chapter 1 Overview 1 2 1 4 Controller CONT ...
Страница 48: ...Release 6 0 48 User Guide Chapter 1 Overview 1 2 3 3 Controller CONT ...
Страница 75: ...Release 6 0 75 User Guide Chapter 3 Installing the Disk Array System Figure 3 10 Securing Unit 2 ...
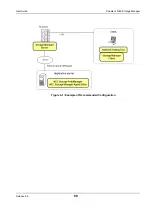
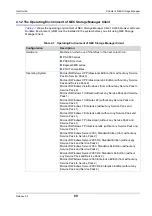
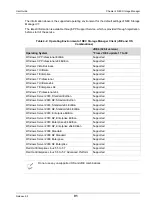
Страница 88: ...Release 6 0 88 User Guide Chapter 4 NEC Storage Manager Figure 4 1 Example of Recommended Configuration ...
Страница 125: ...Release 6 0 125 User Guide Chapter 4 NEC Storage Manager d Click Login to open the main screen Figure 4 26 Main Screen ...
Страница 194: ...Release 6 0 194 User Guide Chapter 6 Initializing a Disk Array iSCSI Figure 6 16 Hot Spare Bind View Display ...
Страница 260: ...Release 6 0 260 User Guide Chapter 8 Installing Optional Parts Figure 8 12 Removing the DIMMs ...
Страница 388: ...Release 6 0 388 User Guide Appendix F How to Set Check Application Server Linux iSCSI Figure F 3 Configuration Example ...
Страница 459: ...NEC Corporation 7 1 Shiba 5 chome Minato ku Tokyo 108 8001 Japan URL http www necstorage com ...