Release 6.0
318
User Guide
Appendix B How to Set/Check Application Server (Windows) (FC/SAS)
B.3.2 Check the PathManager Settings and Status
When PathManager is not used, it is not necessary to perform this step.
After checking the FC cable connection between the application server and disk array unit, restart the
server and run the following command from the command prompt.
Check PathManager status
Run the following command from the command prompt.
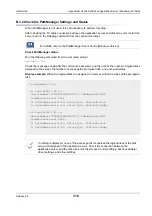
spsadmin /lun
Check the message shown after the command is executed, and then check the number of logical disks
assigned to the server, the number of access paths per logical disk, and each path status.
Display example:
When two logical disks are assigned to a server, with two access paths per logical
disk.
For details, refer to the
PathManager User's Guide (Windows Version)
.
C:\>spsadmin /lun
+++ LogicalUnit #0 +++
SerialNumber="0000000995000001", LDNumber=0x00000
LoadBalance=Least Size
0: ScsiAddress=2:0:0:0, Priority=1, Status=Active
1: ScsiAddress=3:0:0:0, Priority=2, Status=Standby
+++ LogicalUnit #1 +++
SerialNumber="0000000995000001", LDNumber=0x00001
LoadBalance=Least Size
0: ScsiAddress=2:0:0:1, Priority=1, Status=Active
1: ScsiAddress=3:0:0:1, Priority=2, Status=Standby
If nothing is displayed, none of the access paths recognized the logical disks of the disk
array unit assigned to the application server. Check the connection between the
application server and the disk array unit, the Access Control settings, host bus adapter
driver settings, and other settings.
Содержание M100
Страница 25: ...Release 6 0 25 User Guide About Warning Labels Power Supply AC Power Supply ...
Страница 27: ...Release 6 0 27 User Guide About Warning Labels Battery ...
Страница 29: ...Release 6 0 29 User Guide About Warning Labels Power Cable AC Power Supply ...
Страница 40: ...Release 6 0 40 User Guide Chapter 1 Overview 1 2 1 4 Controller CONT ...
Страница 48: ...Release 6 0 48 User Guide Chapter 1 Overview 1 2 3 3 Controller CONT ...
Страница 75: ...Release 6 0 75 User Guide Chapter 3 Installing the Disk Array System Figure 3 10 Securing Unit 2 ...
Страница 88: ...Release 6 0 88 User Guide Chapter 4 NEC Storage Manager Figure 4 1 Example of Recommended Configuration ...
Страница 125: ...Release 6 0 125 User Guide Chapter 4 NEC Storage Manager d Click Login to open the main screen Figure 4 26 Main Screen ...
Страница 194: ...Release 6 0 194 User Guide Chapter 6 Initializing a Disk Array iSCSI Figure 6 16 Hot Spare Bind View Display ...
Страница 260: ...Release 6 0 260 User Guide Chapter 8 Installing Optional Parts Figure 8 12 Removing the DIMMs ...
Страница 388: ...Release 6 0 388 User Guide Appendix F How to Set Check Application Server Linux iSCSI Figure F 3 Configuration Example ...
Страница 459: ...NEC Corporation 7 1 Shiba 5 chome Minato ku Tokyo 108 8001 Japan URL http www necstorage com ...


