3-18
IBP Pressure Calibration
Method 1
Tools required:
Medsim300B patient simulator, MPS450, or other equivalent device
IBP adapter cable for test (P/N 009-002199-00 for Medsim 300B, P/N 009-002198-00 for
MPS450)
Follow this procedure to perform the test:
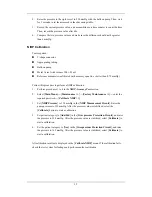
1. Connect the patient simulator to the pressure connector on the module.
2. Set the patient simulator to 0 for the desired IBP channel.
3. Press the Zero Key on the module to make a zero calibration.
4. Configure the patient simulator as P (static) = 200 mmHg.
5. Select
[
Main Menu
]
→
[
Maintenance >>
]
→
[
User Maintenance >>
]
→
[
Cal
.
IBP
Press. >>
]. In the [
Cal. IBP Press.
] menu, set the calibration value to 200 mmHg.
6. Select
the
[
Calibrate
] button next to the desired IBP channel to start a calibration.
7. If the calibration is completed successfully, the message [
Calibration Completed!
] will
be displayed. Otherwise, a corresponding message will be displayed.
Method 2
Tools required:
Standard sphygmomanometer
Balloon pump
Tubing
T-shape connector
To perform a calibration:
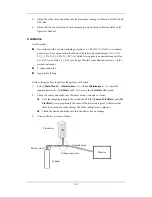
1. Connect the 3-way stopcock, the sphygmomanometer and the balloon pump through a
T-shape connector, as shown below.
2. Vent the transducer to the atmospheric pressure by turning on the 3-way stopcock to the
air. Zero the transducer, and then open the stopcock to the sphygmomanometer.
3. Select
[
Main Menu
]
→
[
Maintenance >>
]
→
[
User Maintenance >>
]
→
enter the
required password
→
[
Cal
.
IBP Press. >>
] In the [
Cal. IBP Press.
] menu, set the
calibration value to 200 mmHg.
4. Inflate using the balloon pump until the reading of sphygmomanometer approximates
the preset calibration value.
Содержание BeneView T5
Страница 1: ...DPM 6 Patient Monitor Service Manual ...
Страница 2: ......
Страница 4: ...II FOR YOUR NOTES ...
Страница 12: ...6 FOR YOUR NOTES ...
Страница 16: ...1 4 FOR YOUR NOTES ...
Страница 32: ...2 16 FOR YOUR NOTES ...
Страница 68: ...3 36 FOR YOUR NOTES ...
Страница 80: ...4 12 FOR YOUR NOTES ...
Страница 118: ...5 38 4 Remove the module infrared communication backboard and disconnect all the cables from it ...
Страница 124: ...5 44 5 Unscrew the two M3 8 screws on the parameter board Then pull off the parameter board rightward as shown below ...
Страница 126: ...5 46 FOR YOUR NOTES ...
Страница 133: ...6 7 6 3 3 12 1 Screen Assembly with anti glare screen Exploded View ...
Страница 163: ...6 37 6 6 7 BIS Module Exploded View ...
Страница 180: ...6 54 FOR YOUR NOTES ...
Страница 204: ...A 14 FOR YOUR NOTES ...
Страница 205: ......

